Pad ROLâ¢200 Series - Johnstech
Pad ROLâ¢200 Series - Johnstech
Pad ROLâ¢200 Series - Johnstech

You also want an ePaper? Increase the reach of your titles
YUMPU automatically turns print PDFs into web optimized ePapers that Google loves.
<strong>Pad</strong> ROL200<br />
<strong>Series</strong><br />
→ →<br />
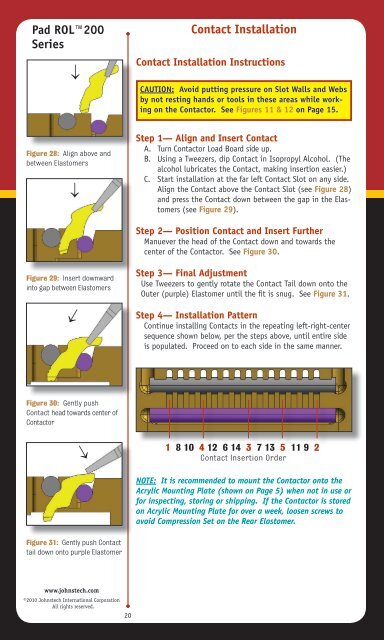
Figure 28: Align above and<br />
between Elastomers<br />
Contact Installation<br />
Contact Installation Instructions<br />
CAUTION: Avoid putting pressure on Slot Walls and Webs<br />
by not resting hands or tools in these areas while working<br />
on the Contactor. See Figures 11 & 12 on Page 15.<br />
Step 1— Align and Insert Contact<br />
A. Turn Contactor Load Board side up.<br />
B. Using a Tweezers, dip Contact in Isopropyl Alcohol. (The<br />
alcohol lubricates the Contact, making insertion easier.)<br />
C. Start installation at the far left Contact Slot on any side.<br />
Align the Contact above the Contact Slot (see Figure 28)<br />
and press the Contact down between the gap in the Elastomers<br />
(see Figure 29).<br />
Step 2— Position Contact and Insert Further<br />
Manuever the head of the Contact down and towards the<br />
center of the Contactor. See Figure 30.<br />
Figure 29: Insert downward<br />
into gap between Elastomers<br />
→<br />
Step 3— Final Adjustment<br />
Use Tweezers to gently rotate the Contact Tail down onto the<br />
Outer (purple) Elastomer until the fit is snug. See Figure 31.<br />
Step 4— Installation Pattern<br />
Continue installing Contacts in the repeating left-right-center<br />
sequence shown below, per the steps above, until entire side<br />
is populated. Proceed on to each side in the same manner.<br />
Figure 30: Gently push<br />
Contact head towards center of<br />
Contactor<br />
→<br />
1 8 10 4 12 6 14 3 7 13 5 11 9 2<br />
Contact Insertion Order<br />
NOTE: It is recommended to mount the Contactor onto the<br />
Acrylic Mounting Plate (shown on Page 5) when not in use or<br />
for inspecting, storing or shipping. If the Contactor is stored<br />
on Acrylic Mounting Plate for over a week, loosen screws to<br />
avoid Compression Set on the Rear Elastomer.<br />
Figure 31: Gently push Contact<br />
tail down onto purple Elastomer<br />
www.johnstech.com<br />
©2010 <strong>Johnstech</strong> International Corporation<br />
All rights reserved.<br />
20