Download Instructions - SINGER Futura Support
Download Instructions - SINGER Futura Support
Download Instructions - SINGER Futura Support

You also want an ePaper? Increase the reach of your titles
YUMPU automatically turns print PDFs into web optimized ePapers that Google loves.
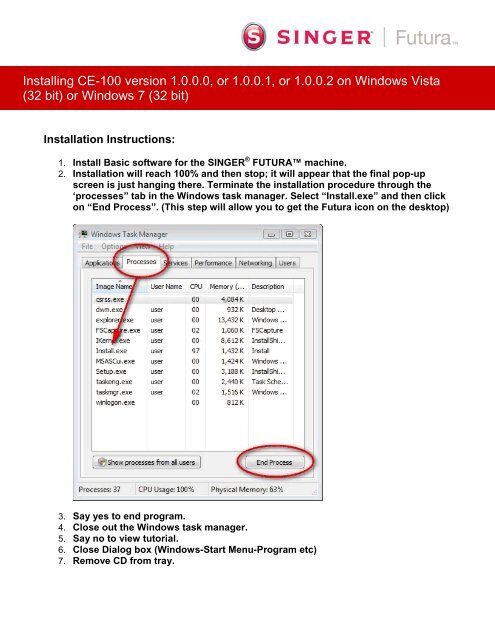
Installing CE-100 version 1.0.0.0, or 1.0.0.1, or 1.0.0.2 on Windows Vista<br />
(32 bit) or Windows 7 (32 bit)<br />
Installation <strong>Instructions</strong>:<br />
1. Install Basic software for the <strong>SINGER</strong> ® FUTURA machine.<br />
2. Installation will reach 100% and then stop; it will appear that the final pop-up<br />
screen is just hanging there. Terminate the installation procedure through the<br />
‘processes” tab in the Windows task manager. Select “Install.exe” and then click<br />
on “End Process”. (This step will allow you to get the <strong>Futura</strong> icon on the desktop)<br />
3. Say yes to end program.<br />
4. Close out the Windows task manager.<br />
5. Say no to view tutorial.<br />
6. Close Dialog box (Windows-Start Menu-Program etc)<br />
7. Remove CD from tray.
8. Install Vista compatibility patch. Wait until “<strong>Futura</strong> Vista Update screen” comes<br />
up. Watch for pop-up screen that tells you the following "Please make sure that<br />
<strong>Futura</strong> machine is connected and switched on". Turn machine on.<br />
9. Click finish. Computer will ask to re-start. Click finish.<br />
10. Right click on the <strong>SINGER</strong> ® <strong>Futura</strong> shortcut icon, select Properties.<br />
o Check compatibility mode for Win XP SP2<br />
o Check to run the program as administrator<br />
11. Click OK.<br />
12. Make sure machine is turned off.<br />
13. If you own “HyperFont”, insert this CD in tray and load software following the<br />
prompts.<br />
14. Turn on machine (with embroidery unit attached)<br />
15. Leave “HyperFont” CD in tray.<br />
16. Double click the <strong>SINGER</strong> ® <strong>Futura</strong> Icon.<br />
17. Click on allow.<br />
18. Enter code.
The following screen will pop up. Check the “Don’t show this message again” box and<br />
click on “Run Program”<br />
19. Turn machine off.<br />
20. If you own “PhotoStitch”, insert this CD in tray and load software following the<br />
prompts.<br />
21. Turn on machine (with embroidery unit attached)<br />
22. Leave “PhotoStitch” CD in tray.<br />
23. Double click the <strong>SINGER</strong> ® <strong>Futura</strong> Icon.<br />
24. Click on allow.<br />
25. Enter code, and nothing will happen.<br />
26. Turn machine off.<br />
27. If you own “Auto Cross-Stitch”, insert this CD in tray and load software following<br />
the prompts.<br />
28. Turn on machine (with embroidery unit attached)<br />
29. Leave “Auto Cross-Stitch” CD in tray.<br />
30. Double click the <strong>Futura</strong> Icon.<br />
31. Click on allow.<br />
32. Enter code, and nothing will happen.<br />
33. Turn machine off.<br />
34. If you own “AutoPunch”, insert this CD in tray and load software following the<br />
prompts.<br />
35. Turn on machine (with embroidery unit attached)<br />
36. Leave “AutoPunch” CD in tray.<br />
37. Double click the <strong>Futura</strong> Icon.<br />
38. Click on allow.<br />
39. Enter code.
40. Turn machine off.<br />
41. Leave “AutoPunch” CD in tray<br />
42. After all of the available options have been installed, run the “Service update<br />
version 1.0.0.2 for CE-200 for Sp2 with options” update from the future-support<br />
site.<br />
43. Turn machine on with embroidery unit attached.<br />
Double click on <strong>SINGER</strong> ® <strong>Futura</strong> icon – it will open and function with all the options<br />
that you have loaded available.<br />
44. You may now remove the AutoPunch CD from the tray.<br />
<strong>SINGER</strong>, the Cameo “S” Design, FUTURA and <strong>SINGER</strong> is SEWING MADE EASY are exclusive trademarks of The Singer Company Limited<br />
S.à r.l. or its Affiliates.© 2011 The Singer Company Limited S.à r.l. or its Affiliates. All rights reserved.