INSTALLATION OF SOFTWARE - SINGER Futura Support
INSTALLATION OF SOFTWARE - SINGER Futura Support
INSTALLATION OF SOFTWARE - SINGER Futura Support

Create successful ePaper yourself
Turn your PDF publications into a flip-book with our unique Google optimized e-Paper software.
<strong>INSTALLATION</strong> <strong>OF</strong> S<strong>OF</strong>TWARE<br />
In order to start using the software on your PC you would have<br />
to first install the contents of the CD to your PC. This procedure<br />
is refered to as “installation procedure”. Please follow the<br />
below listed instructions in order to successfully install<br />
FUTURA on your personal computer.<br />
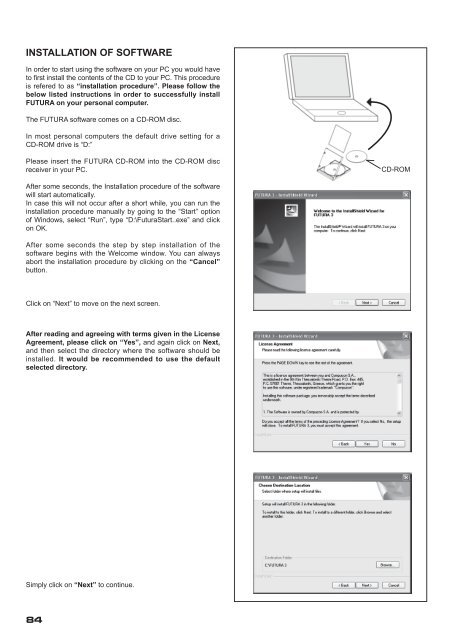
The FUTURA software comes on a CD-ROM disc.<br />
In most personal computers the default drive setting for a<br />
CD-ROM drive is “D:”<br />
Please insert the FUTURA CD-ROM into the CD-ROM disc<br />
receiver in your PC.<br />
CD-ROM<br />
After some seconds, the Installation procedure of the software<br />
will start automatically.<br />
In case this will not occur after a short while, you can run the<br />
installation procedure manually by going to the “Start” option<br />
of Windows, select “Run”, type “D:\<strong>Futura</strong>Start..exe” and click<br />
on OK.<br />
After some seconds the step by step installation of the<br />
software begins with the Welcome window. You can always<br />
abort the installation procedure by clicking on the “Cancel”<br />
button.<br />
Click on “Next” to move on the next screen.<br />
After reading and agreeing with terms given in the License<br />
Agreement, please click on “Yes”, and again click on Next,<br />
and then select the directory where the software should be<br />
installed. It would be recommended to use the default<br />
selected directory.<br />
Simply click on “Next” to continue.<br />
84
Now you are prompted to select the Program Folder where<br />
the shortcut for the software will be stored.<br />
Simply click on “Next” to continue.<br />
Finally you are requested to confirm all the selections made<br />
during the installation set-up.<br />
Pressing the “Next” button will finally start the copy and<br />
installation of the FUTURA software files to the given<br />
directory on the hard disk.<br />
A progress bar will indicate the stage at which the installation<br />
procedure is. It will finish when it has reached to 100%.<br />
The installation procedure is finalizing all required actions and<br />
will automatically close after finish. Please wait for a short<br />
while until this happens.<br />
If the installation utility identifies a lack of available space<br />
on your hard disk, an error message will prompt you to free<br />
some hard disk space before proceeding with the installation.<br />
You can always abort the installation procedure by clicking on<br />
“Cancel”.<br />
CORRECT START-UP PROCEDURE<br />
WHEN EMBROIDERING<br />
The following steps must be followed for proper start-up<br />
protocol. If these steps are not followed precisely, you will<br />
get a “Transmission Pending” error message.<br />
Boot up your computer, but do not open the <strong>Futura</strong><br />
software. Next attach the embroidery unit to your sewing<br />
machine and connect the USB cable between your<br />
computer and sewing machine.<br />
1. Turn on your sewing machine. Make sure the needle has<br />
been moved to the highest position by turning the Hand<br />
wheel towards you.<br />
2. Attach the hoop that you plan to work with to your<br />
embroidery unit.<br />
3. Double click on the <strong>Futura</strong> Icon on your desktop to<br />
open up the <strong>Futura</strong> Software.<br />
4. You are now ready to select and transmit a design to<br />
your machine.<br />
IMPORTANT: If you have embroidered using the small<br />
hoop, and you are now ready to use your large hoop.<br />
Turn off your machine, close the <strong>Futura</strong> software and then<br />
turn <strong>OF</strong>F your computer. Wait for a moment, turn on your<br />
computer and then follow steps 1 through 4 above.<br />
86