Auto Cross-Stitch® - SINGER Futura Support
Auto Cross-Stitch® - SINGER Futura Support
Auto Cross-Stitch® - SINGER Futura Support

You also want an ePaper? Increase the reach of your titles
YUMPU automatically turns print PDFs into web optimized ePapers that Google loves.
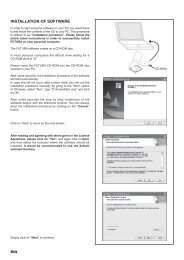
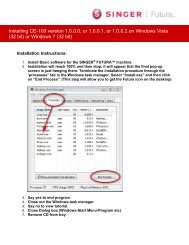
<strong>Futura</strong> - <strong>Auto</strong> <strong>Cross</strong>-Stitch Option - English 1-01
<strong>Futura</strong> - <strong>Auto</strong> <strong>Cross</strong>-Stitch Option - English 1-01Inside <strong>Auto</strong> <strong>Cross</strong>-Stitch<strong>Auto</strong> <strong>Cross</strong>-Stitch is designed to automatically digitize an image(artwork) into an embroidery design with <strong>Cross</strong>-Stitches. <strong>Auto</strong><strong>Cross</strong>-Stitch has a Wizard that walks you through a step-by-stepprocess for creating an automatic embroidery design. In this segment,each step and process will be defined.See the section called “How to Use <strong>Auto</strong> <strong>Cross</strong>-Stitch” for a quickdescription of using the <strong>Auto</strong> <strong>Cross</strong>-Stitch wizard.add-on<strong>Auto</strong> <strong>Cross</strong>-Stitch ®Open WizardYou must launch the Software (see sectioncalled “How to Open FUTURA) to use the<strong>Auto</strong> <strong>Cross</strong>-Stitch wizard.Step Action Result>1 Select <strong>Auto</strong> <strong>Cross</strong>-Stitch...from the Create drop-downmenu.>2 Click Next.<strong>Auto</strong> <strong>Cross</strong>-Stitch Wizard/Introduction page will open.>1: Open ImageThis is the step to choose the image, or artwork to be used with<strong>Auto</strong> <strong>Cross</strong>-Stitch. If you are familiar with any <strong>Cross</strong>-Stitch embroidery,you will appreciate the fact that, simple is better whenit comes to artwork. It is important to use a clean image for thisprocess. A vector type Image (.WMF) like “clipart” works best. If theimage was scanned, it is a Bitmap type (millions of pixels) image– either .bmp or .jpg, and must have a reasonably “high resolution”.150-300 DPI is good. The software will reduce the colors so that itis feasible to stitch the art in embroidery.Step Action Result>1 Choose the Select from theSelect Image box.>2 Choose Image (of yourchoice) from folder whereyour images are stored.>3 Click Next.The Open Image dialoguebox will open.<strong>Auto</strong> <strong>Cross</strong>-Stitch ® :Inside <strong>Auto</strong> <strong>Cross</strong>-Stitch1
add-on<strong>Auto</strong> <strong>Cross</strong>-Stitch ®>2: Crop ImageIn the 2 nd step the Wizard is supplying the option to Crop (cut) theImage. Though it is not necessary to crop, there may be someareas that are not desired in the embroidery design.Step Action Result>1 Click on square on the framearound image.>2 Drag square to Crop.>3 Click Next.<strong>Futura</strong> - <strong>Auto</strong> <strong>Cross</strong>-Stitch Option - English 1-01>3: Set DimensionsThe 3 rd step is your chance to change the Dimensions (size) of theimage.Step Action Result>1 Click Width (or Height) box.>2 Type new value. Both dimensions will changeat once.>3 Click Next.It is possible to change the Unit (of measurement)from CM to MM or Inches in the“Units” box.>4: Color SelectionIn this step the software is prepared to reduce the number of colorsin the image. The Wizard is very self-explanatory. Remember when,in referring to a “Bitmap” type of image, we said it has “millions ofpixels”? How many threads/colors do you want to change?Step Action Result>1 Check Reduce Colors <strong>Auto</strong>maticallyin the Color setsuggestion box.This box is enabled by default.>2 Click Suggest. The Wizard will look at theimage and suggest somecolors.2<strong>Auto</strong> <strong>Cross</strong>-Stitch ® :Inside <strong>Auto</strong> <strong>Cross</strong>-Stitch
<strong>Futura</strong> - <strong>Auto</strong> <strong>Cross</strong>-Stitch Option - English 1-011. It is possible to “Pan” the image in thesmall screen on the right-hand side of thedialogue box.Simply right-click and drag the image.2. It is also possible to delete segmentsthat you do not want to be digitized. Simplyhighlight the color in the suggestedcolor box, and select “Remove”Step Action Resultor>1 Check Reduce Colors to andType in number of desired(thread) colors.>2 Click Suggest. The Wizard will look at theimage and suggest (theamount entered) colors.>3 Click Next.add-on<strong>Auto</strong> <strong>Cross</strong>-Stitch ®>:5 <strong>Cross</strong>-StitchThis 5 th step is designed to offer some control over the way that thesoftware “automatically” handles the <strong>Cross</strong>-Stitch elements of theimage. The size of the <strong>Cross</strong>-Stitch and connection policy (howto travel between blocks) will affect the outcome of the <strong>Cross</strong>-Stitch design. It is also possible to stitch the “background color” ofthe art (often, white) – or not.Step Action Result>1 Click <strong>Cross</strong> Size and move upor down.The <strong>Cross</strong>-Stitch will changesize according to the setvalue. The preview of theimage will reflect proposedsize.All Blocks will be connectedwith a Jump Stitch.>2 Check use a Jump Stitchbox.Continues ><strong>Auto</strong> <strong>Cross</strong>-Stitch ® :Inside <strong>Auto</strong> <strong>Cross</strong>-Stitch3
add-on<strong>Auto</strong> <strong>Cross</strong>-Stitch ®Step Action Result>3 Stitch Background:Check Stitch Background ifcolor is vital to design.>4 Click Finish. The image will be processedshowing progress barsuntil complete.<strong>Futura</strong> - <strong>Auto</strong> <strong>Cross</strong>-Stitch Option - English 1-01Voila! Now, you have an embroidery design that was created with aminimum of labor, and a maximum of control.Image 1finished embroidery design4<strong>Auto</strong> <strong>Cross</strong>-Stitch ® :Inside <strong>Auto</strong> <strong>Cross</strong>-Stitch
<strong>Futura</strong> - <strong>Auto</strong> <strong>Cross</strong>-Stitch Option - English 1-01<strong>Auto</strong> <strong>Cross</strong>-Stitch ®add-on<strong>Auto</strong> <strong>Cross</strong>-Stitch ® :Inside <strong>Auto</strong> <strong>Cross</strong>-Stitch5