The Apex SE Click Pen (PKVPEN) - Penn State Industries
The Apex SE Click Pen (PKVPEN) - Penn State Industries
The Apex SE Click Pen (PKVPEN) - Penn State Industries

Create successful ePaper yourself
Turn your PDF publications into a flip-book with our unique Google optimized e-Paper software.
#<strong>PKVPEN</strong>XX<br />
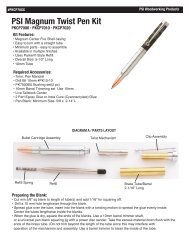
<strong>The</strong> <strong>Apex</strong> <strong>SE</strong> <strong>Click</strong> <strong>Pen</strong> Kit<br />
<strong>PKVPEN</strong> • <strong>PKVPEN</strong>24 • <strong>PKVPEN</strong>CH • <strong>PKVPEN</strong>GM<br />
Kit Features:<br />
• Unique turned plunger design<br />
• Suitable for many stylish profile variations<br />
• Available in multiple finishes<br />
• Heafty / Comfortable <strong>Pen</strong><br />
PSI Woodworking Products<br />
Required Accessories:<br />
• 7mm <strong>Pen</strong> Mandrel<br />
• Drill Bit: 8mm #PKPARK-8MM<br />
• #<strong>PKVPEN</strong>BU Bushing set(4 pc)<br />
• #PKTRIMKIT Barrel Trimming set (U<strong>SE</strong> 8MM SHAFT)<br />
• Live Tailstock Center<br />
• 2 Part Epoxy Glue or Insta Cure (Cyanoacrylate) Glue<br />
• <strong>Pen</strong> Blank: Minimum Size - 3/4” X 3-3/4” L<br />
• Plunger: 1/2” sq X 5/8” L<br />
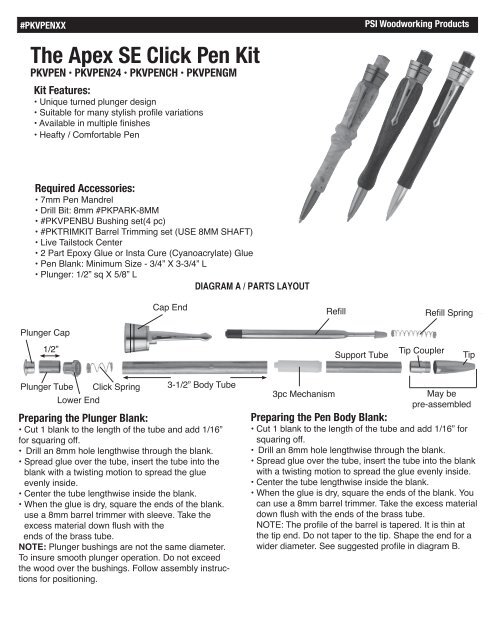
Plunger Cap<br />
Cap End<br />
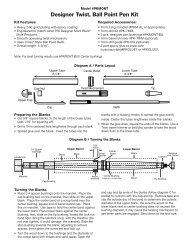
DIAGRAM A / PARTS LAYOUT<br />
Refill<br />
Refill Spring<br />
1/2”<br />
Support Tube<br />
Tip Coupler<br />
Tip<br />
Plunger Tube <strong>Click</strong> Spring<br />
Lower End<br />
3-1/2” Body Tube<br />
Preparing the Plunger Blank:<br />
• Cut 1 blank to the length of the tube and add 1/16”<br />
for squaring off.<br />
• Drill an 8mm hole lengthwise through the blank.<br />
• Spread glue over the tube, insert the tube into the<br />
blank with a twisting motion to spread the glue<br />
evenly inside.<br />
• Center the tube lengthwise inside the blank.<br />
• When the glue is dry, square the ends of the blank.<br />
use a 8mm barrel trimmer with sleeve. Take the<br />
excess material down flush with the<br />
ends of the brass tube.<br />
NOTE: Plunger bushings are not the same diameter.<br />
To insure smooth plunger operation. Do not exceed<br />
the wood over the bushings. Follow assembly instructions<br />
for positioning.<br />
3pc Mechanism<br />
May be<br />
pre-assembled<br />
Preparing the <strong>Pen</strong> Body Blank:<br />
• Cut 1 blank to the length of the tube and add 1/16” for<br />
squaring off.<br />
• Drill an 8mm hole lengthwise through the blank.<br />
• Spread glue over the tube, insert the tube into the blank<br />
with a twisting motion to spread the glue evenly inside.<br />
• Center the tube lengthwise inside the blank.<br />
• When the glue is dry, square the ends of the blank. You<br />
can use a 8mm barrel trimmer. Take the excess material<br />
down flush with the ends of the brass tube.<br />
NOTE: <strong>The</strong> profile of the barrel is tapered. It is thin at<br />
the tip end. Do not taper to the tip. Shape the end for a<br />
wider diameter. See suggested profile in diagram B.
#<strong>PKVPEN</strong>XX<br />
PSI Woodworking Products<br />
Head Stock<br />
Cap Bushing<br />
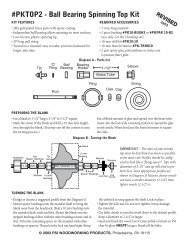
DIAGRAM B / TURNING THE BLANKS<br />
Tip Bushing<br />
Larger dia. Plunger-<br />
Bushing<br />
Taper<br />
Knurled Nut<br />
Live Center<br />
7mm Spacer<br />
Bushings<br />
Profile<br />
Blank<br />
Avoid turning to thickness<br />
of bushing<br />
7mm Spacer Bushings<br />
as required<br />
Turning the Blank<br />
• You may turn the pen blank and the plunger on the same mandrel together.<br />
<strong>Pen</strong> Blank: Turn the barrel to a pleasing profile. You may design a oversized bead on top and curve the wood at the tip to<br />
avoid the thin wall if turned straight to the bushing.<br />
Plunger: 2 bushings are of different diameters. <strong>The</strong> wide bushing is also larger in diameter. Turn a straight profile<br />
NOTE: Do not leave wood on the plunger to exceed the bushings otherwise it will effect the plunging and sliding. Sand smooth<br />
up to the bushings.<br />
Assembly<br />
• Layout parts according to diagram A<br />
PEN BARREL:<br />
• Insert the mechanism assembly, threaded end in first through the narrow end of the barrel.<br />
• Follow with the support tube into the same opening.<br />
Screw the tip into the tip coupler (may be pre-assembled). Press the assembly into the same opening until the base of the tip<br />
bottoms onto the barrel.<br />
• Press the cap end into the wide turned end of the barrell.<br />
• Unscrew the tip, Insert the refill into the opening at the tip. Affix the refill spring. Screw the tip over.<br />
PLUNGER:<br />
• Press the lower end (wider) into the wide end of the plunger.<br />
• Press the plunger cap into the (narrower) opposite opening.<br />
• Drop the click spring into the opening at the cap end. Place the plunger, threaded side in first and screw over the spring onto<br />
the mechanism to bottom.<br />
• <strong>The</strong> pen is ready to use by clicking on the plunger to advance or retract the refill. Unscrew the tip to replace refill.<br />
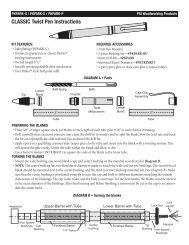
Diagram C / Bushings #<strong>PKVPEN</strong> BU<br />
Blank<br />
Profile<br />
Smaller dia.<br />
Plunger Bushing<br />
Mandrel<br />
ø<br />
.600”<br />
CAP BUSHINGS<br />
ø<br />
.288”<br />
PLUNGER BUSHINGS<br />
ø ø<br />
.404” .288”<br />
.248” Holes through<br />
ø<br />
.288”<br />
ø<br />
.330”<br />
ø<br />
ø<br />
.288” .394”<br />
© 2012 PSI Woodworking Philadelphia PA 19115 - v10/12