PKGRIND7 - Penn State Industries
PKGRIND7 - Penn State Industries
PKGRIND7 - Penn State Industries

You also want an ePaper? Increase the reach of your titles
YUMPU automatically turns print PDFs into web optimized ePapers that Google loves.
#<strong>PKGRIND7</strong><br />
Small Pepper Mill Kit<br />
Kit Features:<br />
• Easy to hold in the palm of your hand<br />
• Requires only drilling two hole sizes<br />
• Ceramic grinding parts can use salt or pepper<br />
• Only 3-3/4” tall<br />
PSI Woodworking Products<br />
Required Accessories:<br />
• 7mm Pen Mandrel<br />
• Drill Bit(s):<br />
1-1/16” #FBI-116 (For thru holes)<br />
36mm #FB36MM (For top recess)<br />
1-1/2” #FB150 (For bottom recess)<br />
• <strong>PKGRIND7</strong>BU Bushing set(2 pc)<br />
• Small Phillips Screw Driver<br />
• 60º Live Tailstock Center<br />
• Wood Blank Required: Minimum Size- 2” x 2” x 3-1/4” H<br />
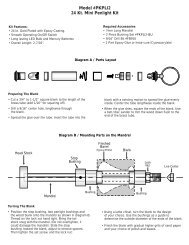
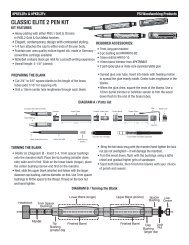
Drilling the Blank<br />
• Square the ends of the blank to start.<br />
• Locate and mark the center of each end of the blank.<br />
• Bore a 36mm hole 3/16” deep in the top of the blank.<br />
• Bore a 1-1/16” hole half way through the top of the blank.<br />
• Bore a 1-1/2” hole 3/8” deep in the bottom of the blank.<br />
• Bore a 1-1/16” through the bottom of the blank to meet up with the top hole.<br />
DIAGRAM A / Drilling the Blank<br />
36mm<br />
3/16”<br />
3-1/4”<br />
0<br />
1-1/16”<br />
3/8”<br />
1-1/2”<br />
2”
#<strong>PKGRIND7</strong><br />
PSI Woodworking Products<br />
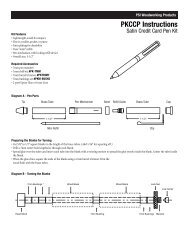
DIAGRAM B / Turning the Blank<br />
Bottom End<br />
Headstock<br />
Blank<br />
Top End<br />
Spacer Bushings<br />
Knurled Nut<br />
Spacer Bushings<br />
Live Center<br />
End Bushings<br />
Profile of your<br />
choice<br />
Turning the Blank (see diagram B)<br />
• Mount an end bushing wide end first on the mandrel.<br />
• Slide the blank on the mandrel onto the bushing.<br />
• Mount the other end bushing, narrow end in first into the blank.<br />
• Lock the setup tight on the mandrel, secure with the tail stock.<br />
• Turn the blank into the profile desired. Finish the wood with a food safe finish.<br />
NOTE: The wood is not turned down to meet the bushings<br />
End Bushings<br />
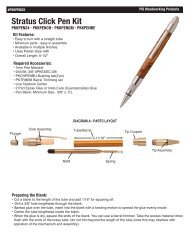
Diagram C Grind Assembly<br />
Grind Adj. Knob<br />
Crank Wheel<br />
Upper Cup<br />
Assembly<br />
• Layout parts according to diagram C<br />
• Glue the upper cup into the recess on the upper blank.<br />
• Insert the grinding assembly, shaft in first through the hole in the bottom. Push on<br />
the spring.<br />
• Mount the crank wheel over the extended rod. Screw the adjusting grind knob over<br />
the threads.<br />
• Line up the grinder housing rim shoulders to match the holes in the grinder base.<br />
Cover with the bottom plate, extended portion toward the bottom (see diagram E)<br />
Screw in through the grinder base and housing securely into the wood.<br />
• When filled with pepper or salt, to adjust the grind just loosen or tighten the knob.<br />
• To reload the mill, remove the knob and crank wheel and reload through the top.<br />
Diagram D / Bushings #<strong>PKGRIND7</strong>BU<br />
1/4”<br />
3/8”<br />
Housing<br />
Spring<br />
Grinder Mill<br />
Grinder Base<br />
Bottom Plate<br />
Mounting<br />
Screws<br />
Grinder<br />
Assembly<br />
.248 Holes through<br />
ø1.375”<br />
ø1.058”<br />
same<br />
Diagram E<br />
© 2012 PSI Woodworking Philadelphia PA 19115 - v03/13