Model #PKPLI2 24 Kt. Mini Penlight Kit + - - Penn State Industries
Model #PKPLI2 24 Kt. Mini Penlight Kit + - - Penn State Industries
Model #PKPLI2 24 Kt. Mini Penlight Kit + - - Penn State Industries

You also want an ePaper? Increase the reach of your titles
YUMPU automatically turns print PDFs into web optimized ePapers that Google loves.
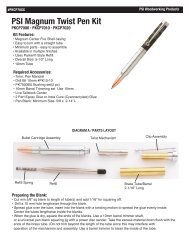
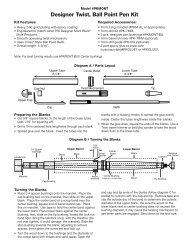
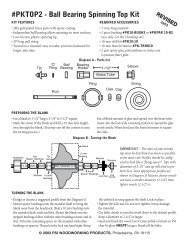
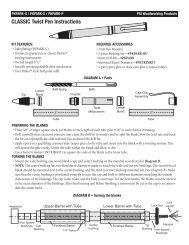
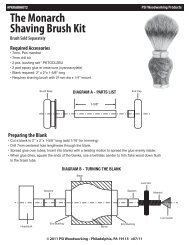
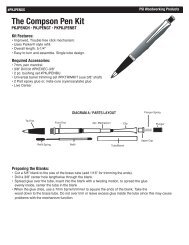
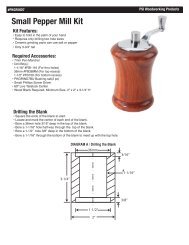
<strong>Model</strong> <strong>#PKPLI2</strong><strong>24</strong> <strong>Kt</strong>. <strong>Mini</strong> <strong>Penlight</strong> <strong>Kit</strong><strong>Kit</strong> Features:• <strong>24</strong> kt. Gold Plated with Epoxy Coating.• Smooth Operating On/Off Switch• Long lasting LED Bulb and Mercury Batteries• Overall Length: 2-7/16”.Required Accessories• 7mm Long Mandrel• 2 Piece Bushing Set <strong>#PKPLI2</strong>-BU• 9/16” Drill Bit #FB916• 2 Part Epoxy Glue or Insta-cure (Cyanoacrylate)Diagram A / Parts Layout+ -Preparing The Blank• Cut a 3/4'' to 1-1/2'' square blank to the length of thebrass tube (add 1/16'' for squaring off).• Drill a 9/16'' center hole, lengthwise throughthe blank.• Spread the glue over the tube. Insert the tube into theblank with a twisting motion to spread the glue evenlyinside. Center the tube lengthwise inside the blank.• When the glue dries, square the ends of the blank. Usea belt / disc sander to trim the wood down flush to theend of the brass tube.Diagram B / Mounting Parts on the MandrelHead StockStopBushingFinishedBarrel(Typical Profile)BlankLockNutLive CenterMandrelBushingBushingTurning The Blank• Position the stop bushing, two penlight bushings andthe wood blank onto the mandrel as shown in diagram B.Thread on the lock nut hand tight. Bring the tailstock snug with the mandrel. (Do not overtighten, itcould damage the mandrel). Slide the stopbushing toward the blank, adjust to remove spaces.Then tighten the set screw, and the lock nut.• Using a lathe chisel, turn the blank to the designof your choice. Use the bushings as a guide todetermine the outside diameter of the ends of the blank.• Finish the blank with gradual higher grits of sand paperand your choice of polish and waxes.
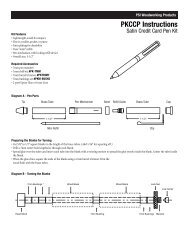
Diagram C / <strong>Penlight</strong> Assembly+ -(1)ThreadedBlubHolder(2)LEDBulb(3)FrontThreadedInsert(4)Barrel(5)LargeSpring(6)BatteryHolder(7)SmallSpring(8)2- Batteries(3)RearThreadedInsert(9)ThreadedKey Ring/SwitchAssembly(10)KeyRingAssembled Battery Holder (6, 7, 8)Assembly• Line up finished parts according to above Diagram C.NOTE: Front and rear threaded inserts #3 are identical.• Press the front threaded insert #3, recessed end first,into the front end of the barrel #4.• Drop the large spring #5, narrow end first into the backend of the barrel #4.• Drop the battery holder #6 small hole end first, into theback end of the barrel #4 behind the spring.• Press rear threaded insert #3, recessed end first into theback end of the barrel #4.• Place LED bulb #2, rounded end first all the way intothe bulb holder #1. Thread the bulb holder assemblyinto the front end of the barrel.• Place LED bulb #2, rounded end first all the way intothe bulb holder #1. Thread the bulb holder assemblyinto the front end of the barrel.• Place the small spring #7, flanged end first, over the pointedlead end of a pencil. Push the spring through the small holeinside the battery holder #6 as shown in diag. D. (remove pencil)• Drop 2 batteries #9 into the battery holder #6. Position as shownin diag. D. with the positive side toward the spring.• Attach the key ring #10 to the switch assembly #9. Screwthe On/Off switch assembly #9 into the rear of the barrel #4.• The penlight operates by turning or pushing the key ring On/Off.NOTE: A quarter turn should lock the switch into an ‘on’ or ‘offposition.TROUBLE SHOOTING:IF THE BULB DOESN’T LIGHT...• Check parts assembly per diagram B.• Check that the batteries are positioned properly.• Check that the front spring is positioned properlyand doesn’t short circuit across the bulb. Tighten rearassembly last to avoid spring distortion.• Make sure batteries are in contact with small springinside battery holder.• Check bulb and batteries individually for properelectrical operation.IF THE BULB DOES NOT TURN OFF...• The front spring is probably installed improperly.Bushings - <strong>#PKPLI2</strong>-BU© 1997PSI WOODWORKING PRODUCTS • Caroline and Comly Roads, Philadelphia, PA 19154-2106