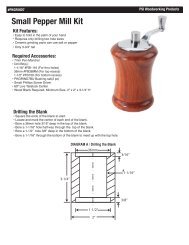
CLASSIC Twist Pen Instructions - Penn State Industries
CLASSIC Twist Pen Instructions - Penn State Industries
CLASSIC Twist Pen Instructions - Penn State Industries

You also want an ePaper? Increase the reach of your titles
YUMPU automatically turns print PDFs into web optimized ePapers that Google loves.
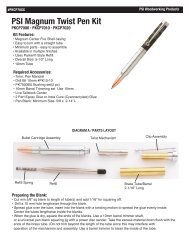
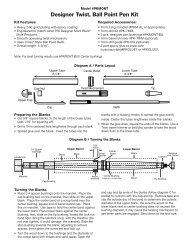
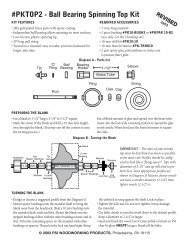
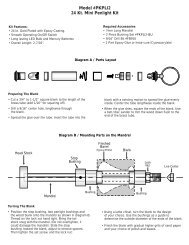
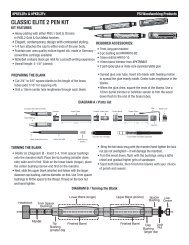
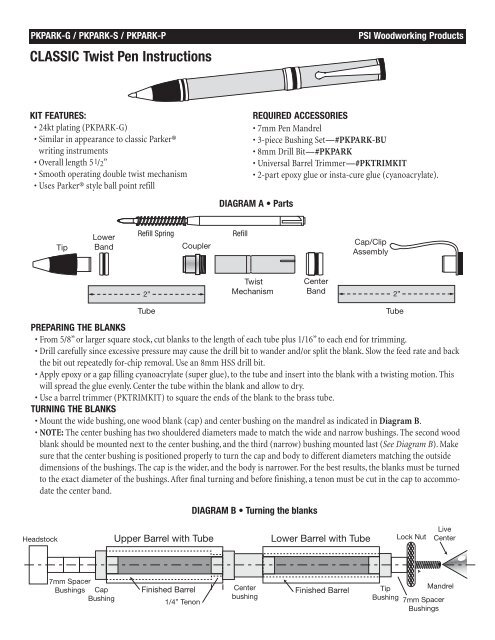
PKPARK-G / PKPARK-S / PKPARK-P<strong>CLASSIC</strong> <strong>Twist</strong> <strong>Pen</strong> <strong>Instructions</strong>PSI Woodworking ProductsKIT FEATURES:• 24kt plating (PKPARK-G)• Similar in appearance to classic Parker®writing instruments• Overall length 5 1/2”• Smooth operating double twist mechanism• Uses Parker® style ball point refillREQUIRED ACCESSORIES• 7mm <strong>Pen</strong> Mandrel• 3-piece Bushing Set—#PKPARK-BU• 8mm Drill Bit—#PKPARK• Universal Barrel Trimmer—#PKTRIMKIT• 2-part epoxy glue or insta-cure glue (cyanoacrylate).DIAGRAM A • PartsTipLowerBandRefill SpringCouplerRefillCap/ClipAssembly<strong>Twist</strong>Center2” Mechanism Band2”TubePREPARING THE BLANKS• From 5/8” or larger square stock, cut blanks to the length of each tube plus 1/16” to each end for trimming.• Drill carefully since excessive pressure may DIAGRAM cause the drill B • Turning bit to wander the blanks and/or split the blank. Slow the feed rate and backthe bit out repeatedly for-chip removal. Use an 8mm HSS DIAGRAM drill bit. A • PartsLive• Apply epoxy or a gap Upper filling cyanoacrylate Barrel with (super Tube glue), to the tube Lower and insert Barrel into with the blank Tube with a twisting Lock Nut motion. Center Thiswill spread the glue evenly. Center the tube within the blank and allow to dry.• Use a barrel trimmer Lower (PKTRIMKIT)Refill Springto square the ends ofRefillthe blank to the brass tube.TURNING Tip THE BLANKSCouplerCap/ClipBandAssembly• Mount the wide bushing, one wood blank (cap) and center bushing on the mandrel as indicated in Diagram B.Cap Finished BarrelCenterMandrelFinished Barrel Tip• NOTE: The center bushing has two shouldered diametersBushingbushing made to match the wide and narrowBushingbushings. The second woodblank should be mounted next to the1/4”centerTenonbushing, and the third <strong>Twist</strong>(narrow) bushing Centermounted last (See Diagram B). Makesure that the center bushing is positioned 2” properly to turnMechanism Bandthe cap and body to different diameters matching 2” the outsidedimensions of the bushings. The cap is the wider, and the body is narrower. For the best results, the blanks must be turnedTubeTubeto the exact diameter of the bushings. After final turning and before finishing, a tenon must be cut in the cap to accommodatethe center band.DIAGRAM C • AssemblyLowerLower Barrel with TubeUpper Barrel with TubeTip BandDIAGRAM B • Turning the blanksHeadstock7 mm S pacerBushingsTube7 mm S pacerBushingsHeadstockUpper Barrel with Tube1/4” TenonLower Barrel with TubeLock NutCap/ClipAssemblyLiveCenter7 mm S pacerBushingsRefill SpringCapBushingFinishedRefillBarrel1/4” TenonCenter CouplerbushingFinished <strong>Twist</strong> BarrelMechanismCenter TipBand BushingMandrel7 mm S pacerBushings
2” Mechanism Band2”TubePKPARK-G / PKPARK-S / PKPARK-PDIAGRAM A • PartsTubePSI Woodworking Products• The diameter of theLowertenon should match the narrowDIAGRAMdiameterB •ofTurningthe centerthebushing.blanksTo ease the turning of the tenon, slideTipCouplerCap/ClipBandthe center bushing off the mandrel and turn it around 180 degrees. Next, slide the center band Assembly onto the bushing (flat endHeadstock towards the wood) and replace Upperit Barrel on the mandrel with Tube as indicated in Diagram Lower B. Barrel with Tube Lock Nut• The length of the tenon can be approximately 1/4" which is about 5/32” less than the width of the center band. This is done<strong>Twist</strong>Centerto allow the pen body to inset into the center band when closed. When ready for the final cut, slide the center band from the2” Mechanism Band2”bushing onto the tenon to test for fit. The proper diameter for the pen cap body should be the same as the outside diameterof the center band, When the proper Tube fit is obtained, move the band away from the wood and finish the blank. Tube You may thenCap Finished BarrelCenter Finished Barrel TipMandrelpermanently mount Bushing the band by adhering with a drop of glue. bushingBushing1/4” Tenon• NOTE: When turning this blank near the center bushing, use a small piece of tape to secure the center band to the bushingso it does not spin and possibly hit yourDIAGRAMturning tool.B • Turning the blanks• Sand both blanks and then finish the blanks with your choice of polish and wax.Headstock7 mm S pacerBushingsTipRefill SpringRefillUpper Barrel with Tube DIAGRAM C • Assembly Lower Barrel with TubeLowerLower Barrel with TubeUpper Barrel with TubeBand7 mm S pacerBushingsLock NutLiveCenterLiveCenter7 mm S pacerBushingsCapBushingFinished Barrel1/4” TenonCenterbushing1/4” TenonFinished BarrelTipBushingMandrelCap/ClipAssembly7 mm S pacerBushingsRefill SpringRefillCoupler<strong>Twist</strong>MechanismGeneral Assembly Hints:DIAGRAM C • Assembly• Use PSI <strong>Pen</strong> Assembly Lower Press #PENPRESS4 Lower Barrel with to assemble Tube the pen.Upper Barrel with Tube• Line up Tip the pen partsBandaccording to the Diagram C.• Thread the cap into the hole in the clip and tighten with the cap nut, leaving the tapered end exposed.• Press the cap/clip assembly into the pen blank opposite the tenon.CenterBandDIAGRAM D • PKPEN-BU• Slide the front ring on the nose piece and insert into the front tube—press together.Cap/Clip1/4” Tenon• Insert the threaded coupler into the opposite end of the pen body leaving the threads exposed; A .400” press together. AssemblyC B B C A B B A B .290”• Insert the pen refill—with the spring—into the pen body. Push the two pen halves together aligning the grain as desired.C .490”• Screw the Refill twist Spring mechanism onto the Refill coupler.CapCenter Coupler Tip<strong>Twist</strong>Center• Glue the center band onto the tenon you Bushing cut in the pen cap Bushing body making sure Bushing Mechanism you place the squared Band end against the wood.• The pen is operated by twisting the halves in opposite directions to extend or retract the point. If the pen point is notretracting smoothly, try to stretch the spring and retry.BUSHINGSDIAGRAM D • PKPEN-BUCCapBushingB B C A B B ACenterBushingTipBushingA .400”B .290”C .490”©2008 PSI Woodworking • Philadelphia, PA 19115 v08-2008