Variable Speed Turncrafter Pro(PK073SPECV) - Penn State Industries
Variable Speed Turncrafter Pro(PK073SPECV) - Penn State Industries
Variable Speed Turncrafter Pro(PK073SPECV) - Penn State Industries

You also want an ePaper? Increase the reach of your titles
YUMPU automatically turns print PDFs into web optimized ePapers that Google loves.
<strong>Turncrafter</strong><strong>Pro</strong><br />
<strong>Variable</strong> <strong>Speed</strong> Lathe<br />
User’s Manual<br />
Read this manual completely before usage.<br />
5<br />
3<br />
4<br />
Model #TCLPROVS<br />
9900 Global Rd.<br />
Philadelphia ,PA. 19115<br />
Version 2 – 10/06
SPECIFICATIONS<br />
OF TURNCRAFTERPROVS MIDI LATHE<br />
Model number: . . . . . . . . . . . . . . . . . . . . . . . . . . . . . . . . . . . . .#TCLPROVS<br />
Motor: . . . . . . . . . . . . . . . . . . . . . . . . . . . . . . . . . . . . . 1/2 HP, 120V AC, 8A<br />
<strong>Variable</strong> speed: . . . . . . . . . . . . . . . . . . . . . . . . . . . . . . . . 650 to 3800 RPM<br />
Distance between centers: . . . . . . . . . . . . . . . . . . . . . . . . . . . . . . . . . . . 18"<br />
Distance between centers with extension bed: . . . . . . . . . . . . . . . . . . . 39"<br />
Swing over bed: . . . . . . . . . . . . . . . . . . . . . . . . . . . . . . . . . . . . . . . . . . . 10"<br />
Head stock spindle thread: . . . . . . . . . . . . . . . . . . . . . . . . . . . . . . . 1" x 8tpi<br />
Hollow head stock . . . . . . . . . . . . . . . . . . . . . . . . . . . . . . . #2 Morse Taper<br />
Hollow tail stock . . . . . . . . . . . . . . . . . . . . . . . . . . . . . . . . . #2 Morse Taper<br />
Overall Size: . . . . . . . . . . . . . . . . . . . . . . . . . . . 30"L x 7-1/4" W x 14-1/2"H<br />
Overall Size with extension bed: . . . . . . . . . . . . 54"L x 7-1/4" W x 14-1/2"H<br />
Net weight (lathe only): . . . . . . . . . . . . . . . . . . . . . . . . . . . . . . . . . . . 71 lbs.<br />
Net weight with extension bed: . . . . . . . . . . . . . . . . . . . . . . . . . . . . 90 lbs.<br />
WARRANTY<br />
THE TURNCRAFTERPROVS LATHE IS<br />
WARRANTED AGAINST DEFECTS IN<br />
MATERIALS AND WORKMANSHIP FOR A<br />
PERIOD OF THREE (3) YEARS FROM THE DATE<br />
OF PURCHASE. THIS WARRANTY APPLIES TO<br />
THE PURCHASER OF THIS PRODUCT, AND IS<br />
LIMITED TO THE REPAIR OR REPLACEMENT<br />
OF THE PRODUCT OR ITS PARTS AT PSI<br />
WOODWORKING PRODUCTS’ DISCRETION.<br />
EXCLUDED ARE PARTS WHICH HAVE BEEN<br />
MISUSED, ABUSED, ALTERED OR CONSUMED<br />
BY NORMAL OPERATION OF THE MACHINE.<br />
ALSO EXCLUDED ARE DIRECT OR<br />
CONSEQUENTIAL DAMAGES TO PERSONS,<br />
PROPERTY, AND/OR MATERIALS. YOUR<br />
INVOICE SERVES AS PROOF OF PURCHASE<br />
AND MUST BE REFERENCED PRIOR TO<br />
RETURN AUTHORIZATION.<br />
______________________________________________<br />
DATE PURCHASED<br />
__________________<br />
INVOICE NO.<br />
2
1. Read and understand this instruction manual.<br />
SAFETY INSTRUCTIONS<br />
2. NEVER connect plug to power source until all of the assembly steps have been completed.<br />
3. Check that your supply voltage and grounding are correct.<br />
4. Do not use the lathe in a damp or wet location.<br />
5. Keep lathe clean and lightly oiled.<br />
6. Make sure the belt, pulley, and control box are adequately guarded at all times.<br />
7. Always remove any tools, chuck keys, toggle bars, etc. when you are finished with them.<br />
8. Keep the work area well lit and provide adequate ventilation and workspace.<br />
9. Keep young children and bystanders at a safe distance from the lathe.<br />
10. Do not force the lathe to do more than what it is designed to do.<br />
11. Do not wear loose clothing, jewelry, or neckties which could get caught in revolving parts. It is recommended that long hair be<br />
restrained.<br />
12. Safety eye wear should be worn at all times. Also, it is recommended to a use of face or dust mask during lathe operation.<br />
13. Attach all workpieces securely to the lathe, whether between centers, on face plates, or in chucks, etc.<br />
14. For best results be sure to keep turning tools sharp, clean, and free from rust.<br />
15. Use only three wire extension cords that have 3-prong grounding type plugs and 3-hole receptacles that accept the tool's plug.<br />
16. Check the speed BEFORE mounting any material onto the lathe. ALWAYS start the lathe at a slow speed.<br />
17. Keep the door to the pulleys and belts securely screwed closed during lathe operation.<br />
3
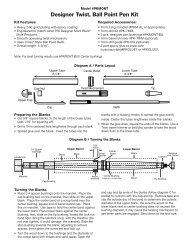
PARTS<br />
5<br />
10<br />
1<br />
3<br />
2<br />
4<br />
7<br />
6<br />
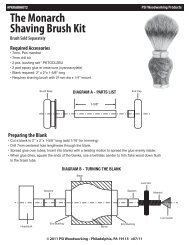
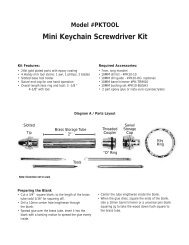
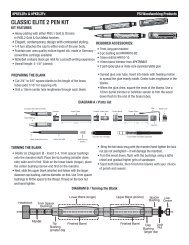
1. Toolrest (6 in)<br />
2. Faceplate (3 in)<br />
3. Spur Center (#2 MT)<br />
4. Live Tailsock Center (#2 MT)<br />
5. Spare Drive Belt<br />
6. Hex Wrenches (set of 2)<br />
7. Set of 4 Mounting Screws<br />
8. <strong>Speed</strong> Controller<br />
Mounting Plate<br />
9. <strong>Speed</strong> Controller<br />
10. Safety Goggles<br />
11. Knock-out Rod<br />
11<br />
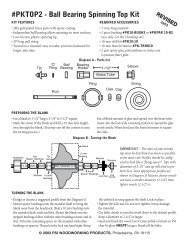
ASSEMBLY<br />
8<br />
9<br />
8<br />
5<br />
4<br />
3<br />
9<br />
7<br />
6<br />
2<br />
10<br />
1<br />
11<br />
12<br />
1 Lathe Bed 7 Headstock<br />
2 Tailstock 8 Faceplate<br />
3 Hand Wheel 9 Hand Wheel<br />
(Quill Adjustement)<br />
(Headstock Adjustement)<br />
4 Tailstock Tightening Lever 10 Motor<br />
5 Live Center 11 <strong>Speed</strong> Controller<br />
6 Toolrest 12 Power Switch<br />
4
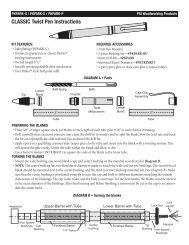
MULTI-POSITIONING CONTROL BOX<br />
FOR THE #TCLPROVS LATHE<br />
m The control box for the TCLPROVS is easily mounted<br />
on the bottom of the bed. This is completed by using the<br />
screws that also mount it to the rear of the bed and using<br />
the provided mounting plate.<br />
m The control box for the TCLPROVS can also be easily<br />
mounted anywhere that is convenient for you. The 3' cord<br />
from the motor to the control box allows you that flexibility.<br />
MOUNTING AND CHANGING<br />
THE SPEED CONTROL<br />
We have packed the speed cotrol box separately to prevent damage. Unpack the speed control box and mount on to the back of the<br />
headstock below the hinge under the hand wheel (the control box can be mounted elsewhere, mounting screws and washers<br />
included). Once mounting is complete, connect to the plug of the control box to the plug of the motor.<br />
The TCLPROVS is fitted with a 3-step pulley set-up which allows for the ranges of speed. See <strong>Speed</strong> Chart below.<br />
CHANGING<br />
THE BELT POSITION<br />
<strong>Speed</strong> Chart<br />
Make sure that the lathe is turned off or unplugged. Open the belt<br />
door on the headstock. Loosen the ratchet handle to allow the<br />
motor plate to swivel upwards. Swing the control box to the side<br />
for access to the motor pulley. To change the speed move the belt<br />
drive from one pulley to another. (NOTE: Always go from<br />
the larger pulley to the smaller pulley) After moving<br />
the belt, move down and tighten the motor pulley with the<br />
ratchet handle– this also tightens the belt. Turn your lathe's<br />
power on, and make sure that the belt is running consistently in<br />
its parallel groove. If all is smooth, turn the power off, reattach<br />
the control box and the belt door to its original position<br />
Headstock<br />
Pulley<br />
Motor<br />
Pulley<br />
A<br />
B<br />
C<br />
A= 650-1430 RPM<br />
B= 1240-2790 RPM<br />
C= 1600-3800 RPM<br />
5
RECOMMENDED TURNING SPEEDS<br />
Work Diameter in Inches. . . . . . . . . . . . . . . . . . . . . . . . . . . . . . . . . <strong>Speed</strong>s<br />
0-2" . . . . . . . . . . . . . . . . . . . . . . . . . . . . . . . . . . . . . . . . . . . . . 2600-3800 RPM<br />
2"-3" . . . . . . . . . . . . . . . . . . . . . . . . . . . . . . . . . . . . . . . . . . . . . 2000-2600 RPM<br />
3"-4" . . . . . . . . . . . . . . . . . . . . . . . . . . . . . . . . . . . . . . . . . . . . . 1300-2000 RPM<br />
4"-5" . . . . . . . . . . . . . . . . . . . . . . . . . . . . . . . . . . . . . . . . . . . . . . 650-1300 RPM<br />
6"+ . . . . . . . . . . . . . . . . . . . . . . . . . . . . . . . . . . . . . . . . . . . . . . . . . . . . 650 RPM<br />
Note: These speeds can vary with different wood species and the skill of the operator. Unbalanced pieces generally should be turned<br />
on speeds lower than those recommended above.<br />
SANDING<br />
Use the fastest speed possible without burning the wood.<br />
POLISHING & FINISHING<br />
Generally finishing can be done at faster speeds than turning.<br />
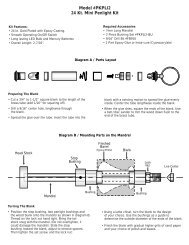
BELT, SPINDLE AND BEARING REPLACEMENT<br />
FOR THE #TCLPROVS LATHE<br />
To change the belt (#53), spindle (#14), or bearings (#4) for the lathe, you must first loosen the two set screws (#2) and hand wheel (#1).<br />
Next remove the upper access door (#7) and knob (#8) loosen the set screw (#69) on the drive pulley (#25).<br />
Tap out the spindle using a mallet. If you do not have a mallet, place a block of wood against the spindle and tap with a hammer. To get<br />
the spindle completely out, use a flat head screwdriver to punch it the rest of the way. Be careful not to damage the bearings or the threads.<br />
Replace the bearings, spindle or belt as required.<br />
BELT: You need only to move the spindle enough to slide a new belt on.<br />
SPINDLE: You must knock the spindle completely out through both bearings.<br />
BEARINGS: After removal of the spindle, completely – knock out the bearings from the inside of the headstock. This is best<br />
accomplished by inserting a long rod or screwdriver through one bearing inside the headstock toward the opposite<br />
bearing. Tap firmly to remove the bearing from the casting. Do the same for the second bearing.<br />
Please be aware not to damage the retainers (#13) when tapping out the bearing.<br />
Reassemble the new bearings by tapping them into place from the outside. Replace the spindle.<br />
Note: You may have to loosen the ratchet handle (ZTCL3-33 - PARTS #44, #45, #46) to reinstall the spindle pulley (#52), spindle collar<br />
(#3), and belt (#53). Reinstall the hand wheel and set screws. DO NOT tighten the hand wheel against the bearings. Tighten the pulley set<br />
screw and close the access door.<br />
6
PARTS LIST<br />
1 ZTCL3-22 HAND WHEEL 1<br />
2 ZTCL3-28 HEX SOCKET SCREW M6_12<br />
3 ZTCL4-03 COLLAR SPINDLE<br />
4 ZTCL4-04 BALL BEARING 80105 2<br />
5 ZTCL4-05 HEX SOCKET SCREW M8_25 4<br />
6 ZTCL4-06 WASHER 6<br />
7 ZTCL4-07 REAR BELT DOOR 1<br />
8 ZTCL4-08 MOVING KNOB 1<br />
9 ZTCL4-09 STATIONARY KNOB 1<br />
10 ZTCL4-10 BOLT 1<br />
11 ZTCL4-11 SEMI-CIRCLE HEAD SCREW 1<br />
12 ZTCL4-12 HEADSTOCK CASTING 1<br />
13 ZTCL4-13 RETAINING RING 47 2<br />
14 ZTCL4-14 HEADSTOCK SPINDLE 1<br />
15 ZTCL3-13 FACE PLATE 1<br />
16 ZTCL3-12 HEADSTOCK SPUR CENTER 1<br />
17 ZTCL3-40 LOCK HANDLE FOR TOOL REST BASE 1<br />
18 ZTCL3-34 RETAINING RING 10 3<br />
19 PART OF ZTCL3-36 - TOOL REST BUSHING 1<br />
20 ZTCL3-35 TOOL REST 1<br />
21 ZTCL3-36 TOOL REST BASE 1<br />
22 ZTCL3-37 TOOL REST CAM FOLLOWER 1<br />
23 ZTCL4-23 BOLT 2<br />
24 ZTCL4-24 SPRING WASHER 2<br />
}<br />
ZTCL3-06<br />
25 ZTCL4-25 SPRING WASHER 2<br />
26 ZTCL4-26 LOCK BOLT 2<br />
27 ZTCL3-11 CUP CENTER 1<br />
28 ZTCL3-10 BALL BEARING 80102 1<br />
} ZTCL3-LS<br />
29 ZTCL3-09 TAPER ROD 1<br />
30 ZTCL3-08A TAILSTOCK QUILL 1<br />
31 ZTCL3-08B TAILSTOCK OPERATING SCREW 1<br />
32 ZTCL3-05 TAILSTOCK 1<br />
33 ZTCL3-07 ECCENTRIC AXIS 1<br />
34 ZTCL3-04 QUILL ADJUSTING WHEEL 1<br />
37 ZTCL3-42 CAM FOLLOWER TAILSTOCK 1<br />
38 ZTCL4-38 HOLDDOWN ADJUSTER TAILS 1<br />
39 ZTCL3-03 RETAINING PLATE 1<br />
40 ZTCL3-02 HEX SOCKET SCREW M10_12 2<br />
41 ZTCL3-43 LOCK PLATE 2<br />
42 ZTCL3-39 NUT M10 2<br />
43 ZTCL4-43 FLAT HEAD SCREW<br />
}<br />
1<br />
44 ZTCL4-44 SPRING WASHER 1<br />
ZTCL3-33<br />
45 ZTCL4-45 RATCHET HANDLE 1<br />
46 ZTCL4-46 LOCK SCREW 1<br />
47 ZTCL3-30 HEX SOCKET SCREW M8_12 1<br />
48 ZTCL4-48 MOTOR PLATE WITH NOTCH 1<br />
49 ZTCL4-49 BIG WASHER 3<br />
50 ZTCL4-50 WASHER 6 3<br />
51 ZTCL4-51 MOTOR PULLEY 1<br />
52 ZTCL4-52 DRIVE PULLEY 1<br />
53 ZTCL3-26 DRIVE BELT 1<br />
54 ZTCL4-54 BOLT 1<br />
55 ZTCL4-55 WASHER 1<br />
56 ZTCL4-56 DOOR LATCH 1<br />
57 ZTCL4-57 WASHER 4 1<br />
58 ZTCL4-58 HINGE 2<br />
59 ZTCL4-59 SEMI-CIRCLE HEAD SCREW M4_8 2<br />
60 ZTCL4-60 SWITCH-BOX PLATE 2<br />
61 ZTCL4-61 PIN HINGE 1<br />
62 ZTCL4-62 POWER CORD 1<br />
63 ZTCL4-63 OVERLOAD PROTECTOR 1<br />
64 ZTCL4-64 LINE BOARD 1<br />
65 ZTCL4-65 SEMI-CIRCLE HEAD SCREW M4_6 4<br />
66 ZTCL4-66 SWITCH-BOX 1<br />
67 ZTCL4-67K KNOB 1<br />
68 ZTCL4-68 SWITCH 1<br />
69 ZTCL4-69 HEX SOCKET TAPER SCREW M6_12 4<br />
70 ZTCL4-70 MOTOR 1<br />
71 ZTCL3-50 RUBBER WASHER 4<br />
72 ZTCL3-43 NUT M10 4<br />
73 ZTCL3-53 RETAINING RING 1<br />
74 ZTCL4-74 WASHER 4<br />
75 ZTCL3-51 8MM FENDER WASHER 1<br />
76 ZTCL4-76 FLAT HEAD SCREW 3<br />
77 ZTCL4-77 BRUSH CAP 2<br />
78 ZTCL4-78 MOTOR BRUSHING 2<br />
67 ZTCL4-67R SPEED RHEOSTAT 1<br />
79 ZTCL4-79 KNOCK OUT BAR 1<br />
80 ZTCL4-80 CONTROLLER TO MOTOR CORD 1
OPTIONAL ACCESSORIES<br />
DUPLICATING SYSTEM<br />
PSI duplicator attachment . . . . . . . . . . . . . . . . . . . . . . . . . . . . . . . #CML-DUPJ<br />
Optional 2-ended carbide cutter . . . . . . . . . . . . . . . . . . . . . . . . . . #CML-DUPX<br />
Steel duplicator templates for a variety of projects.<br />
HEADSTOCK ACCESSORIES<br />
(1" X 8TPI OR #2 MORSE TAPER)<br />
3/8" Drill chuck- #2 MT mount . . . . . . . . . . . . . . . . . . . . . . . . . . . . . . . . . .#TM22<br />
1/2" Drill chuck- #2 MT mount . . . . . . . . . . . . . . . . . . . . . . . . . . . . . . . . . #TM32<br />
Mini screw chuck . . . . . . . . . . . . . . . . . . . . . . . . . . . . . . . . . . . . . #PK-TOP-MJ<br />
Chisel Mate . . . . . . . . . . . . . . . . . . . . . . . . . . . . . . . . . . . . . . . . . . . . . . . . . . #LCM5<br />
4-Piece Drive Center . . . . . . . . . . . . . . . . . . . . . . . . . . . . . . . . . . . . . . . . #LCENT4<br />
CHUCKS<br />
MinIGrip . . . . . . . . . . . . . . . . . . . . . . . . . . . . . . . . . . . . . . . . . . . . . . . . . #CMG3C<br />
Utility Grip . . . . . . . . . . . . . . . . . . . . . . . . . . . . . . . . . . . . . . . . . . . #CUG3418C<br />
Barracuda . . . . . . . . . . . . . . . . . . . . . . . . . . . . . . . . . . . . . . . . . . . #CSC2000C<br />
Barracuda2 . . . . . . . . . . . . . . . . . . . . . . . . . . . . . . . . . . . . . . . . . . #CSC3000C<br />
OTHER ACCESSORIES<br />
Dust collection hood . . . . . . . . . . . . . . . . . . . . . . . . . . . . . . . . . . . . #DLHOODC<br />
Pen making mandrel- 1" x 8tpi . . . . . . . . . . . . . . . . . . . . . . . . . . . . . . #PKM-BL<br />
Pen making mandrel- #2 MT . . . . . . . . . . . . . . . . . . . . . . . . . . . . . . #PKM-FLC<br />
Extension bed . . . . . . . . . . . . . . . . . . . . . . . . . . . . . . . . . . . . . . . . . #TCLPROXB<br />
9900 Global Road<br />
Philadelphia, PA 19115<br />
© 2006 PSI Woodworking <strong>Pro</strong>ducts<br />
TurnCrafter<strong>Pro</strong> Lathe #TCLPROVS - V2 - 10/06