PKEL2F1 - Penn State Industries
PKEL2F1 - Penn State Industries
PKEL2F1 - Penn State Industries

Create successful ePaper yourself
Turn your PDF publications into a flip-book with our unique Google optimized e-Paper software.
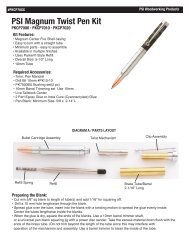
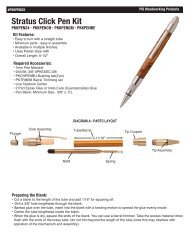
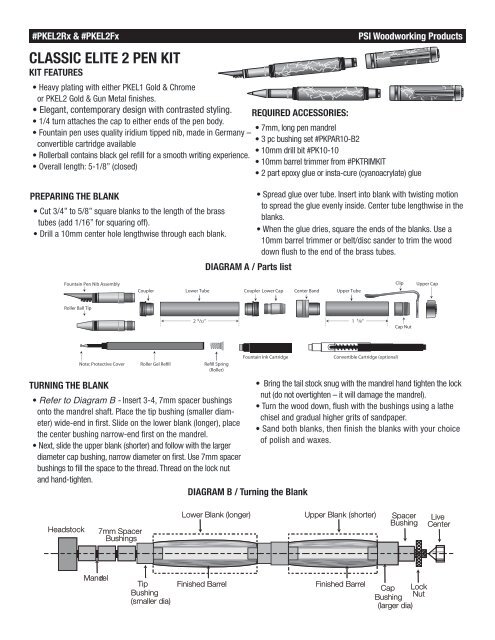
#PKEL2Rx & #PKEL2Fx<br />
CLASSIC ELITE 2 PEN KIT<br />
KIT FEATURES<br />
PSI Woodworking Products<br />
• Heavy plating with either PKEL1 Gold & Chrome<br />
or PKEL2 Gold & Gun Metal finishes.<br />
• Elegant, contemporary design with contrasted styling.<br />
r1 - gold & chrome<br />
REQUIRED ACCESSORIES:<br />
• 1/4 turn attaches the cap r2 - to gold either & Gun ends metal of the pen body.<br />
• Fountain pen uses quality f1 - iridium gold & chrome<br />
• 7mm, long pen<br />
tipped nib, made in Germany –<br />
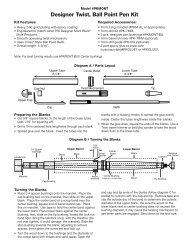
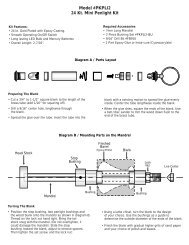
Diagram mandrel A: PARTS LAYOUT<br />
Fountain Pen Nib<br />
f2 - gold & Gun metal<br />
• Coupler 3 pc "O" bushing Ring set #PKPAR10-B2<br />
"O" Ring Coupler Lower Cap Center Band<br />
convertible cartridge available<br />
• 10mm drill bit #PK10-10<br />
• Rollerball contains black gel refill for a smooth writing Roller Ball experience.<br />
Tip<br />
• 10mm barrel trimmer from #PKTRIMKIT<br />
• Overall length: 5-1/8” (closed)<br />
2<br />
• 2 part epoxy glue 9 /32"<br />
or insta-cure (cyanoacrylate) glue<br />
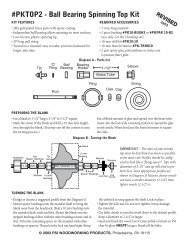
PREPARING THE BLANK<br />
r1 - gold & chrome<br />
r2 - gold & Gun metal<br />
f1 - gold & chrome<br />
f2 - gold & Gun metal<br />
Fountain Pen Nib<br />
Roller Ball Tip<br />
• Cut 3/4” to 5/8” square blanks to the length of the brass<br />
tubes (add 1/16” for squaring off).<br />
• Drill a 10mm center hole lengthwise through each blank.<br />
Fountain Pen Nib Assembly<br />
Roller Ball Tip<br />
Note: Protective Cover<br />
Roller Gel Refill<br />
Fountain Pen Nib<br />
Fountain Pen Nib<br />
Roller Ball Tip<br />
Headstock Refill Spring<br />
(Roller)<br />
Diagram A: PARTS LAYOUT<br />
Coupler "O" Ring Lower Tube "O" Ring Coupler Lower Cap Center Band Upper Tube<br />
• Spread Note: Protective glue Cover over Roller tube. Gel Refill Insert into Refill blank Springwith twisting motion<br />
to spread the glue evenly inside. Center tube lengthwise in the<br />
blanks. Fountain Ink Cartridge<br />
Convertible Cartridge (optional)<br />
• When the glue dries, square the ends of the blanks. Use a<br />
10mm barrel<br />
Diagram<br />
trimmer<br />
C:<br />
or<br />
ASSEMBLY<br />
belt/disc sander to trim the wood<br />
down flush to the end of the brass tubes.<br />
Note: Protective Cover<br />
Headstock 7mm Spacer<br />
Bushings<br />
Note: Protective Cover<br />
Roller Gel Refill<br />
Fountain Ink Cartridge Convertible Cartridge (optional)<br />
Diagram C: ASSEMBLY<br />
Coupler "O" Ring Lower Tube "O" Ring Coupler Lower Cap Center Band Upper Tube<br />
Fountain Ink Cartridge<br />
7mm Spacer<br />
Bushings<br />
Roller Gel Refill<br />
Refill Spring<br />
Fountain Ink Cartridge Convertible Cartridge (optional)<br />
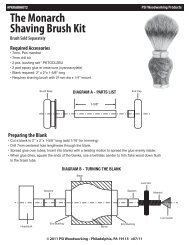
TURNING THE BLANK<br />
• Bring the tail stock snug with the mandrel hand tighten the lock<br />
nut (do not overtighten – it will damage the mandrel).<br />
• Refer to Diagram B - Insert 3-4, 7mm spacer bushings Mandrel<br />
Tip Finished Barrel<br />
Finished Barrel<br />
• Turn the wood down, flush with the bushings using a lathe Cap<br />
onto the mandrel shaft. Place the tip bushing (smaller diameter)<br />
wide-end in first. Slide on the lower blank (longer), place<br />
Bushing<br />
(smaller) chisel and gradual higher grits of sandpaper.<br />
• Sand both blanks, then finish the blanks with your choice<br />
the center bushing narrow-end first on the mandrel.<br />
Diagram F - Bushing Set #PKCWBU<br />
of polish and waxes.<br />
ø ø<br />
• Next, slide the upper blank (shorter) and follow with the larger<br />
.485” ø.345”<br />
ø.345” .586”<br />
diameter cap bushing, narrow diameter on first. Use 7mm spacer<br />
bushings to fill the space to the thread. Thread on the lock nut<br />
ø .248” Hole<br />
Through<br />
.750”<br />
.250”<br />
and hand-tighten.<br />
.250”<br />
.875”<br />
DIAGRAM B / Turning the Blank<br />
Mandrel<br />
Tip<br />
Bushing<br />
(smaller)<br />
2 9 /32"<br />
2 9 /32"<br />
Coupler Lower Tube<br />
Coupler Lower Cap Center Band<br />
2 9 /32"<br />
DIAGRAM A / Parts list<br />
Roller Ball Tip<br />
Note: Protective Cover<br />
Fountain Ink Cartridge<br />
Lower Tube Upper Tube<br />
Roller Gel Refill<br />
Lower Blank<br />
Finished Barrel<br />
Upper Tube<br />
Refill Spring<br />
1 5 /8"<br />
Cap Nut<br />
Convertible Cartridge (optional)<br />
Convertible Cartridge (optional)<br />
Clip<br />
1 13 /16"<br />
Coupler "O" Ring Lower Tube "O" Ring Coupler Lower Cap Center Band Upper Tube<br />
2 9 /32"<br />
Lower Blank<br />
Refill Spring<br />
Diagram F - Bushing Set #PKCWBU<br />
ø .485” ø.345”<br />
ø.345”<br />
.750”<br />
.250” .250”<br />
.875”<br />
1 13 /16"<br />
1 13 /16"<br />
Upper Cap<br />
1 13 /16"<br />
Clip<br />
Finished Barrel<br />
Cap Nut<br />
Clip<br />
Upper Cap<br />
Cap Nut<br />
Cap<br />
Bushing<br />
(larger)<br />
Upper Cap<br />
Upper Blank Spacer<br />
Bushing<br />
Upper Blank<br />
ø .586”<br />
ø .248” Hole<br />
Through<br />
Clip<br />
Clip<br />
Bushing<br />
(larger)<br />
Cap Nut<br />
Cap Nut<br />
Spacer<br />
Bushing<br />
Lock<br />
Nut<br />
Upper Ca<br />
Upper Ca<br />
Li<br />
Ce<br />
Live<br />
Cent<br />
Lock<br />
Nut<br />
Headstock<br />
7mm Spacer<br />
Bushings<br />
Lower Blank (longer)<br />
Upper Blank (shorter)<br />
Spacer<br />
Bushing<br />
Live<br />
Center<br />
Mandrel<br />
Tip<br />
Bushing<br />
(smaller dia)<br />
Finished Barrel<br />
Finished Barrel<br />
Cap Lock<br />
Bushing<br />
Nut<br />
(larger dia)
#PKEL2Rx & #PKEL2Fx<br />
PSI Woodworking Products<br />
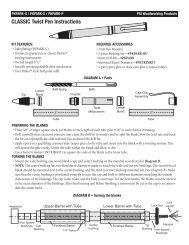
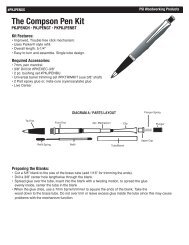
DIAGRAM C / Pen assembly<br />
Fountain Pen Nib Assembly<br />
Lower Barrel<br />
Coupler Coupler Lower Cap Center Band<br />
Upper Barrel<br />
Clip<br />
Upper Cap<br />
Roller Ball Tip<br />
2 9 /32"<br />
1 5 /8"<br />
Cap Nut<br />
Note: Protective Cover<br />
Roller Gel Refill<br />
Refill Spring<br />
(Roller)<br />
Fountain Ink Cartridge<br />
Convertible Cartridge (optional)<br />
ASSEMBLY TIPS<br />
• Line up finished parts according to Diagram C.<br />
• To press parts in, use a pen vise or a vice with covered<br />
jaws.<br />
• Press parts slowly to avoid scratching and damaging the<br />
gold plated parts.<br />
ASSEMBLY OF BODY BARREL:<br />
• Press a coupler into each end of the Lower barrel.<br />
• Screw in the lower cap into either end of the barrel.<br />
• Choose appropriate pen style for final assembly;<br />
ASSEMBLY OF CAP BARREL:<br />
• Press the center band, narrow diameter in first into the<br />
opening at either end of the barrel.<br />
• Insert and press the cap nut, recessed end in first into<br />
the opposite end of the barrel. Stop at the shoulder.<br />
• Place the clip over the threads , mount and screw in the<br />
upper cap, while aligning the clip rim into the slot in the<br />
cap. Tighten cap.<br />
g<br />
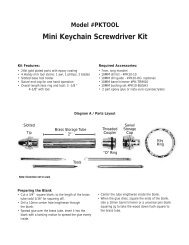
DIAGRAM F • #PKPAR10-B2<br />
( ) g<br />
ø .495”<br />
ø .443” ø .443” ø .359”<br />
ø.359”<br />
ø .492”<br />
ø .248” Hole<br />
Through<br />
FOUNTAIN PEN ASSEMBLY:<br />
• Push the ink cartridge (narrow end first) into the open<br />
end of the nib assembly to the end to cut an opening and<br />
allow the ink to flow. Screw this assembly into the barrel.<br />
Tip: Stroke the pen nib from the small hole to the<br />
tip with a damp paper to help start the ink flow.<br />
• OR – when using the refillable convertable cartridge,<br />
push the clear end of the cartridge into the opening of<br />
the nib assembly until it clicks. Screw the inner shaft<br />
counter clockwise all the way down inside the cartridge.<br />
Now, dip the nib into an ink bottle and slowly turn the<br />
shaft upwards (clockwise) to draw ink in, until the<br />
reservoir is filled. Screw the nib assembly back into the<br />
barrel.<br />
ROLLERBALL PEN ASSEMBLY:<br />
• Drop the refill spring into the opening of the lower barrel<br />
wide end first. Remove the protective cover of the refill.<br />
Insert into the barrel rear end first.<br />
• Screw the roller ball tip over the refill. Rollerball is<br />
ready to operate.<br />
OPERATING THE PEN:<br />
• A quick 1/4 turn will screw the ends together.When<br />
using the pen, screw the cap over the body end. Always<br />
keep the nib covered when not in use to avoid ink from<br />
drying up.<br />
Tip End<br />
Cap End<br />
© 2010 PSI Woodworking Philadelphia PA 19115 - v12/10