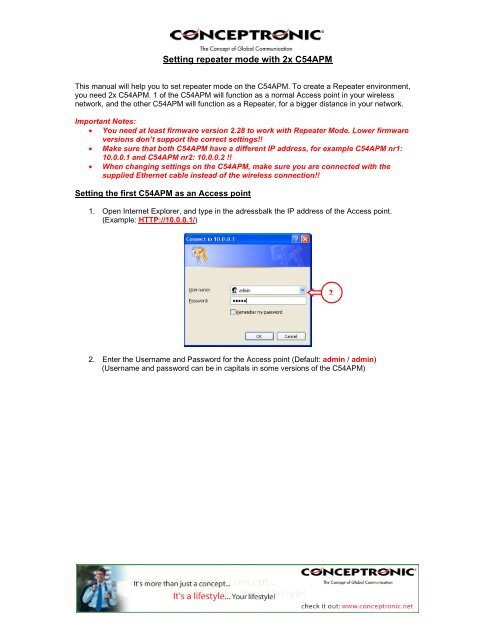
Setting the first C54APM as an Access point - Conceptronic
Setting the first C54APM as an Access point - Conceptronic
Setting the first C54APM as an Access point - Conceptronic

Create successful ePaper yourself
Turn your PDF publications into a flip-book with our unique Google optimized e-Paper software.
<strong>Setting</strong> repeater mode with 2x <strong>C54APM</strong><br />
This m<strong>an</strong>ual will help you to set repeater mode on <strong>the</strong> <strong>C54APM</strong>. To create a Repeater environment,<br />
you need 2x <strong>C54APM</strong>. 1 of <strong>the</strong> <strong>C54APM</strong> will function <strong>as</strong> a normal <strong>Access</strong> <strong>point</strong> in your wireless<br />
network, <strong>an</strong>d <strong>the</strong> o<strong>the</strong>r <strong>C54APM</strong> will function <strong>as</strong> a Repeater, for a bigger dist<strong>an</strong>ce in your network.<br />
Import<strong>an</strong>t Notes:<br />
• You need at le<strong>as</strong>t firmware version 2.28 to work with Repeater Mode. Lower firmware<br />
versions don’t support <strong>the</strong> correct settings!!<br />
• Make sure that both <strong>C54APM</strong> have a different IP address, for example <strong>C54APM</strong> nr1:<br />
10.0.0.1 <strong>an</strong>d <strong>C54APM</strong> nr2: 10.0.0.2 !!<br />
• When ch<strong>an</strong>ging settings on <strong>the</strong> <strong>C54APM</strong>, make sure you are connected with <strong>the</strong><br />
supplied E<strong>the</strong>rnet cable instead of <strong>the</strong> wireless connection!!<br />
<strong>Setting</strong> <strong>the</strong> <strong>first</strong> <strong>C54APM</strong> <strong>as</strong> <strong>an</strong> <strong>Access</strong> <strong>point</strong><br />
1. Open Internet Explorer, <strong>an</strong>d type in <strong>the</strong> adressbalk <strong>the</strong> IP address of <strong>the</strong> <strong>Access</strong> <strong>point</strong>.<br />
(Example: HTTP://10.0.0.1/)<br />
2. Enter <strong>the</strong> Username <strong>an</strong>d P<strong>as</strong>sword for <strong>the</strong> <strong>Access</strong> <strong>point</strong> (Default: admin / admin)<br />
(Username <strong>an</strong>d p<strong>as</strong>sword c<strong>an</strong> be in capitals in some versions of <strong>the</strong> <strong>C54APM</strong>)<br />
2
3. Select “Setup” at <strong>the</strong> <strong>Access</strong> <strong>point</strong> section.<br />
If you w<strong>an</strong>t to use security on your wireless network, follow steps 4-8.<br />
If you don’t w<strong>an</strong>t to use security, you c<strong>an</strong> skip this section <strong>an</strong>d continue at step 9.<br />
4<br />
4. Select <strong>the</strong> option “WEP”, <strong>an</strong>d click on “Setup”. (WPA is not supported in Repeater Mode)<br />
3<br />
4
5<br />
6<br />
5. Set <strong>the</strong> Au<strong>the</strong>ntication Type to “Open”, <strong>the</strong> WEP Length to “WEP-128” <strong>an</strong>d <strong>the</strong> Mode to<br />
“HEX”.<br />
6. Set <strong>the</strong> Default TX Key to “Key 1” <strong>an</strong>d enter <strong>an</strong> encryption key in <strong>the</strong> field “Key 1”.<br />
This key must be 26 characters <strong>an</strong>d c<strong>an</strong> contain <strong>the</strong> numbers 0 to 9 <strong>an</strong>d <strong>the</strong> letters A to F.<br />
Remember this key! You will need it to configure <strong>the</strong> Repeater <strong>an</strong>d <strong>the</strong> wireless card for<br />
connection!<br />
7. Press “Apply”.<br />
The access <strong>point</strong> will display <strong>the</strong> following message:<br />
7<br />
8<br />
8. Press “OK” to save <strong>the</strong> WEP security settings. The <strong>Access</strong> <strong>point</strong> will countdown for enabling<br />
<strong>the</strong> settings <strong>an</strong>d after <strong>the</strong> countdown, it will return at <strong>the</strong> main configuration screen for <strong>Access</strong><br />
<strong>point</strong> mode.<br />
5
13<br />
9. Press “Setup” at <strong>the</strong> Adv<strong>an</strong>ced <strong>Setting</strong>s option.<br />
10<br />
11<br />
9<br />
10. Set Connect Repeater to “Enable” <strong>an</strong>d enter <strong>the</strong> MAC address of <strong>the</strong> second <strong>C54APM</strong> in <strong>the</strong><br />
<strong>first</strong> field of “Repeater MAC Address”. If you use 2 <strong>Access</strong> <strong>point</strong>s for repeating, you c<strong>an</strong> enter<br />
<strong>the</strong> MAC Address of <strong>the</strong> third <strong>Access</strong> <strong>point</strong> in <strong>the</strong> second field of “Repeater MAC Address”.<br />
11. Press “Apply”. The <strong>Access</strong> <strong>point</strong> will do a short configuration reboot, <strong>an</strong>d return to <strong>the</strong> main<br />
configuration screen for <strong>Access</strong> <strong>point</strong> mode.<br />
12. Set <strong>the</strong> SSID to “ACCESSPOINT” or <strong>an</strong>y o<strong>the</strong>r name you w<strong>an</strong>t to use for <strong>the</strong> <strong>C54APM</strong>.<br />
13. Press “Apply”. The <strong>Access</strong> <strong>point</strong> will reboot again, <strong>an</strong>d activate all ch<strong>an</strong>ges.<br />
Now <strong>the</strong> <strong>Access</strong> <strong>point</strong> is configured, you need to configure <strong>the</strong> o<strong>the</strong>r <strong>C54APM</strong> <strong>as</strong> a Repeater.<br />
12
<strong>Setting</strong> <strong>the</strong> second <strong>C54APM</strong> <strong>as</strong> a Repeater<br />
14. Open Internet Explorer, <strong>an</strong>d type in <strong>the</strong> adressbalk <strong>the</strong> IP address of <strong>the</strong> Repeater.<br />
(Example: HTTP://10.0.0.2/)<br />
15. Enter <strong>the</strong> Username <strong>an</strong>d P<strong>as</strong>sword for <strong>the</strong> Repeater (Default: admin / admin)<br />
(Username <strong>an</strong>d p<strong>as</strong>sword c<strong>an</strong> be in capitals in some versions of <strong>the</strong> <strong>C54APM</strong>)<br />
16. Select “Setup” at <strong>the</strong> Repeater section.<br />
If you w<strong>an</strong>t to use security on your wireless network, follow steps 17-21.<br />
If you don’t w<strong>an</strong>t to use security, you c<strong>an</strong> skip this section <strong>an</strong>d continue at step 22.<br />
16<br />
15
17. Select <strong>the</strong> option “WEP”, <strong>an</strong>d click on “Setup”. (WPA is not supported in Repeater Mode)<br />
18<br />
19<br />
20<br />
17<br />
18. Set <strong>the</strong> Au<strong>the</strong>ntication Type to “Open”, <strong>the</strong> WEP Length to “WEP-128” <strong>an</strong>d <strong>the</strong> Mode to<br />
“HEX”.<br />
Set <strong>the</strong> Default TX Key to “Key 1” <strong>an</strong>d enter <strong>the</strong> same encryption key in field “Key 1” <strong>as</strong> you<br />
entered in <strong>the</strong> <strong>first</strong> <strong>C54APM</strong>.<br />
19. Press “Apply”.<br />
17<br />
18
The Repeater will display <strong>the</strong> following message:<br />
20. Press “OK” to save <strong>the</strong> WEP security settings. The Repeater will countdown for enabling <strong>the</strong><br />
settings <strong>an</strong>d after <strong>the</strong> countdown, it will return at <strong>the</strong> main configuration screen for Repeater<br />
mode.<br />
24<br />
21<br />
22<br />
21. Set <strong>the</strong> ch<strong>an</strong>nel on <strong>the</strong> same ch<strong>an</strong>nel <strong>as</strong> <strong>the</strong> <strong>first</strong> <strong>C54APM</strong>, <strong>an</strong>d enter <strong>the</strong> MAC Address of <strong>the</strong><br />
<strong>first</strong> <strong>C54APM</strong> in <strong>the</strong> “Parent MAC Address” section.<br />
(If you w<strong>an</strong>t to repeat <strong>the</strong> signal 1 more time after this Repeater, activate <strong>the</strong> “Enable<br />
Linked Repeater” <strong>an</strong>d enter <strong>the</strong> MAC Address for <strong>the</strong> second Repeater in this field)<br />
22. Set <strong>the</strong> SSID to “REPEATER”, or <strong>an</strong>y o<strong>the</strong>r name you w<strong>an</strong>t to use for <strong>the</strong> Repeater.<br />
23. Press “Apply”. The Repeater will reboot again <strong>an</strong>d activate all ch<strong>an</strong>ges.<br />
Import<strong>an</strong>t Note:<br />
• Before connecting to <strong>the</strong> configured Repeater, make sure that <strong>the</strong> Repeater is not<br />
connected to a wired network!! This will cause <strong>the</strong> wireless connection to connect <strong>an</strong>d<br />
break-up continuously.<br />
23
Connecting your wireless computer to <strong>the</strong> Repeater<br />
The following steps will show how to connect to <strong>the</strong> repeater, using a <strong>Conceptronic</strong> wireless adapter.<br />
24. Connect your Wireless device to <strong>the</strong> computer.<br />
25. Double-click on <strong>the</strong> <strong>Conceptronic</strong> Utility in <strong>the</strong> t<strong>as</strong>kbar. The <strong>Conceptronic</strong> Utility will come up.<br />
You will see both <strong>C54APM</strong> in <strong>the</strong> utility if <strong>the</strong>y are both in r<strong>an</strong>ge, o<strong>the</strong>rwise, only <strong>the</strong> Repeater<br />
will show up.<br />
28<br />
27<br />
26. Remove <strong>an</strong>y existing Preferred WLAN’s in <strong>the</strong> configuration p<strong>an</strong>el. If <strong>the</strong>re are no Preferred<br />
WLAN’s, you c<strong>an</strong> continue to step 28.<br />
27. Select <strong>the</strong> SSID for <strong>the</strong> Repeater <strong>an</strong>d press “Add”.<br />
26<br />
28<br />
27
30<br />
28. If you are using Security, set <strong>the</strong> Au<strong>the</strong>ntication Mode to “Open System”, <strong>the</strong> Data Encryption<br />
to “WEP” <strong>an</strong>d <strong>the</strong> Key length to “128 Bits (104+24) – 26 Hexadecimal”.<br />
29. Enter <strong>the</strong> key from step 7 in <strong>the</strong> field of Key 1 <strong>an</strong>d press “OK”.<br />
If you don’t use security on <strong>the</strong> wireless network, set <strong>the</strong> Au<strong>the</strong>ntication Mode to “Open System”,<br />
<strong>the</strong> Data Encryption to “Disabled” <strong>an</strong>d press “OK”.<br />
The wireless computer will now connect to <strong>the</strong> Repeater, which is in contact with <strong>the</strong> <strong>Access</strong> <strong>point</strong> <strong>an</strong>d<br />
<strong>the</strong> network behind it.<br />
Copyright © 2005 2L International BV. All rights reserved. Written by D<strong>an</strong>iël L<strong>as</strong>sche.<br />
29<br />
30