USER'S MANUAL - Conceptronic
USER'S MANUAL - Conceptronic
USER'S MANUAL - Conceptronic

You also want an ePaper? Increase the reach of your titles
YUMPU automatically turns print PDFs into web optimized ePapers that Google loves.
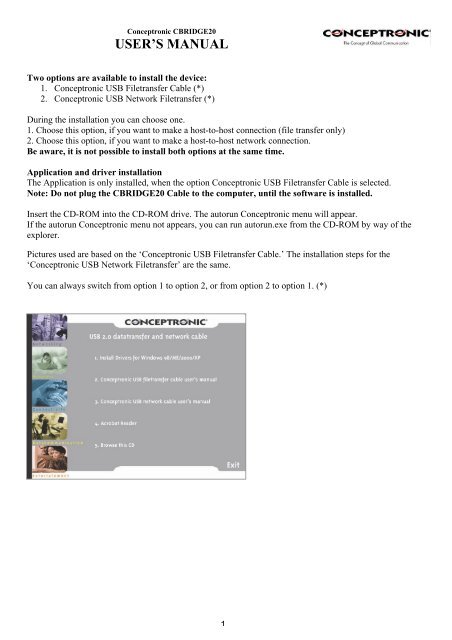
<strong>Conceptronic</strong> CBRIDGE20<br />
USER’S <strong>MANUAL</strong><br />
Two options are available to install the device:<br />
1. <strong>Conceptronic</strong> USB Filetransfer Cable (*)<br />
2. <strong>Conceptronic</strong> USB Network Filetransfer (*)<br />
During the installation you can choose one.<br />
1. Choose this option, if you want to make a host-to-host connection (file transfer only)<br />
2. Choose this option, if you want to make a host-to-host network connection.<br />
Be aware, it is not possible to install both options at the same time.<br />
Application and driver installation<br />
The Application is only installed, when the option <strong>Conceptronic</strong> USB Filetransfer Cable is selected.<br />
Note: Do not plug the CBRIDGE20 Cable to the computer, until the software is installed.<br />
Insert the CD-ROM into the CD-ROM drive. The autorun <strong>Conceptronic</strong> menu will appear.<br />
If the autorun <strong>Conceptronic</strong> menu not appears, you can run autorun.exe from the CD-ROM by way of the<br />
explorer.<br />
Pictures used are based on the ‘<strong>Conceptronic</strong> USB Filetransfer Cable.’ The installation steps for the<br />
‘<strong>Conceptronic</strong> USB Network Filetransfer’ are the same.<br />
You can always switch from option 1 to option 2, or from option 2 to option 1. (*)<br />
1
2<br />
Choose between the two options<br />
The selected option must be the same at<br />
both computers. Where the <strong>Conceptronic</strong><br />
CBRIDGE20 will be installed at.<br />
If this message does appear then the <strong>Conceptronic</strong><br />
CBRIDGE20 Cable is already connected. Please unplug the<br />
<strong>Conceptronic</strong> CBRIDGE20 Cable. Click ‘OK’ and restart the<br />
installation.
3<br />
Keep the<br />
default location.<br />
! Remove the CD-ROM from the CD-<br />
ROM Drive
Insert the <strong>Conceptronic</strong> CBRIDGE20 Cable into a free USB port.<br />
4
Switching from installation type:<br />
Please re-run the installation.<br />
Note: If the <strong>Conceptronic</strong> CBRIDGE20 is already connected, please unplug it and run the autorun.exe file<br />
from the CD-ROM.<br />
6
7<br />
Keep the default location.
8<br />
! Remove<br />
the CD-ROM from the CD-ROM Drive.
Insert the <strong>Conceptronic</strong> CBRIDGE20 Cable into a free USB port.<br />
9
USB2.0 Super-Link Software Utilities Manager usage<br />
Super-Link software application is like windows file manager. Users can use<br />
same function key<br />
to cut/copy/paste/delete target files and folders just like using windows file manager.<br />
Disk utility edit service<br />
- Cut (Ctrl+X)<br />
- Copy (Ctrl+C)<br />
- Paste (Ctrl+V)<br />
- Delete (Ctrl+D)<br />
- New Folder (Ctrl+N)<br />
- Select All (Ctrl+A)<br />
- Mouse’s drag and drop (To move an item on the screen by selecting the item and then<br />
pressing and holding down the mouse button while moving the mouse).<br />
User interface introduction<br />
A. Connect and open remoter.<br />
Only “Local computer” will be shown up if doesn’t connect to remote computer, and application<br />
will keep auto-monitor whether<br />
the remoter is connected.<br />
11
Remote Computer will be show up automatic while both-side computers are<br />
connected.<br />
12<br />
User can also use function<br />
selection “Open<br />
remote( F12) ”to open the<br />
remote.<br />
B. Copy/delete/cut/paste function key<br />
User can use function key or mouse’s drag and drop to copy/delete/cut/paste target files or<br />
folders, actually, it’s just like<br />
windows file manager.
Example-1: Copy file.<br />
Example-2: User can also create a target folder both in remoter/local computers. Select “New<br />
Folder” item to build up a folder which user want to manage his files.<br />
Fill in the target folder’s name, and the target folder is built.<br />
13
C. Check the interface version of USB2.0 Super Link Cable.<br />
Click the “Help” selection or “Question mark” item, and the version<br />
information will be shown<br />
up.<br />
14
Virtual-Network software application setting<br />
Peer-to-Peer File-Sharing with Virtual-Network connection. For Windows 98SE/ME/2K/XP, both sides<br />
setting are the same. Steps by Steps to enable Internet Connection sharing on a network connection:<br />
A. Manual IP addresses setting.<br />
Step 1: Open Network Connections (Click Start -><br />
Control Panel -> Network and DIAL up Connections.<br />
Click Local Area Network Connections.)<br />
Click ‘Properties’.<br />
Step 2: Select ‘Internet Protocol (TCP/IP)’, click<br />
‘Properties’.<br />
15
16<br />
Step 3: Fill in<br />
default IP address value: ’169.254.x.x’, click<br />
‘OK’.<br />
Step 4: Check the connection information to<br />
verify whether IP address setting is ok.
17<br />
Step 5: Or use<br />
windows<br />
command prompt: ‘IPCONFIG’ to check the<br />
connection status.<br />
Step 6: Another connection of Virtual-Network<br />
setting in another computer is the same. User<br />
can use ‘My Network Places’ and ‘Search for<br />
computer’ to find the other connected<br />
computer.
18<br />
Step 7: Fill in<br />
the computer<br />
name, to search the other computer in the<br />
network.<br />
B. Auto-detected IP address setting<br />
Two computers share in internet resource with <strong>Conceptronic</strong> USB Network Filetransfer Virtual-<br />
Network connection.<br />
For Win98SE/ ME/ 2000/ XP.<br />
Wait for Windows while it is assigning an IP address about 2~3 minutes while connected. And the<br />
following steps are same as manual IP address setting.<br />
Setup A: computer which is external internet<br />
connection.(LAN or Modem)<br />
Step 1: Enable the local connection(internet<br />
connection), click ‘Properties’ to setup internet<br />
sharing.
19<br />
Step 2: select<br />
“Sharing” and<br />
click “Enable Internet Connection Sharing<br />
for this connection “and click “OK”<br />
Step 3: Windows will force to assign a<br />
default IP addres: 192.168.0.1 to confirm<br />
sharing, click ‘Yes’.
20<br />
USB2.0 Super<br />
link Cable<br />
Virtual-Network local connection will be<br />
forced to set IP address.<br />
Setup B: Computer which is only having a<br />
local connection with A-computer.<br />
Step1: Enable the local connection<br />
<strong>Conceptronic</strong> USB Network Filetransfer<br />
properties to setup the suitable IP address/<br />
Subenet mask and gateway.<br />
IP address: 192.168.0.x<br />
Subnet mask: 255.255.255.0<br />
Default gateway: 192.168.0.1
outes are configured automatically.<br />
21<br />
Step2: Do<br />
not forget to set the correct Internet<br />
connection settings, which should be same<br />
as A-computer.<br />
Step3: B-computer is available to share<br />
the internet resource from A-computer.<br />
Note: General Internet setting for Peerto-peer<br />
internet connection sharing<br />
a) User must be logged on as an<br />
administrator or a member of the<br />
Administrators group in order to<br />
complete this procedure.<br />
b) Under Internet Connection Sharing,<br />
in Home networking connection,<br />
select any adapter that connects the<br />
computer sharing its Internet<br />
connection to the other computers on<br />
user’s network.<br />
c) When user runs the Network Setup<br />
Wizard and enables Internet<br />
Connection Sharing, certain<br />
protocols, services, interfaces, and
The following describes these configured items.<br />
If Internet Connection Sharing is enabled on a LAN connection, TCP/IP and a default gateway must be<br />
configured for that LAN connection. The IP address for this interface can be static or dynamic (when using.<br />
DHCP.)<br />
For example:<br />
d) To enable Internet Connection Sharing (ICS) Discovery and Control on Windows 98, Windows 98 SE,<br />
and Windows Millennium Edition computers, run the Network Setup Wizard from the CD or floppy disk<br />
on these computers.<br />
e) For ICS Discovery and Control to work on Windows 98, Windows 98 Second Edition, and Windows<br />
Millennium Edition computers, Internet Explorer version 5.0 or later must be installed.<br />
f) Internet Connection Sharing is not available on Windows XP 64-Bit Edition.<br />
22
Three or more computers share in internet resource with <strong>Conceptronic</strong><br />
USB Network Filetransfer. Bridge-computers are for Windows XP only,<br />
other local computers are for Windows98SE/ ME/ 2000 and XP.<br />
Setup Bridge-computer which is connected 2 or more local connections of USB2.0 Super Link Cable Virtual-<br />
Network.<br />
For example:<br />
To stride across<br />
23<br />
1. User can find 2 or more USB Virtual-<br />
Network connections in the bridge<br />
computers.
24<br />
2. Open Network Connections (Click<br />
Start, click Control Panel, click<br />
Network and Internet Connections,<br />
and then click Network<br />
Connections). Under LAN or High-<br />
Speed Internet select each of the<br />
private network connections that<br />
you want to be part of the bridge.<br />
Right-click one of the highlighted<br />
private network connections, and<br />
then click Bridge Connections.<br />
3. IP address setting is same as Peerto-peer<br />
internet resource sharing.<br />
User have to manual fill into<br />
correctly value of bridge<br />
connection.<br />
IP address: 192.168.0.x<br />
Subnet mask: 255.255.255.x<br />
Default gateway: 192.168.0.1<br />
Setup first computer which is connected to internet service to share resource to bridge computers or other<br />
local computer.<br />
Actually, the setup method is same as peer-to-peer internet service sharing.<br />
Setup other local computers that wonder sharing the internet resource via bridge computers.<br />
The setup method is same as peer-to-peer internet service sharing.
Note: General setting for 3 or more local connections of computers for<br />
sharing Internet service.<br />
a) User must be logged on as an administrator or a member of the Administrators group in order to complete<br />
this procedure.<br />
b) User must select at least two eligible network connections in order for Bridge Connections to create a<br />
bridge.<br />
c) Only Ethernet, IEEE-1394 adapters, <strong>Conceptronic</strong> USB Network Filetransfer, or Ethernet compatible<br />
adapters such as Wireless and home phone-line adapters (HPNA), can be part of the network bridge.<br />
d) User cannot create a bridge connection on a computer running Windows 2000 or earlier versions of<br />
Windows.<br />
e) If you remove adapters from the network-bridge, and less than two adapters remain, Network Bridge will<br />
not perform its intended function, but it will continue to use system resources.<br />
f) Network bridges with <strong>Conceptronic</strong> USB Network Filetransfer connection support traffic using Internet<br />
Protocol version 4 (IPv4) only.<br />
g) Network Bridge is not available on Windows XP 64-Bit Edition.<br />
ANNEX-A: Allowing Internet Gaming on Your Network<br />
To run Internet games between computers through <strong>Conceptronic</strong> USB Network Filetransfer and computers<br />
on the Internet, you must ensure that the Internet game traffic is forwarded by the network that are between<br />
your <strong>Conceptronic</strong> USB Network Filetransfer and the Internet. If the network between your <strong>Conceptronic</strong><br />
USB Network Filetransfer and the Internet is a computer running Windows XP and Internet Connection<br />
Sharing, you must configure Internet Connection Sharing settings to pass the game traffic.<br />
If the network device is a firewall or security gateway, it must be configured to pass the game traffic between<br />
your <strong>Conceptronic</strong> USB Network Filetransfer and the Internet. In this case, contact your network<br />
administrator who will identify the specific type of traffic used by the Internet game and configure the firewall<br />
to forward the traffic.<br />
If this configuration is not done, Internet game clients on your network will be unable to connect to Internet<br />
game servers on the Internet and Internet game clients on the Internet is unable to connect to Internet game<br />
servers on your network.<br />
For example:<br />
25