Wax Primer
Wax Primer
Wax Primer

You also want an ePaper? Increase the reach of your titles
YUMPU automatically turns print PDFs into web optimized ePapers that Google loves.
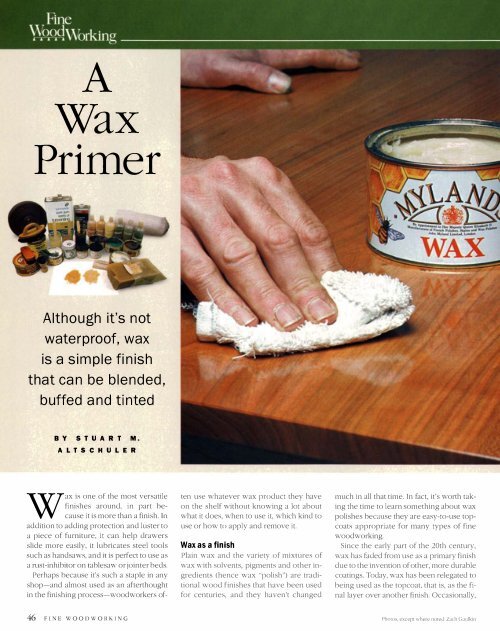
A<br />
<strong>Wax</strong><br />
<strong>Primer</strong><br />
Although it's not<br />
waterproof, wax<br />
is a simple finish<br />
that can be blended,<br />
buffed and ti nted<br />
B Y S T U A R T M.<br />
A L T S C H U L E R<br />
<strong>Wax</strong> is one of the most versatile<br />
finishes around, in part because<br />
it is more than a finish. In<br />
addition to adding protection and luster to<br />
a piece of furniture, it can help drawers<br />
slide more easily, it lubricates steel tools<br />
such as handsaws, and it is perfect to use as<br />
a rust-inhibitor on tablesaw or jointer beds.<br />
Perhaps because it's such a staple in any<br />
shop-and almost used as an afterthought<br />
46<br />
in the finishing process-woodworkers of-<br />
FIN E \XI 00 D \XI 0 R KIN G<br />
ten use whatever wax product they have<br />
on the shelf without knowing a lot about<br />
what it does, when to use it, which kind to<br />
use or how to apply and remove it.<br />
<strong>Wax</strong> as a finish<br />
Plain wax and the variety of mixtures of<br />
wax with solvents, pigments and other ingredients<br />
(hence wax ·'polish·') are traditional<br />
wood finishes that have been used<br />
for centuries, and they haven't changed<br />
much in all that time. In fact, it's worth taking<br />
the time to learn something about wax<br />
polishes because they are easy-to-use topcoats<br />
appropriate for many types of fine<br />
woodworking.<br />
Since the early part of the 20th century,<br />
wax has faded from use as a primary finish<br />
due to dle invention of odler, more durable<br />
coatings. Today, wax has been relegated to<br />
being used as dle topcoat, dlat is, as the final<br />
layer over another fi nish. Occasionally,<br />
Photos, except where noted: Zach Gaulkin
in a situation where little protection is<br />
needed, waxes (particularly specialty waxes)<br />
can be used alone, often yielding results<br />
that are quite pleasing.<br />
What does wax do<br />
All wooden surfaces deteriorate, and like<br />
other finishes, W
with a solvent and possibly some pigment.<br />
The solvent creates a workable viscosity<br />
that makes it easier to apply.<br />
The most traditional solvent is pure gum<br />
spirits of turpentine, but turpentine is getting<br />
hard to find these days because (like<br />
many other solvents) it is hazardous. If you<br />
wander into a large home center and ask at<br />
the paint department for turpentine, you<br />
will most likely be shown a turpentine substitute.<br />
Don't be fooled by names that are<br />
close-they won't work quite the same in a<br />
wax mixture. Read the label on the can to<br />
make sure you get the real thing.<br />
Another solvent in wax is toluene. If you<br />
are making your own wax polish (see the<br />
story at right), you can do so without<br />
toluene, which is a strong solvent that can<br />
eat into finishes such as varnish if they are<br />
For best results,<br />
make your own<br />
Many people resist making<br />
something from scratch that<br />
can be bought pre madeespecially<br />
when it comes to<br />
finishes-perhaps because<br />
they are in a hurry to see results.<br />
But when you use a<br />
premade product, you lose<br />
control. You don't always<br />
know what is in the can, so<br />
wax polish<br />
STANDARD BEESWAX POLISH<br />
This is an easy wax polish to make and is a<br />
fine finish on all types of wood for imparting<br />
a low luster.<br />
3 parts turpentine<br />
1 part beeswax, shaved into thin pieces<br />
1. Melt the wax in a double boiler (a bowl<br />
or jar floating in a pot with water) over an<br />
electric hot plate. Although it is not necessary,<br />
shaving the wax into small pieces<br />
makes the process go faster.<br />
2. Remove it from the heat. Add turpentine<br />
while stirring.<br />
how can you adjust the mixture<br />
for best results<br />
The answer is to make<br />
your own. Making your own<br />
wax polish is easy; simply<br />
follow any of these recipes.<br />
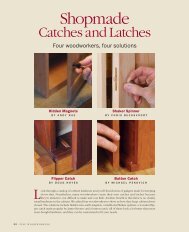
One of the oldest finishes around. A<br />
creamed beeswax polish, made by dissolving<br />
pure beeswax in turpentine (not mineral spirits),<br />
has been used on furniture for centuries.<br />
not fully cured. Toluene is used in the mixture<br />
for many wax polishes, including<br />
common brands such as Briwax. Toluene<br />
is a more powerful solvent than turpentine,<br />
and therefore a greater quantity of the<br />
harder waxes, such as carnauba and candelilla,<br />
can be incorporated into the polish<br />
while maintaining a workable viscosity.<br />
In most off-the-shelf brands of wax, the<br />
blend is usually a mixture of beeswax and<br />
the harder carnauba wax. It's hard to tell,<br />
however-most brands do not let you<br />
know what's in them. Briwax prints the ingredients<br />
on the label (it's beeswax and<br />
48<br />
carnauba wax dissolved in toluene) but<br />
FIN E WOOD W 0 R KIN G<br />
A few simple precautions:<br />
First, remember that the solvents<br />
are flammable. Never<br />
use an open flame of any<br />
type to heat the waxes. Second,<br />
remember that hot wax<br />
is just that-hot. Be careful<br />
not to get burned, particularly<br />
from wax that splatters<br />
when you pour from one container<br />
to another.<br />
Grate the wax so that it dissolves faster.<br />
The first step in making wax is to melt or dissolve<br />
it. This process goes faster if you shave<br />
the wax into small pieces.<br />
Use a shopmade double boiler to melt the<br />
wax. Most waxes will dissolve in turpentine,<br />
but it's faster to melt them (waxes used in polish<br />
melt between 145°F and 185°F). Place the<br />
wax in a heat-proof glass container, and put<br />
the container in a pot of hot water.<br />
Ph010, this page (top right} Michael Pekovich
CREAMED BEESWAX POLISH<br />
A suitable finish for most furniture and<br />
easy to apply, creamed beeswax should<br />
not be used on open-grained woods<br />
because it might leave an unsightly<br />
residue in the pores if not carefully<br />
applied and buffed.<br />
1 pint turpentine<br />
1 pint water<br />
5 oz. beeswax<br />
1 tablespoon ammonia<br />
1. Melt the wax, using the double·boiler<br />
method described previously.<br />
2. Remove it from the heat and add the<br />
turpentine while stirring.<br />
3. In a separate container, combine the<br />
ammonia with the water.<br />
4. Add the ammonia·water mixture to<br />
the wax-turpentine mixture while contino<br />
uing to stir.<br />
5. Transfer to a clean container while<br />
still warm.<br />
glossy sheen without being too hard to<br />
buff out.<br />
S parts beeswax<br />
3 parts carnauba wax<br />
9 parts turpentine<br />
1. Melt the waxes, using the doubleboiler<br />
method.<br />
2. Remove the wax from the heat and<br />
add the turpentine while stirring.<br />
3. Add pigment, if desired.<br />
4. Transfer to a clean container while<br />
still warm.<br />
HIGHEST-SHEEN WAX POLISH<br />
This recipe makes a hard wax that produces<br />
a glossy sheen. But because of its<br />
hardness, the wax is more difficult to ap·<br />
ply and buff.<br />
5 parts beeswax<br />
2 parts carnauba wax<br />
2 parts candelilla wax<br />
27 parts turpentine<br />
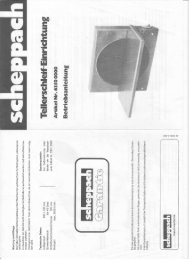
Add remaining ingredients to the melted<br />
wax. Before the wax cools and hardens,<br />
add the remaining ingredients, such as turpentine<br />
or pigment (top). Stir the mixture<br />
well, then pour it into a jar or a clean, pintsized<br />
paint can and allow it to cool (bottom).<br />
As an alternative, you can make this<br />
recipe without heating the ingredients.<br />
Simply combine the beeswax shavings<br />
and turpentine in a jar, stirring occasionally.<br />
The beeswax should dissolve into<br />
the turpentine overnight. If it does not,<br />
add more turpentine very slowly.<br />
The addition of solvents changes only<br />
the viscosity of the polish, not its characteristics<br />
as a polish. If your polish is<br />
too dry, add a few drops of solvent. If the<br />
consistency is too thin or runny, leave<br />
the cover to your container open so that<br />
some of the solvent evaporates. In other<br />
words, there is no such thing as bad or<br />
unusable wax.<br />
NO-SOLVENT WAX POLISH<br />
This blend can be used in situations<br />
where a finish could be damaged by a<br />
strong solvent.<br />
1 part beeswax<br />
1 part ammonium carbonate<br />
S parts water<br />
Note: Use a pot that is at least four<br />
times the size of all of the ingredients<br />
because the mixture will bubble and<br />
foam when the ammonium carbonate,<br />
available from Kremer Pigments (see<br />
Sources of Supply on p. 51), is added.<br />
1. Melt the wax in water, using the<br />
double-boiler method.<br />
2. While stirring, add the ammonium carbonate<br />
a small amount at a time. If the<br />
solution threatens to spill over, remove it<br />
from the heat, continuing to stir, until it<br />
subsides.<br />
3. Add pigment, if desired.<br />
4. Transfer to a clean container while<br />
still warm.<br />
GLOSSY WAX POLISH<br />
This mixture is suitable for everyday polishing.<br />
The recipe produces a nice,<br />
1. Melt the waxes, using the double·<br />
boiler method.<br />
2. Remove it from the heat and add the<br />
turpentine while stirring.<br />
3. Add pigment, if desired.<br />
4. Transfer to a clean container while<br />
still warm.<br />
Adding pigment to clear wax works, too.<br />
If you don't want to go to the trouble of<br />
making your own wax, you can add pigment<br />
to any liquid or paste wax. You can use dry<br />
artist's pigments or mica powders (shown<br />
above). The author mixes the wax on glass,<br />
which is easy to clean.<br />
J A " A<br />
R Y FEB R U A R Y 2000 49
Buff a surface like you're<br />
shining shoes-with a<br />
brush. To bring out the shine<br />
in a waxed surface, start with<br />
a quill brush (above right)<br />
and finish with softer hoghair<br />
brushes (above left). The<br />
more you brush the surface,<br />
the harder and shinier it gets.<br />
A random-orbit sander makes<br />
buffing fast and easy. Although<br />
the author seldom uses one, a<br />
random-orbit sander equipped<br />
with a soft buffing pad will make<br />
short work of large surfaces.<br />
Make sure the wax has fully cured<br />
before buffing for the highest<br />
sheen and hardest surface.<br />
does not divulge the mixing proportions.<br />
Briwax 2000 substitutes another (unspecified),<br />
less-hazardou solvent. Most of the<br />
creamed beeswaxes are beeswax dissolved<br />
in turpentine-the traditional formula<br />
for centuries.<br />
Turpentine and toluene can be u ed to<br />
remove wax (depending on the type of<br />
wax). Mineral spirits (paint thinner) also<br />
works, though not as well. If mineral spirits<br />
Pigmented wax works like a<br />
stain. Highly pigmented waxes<br />
such as these (manufactured by<br />
Liberon) can create interesting<br />
effects on open-pored woods<br />
such as oak and ash. The author<br />
is using a clear paste wax to remove<br />
excess pigmented wax.<br />
50 F<br />
[ NE W 0 00 W 0 R K [ N G<br />
doesn't work, try naphtha, which is<br />
stronger than mineral spirits.<br />
When to use wax<br />
It has often been said that there is no surface<br />
that wouldn't be helped by a coat of<br />
wax. But this couldn't be further from the<br />
truth. For instance, wax wouldn't be my<br />
first choice for anything that will see a lot<br />
of moisture, such as dining tables, coffee<br />
tables or (obviously) any outdoor fu rniture.<br />
till, some people like the look and<br />
aroma of wax, so if you absolutely must<br />
use wax in these ituations, I would recommend<br />
something that is microcrystalline,<br />
which ha the highest water<br />
resistance. Renaissance wax would be a<br />
good choice. It is expensive, but when applied<br />
in very thin coats, it offers the best<br />
protection from water.<br />
Also think about the use of a particular<br />
piece of furniture before waxing it to a<br />
high polish. Chairs and benches, for instance,<br />
are not good wax candidates because<br />
you don't want them to be too<br />
slippery. Also, a wax with low heat resistance<br />
might begin to melt and get stiCky<br />
from body heat.<br />
What finishes can you apply wax over<br />
Varnish, oil and shellac love a coat of wax<br />
on top. The solvents in wax polish won't<br />
dissolve a water-based finish, so they will<br />
sit happily (and beautifully) on top of most<br />
water-based coatings.
Remember, the wax itself is not going to<br />
be harmful to much of anything. It is the<br />
solvent, particularly toluene, that may<br />
cause problems. Be sure to let a finish fully<br />
cure before waxing it, and your best bet is<br />
to test the wax on a sample piece or in an<br />
area that won't be seen. And, of course,<br />
don't apply anything over the wax finish,<br />
except for more wax.<br />
How to apply wax<br />
<strong>Wax</strong> polish is easy to apply. Start with a<br />
clean, smooth, dust-free surface. If the surface<br />
has been previously waxed, it is not<br />
necessary, in ideal conditions, to remove<br />
the old wax. Over time, the wax polish will<br />
wear away so that you really aren't building<br />
up too much polish. You should only<br />
have to remove old wax that has yellowed<br />
or become brittle.<br />
On older furniture, if the surface is extremely<br />
dirty, you may want to use a commercial<br />
degreaser. Vulpex, a soap often<br />
used in conservation and restoration work<br />
and available from Conservator's Emporium<br />
(775-852-0404; www.consemp.com).<br />
can be diluted in water, denatured alcohol,<br />
mineral spirits and other solvents.<br />
<strong>Wax</strong> polish comes in liquids or thicker<br />
formulations known as paste wax. Keep in<br />
mind that the consistency of wax affects<br />
not how it looks but how easy it is to apply.<br />
If you have a can of old wax that looks<br />
dried out, try adding a little turpentine to<br />
thin it. If the wax seems too runny, let the<br />
solvent evaporate until it thickens.<br />
In its liquid form, wax polish can be applied<br />
evenly using a brush or a rag. Wipe<br />
off the excess when the surface feels dry to<br />
the touch. If you're using a paste wax, you<br />
can place a generous amount of the wax<br />
directly on the surface to be waxed, or you<br />
can make a wax pad or "rubber" by folding<br />
a chunk of wax inside a clean cotton cloth.<br />
After applying the wax, but before allowing<br />
it to dry, remove tl1e excess by rubbing<br />
witl1 a clean, dry cotton c1otl1.<br />
You also can use 0000 steel wool (or the<br />
synthetic variety) to apply wax, but this is<br />
usually reserved for rubbing out a hard<br />
<strong>Wax</strong> puts a specialty<br />
finish within anyone's<br />
reach. Pig-<br />
. mented or liming finishes<br />
work best on<br />
open-pored woods<br />
such as the white oak<br />
of this side table. Applied<br />
the same way as<br />
plain paste wax (inset),<br />
the white liming<br />
wax fills the pores of<br />
the oak, creating a<br />
pickled finish.<br />
coating such as varnish, because it gently<br />
abrades the surface, creating a matte finish.<br />
Two coats and a buffing out<br />
Like many other finishes, the wax polish<br />
surface is built up. You should be able to<br />
achieve a nice sheen in two coats. If you do<br />
not, the application is probably too heavy<br />
and the buffing too light. Shine occurs<br />
when the molecules of the wax polish are<br />
compressed and reflect more light.<br />
After applying the first coat and wiping<br />
off tl1e excess, let the surface sit for at least<br />
two hours while the solvents evaporate.<br />
The longer the evaporation time, the better;<br />
a day or two is not too long. Apply a<br />
second coat and let it dry for the same<br />
amount of time.<br />
Buffing can be done using a soft cotton<br />
cloth for low sheen. For higher sheen, you<br />
will need more pressure. A number of different<br />
brushes will yield a higher sheen.<br />
For open-pored woods such as oak, start<br />
with a quill brush to compress the polish.<br />
Then switch to a hog-hair polish brush<br />
similar to the kind used for polishing<br />
shoes. For large projects, it may be practical<br />
to use a random-orbit sander fitted witl1<br />
a buffing pad.<br />
Specialty waxes<br />
Finally, a word on some specialty waxes<br />
that are available. Liming wax allows you<br />
to achieve a pickled, limed or French<br />
country look in just minutes with tl1e application<br />
of two coats of wax polish. Patinating<br />
wax comes in a number of colors<br />
(black, green, terra-cotta and blue) and can<br />
create a startlingly beautiful effect. Both of<br />
these waxes work best on open-pored<br />
woods such as oak or ash, and wire-brushing<br />
the surface of the wood to deepen the<br />
grain can enhance tl1e effect.<br />
When it comes to pigmented waxes, being<br />
able to mix your own and adjust the ingredients<br />
is important. True, manufactured<br />
wax polish comes in many colors, but it's<br />
often easier to make the color yourself.<br />
You can do this by making wax polish<br />
from scratch or by adding pigments to<br />
clear polishes (or sometimes even to those<br />
already pigmented).<br />
Natural earth pigments (see Sources of<br />
Supply below) work best, but you can use<br />
any dry pigment. Special effects are easy to<br />
achieve by adding pigments or mica powders<br />
to the polish. Micas are nontarnishing,<br />
nontoxic metallic pigments that will not react<br />
with the solvents in the polish.<br />
One important piece of advice: Keep<br />
track of the exact ingredients of anything<br />
that you make or modify. You never know<br />
when you'll have to duplicate a recipe. D<br />
Stuart M. Altschuler is a woodworker, certified<br />
picture framer, gilder and teacher. His studio<br />
and school, Prestige Framing Academy, is in<br />
Danvers, Mass.<br />
Some waxes are available<br />
through woodworking catalogs.<br />
,.cp·.<br />
The sources at right have a<br />
wide selection of pure<br />
waxes, pigments and other<br />
unusual items mentioned<br />
in this article.<br />
LIBERONjSTAR<br />
SOURCES OF SUPPLY<br />
WOOD FINISH SUPPLY<br />
P.O. Box 86<br />
Mendocino, CA 95460<br />
(800) 245-5611<br />
www.woodfinishsupply.com<br />
KREMER PIGMENTS, INC.<br />
228 Elizabeth St.<br />
New York, NY 10012<br />
(212) 219-2394<br />
www.kremer-pigmente.de<br />
BAGGOT LEAF CO.<br />
430 Broome St.<br />
New York, NY 10013<br />
(212) 431-4653<br />
www.goldleaf.net<br />
SEPP LEAF PRODUCTS<br />
381 Park Ave. S.<br />
Suite 301<br />
New York, NY 10016<br />
(212) 683-2840<br />
www.seppleaf.com<br />
JA 'UARY/FEBRUARY 2000 51
All About<br />
<strong>Wax</strong><br />
Use it to perfect a finish<br />
or create special effects<br />
B Y P E T E R G E D R Y S<br />
There is a quality to a wax topcoat that can’t be matched by<br />
more durable, modern finishes. The soft sheen and tactile<br />
quality of a waxed surface just begs to be touched. Not<br />
only does a waxed surface look good and feel good, but it also<br />
helps protect the finish underneath.<br />
Besides being a final coat on finished wood, wax has a number<br />
of other uses. It can serve as a minimal finish to maintain a wood’s<br />
natural beauty, or it can give a just-made piece an antique<br />
look. Colored waxes can create special effects. Best of<br />
all, the tools are simple and the techniques are easy.<br />
Whatever your furniture-making ability, your projects<br />
will look and feel better after a proper waxing.<br />
<strong>Wax</strong> polish finishes a finish<br />
The most common use for wax is to<br />
apply it as the final layer of finish.<br />
It can go on top of any type of<br />
finish, from an in-the-wood couple<br />
of coats of oil to high-gloss,<br />
CHOOSE ONE<br />
MADE FOR FURNITURE<br />
In general, if the first use mentioned on the can is polishing wood floors, don’t<br />
use the wax on furniture. It is likely to contain a high percentage of carnauba<br />
wax and is designed to be buffed with a mechanical floor buffer. You’ll have a<br />
hard time buffing it by hand. Butcher’s Bowling Alley <strong>Wax</strong> and Minwax finishing<br />
wax fall into this category. However, these hard paste waxes can be used as<br />
a clear base for custom-coloring. In general, waxes designed for furniture are<br />
easier to use. They usually are softer in consistency (what I call a semi-paste<br />
wax) due to their higher percentage of solvent, which makes them easier to apply.<br />
I’ve had good results with Antiquax; Fiddes dries fast and has a low odor; Liberon’s<br />
Black Bison goes on very smoothly but has a strong odor; Goddard’s has a pleasant<br />
lemon verbena scent.<br />
54 F I N E W O O D W O R K I N G Photos, except where noted: Mark Schofield; this page: Michael Pekovich (top); John Tetreault (bottom) and facing page, top left and right
Step one is understanding the ingredients<br />
CLEAR-WAX<br />
BASICS<br />
Although brands of wax vary greatly<br />
in price, they all draw from the<br />
same limited number of raw waxes<br />
and solvents.<br />
The best-known wax is beeswax.<br />
After the comb has been<br />
honeyplaced<br />
in the sun<br />
and bleached. Medium-soft, beeswax<br />
melted and<br />
refined, it can<br />
be left dark or<br />
produces a medium-gloss finish.<br />
The cheapest component is paraffin<br />
wax, derived from refining crude oil.<br />
Relatively soft and colorless, it serves as<br />
the base for many wax blends. Also obtained<br />
from petroleum is microcrystalline<br />
wax, a highly refined and expensive wax<br />
that has excellent resistance to water.<br />
It is favored by museums because of its<br />
neutral pH.<br />
To offset paraffin wax’s softness, manufacturers<br />
add harder waxes: Carnauba,<br />
obtained from scraping the leaves of a<br />
Brazilian palm tree, produces a very high<br />
shine but is also very hard to buff out<br />
when used alone; candelilla, obtained<br />
from the<br />
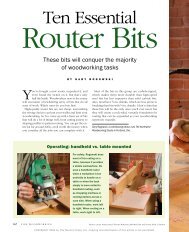
Raw waxes. Shown from left are beeswax,<br />
paraffin, and carnauba flakes.<br />
leaves of a Mexican plant, is much like<br />
carnauba, but somewhat softer.<br />
The speed at which a solvent evaporates<br />
will determine how long you have<br />
to wait before you can buff the wax.<br />
Traditionally, turpentine was used to dissolve<br />
beeswax, but its relative expense<br />
means this medium-paced solvent is<br />
rarely used in commercial waxes.<br />
Mineral spirits is the most common<br />
solvent and can be formulated for slow<br />
or medium-paced evaporation. Fasterevaporating<br />
solvents include naphtha<br />
and toluene. I avoid toluene waxes such<br />
as Briwax (below) for a number of reasons.<br />
First, I dislike their strong odor;<br />
second, toluene is most likely to damage<br />
a finish that is not fully cured; third, I<br />
find they harden very fast, making them<br />
somewhat difficult to work with.<br />
COLORED WAX<br />
CLEAR WAX<br />
If you do one thing after<br />
reading this article, I hope<br />
you’ll try using a dark wax.<br />
As this piece of walnut shows, a<br />
clear wax on a dark, open-pored DARK WAX<br />
wood can leave white residue in<br />
the pores. Even if the pores are<br />
filled, the clear wax can leave a<br />
slight haze on a dark surface.<br />
Conversely, wax the same color or darker than<br />
the wood can enhance the appearance. See<br />
p. 59 for more detail and to learn how dark wax<br />
can be used to give an aged look.<br />
You can buy wax in a range of wood tones, or<br />
you can take clear paste wax and color it yourself.<br />
You must first melt the wax, but because wax<br />
is flammable, never heat it over an open flame.<br />
Instead, place it in a container over heated water,<br />
a device known as a double boiler. Add artist’s oils<br />
or universal colorants and mix them in thoroughly.<br />
Let the wax solidify before use.<br />
Buy the right<br />
color. Find one<br />
that matches<br />
the wood and<br />
it won’t show<br />
in pores and<br />
recesses.<br />
Or color your own. If you need only a small amount<br />
of colored wax or you want an unusual color, melt<br />
some clear paste wax in a container over hot water,<br />
and then mix in artist’s oil colors.<br />
www.finewoodworking.com<br />
M A Y / J U N E 2 0 0 7<br />
55
Finish a finish with wax<br />
GLOSS LOOK<br />
Create a wax applicator. Place some wax in the center of a<br />
double thickness of cheesecloth, gather the edges of the cloth<br />
together, and twist them closed.<br />
rubbed-out shellac. The wax helps to even out the sheen and adds<br />
a measure of protection that can be renewed easily. However,<br />
don’t be in a rush to apply it: Almost all waxes contain solvents,<br />
which can damage a film finish that isn’t fully cured. For most<br />
finishes, this means waiting a week; but wait at least a month<br />
before applying a paste wax to solvent-based lacquer.<br />
For best results, use an applicator—Using widely available<br />
but hard paste waxes, beginners tend to put on too much, then<br />
wonder why the surface smears when they try to buff it. The<br />
answer is to make a wax applicator.<br />
Take some good, dense cheesecloth and fold it over. Place a<br />
small amount of wax on the middle of this pad. Gather up the<br />
edges and twist them to form a small knob that encloses the wax.<br />
As soon as you rub the surface, the wax will start coming through<br />
the cloth evenly and thinly. Although you can use softer semi-paste<br />
wax this way, you gain the most benefit when using harder paste<br />
waxes. For closed-pore, light-colored woods such as maple, I use<br />
a clear wax, but for open-pore woods such as oak or mahogany<br />
and darker closed-pore woods like cherry, I use a colored wax.<br />
When you rub the surface, you will apply a very thin film of wax.<br />
The applicator prevents you from applying too much. I begin by<br />
applying the wax in circles, forcing it into any open pores, and<br />
then I give it a once-over with the grain to straighten everything<br />
out. If you run out of wax, don’t apply more to the outside of<br />
the applicator; just unwrap it and replenish the inside. When<br />
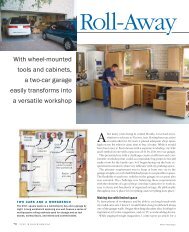
1 2 3<br />
A thin coat is critical. The<br />
cheesecloth applicator allows an<br />
even amount of wax to reach the<br />
wood. Apply the wax in a circular<br />
motion (1). Follow up by giving<br />
some light strokes with the grain<br />
(2). Before buffing, wipe the<br />
surface with a white nonabrasive<br />
pad; the open<br />
weave picks up<br />
any residue (3).<br />
Don’t use a colored<br />
pad; many<br />
contain abrasives.<br />
To raise the shine<br />
(4), you can do the final<br />
buffing with a cotton cloth<br />
or a paper towel. Turn it frequently<br />
to keep removing surplus wax.<br />
4<br />
56<br />
F I N E W O O D W O R K I N G
finished, you can store the applicator inside<br />
the can of wax.<br />
To get the best results, you must wait for the<br />
solvent to evaporate before you remove the<br />
excess wax and buff the surface. If you do this<br />
too soon, you’ll either remove the wax or just move it around. If<br />
you wait too long, it becomes progressively harder to remove the<br />
surplus. Although the wax won’t get hazy like car polish, it will<br />
change from glossy to dull. The time this takes varies by brand<br />
and atmospheric conditions, but 20 minutes is average.<br />
Although using the applicator should prevent excess wax, I still<br />
rub the dried wax with a white nylon nonabrasive pad (www.<br />
woodworker.com). The open weave picks up any thicker patches<br />
or small lumps of wax. The final step is to buff the surface with<br />
a soft cloth like terrycloth, an old T-shirt, or even a paper towel.<br />
Rub the surface vigorously and turn the cloth frequently so that<br />
you burnish the wax rather than just redistribute it.<br />
At this stage, if you find you simply can’t get the surface to shine,<br />
you probably put on too much wax or let it harden for too long.<br />
Rub the surface with a cloth dampened with mineral spirits to<br />
remove most of the wax. Wait an hour for the solvent to evaporate,<br />
and then reapply the wax more carefully.<br />
Rub out the surface with wax—If you prefer a medium<br />
luster, an option when waxing a cured finish such<br />
as shellac, varnish, or lacquer is to apply the wax with<br />
FineWoodworking.com<br />
Peter Gedrys mixes up a batch<br />
of wax and finishes a piece.<br />
0000 steel wool or a gray abrasive pad. This will<br />
reduce the sheen and soften the look. To better<br />
lubricate the steel wool, I use a softer semi-paste<br />
wax. To avoid cross-grain scratches, apply the<br />
wax with the grain only. It is easy to apply too<br />
much wax with this method, so you’ll probably need to go over<br />
the wax once it has dried with clean steel wool or a white abrasive<br />
pad. When the wax has cured, buff the surface in the same way<br />
as previously described.<br />
<strong>Wax</strong>ing intricate shapes and carvings—By highlighting areas<br />
that are proud and leaving recesses dull, wax can give carvings<br />
and moldings a more three-dimensional appearance. The softer<br />
the wax, the easier it is to work into the corners using either a<br />
cloth or a small stiff brush. When dry, a vigorous buffing with a<br />
dry and moderately stiff-bristle brush will yield good results.<br />
Renewing a waxed surface—When a waxed surface begins<br />
to look dull, try buffing to renew the sheen. If this doesn’t do the<br />
trick, simply apply and buff another layer of wax in the same way<br />
as described earlier. When done correctly, the layers of wax are<br />
so thin you need have no concern about wax buildup.<br />
If the surface becomes worn or dirty, wax can be removed with<br />
mineral spirits or one of the proprietary wax washes. If it is very<br />
SATIN SHEEN<br />
Steel wool and wax.<br />
You can combine rubbing<br />
out the finish and<br />
waxing it by using steel<br />
wool to apply the wax.<br />
Liberon’s 0000 steel<br />
wool gives the most<br />
even scratch pattern<br />
(right). To avoid crossgrain<br />
scratches, rub the<br />
steel wool with the wax<br />
in the direction of the<br />
grain only (below).<br />
Not just for shoes. You can buff wax with a brush. This works well in carved<br />
areas and produces a slightly lower shine than a cloth.<br />
www.finewoodworking.com<br />
M A Y / J U N E 2 0 0 7 57
As a minimal finish<br />
grimy, use either 0000 steel wool or a gray abrasive pad with<br />
solvent to loosen the wax. Wipe well with paper towels, and then<br />
rewax the surface.<br />
<strong>Wax</strong> bare wood for a natural look<br />
<strong>Wax</strong> also can be used on its own as a finish. It has the advantage<br />
of barely changing the natural color of the wood,<br />
just giving the surface a slightly higher<br />
sheen. The downside is that it gives<br />
minimal protection, but this is not a<br />
problem for objects such as picture<br />
frames that are subject to infrequent<br />
handling. As with waxing a finish, you<br />
need to match the wax color to the wood.<br />
A variation on this is one of my favorite finishes.<br />
I seal the bare wood with a coat or two of a 1- to 2-lb.<br />
cut of shellac, lightly sand it when dry, and then apply the<br />
wax. I’ve used it with great success on lightly used furniture<br />
and on architectural components such as paneling. The thin barrier<br />
of shellac barely changes the wood’s appearance yet makes<br />
it smoother and less porous, allowing a more even luster. It also<br />
allows me to easily remove the wax at a later date, if required.<br />
Simple steps. For<br />
objects rarely touched<br />
and that don’t need a<br />
protective finish, wipe<br />
on a single coat of shellac,<br />
sand when dry, and<br />
then wax and buff.<br />
Colored wax gives a range of looks<br />
<strong>Wax</strong> comes in a range of colors, from wood tones to specialty<br />
colors such as black and white. These colored waxes can be used<br />
either for decorative finishing or for replicating antiques.<br />
A limed finish on white oak is the most famous decorative wax<br />
finish. First, open up the pores with a brass brush or a slightly<br />
stiffer bronze brush, then vacuum and blow out the pores thoroughly.<br />
Seal the surface with a thin coat of shellac, and then rub<br />
white wax well into the pores. Wipe off the excess and apply<br />
Pop the pores with colored wax<br />
Prepare the wood. Open the pores<br />
by brushing the wood with a bronze<br />
or brass brush. After removing the<br />
dust with a vacuum or compressed<br />
air, apply a single coat of shellac.<br />
A limed finish. Fill the pores<br />
with white liming wax, and then<br />
remove the surplus. Later add a<br />
coat of clear wax, or for a higher<br />
gloss, a coat of shellac.<br />
Color wax with powders. You can<br />
color clear wax by adding dry pigments<br />
or mica powders. Afterward,<br />
topcoat with either clear wax or<br />
shellac.<br />
58<br />
F I N E W O O D W O R K I N G
<strong>Wax</strong> can give an aged appearance<br />
CREATE INSTANT DUST<br />
ADD YEARS OF POLISH<br />
Dirt in the crevices.<br />
Apply softened paste<br />
wax into the nooks and<br />
crannies of carvings.<br />
Then tap in some rottenstone<br />
with a stiff-bristled<br />
brush (top). When the<br />
wax has dried, rub the<br />
area with crumpled<br />
newspaper to remove<br />
the bulk of the rottenstone,<br />
and then burnish<br />
the high points with a<br />
cloth (right). This leaves<br />
a line of gray similar to<br />
that found on antiques.<br />
Simulate wax<br />
buildup. To replicate<br />
the dark<br />
recesses found<br />
on antiques, use<br />
dark wax in these<br />
areas (above), or<br />
apply dry pigments<br />
to freshly applied<br />
clear wax (center).<br />
When the wax is<br />
dry, burnish the<br />
high points with<br />
a cloth or a brush<br />
(below).<br />
either a couple of coats of paste wax or, for a higher sheen, a<br />
coat of shellac. Other applications include adding colored pigments<br />
or mica powders to clear wax to color the pores.<br />
If your taste runs more toward period than contemporary, wax<br />
can give furniture an aged appearance. Using wax a shade or<br />
two darker than the wood will add accent lines around moldings<br />
and carvings. There are brown and black waxes sold as patinating<br />
waxes, but you can make your own or use dry pigment<br />
powders on top of a clear wax.<br />
Don’t use shoe polish. Many include silicone, which will play<br />
havoc with any film finish that you apply afterward. <br />
Peter Gedrys is a professional finisher and restorer in East Haddam, Conn.<br />
www.finewoodworking.com<br />
M A Y / J U N E 2 0 0 7 59