Wax Primer
Wax Primer
Wax Primer

Create successful ePaper yourself
Turn your PDF publications into a flip-book with our unique Google optimized e-Paper software.
finished, you can store the applicator inside<br />
the can of wax.<br />
To get the best results, you must wait for the<br />
solvent to evaporate before you remove the<br />
excess wax and buff the surface. If you do this<br />
too soon, you’ll either remove the wax or just move it around. If<br />
you wait too long, it becomes progressively harder to remove the<br />
surplus. Although the wax won’t get hazy like car polish, it will<br />
change from glossy to dull. The time this takes varies by brand<br />
and atmospheric conditions, but 20 minutes is average.<br />
Although using the applicator should prevent excess wax, I still<br />
rub the dried wax with a white nylon nonabrasive pad (www.<br />
woodworker.com). The open weave picks up any thicker patches<br />
or small lumps of wax. The final step is to buff the surface with<br />
a soft cloth like terrycloth, an old T-shirt, or even a paper towel.<br />
Rub the surface vigorously and turn the cloth frequently so that<br />
you burnish the wax rather than just redistribute it.<br />
At this stage, if you find you simply can’t get the surface to shine,<br />
you probably put on too much wax or let it harden for too long.<br />
Rub the surface with a cloth dampened with mineral spirits to<br />
remove most of the wax. Wait an hour for the solvent to evaporate,<br />
and then reapply the wax more carefully.<br />
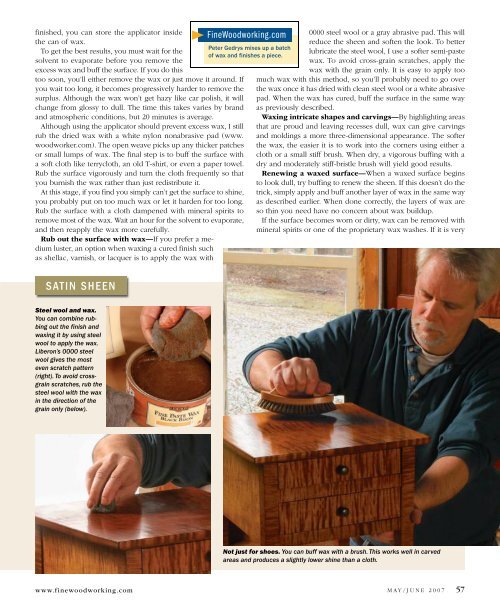
Rub out the surface with wax—If you prefer a medium<br />
luster, an option when waxing a cured finish such<br />
as shellac, varnish, or lacquer is to apply the wax with<br />
FineWoodworking.com<br />
Peter Gedrys mixes up a batch<br />
of wax and finishes a piece.<br />
0000 steel wool or a gray abrasive pad. This will<br />
reduce the sheen and soften the look. To better<br />
lubricate the steel wool, I use a softer semi-paste<br />
wax. To avoid cross-grain scratches, apply the<br />
wax with the grain only. It is easy to apply too<br />
much wax with this method, so you’ll probably need to go over<br />
the wax once it has dried with clean steel wool or a white abrasive<br />
pad. When the wax has cured, buff the surface in the same way<br />
as previously described.<br />
<strong>Wax</strong>ing intricate shapes and carvings—By highlighting areas<br />
that are proud and leaving recesses dull, wax can give carvings<br />
and moldings a more three-dimensional appearance. The softer<br />
the wax, the easier it is to work into the corners using either a<br />
cloth or a small stiff brush. When dry, a vigorous buffing with a<br />
dry and moderately stiff-bristle brush will yield good results.<br />
Renewing a waxed surface—When a waxed surface begins<br />
to look dull, try buffing to renew the sheen. If this doesn’t do the<br />
trick, simply apply and buff another layer of wax in the same way<br />
as described earlier. When done correctly, the layers of wax are<br />
so thin you need have no concern about wax buildup.<br />
If the surface becomes worn or dirty, wax can be removed with<br />
mineral spirits or one of the proprietary wax washes. If it is very<br />
SATIN SHEEN<br />
Steel wool and wax.<br />
You can combine rubbing<br />
out the finish and<br />
waxing it by using steel<br />
wool to apply the wax.<br />
Liberon’s 0000 steel<br />
wool gives the most<br />
even scratch pattern<br />
(right). To avoid crossgrain<br />
scratches, rub the<br />
steel wool with the wax<br />
in the direction of the<br />
grain only (below).<br />
Not just for shoes. You can buff wax with a brush. This works well in carved<br />
areas and produces a slightly lower shine than a cloth.<br />
www.finewoodworking.com<br />
M A Y / J U N E 2 0 0 7 57