suzo-happ group
suzo-happ group
suzo-happ group
- No tags were found...

Create successful ePaper yourself
Turn your PDF publications into a flip-book with our unique Google optimized e-Paper software.
78 touch screens<br />
Command Strips for Touch Sensors saves display integrators and slot technicians time and<br />
money with a quick removal and easy remounting solution for their touch displays.<br />
Once a touch sensor is mounted with Command Strips for Touch Sensors, it takes only seconds<br />
to remove a damaged touch sensor or separate the working sensor from the damaged LCD display, and then only minutes to remount it.<br />
Compared to today’s industry average of 45-60 minutes for removing and remounting a touch sensor, that’s time and money saved.<br />
Using these “peel and stick” strips, a touch sensor can be easily mounted to a display in minutes and put back in service. When a touch<br />
sensor needs to be removed, Command’s “stretch release technology” allows technicians to just pull each strip’s tab at a 90 degree angle and<br />
the sensor pops free in seconds. And, these “no mess” strips don’t leave an adhesive residue that can be difficult to clean up.<br />
Command Strips for Touch Sensors offer superior adhesion in high temperature environments such as gaming machines, kiosk enclosures,<br />
and non-air conditioned warehousing. And, the low temperature properties of the adhesive are ideally suited for machine storage or shipping<br />
in cold climates.<br />
With more than 25 years touch experience and with millions of touch systems in the field, 3M continues to deliver products and processes that<br />
make touch display integration easier and more efficient. By using Command Strips for Touch Sensors, slot managers can save time and<br />
money in their gaming machine maintenance operations.<br />
Recommended Applications<br />
3M COMMAND STRIPS FOR TOUCH SENSORS<br />
New<br />
• Slot Machines<br />
• Bartop Games<br />
• Video Poker Games<br />
• Casino Gaming<br />
• Kiosks<br />
• Amusement Games<br />
Pressure-Sensitive Adhesive Strips<br />
• Wide temperature range -40˚C to 70˚C provides excellent holding strength in both<br />
operating and storage environments<br />
• Water-resistant adhesive allows use in hot, wet and humid conditions<br />
• High adhesion characteristics ensures secure touch sensor-to-display bond over time<br />
Command Stretch Release Technology<br />
• Easy pull tabs enable quick and easy removal of adhesive strips<br />
• Easy-to-remove strips don’t leave an adhesive residue that can be difficult to clean up<br />
Peel and Stick Application<br />
• Peelable strip liners allow for easy positioning and effective touch sensor mounting<br />
• Liners allow for easy handling of adhesive strips to speed integrations and minimize<br />
waste<br />
Foam-Backing<br />
• Adhesive-backed foam allows for secure bonding to smooth out semi-rough surfaces<br />
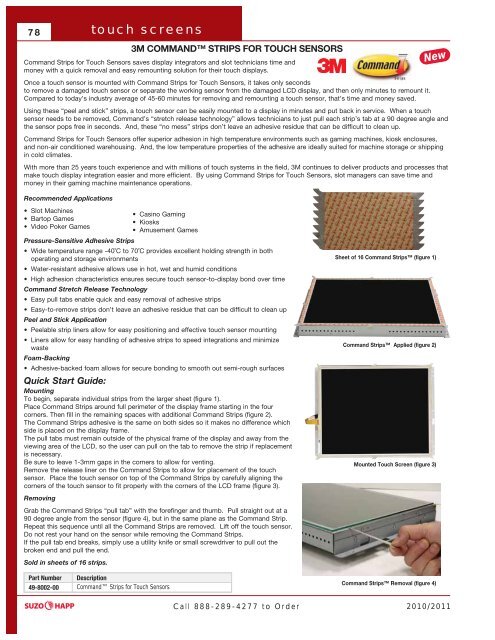
Quick Start Guide:<br />
Mounting<br />
To begin, separate individual strips from the larger sheet (figure 1).<br />
Place Command Strips around full perimeter of the display frame starting in the four<br />
corners. Then fill in the remaining spaces with additional Command Strips (figure 2).<br />
The Command Strips adhesive is the same on both sides so it makes no difference which<br />
side is placed on the display frame.<br />
The pull tabs must remain outside of the physical frame of the display and away from the<br />
viewing area of the LCD, so the user can pull on the tab to remove the strip if replacement<br />
is necessary.<br />
Be sure to leave 1-3mm gaps in the corners to allow for venting.<br />
Remove the release liner on the Command Strips to allow for placement of the touch<br />
sensor. Place the touch sensor on top of the Command Strips by carefully aligning the<br />
corners of the touch sensor to fit properly with the corners of the LCD frame (figure 3).<br />
Removing<br />
Grab the Command Strips “pull tab” with the forefinger and thumb. Pull straight out at a<br />
90 degree angle from the sensor (figure 4), but in the same plane as the Command Strip.<br />
Repeat this sequence until all the Command Strips are removed. Lift off the touch sensor.<br />
Do not rest your hand on the sensor while removing the Command Strips.<br />
If the pull tab end breaks, simply use a utility knife or small screwdriver to pull out the<br />
broken end and pull the end.<br />
Sold in sheets of 16 strips.<br />
Part Number Description<br />
49-8002-00 Command Strips for Touch Sensors<br />
Sheet of 16 Command Strips (figure 1)<br />
Command Strips Applied (figure 2)<br />
Mounted Touch Screen (figure 3)<br />
Command Strips Removal (figure 4)<br />
Call 888-289-4277 to Order 2010/2011