Ondatherm 900 Installation Guide - PGA Consultants
Ondatherm 900 Installation Guide - PGA Consultants
Ondatherm 900 Installation Guide - PGA Consultants

You also want an ePaper? Increase the reach of your titles
YUMPU automatically turns print PDFs into web optimized ePapers that Google loves.
Edition: October 2011<br />
<strong>Installation</strong> guidelines<br />
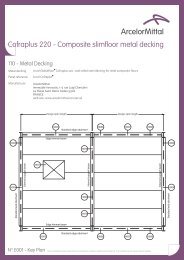
System: ONDATHERM <strong>900</strong> C<br />
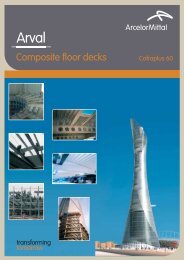
ArcelorMittal Construction International<br />
Industriestrasse 19<br />
8112 Otelfingen / Zürich<br />
Switzerland<br />
www.arcelormittal.com/arval<br />
ArcelorMittal Construction Page 1 of 21<br />
Javier Cirauqui
Summary<br />
1. Basic principles ........................................................................................................ 3<br />
2. Documentation ......................................................................................................... 3<br />
3. Building site conditions............................................................................................ 3<br />
3.1. Lifting the material ....................................................................................... 4<br />
3.2. Packaging and storage on site....................................................................... 4<br />
3.3. Un-packaging................................................................................................ 5<br />
3.4. Protective film .............................................................................................. 5<br />
4. Safety........................................................................................................................ 5<br />
5. General rules............................................................................................................. 6<br />
5.1. Inspection of existing works......................................................................... 6<br />
5.2. Inspection of installation work ..................................................................... 6<br />
5.3. Structure alignment ...................................................................................... 6<br />
5.4. Installing the panels...................................................................................... 6<br />
6. Cutting and drilling during installation .................................................................... 7<br />
6.1. Cutting .......................................................................................................... 7<br />
6.2. Drilling ......................................................................................................... 7<br />
7. Anchoring, fixing and connecting the panels during installation............................. 7<br />
7.1. General.......................................................................................................... 7<br />
7.2. Fixations and how to fix ............................................................................... 7<br />
7.2.1. Screws....................................................................................................... 8<br />
7.2.2. Blind rivets ............................................................................................... 8<br />
7.2.3. Considerations .......................................................................................... 8<br />
8. System fixation description ...................................................................................... 9<br />
8.1. <strong>Installation</strong> .................................................................................................... 9<br />
8.2. Width of support........................................................................................... 9<br />
8.3. Alignment of the panels................................................................................ 9<br />
8.4. Fixings and connections ............................................................................. 10<br />
8.5. Sealing strips .............................................................................................. 10<br />
8.6. Fillers for profiles sheeting......................................................................... 10<br />
8.7. Drainage...................................................................................................... 11<br />
8.8. Overlaps...................................................................................................... 11<br />
8.8.1. Side laps.................................................................................................. 11<br />
8.8.2. End lap.................................................................................................... 12<br />
8.9. Direction of installation.............................................................................. 12<br />
8.10. Securing for uplift................................................................................... 13<br />
8.11. Holes....................................................................................................... 13<br />
8.12. Design of flashings ................................................................................. 13<br />
8.12.1. Flashings overlap.................................................................................... 14<br />
Annexes .......................................................................................................................... 15<br />
I. Templates ....................................................................................................... 16<br />
I.1. Checking lists templates ............................................................................. 16<br />
I.2. Cutting list templates.................................................................................. 17<br />
I.3. Curved cutting list templates ...................................................................... 20<br />
II. <strong>Installation</strong> ratios ............................................................................................ 21<br />
ArcelorMittal Construction Page 2 of 21<br />
Javier Cirauqui
1. Basic principles<br />
Every project has requirements according with national and local regulations.<br />
These regulations must be taken in consideration to select a system with the<br />
right performances to fulfil the requirements of the project.<br />
Safety, thermal and acoustic comfort, or energy savings may fail if not properly<br />
selected.<br />
Before ordering any material, it must be checked that the selected system<br />
performances are in accordance with the requirements for the project.<br />
1.1. Load bearing of the system support<br />
1.2. Load bearing of the external skin<br />
1.3. Thermal insulation<br />
1.4. Noise insulation<br />
1.5. Acoustic absorption<br />
1.6. Fire behaviour<br />
1.7. Air permeability<br />
2. Documentation<br />
For any project it is necessary to prepare a basic documentation to verify that<br />
the building can be erected in accordance with client’s performance<br />
requirements:<br />
• <strong>Installation</strong> drawings with the layout of the roof or façade and indications<br />
about the position of any profile and the direction of installation should be<br />
a must before starting the erection.<br />
• Details showing how flashings should be positioned, sealed, and fixed.<br />
• Cutting list to have a reference of the materials we have ordered and<br />
ease following of the layout<br />
3. Building site conditions<br />
A necessary task that can save time and money during the erection of the<br />
building is to do a visit to check if:<br />
• Site is in conditions to receive and storage the materials properly<br />
• Free space to place and move the cranes, platforms, scaffoldings, etc.<br />
• Safety measure can be installed<br />
ArcelorMittal Construction Page 3 of 21<br />
Javier Cirauqui
3.1. Lifting the material<br />
Bundles must be handled properly to avoid damaging the material.<br />
Bundles can be handled with:<br />
• Sling belts<br />
• Sling belts and spreader beam<br />
• Fork lift<br />
3.2. Packaging and storage on site<br />
Avoiding the retention of water between sheets and panels is a must to avoid<br />
corrosion.<br />
Bundles must be stored with a slop of 1% to facilitate the evacuation of the<br />
water.<br />
ArcelorMittal Construction Page 4 of 21<br />
Javier Cirauqui
The materials must be distributed on site as close as possible to the area where<br />
they will be installed.<br />
Bundles can not be stacked on top of each other on the construction site.<br />
They can be delivered stacked but they must be unloaded and stored<br />
separately.<br />
When lifting the bundles to the roof, you must secure them to avoid sliding<br />
sheets or panels.<br />
Before leaving bundles on the roof, you must check with the contractor that the<br />
structure can support the bundled weight.<br />
3.3. Un-packaging<br />
When you unpack the materials you have to take care about the risk of<br />
displacements of the materials or up-lifting them due to the wind action.<br />
Waste material has to be taken to the proper place to avoid dirty and risk of<br />
accidents.<br />
3.4. Protective film<br />
Coated products are supplied with a removable<br />
protective film to prevent mechanical damage<br />
during transport and assembly. This film must<br />
be removed 15 days after outside storage<br />
exposed to weather and/or immediately after<br />
installation, whichever is soonest.<br />
4. Safety<br />
The work site must have the collective protective measures installed properly<br />
before starting the works.<br />
These protections must be defined according with the requirements of the<br />
safety project created by the General contractor.<br />
Employees must be equipped with the individual protections appropriated for<br />
the job that they are doing.<br />
Some of the protections are: helmets, gloves, boots, harness, etc.<br />
ArcelorMittal Construction Page 5 of 21<br />
Javier Cirauqui
5. General rules<br />
5.1. Inspection of existing works<br />
Before starting the installation, it is necessary to check the works and analyze if<br />
there are deviations in the existing works (structure alignment, dimensions, etc.)<br />
that could concern your own works and stop you installing materials properly.<br />
5.2. Inspection of installation work<br />
Your own works must be inspected regularly to verify that all the works are<br />
being developed according with the manufacturer’s instructions and the<br />
construction rules.<br />
When works are done professionally, we all will get the customer satisfaction<br />
and reducing the claims.<br />
The checking list documents provided in this document can help to do it.<br />
5.3. Structure alignment<br />
If the structure is not properly aligned, the roof will not be with the right pitch.<br />
Every error in the structure will be transmitted to the roof.<br />
When defects in the alignment, etc. the contractor should correct the defects or<br />
installing a substructure prior starting our works.<br />
Maximum deflection of purlins must be considered to avoid water retentions on<br />
the roof.<br />
5.4. Installing the panels<br />
Panels have to be installed according with the layout drawing prepared for this<br />
job. It must be done in the direction indicated in the drawings.<br />
Before interrupting the day works, profiles must be secured to avoid uplift due to<br />
the wind action.<br />
ArcelorMittal Construction Page 6 of 21<br />
Javier Cirauqui
6. Cutting and drilling during installation<br />
6.1. Cutting<br />
Panels can not be cut with abrasive tools.<br />
Most kinds of saws are suitable to cut steel<br />
sheets and panels if they don’t burn the<br />
material as abrasive tools.<br />
Metal shavings have to be removed from the<br />
area to avoid adverse optical and warranty<br />
issues.<br />
During the cuts, the area where the saw tool<br />
can scratch the sheet must be protected.<br />
6.2. Drilling<br />
Metal shavings from these operations have to be removed to avoid optical and<br />
warranty issues.<br />
7. Anchoring, fixing and connecting the panels during<br />
installation<br />
7.1. General<br />
Depending on the final use of the sheet / panel, its dimension and the<br />
supporting structure, several fixings systems can be used.<br />
Fasteners must have an appropriate corrosion protection for the environment<br />
where the buildings are located.<br />
<strong>Installation</strong> and dimension of the fasteners is described in the next points<br />
7.2. Fixations and how to fix<br />
The next points will describe the possible fasteners, how they must be fitted and<br />
the field of application.<br />
ArcelorMittal Construction Page 7 of 21<br />
Javier Cirauqui
7.2.1. Screws<br />
Screws can be used to fix cladding panels.<br />
Two types of screws are acceptable:<br />
• Self-drilling<br />
• Self-tapping<br />
Tools, power and speed must be fitted according with the technical<br />
recommendations of the screw manufacturers.<br />
In the case of self-tapping screws, the diameter of the hole must be in<br />
concordance with the instruction of the screw manufacturer to keep the loadbearing<br />
capacity.<br />
If the screws have a sealing washer, it is recommended to use a depth stop to<br />
keep the waterproof properties.<br />
No water tight Correct Too tight Oblique<br />
7.2.2. Blind rivets<br />
Blind rivets can be used for stitching two sheets together for side laps,<br />
flashings, etc.<br />
Load-bearing capacity and diameter of the drilled hole must be considered from<br />
the recommendations of the rivets manufacturer.<br />
7.2.3. Considerations<br />
Expansion and contraction of the materials due to the changes of temperature<br />
must be taken in consideration when the type of fixation is decided.<br />
Our technical assistance can support you to choose the right fastener and<br />
indications about how to install it properly.<br />
ArcelorMittal Construction Page 8 of 21<br />
Javier Cirauqui
8. System fixation description<br />
8.1. <strong>Installation</strong><br />
Every system has its own way of installation.<br />
In this case, you must follow the<br />
recommendations below:<br />
• <strong>Installation</strong> of consecutive panels<br />
• <strong>Installation</strong> of the distribution plate and<br />
fixing it in the central hole or two<br />
external holes (depending on uplift<br />
loads) with a screw diameter 6.3 mm x<br />
L<br />
• <strong>Installation</strong> of a thermal insulation<br />
between the two ribs.<br />
• <strong>Installation</strong> of the cover plate clipping<br />
to the ribs and hiding insulation and fixation.<br />
8.2. Width of support<br />
Width of the support must be confirmed according with the product we are using<br />
and, material of the structure and the wind loads<br />
In general, you can consider that for steel structure we need a minimum width:<br />
• End support: 40 mm<br />
• Intermediate supports: 60 mm<br />
Performances of the panels change considerably when we increase the width of<br />
the supports.<br />
8.3. Alignment of the panels<br />
The ribs of the profiles of every row must be aligned on whole surface.<br />
The first panel must be properly vertical or horizontal installed because it is the<br />
reference for the whole roof.<br />
ArcelorMittal Construction Page 9 of 21<br />
Javier Cirauqui
8.4. Fixings and connections<br />
The number of fixings must be calculated per project to ensure the resistance of<br />
the roof / façade to the wind actions.<br />
The selection of the fasteners has to be done according with the thickness of<br />
the structure and the grade of steel.<br />
All the fixings must be protected against corrosion, stainless steel or bichromium<br />
protection.<br />
When water runs off on the fixings, a waterproof washer is a must.<br />
8.5. Sealing strips<br />
End laps must be sealed and also flashing laps<br />
8.6. Fillers for profiles sheeting<br />
Fillers for profiling sheets or panels must be installed properly to avoid dropping<br />
out.<br />
ArcelorMittal Construction Page 10 of 21<br />
Javier Cirauqui
8.7. Drainage<br />
Dimensions of gutters and outlets must be done in accordance with the<br />
technical standards.<br />
Solutions for overflows must be designed an installed when inside mounted<br />
gutter.<br />
8.8. Overlaps<br />
Overlaps must be done according with professional rules to keep the water<br />
tightness under every action.<br />
Panels can be prepared with two types of overlap depending on the slope that<br />
will be placed, right and left overlap. The reason of both overlaps is to allow the<br />
continuity of the ribs from one slope to the other slope at the ridge.<br />
Right overlap<br />
Left overlap<br />
8.8.1. Side laps<br />
As consequence of cover plates, it is not necessary to seal side laps<br />
ArcelorMittal Construction Page 11 of 21<br />
Javier Cirauqui
8.8.2. End lap<br />
End lap must be sealed with a row of<br />
8mm diameter PIB butyl strip positioned<br />
maximum 15mm from the edge of the<br />
under lapping sheet or using butt straps to<br />
achieve a flush joint use tapes as above.<br />
It is not necessary to stitch it.<br />
Cover plate overlap must be displaced 500 mm upstream from panel overlap to<br />
avoid water infiltrations.<br />
8.9. Direction of installation<br />
<strong>Installation</strong> must be done in the direction of the predominant winds. Every<br />
product has its own direction of installation and must be consider before starting<br />
installing it.<br />
ArcelorMittal Construction Page 12 of 21<br />
Javier Cirauqui
8.10. Securing for uplift<br />
Products must be fixed as soon as they are placed on the roof or façade to<br />
avoid any uplift due to the action of the wind.<br />
Before interrupting the work, it is necessary to check that all the products are<br />
properly fixed and the bundles are also fixed with some straps to avoid risks of<br />
falling materials.<br />
Direction of installation is important for an easier secure.<br />
8.11. Holes<br />
Pipe penetrations must be properly made in concordance with the design taking<br />
in consideration that:<br />
• Pipes can not transmit forces to the façade<br />
• Reduction of the thermal bridges is a must<br />
• Flashings must be water and air tight<br />
8.12. Design of flashings<br />
Flashings must be defined following some recommendations:<br />
• Flat surface shouldn’t be larger than 250 mm to keep the flatness<br />
• Small slope is recommended to avoid water retention.<br />
• Drip is recommended in any flashing to reduce the dirty on the façade.<br />
ArcelorMittal Construction Page 13 of 21<br />
Javier Cirauqui
8.12.1. Flashings overlap<br />
Laps can be done:<br />
• Overlapping the flashings 100 mm and adding a sealant butyl tape 15<br />
mm from the end and in front of the stitching screws or using butt straps<br />
to achieve a flush joint use tapes as above<br />
• Joining obtusely to an underlay sheet with sealant tapes 15 mm from the<br />
ends of the two pieces of flashing and in front of the stitching screws.<br />
ArcelorMittal Construction Page 14 of 21<br />
Javier Cirauqui
Annexes<br />
The next annexes are showed as example and orientation, ArcelorMittal<br />
Construction is not responsible about the right use of them.<br />
Other alternatives are possible and the customer must check if the information<br />
is enough for his company.<br />
ArcelorMittal Construction Page 15 of 21<br />
Javier Cirauqui
I. Templates<br />
I.1. Checking lists templates<br />
ArcelorMittal Construction Page 16 of 21<br />
Javier Cirauqui
Only if cutting list,<br />
drawings have been<br />
made by AMC<br />
Only if installation is<br />
supervised by AMC<br />
Check list<br />
Site<br />
Tidy and clean<br />
Y N<br />
Delivery On time<br />
Y N<br />
Number of times<br />
Packages properly storages<br />
Y N<br />
Material properly lifted from packet to site<br />
Y N<br />
On time<br />
Y N<br />
Delays<br />
Y N<br />
Roof<br />
Fixation to the roof Y N<br />
Are properly Junctions<br />
Y N<br />
done Ends<br />
Y N<br />
Gutters<br />
Expansion joints<br />
Y N<br />
Are they Shavings<br />
Y N<br />
clean bubles<br />
Y N<br />
Are installed Joints<br />
Y N<br />
properly mouths<br />
Y N<br />
Aligment of the gutter and ridge<br />
Y N<br />
Undulations, scratchs, dents, material properly managed<br />
Y N<br />
Roof is lengh enough at the gutter<br />
Y N<br />
Overlaps of the roof are properly done<br />
Y N<br />
Fixations are enough and well positioned<br />
Y N<br />
Roof material properly fixed<br />
Y N<br />
Ridge properly installed<br />
Y N<br />
Ridge joints properly installed<br />
Y N<br />
End of the roof material is properly folded<br />
Y N<br />
Fixation of flashings properly done<br />
Y N<br />
Every solution is water proof<br />
Y N<br />
Holes revised and properly done<br />
Y N<br />
Protected film properly retired and storaged<br />
Y N<br />
Roof cleaned<br />
Y N<br />
Façade<br />
Material properly lifted from packet to site<br />
Y N<br />
Material without bubles and undulations<br />
Y N<br />
Fixations are enough and well positioned<br />
Y N<br />
Drip and façade are properly leveled and aligned<br />
Y N<br />
Doors, Windows and holes properly done and flashings installed<br />
Y N<br />
Overlaps or vertical joints properly installed and sealed<br />
Y N<br />
Drip is properly aligned<br />
Y N<br />
Corners are properly aligned<br />
Y N<br />
Windows are properly aligned<br />
Y N<br />
Flashings properly designed<br />
Y N<br />
Flashings properly sealed and fixed<br />
Y N<br />
Drip flashing doesn't have any dent<br />
Y N<br />
Safety<br />
Installers have finished the safety training<br />
Y N<br />
Safety speach has been done to the installers<br />
Y N<br />
Collective safety measures are installed<br />
Access to the roof is safe<br />
Y N<br />
Electricity wires are at the right distance and properly insulated<br />
Y N<br />
Electrical box containers have a "gadget that cut the electricity if contact with metal" Y N<br />
Installers have the right tools for the installation<br />
Y N<br />
Material packets are properly placed and/or fixed<br />
Y N<br />
Scaffolding and platforms are safe<br />
Y N<br />
The ground permits the movement of the platforms<br />
Y N<br />
The roof holes are protected aganist fallings<br />
Y N<br />
Working area is properly indicated<br />
Y N<br />
Installers have the individual safety elements<br />
Y N<br />
New installer in the work site has been trained in safety<br />
Y N<br />
Components installation<br />
The insulation is properly installed according with the system description<br />
Y N<br />
The spacers are properly installed and fixed<br />
Y N<br />
Vapour barrier is installed properly<br />
Y N<br />
Are there thermal bridges visibles<br />
Y N<br />
I.2. Cutting list templates<br />
ArcelorMittal Construction Page 17 of 21<br />
Javier Cirauqui
Panels cutting list<br />
Customer<br />
Work reference<br />
Location<br />
Delivery address<br />
Number of order<br />
Date<br />
Number of<br />
position<br />
Product<br />
Core<br />
Panel<br />
thickness<br />
Number of<br />
units<br />
Lenght<br />
External face<br />
Internal face<br />
Steel thick Coating Colour Steel thick. Coating Colour Layout drawing position<br />
Signature<br />
Stamp<br />
ArcelorMittal Construction Page 18 of 21<br />
Javier Cirauqui
Flashings cutting list<br />
Customer<br />
Work reference<br />
Location<br />
Delivery address<br />
Number of order<br />
Date<br />
Flashing name<br />
Number of pieces<br />
Lenght piece<br />
Number overlap pieces<br />
Coating<br />
Colour<br />
Steel thickness<br />
Layout drawing position<br />
Flashing name<br />
Number of pieces<br />
Lenght piece<br />
Number overlap pieces<br />
Coating<br />
Colour<br />
Steel thickness<br />
Layout drawing position<br />
Flashing name<br />
Number of pieces<br />
Lenght piece<br />
Number overlap pieces<br />
Coating<br />
Colour<br />
Steel thickness<br />
Layout drawing position<br />
Signature<br />
Stamp<br />
Flashing name<br />
Number of pieces<br />
Lenght piece<br />
Number overlap pieces<br />
Coating<br />
Colour<br />
Steel thickness<br />
Layout drawing position<br />
ArcelorMittal Construction Page 19 of 21<br />
Javier Cirauqui
I.3. Curved cutting list templates<br />
Curved steel profiled sheets cutting list<br />
Customer<br />
Work reference<br />
Location<br />
Delivery address<br />
Number of order<br />
Date<br />
Internal face<br />
Number of<br />
position<br />
Product<br />
Thickness<br />
Number of<br />
units<br />
Internal<br />
Radius<br />
Angle<br />
External face<br />
(to be filled if different of back coating)<br />
Coating Colour Coating Colour Layout drawing position<br />
Signature<br />
Stamp<br />
ArcelorMittal Construction Page 20 of 21<br />
Javier Cirauqui
II. <strong>Installation</strong> ratios<br />
<strong>Installation</strong> ratios are given in hours per man and square meter.<br />
In general, we can consider that installation must be done by teams and every<br />
team is composed by three members: two handling and fixing and the third one<br />
preparing the material at the position.<br />
Element<br />
Rate<br />
(Hours / (man · m 2 )<br />
Panel 0.08 hours / (man · m 2 )<br />
Flashings 0.2 hours / (man · m)<br />
ArcelorMittal Construction Page 21 of 21<br />
Javier Cirauqui