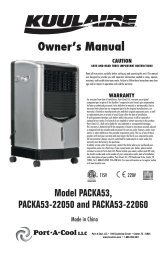
36” QuietCool Portable Evaporative Cooler - Air & Water
36” QuietCool Portable Evaporative Cooler - Air & Water
36” QuietCool Portable Evaporative Cooler - Air & Water

Create successful ePaper yourself
Turn your PDF publications into a flip-book with our unique Google optimized e-Paper software.
<strong>36”</strong> <strong>QuietCool</strong><br />
<strong>Portable</strong> <strong>Evaporative</strong> <strong>Cooler</strong><br />
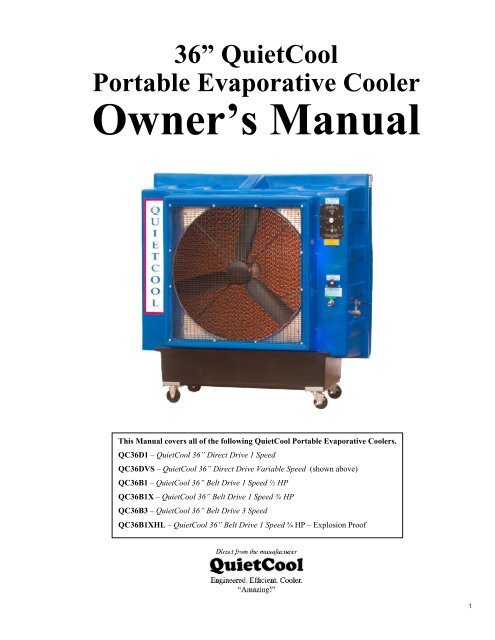
This Manual covers all of the following <strong>QuietCool</strong> <strong>Portable</strong> <strong>Evaporative</strong> <strong>Cooler</strong>s.<br />
QC36D1 – <strong>QuietCool</strong> <strong>36”</strong> Direct Drive 1 Speed<br />
QC36DVS – <strong>QuietCool</strong> <strong>36”</strong> Direct Drive Variable Speed (shown above)<br />
QC36B1 – <strong>QuietCool</strong> <strong>36”</strong> Belt Drive 1 Speed ½ HP<br />
QC36B1X – <strong>QuietCool</strong> <strong>36”</strong> Belt Drive 1 Speed ¾ HP<br />
QC36B3 – <strong>QuietCool</strong> <strong>36”</strong> Belt Drive 3 Speed<br />
QC36B1XHL – <strong>QuietCool</strong> <strong>36”</strong> Belt Drive 1 Speed ¾ HP – Explosion Proof
File this owner’s manual in a safe place for future reference. It contains operating procedures – maintenance procedures –<br />
trouble shooting guide – replacement parts guide – order form – and contact information. You will need this!<br />
ELECTRICAL<br />
Warnings and Cautions<br />
Read before operating <strong>QuietCool</strong> <strong>Portable</strong> <strong>Evaporative</strong> <strong>Cooler</strong><br />
WARNING<br />
Do not use a 3 prong to 2 prong adapter on the electrical power cord.<br />
WARNING<br />
Do not remove the grounding lug from the electrical power cord plug.<br />
Use only 3 prong, grounded receptacles.<br />
WARNING<br />
Disconnect the <strong>QuietCool</strong> <strong>Portable</strong> <strong>Evaporative</strong> <strong>Cooler</strong> from your electrical power source before performing<br />
any service action.<br />
WARNING<br />
Your <strong>QuietCool</strong> unit must be plugged into a fused or circuit breaker protected 20 Amp, 120 Volt, 60 Hz circuit<br />
– unless specifically manufactured for another voltage / frequency configuration. See manufacturer’s label on<br />
cooler. A ground fault circuit interrupter protected circuit is strongly recommended.<br />
WARNING<br />
Check your units electric power cord for insulation breaks, cracks or fraying. If any of these conditions are<br />
found DO NOT USE. See your distributor for immediate service replacement parts.<br />
WARNING<br />
Some electric motors require periodic oiling. Check your model for oil fill holes. A couple drops of light oil<br />
per year normally will be sufficient. Heavy usage may require additional oil.<br />
WARNING<br />
To reduce the risk of fire or electrical shock, DO NOT USE with any solid-state speed control device.<br />
WARNING<br />
To reduce the risk of electrical shock or injury to persons, DO NOT USE cooler in a window.<br />
WATER<br />
WARNING<br />
Do not connect your <strong>QuietCool</strong> <strong>Portable</strong> <strong>Evaporative</strong> <strong>Cooler</strong> to any water source where water pressure exceeds<br />
60 p.s.i. If your water source is above 60 p.s.i. you must use a pressure regulator (which can be found<br />
at your local hardware store).
<strong>QuietCool</strong> <strong>Portable</strong> <strong>Evaporative</strong> <strong>Cooler</strong><br />
Table of Contents<br />
1.0 Introduction<br />
1.1 Quick Start<br />
2.0 How <strong>Evaporative</strong> Cooling Works<br />
3.0 Unpacking your new <strong>QuietCool</strong> unit<br />
4.0 Set-up your <strong>QuietCool</strong> unit<br />
4.1 Connecting the electrical supply<br />
4.2 Connecting the water supply<br />
5.0 Operating procedures<br />
5.1 Filling the units reservoir with water<br />
5.2 Turn-on pump<br />
5.3 Adjust water flow<br />
5.4 Turn-on Fan<br />
6.0 Daily Operating procedures<br />
6.1 Turn-on pump<br />
6.2 Adjust water flow<br />
6.3 Turn-on fan<br />
6.4 Turn-off unit<br />
7.0 Maintenance<br />
7.1 Access inside of unit<br />
7.2 Removing the cooling media<br />
7.3 Daily maintenance<br />
7.4 Periodic maintenance<br />
7.5 <strong>QuietCool</strong> Trouble Shooting Guide<br />
8.0 Storage<br />
9.0 Accessories<br />
10.0 Replacement Parts and – Order form<br />
11.0 Wiring Diagrams for all <strong>36”</strong> units<br />
12.0 Warranty<br />
File this owner’s manual in a safe place for future reference. It contains operating procedures – maintenance procedures –<br />
trouble shooting guide – replacement parts guide – order form – and contact information. You will need this!
<strong>QuietCool</strong> <strong>Portable</strong> <strong>Evaporative</strong> <strong>Cooler</strong><br />
1.0 Introduction<br />
Your <strong>QuietCool</strong> was engineered to be the most efficient portable evaporative cooler manufactured. It was<br />
manufactured and assembled at our plant in Houston, Texas.<br />
Your <strong>QuietCool</strong> was tested 3 ways. Your unit was tested for 1. Maximum air flow at operating static pressure.<br />
Only <strong>QuietCool</strong> is tested in operating conditions with 2. <strong>Water</strong> and 3. Electricity before it is shipped.<br />
<strong>QuietCool</strong> is easy to operate – needs only tap water and electricity to operate.<br />
<strong>QuietCool</strong> is easy to move – roll your <strong>QuietCool</strong> to the area you want to cool. <strong>QuietCool</strong> comes standard with<br />
straight and swivel / lock casters which make moving your <strong>QuietCool</strong> a breeze.<br />
1.1 Quick Start – Your Quick Start Information is located inside the information packet shipped with your unit.<br />
Look on the front of your <strong>QuietCool</strong> in a plastic sleeve.<br />
2.0 How <strong>Evaporative</strong> Cooling Works<br />
Keeping in mind that regular fans only circulate same temperature air -<br />
same humidity – your <strong>QuietCool</strong> portable evaporative cooler takes that<br />
same existing air, combines it with evaporating water (which<br />
dramatically lowers the temperature) immediately relieving hot, dry<br />
areas, similar to the conditions when a natural rain storm approaches, the<br />
temperature drops noticeably cooler, because the air is saturated with<br />
water. Because your air is now saturated with water it becomes<br />
noticeably cooler. In high humidity areas the temperature will not be as<br />
cool – however, the <strong>QuietCool</strong> was engineered efficient to evaporate<br />
perspiration and sweat from employees to keep them cooler.<br />
3.0 Unpacking your new <strong>QuietCool</strong> unit<br />
Note: Carefully examine your <strong>QuietCool</strong> shipping carton for damage before opening. If your carton is damaged –<br />
notify the shipper immediately!<br />
Your QC<strong>36”</strong> unit was shipped on a wooden skid covered with a cardboard cover and lid – strapped. First remove the straps<br />
then you may lift the whole cardboard box off the unit and skid. Your <strong>QuietCool</strong> must now be lifted off the wooden skid.<br />
4.0 Set-up your <strong>QuietCool</strong> unit.<br />
Roll your <strong>QuietCool</strong> unit to a level surface and lock the swivel casters to prevent<br />
accidental movement.<br />
4.1 Connecting the electrical supply<br />
All <strong>QuietCool</strong> models require regular 3 prongs, ground with 120 volt power supply.<br />
Plug electrical cord into receptacle. If using an extension cord be sure it is rated<br />
for at least 20 amps for the distance your cord is running. To be safe – make<br />
sure no other equipment is plugged into the same circuit. The <strong>QuietCool</strong> should
un smoothly on 20 amp, 120 volt, and 60 Hz circuit.<br />
4.2 Connecting the water supply<br />
Connect standard water hose to female fitting on the right side of your <strong>QuietCool</strong> (looking at the fan blade side). If your<br />
water pressure is above 60 pounds per square inch (p.s.i). you must use a pressure regulator (which can be found at your<br />
local hardware store). If you have purchased our optional QR60 gallon reservoir tank – simply attach the garden hose from<br />
the tank to the cooler. Note: Do not connect to water source exceeding 60 p.s.i. – this can cause damage to your <strong>QuietCool</strong>.<br />
5.0 Operating procedures<br />
Back your <strong>QuietCool</strong> unit up to a fresh air source<br />
such as an open door or window so the unit can pull<br />
in fresh air from the outside. Next, make sure you<br />
have a natural exhaust at the opposite end of the<br />
room, bay or building such as a window, door or bay<br />
door. This will ensure maximum efficiency from<br />
your unit. Finally make sure there are no obstructions<br />
between your <strong>QuietCool</strong> and the people / area you<br />
need to cool.<br />
5.1 Filling the units reservoir with water<br />
Once your water hose is connected – open the water<br />
flow valve (located on the front of your unit) only<br />
one and half (1 1/4) turns. This water flow valve adjusts the amount of water to the unit. Next, turn water on and fill the<br />
reservoir with water. Listen carefully. You can hear water filling the reservoir. Check your water connection – make sure<br />
there is no dripping. Once the reservoir is filled with water the float valve will automatically shut off the water source. When<br />
you no longer hear the water running – you know that the float valve is fully operational (the water turns off automatically)<br />
and you are now ready to turn on the water pump.<br />
Warning! Do not run water pump without water in the reservoir.<br />
5.2 Turn-on pump<br />
To turn-on the water pump - flip the toggle switch for the water pump to on. Switch is<br />
located on front side of unit. Warning! Do not run water pump without water in the<br />
reservoir. The water pump will now begin pumping water to the top of the unit so that<br />
gravity will allow the water to run down the backside of unit inside and on the cooling<br />
pads. (If the water is dripping off of the pads on to the floor – close the flow valve a<br />
little to slow the water flow. After the pads are wet – you can open the valve to 1 ¼ turn.<br />
Allow water to run for 10 – 15 minutes on new cooling pads to totally saturate them<br />
with water. Once your units cooling pads are saturated – then, you are ready to turn on<br />
fan and begin to feel the cooling effect from your new <strong>QuietCool</strong>. Note: After your<br />
cooling pads are broken in (typically takes 1 -2 weeks in operation) it will take less time to saturate pads for start-up.
5.4 Turn-on Fan<br />
Once your cooling pads are wet – you may turn on your <strong>QuietCool</strong> unit. Now you can begin to feel the <strong>QuietCool</strong> difference<br />
in temperature. After your <strong>QuietCool</strong> has run for 5 minutes or so, visually inspect the pads – if water is dripping outside the<br />
unit – you have too much water, simply turn the water flow valve to the right ½ turn and inspect water flow in another 5<br />
minutes. If there are dry streaks in the cel deck pads open the water flow valve handle ½ turn to increase water – check water<br />
flow in another 5 minutes and adjust accordingly. Most <strong>QuietCool</strong> operations work effectively with valve opened between 1<br />
½ - 2 turns. This water valve is efficient – it requires minimal turning.<br />
6.0 Daily Operating procedures<br />
6.1 Turn-on water pump<br />
Turn on water pump to unit – let cooling pads get saturated – then turn on fan for cooling. Adjust the water flow –<br />
Your <strong>QuietCool</strong> operates most efficiently – and maintains uniform cooling pad wetness with the water control valve turned<br />
on at 1 ¼ turns. You must determine what works best for you and your specific environment.<br />
6.2 Adjust water flow<br />
Your <strong>QuietCool</strong> operates most efficiently – and maintains uniform cooling pad wetness with the water control valve turned<br />
on at 1 ¼ turns. You must determine what works best for you and your specific environment.<br />
6.2 Turn on fan<br />
When you can see that the cooling pads are saturated with water – turn on the fan and feel the cooler air coming from your<br />
<strong>QuietCool</strong> unit. Adjust the fan speed for your comfort.<br />
6.4 Turn-off unit at end of day<br />
15 minutes before closing for the day – turn off water pump with toggle switch – leave fan running – this action will shut-off<br />
water to the cooling pads while keeping the fan running. The fan will dry out the cooling pads. When the cooling pads are<br />
thoroughly dry – turn off fan. Drying your cooling pads thoroughly - everyday will help prevent mold and mildew growth,<br />
plus it will prolong the life of your cooling pads.<br />
7.0 Maintenance<br />
7.1 Access inside of unit<br />
Turn-off water pump and let the fan continue to run until the cooling pads are thoroughly dry (about 10 – 15 minutes). Once<br />
your cooling pads are completely dry you may turn-off fan. Now unplug electricity to unit to avoid unnecessary shock. Next,<br />
using a 7/16” wrench – remove the two retaining bolts from the backside and topside (cooling pad side) of the unit. These<br />
two bolts hold the metal angle retaining bar and the cooling pads in place. Next, remove the angle retaining bar and set to<br />
side. Now you are ready to remove your unit’s cooling pads.<br />
7.2 Removing the cooling pads<br />
Before your start, make a note of the direction of the angle of the pads flutes (see side of pads). You must put pads<br />
back in correct order for your unit to function effectively. (Note: Install steep side 45° angle flute to the back of unit.)
Once the retaining angle bar is removed from the top of your <strong>QuietCool</strong> unit, reach to the top of the dry cooling pad to the<br />
left and gently take hold of the top of the pad and gently pull back and slightly down – this action will loosen the pad from<br />
the unit. Look at the direction of the angle of the pad flutes (side of pads). Remove the cooling pad and proceed to the next<br />
pad. Then, remove all five cooling pads and gently set in a safe place. Note: this is a good time to take the cooling deck pads<br />
outside and run clean water over the pads to remove any accumulated dirt and debris. Do not use high pressure hose – this<br />
will damage pads and their ability to function effectively. Make sure the pads are thoroughly dry before placing back inside<br />
the unit. Full exposure to the sunlight is a good way to dry the pads while helping remove mold and mildew.<br />
7.3 Daily maintenance<br />
15 minutes before quitting time – turn off the water pump and let the fan run 10 – 15 minutes – to dry out the cooling pads<br />
before leaving. Inspect the cooling pads to make sure they are thoroughly dry (this action helps to reduce mold and mildew)<br />
when pads are completely dry then turn-off fan.<br />
7.4 Periodic maintenance<br />
Depending upon your environment and how often you operate your <strong>QuietCool</strong> will depend on how dirty your water gets in<br />
the reservoir and how often you will need to clean it. If you begin to detect an algae smell coming from your unit – it’s time<br />
to flush your <strong>QuietCool</strong> reservoir with fresh water. Refer to and follow the steps above in 7.2 and you will only need to<br />
remove 1 or 2 of the cooling pads from the left side of the unit to gain access to your water reservoir. Take a small sponge<br />
and clean out your water reservoir with a light cleaner and wipe it down completely and let the unit dry. (You may want to<br />
use a wet / dry shop vacuum to clean out unit). When unit is clean replace your cooling pads (make sure flutes are facing<br />
correct direction) retaining bar and bolts and add fresh, clean water back to the units’ water reservoir. Note: If smell<br />
continues after restarting the unit you may want to add QC Tabs (which help to reduce algae, mold and mildew) you can get<br />
the QC Tabs by ordering from the <strong>QuietCool</strong> order form found in section 9.0. Simply follow instructions on the label. You<br />
may want to consider a <strong>Water</strong> Stabilizer to remove harmful calcium, scale build-up and algae – see section 9.0.<br />
Note: You may want to remove most of water from water reservoir by attaching a garden hose to the drain valve and place<br />
the end of the garden hose into a drain then, running pump until sump is dry – shutting off pump immediately.<br />
Warning! Do not run pump without water in the reservoir. This action will burn up your <strong>QuietCool</strong>’s water pump.<br />
7.5 <strong>QuietCool</strong> Trouble Shooting Guide<br />
Problem<br />
1. <strong>Water</strong> on the Floor<br />
A. Front of unit . . .<br />
B. Back of unit<br />
Cause<br />
Too much water.<br />
Damage to polyethylene housing. Note:<br />
Check for possible cracks in the blue<br />
polyethylene.<br />
Excess water at top or bottom of pads.<br />
Damage to blue polyethylene housing.<br />
Solution<br />
Reduce the water flow with the water control<br />
valve located on the front of the unit. Note:<br />
Close the valve all the way – then open 1 ¼<br />
turns. <strong>QuietCool</strong> units usually operate at peak<br />
performance at 1 ¼ turns.<br />
Repair as necessary.<br />
Reduce the water flow with the water control<br />
valve located on the front of the unit.<br />
Search for leaks and repair as necessary.
Problem (continued)<br />
Cause (continued)<br />
Leaking from bottom of pads.<br />
Solution (continued)<br />
Push bottom of cooling pads gently inside to<br />
stop leaking.<br />
2. Found water on floor after<br />
overnight shut off.<br />
Excessive water pressure.<br />
Float valve maybe stuck in open position.<br />
Check you pressure. Max water pressure is 413<br />
KPA (60 p.s.i.), adjust water supply valve to<br />
1 ¼ turns or install a water pressure regulator<br />
found at local hardware store.<br />
Contaminants in water; drain cooler, sump and<br />
refill. If float remains stuck remove pads and<br />
examine float for debris or damage. Wash out<br />
debris and replace float. Continue.<br />
3. Foul odor from fan<br />
A. New Unit . . .<br />
New pad may have a temporary odor (this<br />
is normal) – you may be smelling the<br />
thermosetting resin – it will pass.<br />
Drain and refill several times in first week to<br />
remove thermosetting resin smell.<br />
Add QC Tablets to reduce smell – and algae.<br />
B. After normal use . . .<br />
<strong>Water</strong> quality – check your immediate<br />
environment.<br />
<strong>Water</strong> should be drained about once a month or<br />
sooner depending on your specific working<br />
environment – the water quality and conditions.<br />
4. No water running over the<br />
pads . . .<br />
Check your water flow valve first.<br />
Make sure your water flow valve is open.<br />
<strong>QuietCool</strong> units usually operate at peak<br />
performance at 1 ¼ turns.<br />
<strong>Water</strong> supply off at main valve source.<br />
Open water valve at supply. You may wish to<br />
keep this valve open at all times.<br />
Pump switch is off.<br />
Turn pump switch on.<br />
5. Scale build-up on cooling pads.<br />
<strong>Water</strong> filter may be clogged.<br />
Hard water with excessive mineral content.<br />
Remove the cooling pads see section 6.2. Open<br />
back of unit – open water filter – pull out filter<br />
screen and clean. Replace and try again.<br />
Use Evapo-O-Matic Tablets or add a <strong>Water</strong><br />
Stabilizer at the discharge side of the pump.<br />
See Accessories section 9.0.<br />
Flush water from unit’s water reservoir more<br />
frequently. See section 7.4.<br />
8.0 Storage<br />
Remove pads as described above in 7.2 and rinse pads clean with fresh water. Dry cooling pads in sunlight. Drain water<br />
reservoir completely and wipe dry. Replace dry cooling pads. Replace top angle bar to hold pads in place. Store <strong>QuietCool</strong><br />
in dry, clean area and cover (you can order a QCCover for your unit – see section 9.0) to prevent dust build up to have unit<br />
ready for the next hot season. Note: Make a list of accessories and needed parts – purchase off-season to save money.
9.0 Accessories
10.0 Replacement Parts<br />
All Accessories / Replacement Parts are obtainable through your local <strong>QuietCool</strong> distributor. Should a part be temporarily<br />
out of stock at your distributor he can special order it for you.<br />
You can contact the manufacturer, Quietaire Cooling Inc. directly at: Telephone: 713.228.9421 or Fax: 713.228.9425.<br />
Please have your units 1. Model number 2. Serial number (look at front side of your cooler - on the right hand side – inside<br />
guard - on the fan shroud) handy when you contact either your distributor or Quietaire Cooling Inc. for all Accessories /<br />
Replacement parts. This will assure that we are able to help you with the correct part the first time.
12.0 Wiring Diagrams for all <strong>36”</strong> units
13.0 Warranty<br />
WARRANTY<br />
WARRANTY AND DISCLAIMER: Quietaire Cooling extends this limited warranty to the original buyer and warrants that products<br />
manufactured by Quietaire Cooling shall be free from original defects in workmanship and material for one year from date of shipment,<br />
provided same have been properly stored, installed, service, maintained and operated. This warranty shall not apply to products which have<br />
been altered or repaired in any way so as to effect its performance, without Quietaire Cooling's express authorization, or altered or reliability,<br />
nor which have been improperly installed or subjected to misuse, negligence, or accident, or incorrectly used in combination with other<br />
substances. The Buyer assumes all risks and liability for results of; use for the products. Warranties on purchased parts, such as electric motor<br />
and controls are limited to the terms of warranty extended by our supplier.<br />
LIMITATION OF REMEDY AND DAMAGES: All claims under this warranty must be made in writing and delivered to Quietaire Cooling<br />
505 N. Hutcheson, Houston, Texas, 77003 within 15 days after discovery of the defect and prior to the expiration of one year from the date of<br />
shipment by Quietaire Cooling of the product claimed defective, and Buyer shall be barred from any remedy if Buyer fails to make such claims<br />
within such period.<br />
Within 30 days after receipt of a timely claim, Quietaire Cooling shall have the option either to inspect the product while in Buyer's possession<br />
or to request Buyer to return the product to Quietaire Cooling at Buyer's expense for inspection by Quietaire Cooling. Quietaire Cooling shall<br />
replace, or at its option repair, free of charge, any product it determines to be defective, and it shall ship the repaired or replacement product to<br />
Buyer F.O.B. point of shipment; provided, however, if circumstanced are such as Quietaire Cooling judgment to prohibit repair of replacement<br />
to remedy the warranted defects, the buyer's sole and exclusive remedy shall be a refund to the buyer of any part of the invoice price, paid to<br />
Quietaire Cooling for the defective product or part.<br />
Quietaire Cooling is not responsible for the cost of removal of the defective product or part, damages due to removal, or any expenses incurred<br />
in shipping the product of part to or from Quietaire Cooling plant, or the installation of the repaired or replaced product or part.<br />
Implied warranties, when applicable, shall commence upon the same date as the express warranty provided above, and shall except for<br />
warranties of title, extend only for the duration of the express warranty provided above. Some states do not allow limitations on how long an<br />
implied warranty lasts, so the above limitation may not apply to you. The only remedy provided to you under an applicable implies warranty<br />
and the express warranty shall be the remedy provided under the express warranty, subject to terms and conditions contained therein. Quietaire<br />
Cooling shall not be liable for incidental and consequential losses and damages under the express warranty, any applicable implied warranty, or<br />
claims for negligence, except to the extent that his limitation is found to be unenforceable under applicable state law. Some states do not allow<br />
exclusion or limitation of incidental or consequential damages, so the above limitation or exclusion may not apply to you. The warranty gives<br />
you specific legal rights, and you may also have other rights which vary from state to state.<br />
No employee, agent, dealer, or other person is authorized to give any warranties on behalf of Quietaire Cooling or to assume for Quietaire<br />
Cooling any other liability in connection with any of its products except in writing and signed by an officer of Quietaire Cooling.<br />
TECHNICAL ADVICE AND RECOMMENDATION, DISCLAIMER: Notwithstanding any past practice or dealings or any custom of the<br />
trade, sales shall not include the furnishing of technical advice or assistance or system design, any such assistance shall be at Quietaire Cooling<br />
sole option and may be subject to additional charge.<br />
Quietaire Cooling assumes no obligation or liability on account of any recommendations, opinions, or advice as to the choice, installation or<br />
use of products, Any such recommendations, opinions or advice are given and shall be accepted at your own risk and shall not constitute any<br />
warranty or guarantee of such products or their performance.<br />
QUIETAIRE COOLING INC.<br />
505 NORTH HUTCHESON STREET<br />
HOUSTON, TEXAS 77003<br />
TELEPHONE: 713.228.9421 FAX: 713.228.9425<br />
Visit us online at: www.Quietaire.com Click on <strong>QuietCool</strong>