PA 45 - McConnel
PA 45 - McConnel
PA 45 - McConnel
- No tags were found...

Create successful ePaper yourself
Turn your PDF publications into a flip-book with our unique Google optimized e-Paper software.
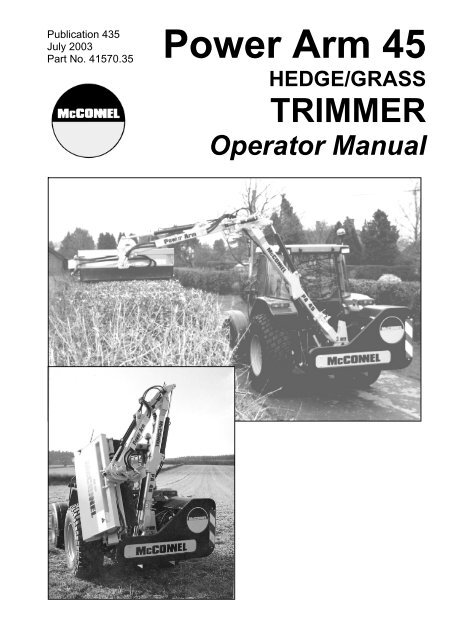
Publication 435<br />
July 2003<br />
Part No. 41570.35<br />
Power Arm <strong>45</strong><br />
HEDGE/GRASS<br />
TRIMMER<br />
Operator Manual
IMPORTANT<br />
VERIFICATION OF WARRANTY REGISTRATION<br />
(Applies to UK Machines only)<br />
UK DEALER WARRANTY INFORMATION & REGISTRATION VERIFICATION<br />
It is imperative that the selling dealer registers this machine with <strong>McConnel</strong> Limited within 7<br />
days of delivery to the end user – failure to do so may affect the validity of the machine<br />
warranty.<br />
To register a machine go to the <strong>McConnel</strong> Limited web site at www.mcconnel.com, log on<br />
to ‘DEALER INSIDE’ and select the ‘Machine Registration button’ which can be found in<br />
the Service Section of the site. Confirm to the customer that the machine has been<br />
registered in the section below.<br />
Should you experience any problems registering a machine in this manner please contact<br />
the <strong>McConnel</strong> Service Department on 01584 875848.<br />
Registration Verification (UK Machines)<br />
Dealer Name:<br />
Dealer Address:<br />
……………………………………………………………………………………..<br />
…………………………………………………………………………………..<br />
Customer Name:<br />
…………………………………………………………………………………<br />
Date of Warranty Registration:<br />
……/……/...…… Dealer Signature: ………………………<br />
NOTE TO CUSTOMER / OWNER<br />
Please ensure that the above section above has been completed and signed by the selling<br />
dealer to verify that your machine has been registered with <strong>McConnel</strong> Limited.
EC DECLARATION OF CONFORMITY<br />
Conforming to EEC Machinery Directive 98/37/EC*<br />
We,<br />
McCONNEL LIMITED,<br />
Temeside Works, Ludlow, Shropshire SY8 1JL.<br />
Declare under our sole responsibility that:<br />
The product (type) ……………………………………………………………………<br />
Tractor Mounted Hedge Cutter / Trimmer<br />
………………………………………………………………………………………….<br />
Product Code …………………………………………………………………………..<br />
<strong>PA</strong><strong>45</strong><br />
Serial No. & Date ……………………………………. Type …………………………<br />
Manufactured by the above company/* ………………………………………<br />
………………………………………………………………………………………….<br />
(* insert business name and full address if not stated above)<br />
Complies with the required provisions of the Machinery Directive 98/37/EC, *<br />
previously Directive 89/392/EEC as amended by Directives 91/368/EEC, 93/44/EEC<br />
and 93/68/EEC.<br />
The machinery directive is supported by;<br />
• BS EN ISO 12100:2003 Safety of Machinery. This standard is made up of two<br />
parts; Part 1 Terminology, methodology, Part 2 Technical Specifications.<br />
• BS EN 1050 Safety of machinery - Principles of risk assessment.<br />
• and other national standards associated with its design and construction as<br />
listed in the Technical File.<br />
The Machinery Directive is fully implemented into UK law by means of the Supply<br />
of Machinery (Safety) Regulations 1992 (SI 1992/3073) as amended by The Supply<br />
of Machinery (Safety) (Amendment) Regulations 1994 (SI 1994/2063).<br />
Signed …………………………..……………………………………………………...<br />
on behalf of McCONNEL LIMITED<br />
Responsible Person<br />
Status: Chief Design Engineer Date: May 2005
READ THE BOOK FIRST<br />
It might save hours and pounds later !<br />
When ordering spare parts always quote<br />
• The Machine Type<br />
• The Machine Serial Number<br />
• The Part Number<br />
Factory re-built service exchange units of<br />
the major hydraulic components are<br />
available from your Dealer<br />
NOISE<br />
The equivalent daily personal noise exposure from this machine, measured at<br />
the operators’ ear, is within the range 78 – 85 DB.<br />
These figures apply to a normal distribution of use where the noise fluctuates<br />
between zero and maximum. The figures assume that the machine is fitted to<br />
a tractor with a quiet cab with the windows closed in a generally open<br />
environment. We recommend that the windows are kept closed.<br />
With the cab rear window open the equivalent daily personal noise exposure<br />
will increase to a figure within the range 82 – 88 DB.<br />
At equivalent daily noise exposure levels of between 85 and 90 DB, ear<br />
protection is recommended, it should be used if any window is left open.
GENERAL INFORMATION<br />
Read this manual before fitting or operating the machine. Whenever any doubt exists contact<br />
your dealer or the <strong>McConnel</strong> Service Department for assistance.<br />
Use only <strong>McConnel</strong> Genuine spare parts on <strong>McConnel</strong> equipment and machines.<br />
DEFINITIONS - the following definitions apply throughout this manual:<br />
WARNING<br />
An operating procedure, technique etc., which can result in personal injury or loss of life if not<br />
observed carefully.<br />
CAUTION<br />
An operating procedure, technique etc., which can result in the damage of either machine or<br />
equipment if not observed carefully.<br />
NOTE<br />
An operating procedure, technique etc., which is considered essential to emphasise.<br />
LEFT AND RIGHT HAND<br />
This term is applicable to the machine when fitted to the tractor and viewed from the rear.<br />
This also applies to tractor references.<br />
Record the serial number of your machine on this page and always quote this number when<br />
ordering spares. Whenever information concerning the machine is requested remember to<br />
also state the type of tractor to which it is fitted.<br />
MACHINE SERIAL NUMBER<br />
INSTALLATION DATE<br />
MODEL DETAILS<br />
DEALERS NAME & ADDRESS<br />
DEALERS TELEPHONE NUMBER<br />
1
FEATURES<br />
<strong>PA</strong><strong>45</strong> – All models<br />
Linkage Mounted<br />
Left Hand Cutting<br />
Operator Guard<br />
Hydraulic Breakaway<br />
<strong>45</strong>HP Hydraulic System<br />
1.2m Centre Mount Supercut Flail Head<br />
<strong>PA</strong><strong>45</strong> SI models<br />
Semi Independent Hydraulics -<br />
(Tractor powered arm movement, P.T.O. pump for rotor)<br />
Rotor Engagement by Tractors PTO Lever<br />
Cable Controls<br />
<strong>PA</strong><strong>45</strong> TI models<br />
Totally Independent Hydraulics –<br />
(Powered by tandem P.T.O. pump)<br />
Independent Reversible Rotor On/Off Valve<br />
Cable Controls<br />
Optional Extras<br />
Lift Float Kit – All models<br />
Lighting Kit – All models<br />
2
This machine has the potential to be extremely dangerous, in the wrong hands it can kill or<br />
maim. It is therefore imperative that both owner, and operator of this machine, read and<br />
understand the following section to ensure that they are fully aware of the dangers that do,<br />
or may exist, and their responsibilities surrounding the use and operation of the machine.<br />
The operator of this machine is responsible not only for their own safety but equally for the<br />
safety of others who may come into the close proximity of the machine, as the owner you<br />
are responsible for both.<br />
When the machine is not in use the cutting head should be lowered to rest on the ground.<br />
In the event of a fault being detected with the machine’s operation it should be stopped<br />
immediately and not used again until the fault has been corrected by a qualified technician.<br />
POTENTIAL SIGNIFICANT DANGERS ASSOCIATED WITH THE USE OF THIS<br />
MACHINE:<br />
▲ Being hit by debris thrown by rotating components.<br />
▲ Being hit by machine parts ejected through damage during use.<br />
▲ Being caught on a rotating power take-off (PTO) shaft.<br />
▲ Being caught in other moving parts i.e.: belts, pulleys and cutting heads.<br />
▲ Electrocution from Overhead Power Lines (by contact with or ‘flashover’ from).<br />
▲ Being hit by cutting heads or machine arms as they move.<br />
▲ Becoming trapped between tractor and machine when hitching or unhitching.<br />
▲ Tractor overbalancing when machine arm is extended.<br />
▲ Injection of high-pressure oil from hydraulic hoses or couplings.<br />
▲ Machine overbalancing when freestanding (out of use).<br />
▲ Road traffic accidents due to collision or debris on the road.<br />
4
BEFORE USING THIS MACHINE YOU MUST:<br />
▲ Ensure you read all sections of the operator handbook.<br />
▲ Ensure the operator is, or has been, properly trained to use the machine.<br />
▲ Ensure the operator has been issued with and reads the operator handbook.<br />
▲ Ensure the operator understands and follows the instructions in operator handbook.<br />
▲ Ensure the tractor front, rear and side(s) are fitted with metal mesh or polycarbonate<br />
guards of suitable size and strength to protect the operator against thrown debris or<br />
parts.<br />
▲ Ensure tractor guards are fitted correctly, are undamaged and kept properly<br />
maintained.<br />
▲ Ensure that all machine guards are in position, are undamaged, and are kept<br />
maintained in accordance with the manufacturer’s recommendations.<br />
▲ Ensure flails and their fixings are of a type recommended by the manufacturer, are<br />
securely attached and that none are missing or damaged.<br />
▲ Ensure hydraulic pipes are carefully and correctly routed to avoid damage by chaffing,<br />
stretching or pinching and that they are held in place with the correct fittings.<br />
▲ Always follow the manufacturer’s instructions for attachment and removal of the<br />
machine from the tractor.<br />
▲ Check that the machine fittings and couplings are in good condition.<br />
▲ Ensure the tractor meets the minimum weight recommendations of the machine’s<br />
manufacturer and that ballast is used as necessary.<br />
▲ Always inspect the work area thoroughly before starting to note obstacles and remove<br />
wire, bottles, cans and other debris.<br />
▲ Use clear suitably sized warning signs to alert others to the nature of the machine<br />
working within that area. Signs should be placed at both ends of the work site. (It is<br />
recommended that signs used are of a size and type specified by the Department of<br />
Transport and positioned in accordance with their, and the Local Highways Authority,<br />
guidelines).<br />
▲ Ensure the operator is protected from noise. Ear defenders should be worn and tractor<br />
cab doors and windows must be kept closed. Machine controls should be routed<br />
through proprietary openings in the cab to enable all windows to be shut fully.<br />
▲ Always work at a safe speed taking account of the conditions i.e.: terrain, highway<br />
proximity and obstacles around and above the machine. Extra special attention should<br />
be applied to Overhead Power Lines. Some of our machines are capable of reach in<br />
excess of 8 metres (26 feet) this means they have the potential to well exceed, by<br />
possibly 3 metres (9’ 9”), the lowest legal minimum height of 5.2 metres from the<br />
ground for 11,000 and 33,000 volt power lines. It cannot be stressed enough the<br />
dangers that surround this capability, it is therefore vital that the operator is fully aware<br />
of the maximum height and reach of the machine, and that they are fully conversant<br />
with all aspects regarding the safe minimum distances that apply when working with<br />
machines in close proximity to Power Lines. (Further information on this subject can be<br />
obtained from the Health & Safety Executive or your Local Power Company).<br />
5
▲ Always disengage the machine, kill the tractor engine, remove and pocket the key<br />
before dismounting for any reason.<br />
▲ Always clear up all debris left at the work area, it may cause hazard to others.<br />
▲ Always ensure when you remove your machine from the tractor that it is left in a safe<br />
and stable position using the stands and props provided and secured if necessary.<br />
WHEN NOT TO USE THIS MACHINE:<br />
▲ Never attempt to use this machine if you have not been trained to do so.<br />
▲ Never use a machine until you have read and understood the operator handbook, are<br />
familiar with it, and practiced the controls.<br />
▲ Never use a machine that is poorly maintained.<br />
▲ Never use a machine if guards are missing or damaged.<br />
▲ Never use a machine on which the hydraulic system shows signs of wear or damage.<br />
▲ Never fit, or use, a machine on a tractor that does not meet the manufacturer’s<br />
minimum specification level.<br />
▲ Never use a machine fitted to a tractor that does not have suitable front, rear and<br />
side(s) cab guarding made of metal mesh or polycarbonate.<br />
▲ Never use the machine if the tractor cab guarding is damaged, deteriorating or badly<br />
fitted.<br />
▲ Never turn a machine cutting head to an angle that causes debris to be ejected<br />
towards the cab.<br />
▲ Never start or continue to work a machine if people are nearby or approaching - Stop<br />
and wait until they are at a safe distance before continuing. WARNING: Some Cutting<br />
Heads may continue to ‘freewheel’ for up to 40 seconds after being stopped.<br />
▲ Never attempt to use a machine on materials in excess of its capability.<br />
▲ Never use a machine to perform a task it has not been designed to do.<br />
▲ Never operate the tractor or machine controls from any position other than from the<br />
driving seat, especially whilst hitching or unhitching the machine.<br />
▲ Never carry out maintenance of a machine or a tractor whilst the engine is running –<br />
the engine should be switched off, the key removed and pocketed.<br />
▲ Never leave a machine unattended in a raised position – it should be lowered to the<br />
ground in a safe position on a level firm site.<br />
▲ Never leave a tractor with the key in or the engine running.<br />
▲ Never carry out maintenance on any part or component of a machine that is raised<br />
unless that part or component has been properly substantially braced or supported.<br />
▲ Never attempt to detect a hydraulic leak with your hand – use a piece of cardboard.<br />
▲ Never allow children near to, or play on, a tractor or machine under any circumstances.<br />
6
ADDITIONAL SAFETY ADVICE<br />
Training<br />
Operators need to be competent and fully capable of operating this machine in a safe and<br />
efficient way prior to attempting to use it in any public place. We advise therefore that the<br />
prospective operator make use of relevant training courses available such as those run by<br />
the Agricultural Training Board, Agricultural Colleges, Dealers and <strong>McConnel</strong>.<br />
Working in Public Places<br />
When working in public places such as roadsides, consideration should be paid to others<br />
in the vicinity. Stop the machine immediately when pedestrians, cyclists and horse riders<br />
etc. pass. Restart only when they are at a distance that causes no risk to their safety.<br />
Warning Signs<br />
It is advisable that any working area be covered by suitable warning signs and statutory in<br />
public places. Signs should be highly visible and well placed in order to give clear<br />
advanced warning of the hazard. Contact the Department of Transport or your Local<br />
Highways Authority to obtain detailed information on this subject. The latter should be<br />
contacted prior to working on the public highway advising them of the time and location of<br />
the intended work asking what is required by way of signs and procedure. – ‘Nonauthorised<br />
placement of road signs may create offences under the Highways Act’.<br />
Suggested Warning Signs Required<br />
“Road works ahead” warning sign with a supplementary “Hedge cutting” plate. “For 1<br />
mile” or appropriate shorter distance may be added to the plate.<br />
“Road narrows” warning sign with supplementary “Single file traffic” plate.<br />
White on blue “Keep right” (*) arrow sign on rear of machine.<br />
* Note – this applies to UK Market machines where traffic passes to the right of a machine<br />
working in the same direction as the traffic flow. The direction, use and colour of the arrow<br />
sign will depend on the country of use and the Local Highway Authorities regulations in the<br />
locality.<br />
Use of Warning Signs<br />
▲ On two-way roads one set of signs is needed facing traffic in each direction.<br />
▲ Work should be within 1 mile of the signs.<br />
▲ Work only when visibility is good and at times of low risk e.g.: NOT during ‘rush-hour’.<br />
▲ Vehicles should have an amber-flashing beacon.<br />
▲ Ideally, vehicles should be conspicuously coloured.<br />
▲ Debris should be removed from the road and path as soon as practicable, and at<br />
regular intervals, wearing high visibility clothing and before removing the hazard<br />
warning signs.<br />
▲ Collect all road signs promptly when the job is completed.<br />
Although the information given here covers a wide range of safety subjects, it is impossible to<br />
predict every eventuality that can occur under differing circumstances whilst operating this<br />
machine. No advice given here can replace ‘good common sense’ and ‘total awareness’ at all times,<br />
but will go a long way towards the safe use of your <strong>McConnel</strong> machine.<br />
7
FITTING<br />
Tractor Requirements<br />
Minimum tractor weight – including ballast weight if necessary:<br />
All models – 2500 kg<br />
Minimum HP requirements:<br />
All models – <strong>45</strong>HP<br />
Linkage Type:<br />
Category l / ll<br />
P.T.O. Shaft:<br />
Tractor must be equipped with a ‘live drive P.T.O.’ to enable forward motion to be<br />
stopped while the flail head continues to operate.<br />
Linkage Isolation:<br />
A linkage isolation facility is necessary for SI models only.<br />
Check Chains / Stabilisers:<br />
Check Chains or Stabiliser Bars must be fitted and tightened.<br />
Tractor Relief Valve:<br />
For SI models only the tractor relief valve must be set above 2320 psi (160 bar).<br />
Tractor Hydraulic Flow Rate:<br />
Hydraulic flow rates are not crucial for SI models.<br />
9
VEHICLE / TRACTOR PRE<strong>PA</strong>RATION<br />
We recommend vehicles are fitted with<br />
cabs using ‘safety glass’ windows and<br />
protective guarding when used with our<br />
machines.<br />
Fit Operator Guard (part no. 73 13 324)<br />
using the hooks provided. Shape the mesh<br />
to cover all vulnerable areas.<br />
Remember the driver must be looking<br />
through mesh and/or polycarbonate glazing<br />
when viewing the flail head in any working position - unless the vehicle/ cab manufacturer<br />
can demonstrate that the penetration resistance is equivalent to, or higher than, that<br />
provided by mesh/polycarbonate glazing. If the tractor has a roll bar only, a frame must be<br />
made to carry both mesh and polycarbonate glazing. The operator should also use<br />
personal protective equipment to reduce the risk of serious injury such as; eye protection<br />
(mesh visor to EN1731 or safety glasses to EN166), hearing protection to EN352, safety<br />
helmet to EN297, gloves, filter mask and high visibility clothing.<br />
Vehicle Ballast: It is imperative when attaching ‘third-party’ equipment to a vehicle that<br />
the maximum possible stability of the machine and vehicle combination is achieved – this<br />
can be accomplished by the utilisation of ‘ballast’ in order to counter-balance the additional<br />
equipment added.<br />
Front weights may be required for rear mounted machines to place 15% of total outfit<br />
weight on the front axle for stable transport on the road and to reduce ‘crabbing’ due to the<br />
drag of the cutting unit when working on the ground.<br />
Rear weights may be required to maintain a reasonable amount of rear axle load on the<br />
opposite wheel from the arms when in work; for normal off-ground work i.e. hedge cutting<br />
this should be 20% of rear axle weight or more for adequate control, and for ground work<br />
i.e. verge mowing with experienced operators, this can be reduced to 10%.<br />
All factors must be addressed in order to match the type and nature of the equipment<br />
added to the circumstances under which it will be used – in the instance of Power Arm<br />
Hedgecutters it must be remembered that the machines centre of gravity during work will<br />
be constantly moving and will differ from that during transport mode, therefore balance<br />
becomes critical.<br />
Factors that effect stability:<br />
● Centre of gravity of the tractor/machine combination.<br />
● Geometric conditions, e.g. position of the cutting head and ballast.<br />
● Weight, track width and wheelbase of the tractor.<br />
● Acceleration, braking, turning and the relative position of the cutting head during these<br />
operations.<br />
● Ground conditions, e.g. slope, grip, load capability of the soil/surface.<br />
● Rigidity of implement mounting.<br />
Suggestions to increase stability:<br />
●<br />
●<br />
●<br />
●<br />
Increasing rear wheel track; a vehicle with a wider wheel track is more stable.<br />
Ballasting the wheel; it is preferable to use external weights but liquid can be added to<br />
around 75% of the tyre volume – water with anti-freeze or the heavier Calcium Chloride<br />
alternative can be used.<br />
Addition of weights – care should be taken in selecting the location of the weights to ensure<br />
they are added to a position that offers the greatest advantage.<br />
Front axle locking, check with tractor manufacturer.<br />
The advice above is offered as a guide for stability only and is not a guide to vehicle strength. It is<br />
therefore recommended that you consult your vehicle manufacturer or local dealer to obtain specific<br />
advise on this subject, additionally advice should be sought from a tyre specialist with regard to tyre<br />
pressures and ratings suitable for the type and nature of the machine you intend to fit.<br />
10
INITIAL ATTACHMENT<br />
• Choose a firm level site.<br />
• Cut banding straps and remove<br />
transport strap, loose items and<br />
stabiliser.<br />
12
19<br />
13
OIL REQUIREMENTS<br />
Tank<br />
Fill the reservoir to approximately 2” (50mm) below the top of the tank.<br />
The capacity is approximately 140 Litres (30 imp. Gallons) – Do not overfill.<br />
Supplier Cold or Temperate Climate Hot Climate<br />
BP<br />
Bartran 46<br />
Bartran 68<br />
Energol HLP-HM 46<br />
Energol HLP-HM 68<br />
CASTROL Hyspin AWH-M 46 Hyspin AWH-M 68<br />
COMMA Hydraulic Oil LIC 15 Hydraulic Oil LIC 20<br />
ELF<br />
Hydrelf HV 46<br />
Hydrelf HV 68<br />
Hydrelf XV 46<br />
ESSO Univis N 46 Univis N 68<br />
Renolin 46<br />
Renolin 68<br />
FUCHS<br />
Renolin HVZ 46<br />
Renolin HVZ 68<br />
(UK/Non UK markets*) Renolin CL46/B15*<br />
Renolin CL68/B20*<br />
Renolin AF46/ZAF46B* Renolin AF68/ZAF68B*<br />
GREENWAY Excelpower HY 68 Excelpower HY 68<br />
MILLERS<br />
Millmax 46<br />
Millmax 68<br />
Millmax HV 46<br />
Millmax HV 68<br />
MORRIS<br />
SHELL<br />
TEXACO<br />
Liquimatic 5<br />
Liquimatic HV 46<br />
Triad 46<br />
Tellus 46<br />
Tellus T46<br />
RandoHD 46<br />
Rando HDZ 46<br />
Liquimatic 6<br />
Liquimatic HV 68<br />
Triad 68<br />
Tellus 68<br />
Tellus T68<br />
Rando HD 68<br />
Rando HDZ 68<br />
TOTAL Equivis ZS 46 Equivis ZS 68<br />
Gearbox<br />
Check the gearbox oil level –<br />
On level ground the gearbox should be filled until the oil begins to ‘dribble’ out of the level plug.<br />
Top up if required with suitable light gear oil.<br />
19
ARM CONTROLS<br />
26
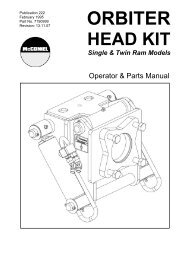
HEDGE CUTTING<br />
PROCEDURE<br />
1. Cut the side and bottom of the field side<br />
first. This leaves the maximum thickness<br />
of hedge on the road side to prevent the<br />
possibility of any debris being thrown<br />
through the hedge into the path of<br />
oncoming vehicles.<br />
2. Cut the side and bottom of the road side.<br />
3. Top cut the hedge to the height required.<br />
32
MAINTENANCE<br />
LUBRICATION<br />
General<br />
Grease daily all the points indicated in the diagram above.<br />
Power Take-off Shaft<br />
The P.T.O. Shaft and its guards should be regularly examined. The universal joints should be<br />
greased very sparingly i.e. one shot of grease weekly.<br />
Note:<br />
Overgreasing of a universal joint will ‘blow out’ the cork or neoprene sealing rings that exclude<br />
dirt and grit from the needle bearings inside.<br />
The two halves of the plastic guard should be checked daily to ensure that they spin freely on<br />
the shaft. The nylon slip rings, which support the guard, should be lightly greased at weekly<br />
intervals.<br />
The telescopic drive shaft should be similarly separated and grease applied to the internal shaft<br />
at approximately 100 hour intervals.<br />
35
<strong>McConnel</strong> Limited, Temeside Works, Ludlow, Shropshire SY8 1JL. England.<br />
Telephone: 01584 873131. Facsimile: 01584 876463. www.mcconnel.com