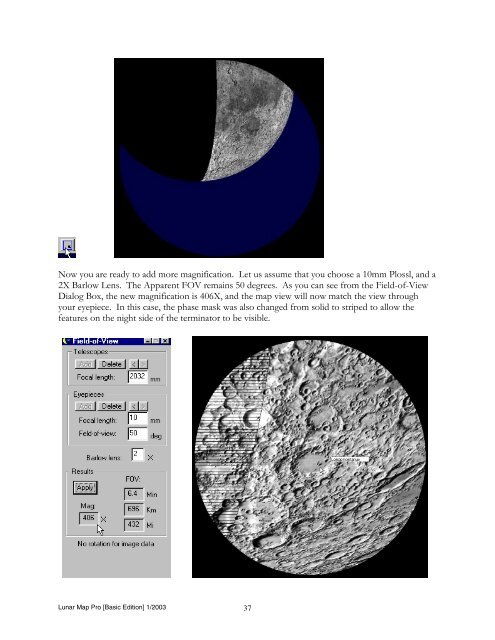
Now you are ready to add more magnification. Let us assume that you choose a 10mm Plossl, and a 2X Barlow Lens. The Apparent FOV remains 50 degrees. As you can see from the Field-of-View Dialog Box, the new magnification is 406X, and the map view will now match the view through your eyepiece. In this case, the phase mask was also changed from solid to striped to allow the features on the night side of the terminator to be visible. <strong>Lunar</strong> <strong>Map</strong> <strong>Pro</strong> [<strong>Basic</strong> <strong>Edition</strong>] 1/2003 37
One thing that should be pointed out, is that although FOV maps will closely match the view through your telescope eyepieces, it is unlikely that the maps will match perfectly. The reason for that is not software related, but equipment related. While the computer has the luxury of making precise mathematical calculations, you can expect some variation in the manufacturing tolerances of your optics. If, for instance, we allow for a very small 1% variation in the manufacturing tolerances of your equipment, a 2032mm focal length SCT, could actually be a 2052mm focal length scope. A 6.7mm eyepiece could be a 6.6mm eyepiece, and an 84 degree apparent FOV could actually be 83 degrees. When you consider the cumulative effect of these minor variations, the reasons for the disparity becomes clear. If absolute precision is important to you, select one function, the best choice being FOV, and tweak it until you are fully satisfied with the results. IMPORTANT: Never use the Zoom Buttons on the Tool Bar, if you are using the FOV Dialog Box. Using the Zoom Buttons will throw the calculations way off. The only way to increase or decrease the image scale, is by entering shorter, or longer focal length eyepiece values into the Field-of-View Dialog Box, or by entering a Barlow factor greater than 1. As you can see, <strong>Lunar</strong> <strong>Map</strong> <strong>Pro</strong> TM BE contains several powerful mapping and feature identification tools for computer users, but it is not essential to take a laptop into the field. You can still print beautiful custom maps for use at your telescope eyepiece. Just prepare a set of high-resolution maps prior to your observing session. Select the correct date, time, and map orientation, and use the “Phase Manager” to add the correct terminator position. Use the Labeler, to add feature names, and you will have the most detailed and accurate maps available for your personal observing X. Adjusting Dialog Boxes: If you do not want to see open dialog boxes on your screen, you can always minimize them. When you minimize a dialog box, it continues to remain active, but is reduced to a small button that sits on the Windows TM Task Bar. To minimize a dialog box, click the “Underscore” button on the upper right-hand corner of the dialog box. To restore the dialog box, just click its button on the Windows TM Task Bar. If your computer is set so that the Task Bar is covered by the <strong>Lunar</strong> <strong>Map</strong> <strong>Pro</strong> TM BE Status Bar, just click on the appropriate Menu item or Tool Bar button. If you want to change the location of a dialog box, you can drag it to a different area of your screen. Just click on the blue Title Bar at the top of the dialog box, and depress your left mouse key while moving your mouse. When the dialog box has been moved to the desired position, release the mouse. If you are not familiar with these Windows TM protocols, please refer to Windows TM Help. IMPORTANT: With most dialog boxes, closing the dialog box, instead of minimizing it, will cancel out the dialog box function! <strong>Lunar</strong> <strong>Map</strong> <strong>Pro</strong> [<strong>Basic</strong> <strong>Edition</strong>] 1/2003 38