Download PDF Manual for LX1360 Scoreboard - Scoreboards
Download PDF Manual for LX1360 Scoreboard - Scoreboards
Download PDF Manual for LX1360 Scoreboard - Scoreboards

You also want an ePaper? Increase the reach of your titles
YUMPU automatically turns print PDFs into web optimized ePapers that Google loves.
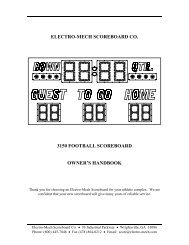
Model <strong>LX1360</strong><br />
Product Guide<br />
Baseball & Football <strong>Scoreboard</strong><br />
72 Industrial Boulevard<br />
Wrightsville, GA 31096<br />
Phone: (800) 445-7843<br />
Fax: (800) 864-0212<br />
www.electro-mech.com<br />
<strong>LX1360</strong> Revision 5 March 11, 2013
Table of Contents<br />
<strong>Scoreboard</strong> Specifications .........................................................3<br />
<strong>Scoreboard</strong> Installation .............................................................4<br />
Mechanical Installation.............................................................................................4<br />
Electrical Installation................................................................................................8<br />
Reversible Captions.................................................................................................11<br />
Servicing the <strong>Scoreboard</strong> ........................................................12<br />
Display Replacement...............................................................................................12<br />
Driver Replacement.................................................................................................15<br />
Power Supply Replacement.....................................................................................17<br />
Horn Replacement...................................................................................................18<br />
Warranty ..................................................................................19<br />
<strong>LX1360</strong> Revision 5 March 11, 2013
<strong>LX1360</strong> Revision 5 March 11, 2013<br />
<strong>Scoreboard</strong> Specifications<br />
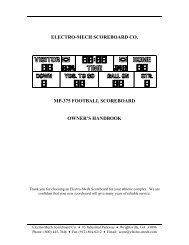
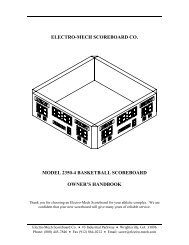
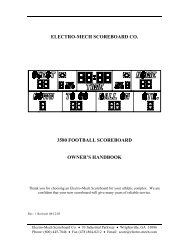
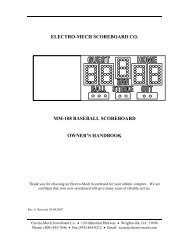
Model: <strong>LX1360</strong><br />
Packing List: <strong>Scoreboard</strong> cabinet, mounting hardware, control console, junction box, and stereo<br />
patch cable<br />
Displays: Red or Amber LEDs <strong>for</strong>...<br />
• Clock: 18-inch tall digits <strong>for</strong> minutes and seconds<br />
• Home / Guest Score: 18-inch tall digits with a max count of 99<br />
• Inning (To Go): 18-inch tall digit with a max count of 9<br />
• Ball/Down, Strike/Quarter, Out: 4-inch bullet-style indicators<br />
Dimensions: 120 inches W x 60 inches H x 6 inches D<br />
Weight: 180 lbs.<br />
Location of Serviceable Components: Behind right side (Home) Score digits<br />
Power Requirements: 120 VAC, 2.0 Amps, 60 Hz<br />
Accessories: A 4-1/4 in. x 2-1/4 in. x 2 in. junction box with a 1/4 in. stereo jack mounted on the<br />
face plate is attached to the data cable at the point of operation. A 10-ft. stereo patch cable connects<br />
the control console to the junction box.<br />
Posts Needed <strong>for</strong> Mounting: 2<br />
3
<strong>LX1360</strong> Revision 5 March 11, 2013<br />
<strong>Scoreboard</strong> Installation<br />
One of the items listed below must be purchased from Electro-Mech in order to complete the<br />
installation:<br />
• Data cable (length dependent upon installation site layout)<br />
• ScoreLink wireless communication system<br />
Items not provided by Electro-Mech that are necessary <strong>for</strong> installation:<br />
• Two posts<br />
• Power cable to connect the scoreboard to the power source<br />
• Grounding hardware<br />
• A grounded NEMA 5-15R 120 VAC receptacle <strong>for</strong> the control console at the<br />
scorekeeper’s table<br />
• A weatherproof power disconnect at the scoreboard<br />
Please consult national and local codes be<strong>for</strong>e beginning your installation. Electronic signs such<br />
as scoreboards can be subject to restrictions in some areas. Electro-Mech will provide technical<br />
support to answer your installation questions and cooperate with the people involved in your<br />
installation process. Qualified personnel should per<strong>for</strong>m the scoreboard installation.<br />
Mechanical Installation<br />
Mechanical installation includes erecting posts and attaching the scoreboard and ID panel cabinets<br />
to the posts.<br />
Post Installation<br />
In its standard configuration, the scoreboard cabinet mounts on two posts. Typically installers use<br />
steel pipes or I-beams as mounting posts. The mounting hardware provided with this scoreboard<br />
will accommodate posts up to 4-1/2 inches in diameter. When the scoreboard cabinet includes two<br />
side ID panels, it ships with larger mounting hardware that will accommodate 7-inch diameter<br />
posts.<br />
In order to reduce glare from the sun on the front of the scoreboard, position the posts to angle the<br />
scoreboard face away from the afternoon sun. Sink the posts in concrete footings. The specifications<br />
<strong>for</strong> posts and footings are dependent upon factors such as the expected local wind and soil<br />
conditions, the height of the scoreboard from the ground, and local building codes.<br />
The illustrations on the following pages show the how the posts are spaced <strong>for</strong> a few typical configurations<br />
of this scoreboard. Please contact the factory to verify the post size and spacing <strong>for</strong><br />
your particular package be<strong>for</strong>e beginning installation.<br />
4
<strong>LX1360</strong> Revision 5 March 11, 2013<br />
<strong>LX1360</strong> Standard Post Spacing<br />
10'<br />
7'<br />
5'<br />
POWER CABLE<br />
IN 3/4" CONDUIT<br />
POWER<br />
DISCONNECT<br />
#6 BARE COPPER<br />
GROUND WIRE<br />
5/8" BRASS TEAR<br />
DROP CONNECTOR<br />
5/8" X 8' COPPER<br />
CLAD GROUND ROD<br />
CONTROL CABLE<br />
IN 3/4" CONDUIT<br />
10'<br />
TO CONTROL LOCATION<br />
TO POWER SOURCE<br />
<strong>LX1360</strong> Post Spacing with One Side ID Panel<br />
14'<br />
11'<br />
5'<br />
POWER CABLE<br />
IN 3/4" CONDUIT<br />
POWER<br />
DISCONNECT<br />
#6 BARE COPPER<br />
GROUND WIRE<br />
5/8" BRASS TEAR<br />
DROP CONNECTOR<br />
5/8" X 8' COPPER<br />
CLAD GROUND ROD<br />
CONTROL CABLE<br />
IN 3/4" CONDUIT<br />
10'<br />
TO CONTROL LOCATION<br />
TO POWER SOURCE<br />
5
<strong>LX1360</strong> Revision 5 March 11, 2013<br />
<strong>LX1360</strong> Post Spacing with Two Side ID Panels<br />
18'<br />
11'<br />
5'<br />
POWER CABLE<br />
IN 3/4" CONDUIT<br />
POWER<br />
DISCONNECT<br />
#6 BARE COPPER<br />
GROUND WIRE<br />
5/8" BRASS TEAR<br />
DROP CONNECTOR<br />
5/8" X 8' COPPER<br />
CLAD GROUND ROD<br />
CONTROL CABLE<br />
IN 3/4" CONDUIT<br />
10'<br />
TO CONTROL LOCATION<br />
TO POWER SOURCE<br />
Mounting Hardware<br />
The back of the scoreboard is attached to the posts at four points as shown below. Four sets of<br />
mounting hardware are provided to attach the scoreboard to the posts at these points. Additional<br />
hardware sets are provided to attach the optional ID panels, if ordered. A single set of mounting<br />
hardware consists of a steel angle bracket, two threaded rods, two washers, and two nuts. On the<br />
following page is an illustration of an overhead cross section view and a side cross section view of<br />
the scoreboard attached to a post at a mounting point. A steel bar is riveted to the scoreboard’s<br />
aluminum extrusion frame. The bar has two tapped holes. The threaded rods screw into these<br />
tapped holes. The washers and nuts are used to clamp the steel angle bracket against the steel post<br />
and hold the scoreboard in place.<br />
<strong>LX1360</strong> Mounting Points<br />
Mounting Points<br />
6
<strong>LX1360</strong> Revision 5 March 11, 2013<br />
Extrusion Lip<br />
<strong>Scoreboard</strong><br />
Back<br />
Threaded Rod<br />
Steel Angle<br />
Bracket<br />
Overhead Cross Section View<br />
1/4-Inch Flat Bar<br />
With Tapped Holes<br />
Nut<br />
Washer<br />
4-Inch Steel Post<br />
4-Inch<br />
Steel Post<br />
Steel Angle<br />
Bracket<br />
Nut<br />
Washer<br />
Side Cross Section View<br />
Aluminum Frame<br />
Extrusion<br />
<strong>Scoreboard</strong><br />
Face<br />
Threaded Rod<br />
1/4-Inch Flat Bar<br />
With Tapped Holes<br />
<strong>Scoreboard</strong> Back<br />
Standard Mounting Method<br />
Note: If you’ve purchased an ID panel to be mounted above the scoreboard, it will be easier to<br />
raise it into position first. Use the same technique described below.<br />
The following steps describe how to mount the scoreboard on the posts:<br />
1. Place the back of the scoreboard cabinet against the posts on the ground. Make sure the<br />
mounting points are aligned with the posts.<br />
2. Screw the threaded rods into the tapped holes in the scoreboard.<br />
3. Place a steel angle bracket over the threaded rods at one of the mounting points.<br />
4. Place a washer over each threaded rod.<br />
5. Screw the nuts onto the threaded rods so that the bracket is loosely held in place.<br />
6. Repeat steps 3 - 5 at the other mounting points.<br />
7. Raise scoreboard into place and tighten nuts to clamp the back of the scoreboard against<br />
the posts.<br />
7
<strong>LX1360</strong> Revision 5 March 11, 2013<br />
Electrical Installation<br />
We recommend a qualified electrician per<strong>for</strong>m the needed electrical connections to ensure proper<br />
operation of the scoreboard. These connections include grounding the scoreboard, connecting the<br />
scoreboard to a power source, installing the ScoreLink RF Receiver or the data cable, and connecting<br />
the control console.<br />
Ground Connection<br />
The National Electrical Code requires a scoreboard (electric sign) to be grounded. Grounding the<br />
cabinet helps the scoreboard electronics operate properly and helps minimize damage caused by<br />
lightning strikes. Metal posts do not provide an adequate ground path. The following steps<br />
describe how to ground the scoreboard:<br />
1. Drive one or more 5/8 in. x 8 ft. copper clad ground rods in the soil near the scoreboard.<br />
2. Connect #6 bare copper wire to the ground rods using 5/8 in. brass tear drop connectors.<br />
3. On the back of the scoreboard, remove the access panel to expose the Power and Data<br />
Chassis. Dome plugs covering the knock-outs may be removed to feed cables through to<br />
the Power and Data Chassis.<br />
4. Pass the ground conductor through one of the knock-outs and connect it to the ground lug<br />
(Ground).<br />
Power and Data Chassis Location (Access Panel in Place)<br />
8
<strong>LX1360</strong> Revision 5 March 11, 2013<br />
Power and Data Chassis (Access Panel Removed)<br />
Power Connections<br />
The scoreboard requires 120 VAC service at the scoreboard to operate properly. Maximum<br />
power consumption of Model <strong>LX1360</strong>: 260 Watts. Make sure your power cable is rated <strong>for</strong> this<br />
electrical load. Install the power cable in conduit. Avoid running the power cable near the data<br />
cable. The following steps describe how to connect the scoreboard to the power source:<br />
1. Feed the power cable through one of the knock-outs beside the Power and Data Chassis.<br />
2. Crimp <strong>for</strong>k terminals to the power cable wires.<br />
3. Connect the AC line wire, AC ground wire, and AC neutral wire to the Main Power terminal<br />
block on the Power and Data Chassis according to the illustration below:<br />
AC-L<br />
AC-N<br />
MAIN POWER<br />
GROUND<br />
9
<strong>LX1360</strong> Revision 5 March 11, 2013<br />
Install a power disconnect that isolates all current carrying conductors (not the ground conductor)<br />
on one of the posts below the scoreboard. If a secondary switch is installed near the scorekeeper’s<br />
table, it should also isolate these conductors. Place the power disconnect in the OFF position<br />
between games to help protect the scoreboard from lightning damage. This can also provide a<br />
convenient way of turning the scoreboard off during maintenance or repairs.<br />
ScoreLink Wireless RF Communication System<br />
The ScoreLink Wireless RF Communication System is designed to eliminate the data cable<br />
between the scoreboard and the control console on Electro-Mech scoreboards. If you have purchased<br />
this accessory, disregard the section of this manual titled Data Cable Installation. Refer to<br />
the installation manual provided <strong>for</strong> this product. An embedded ScoreLink receiver module purchased<br />
along with a scoreboard will be shipped pre-installed from the factory<br />
Data Cable Installation<br />
The data cable connects the scoreboard to the control console. Install the data cable in conduit. If<br />
the cable is ever damaged, it is easier and less expensive to replace a cable in conduit. A small<br />
junction box with a 1/4-inch stereo jack mounted on the face plate is attached to the data cable at<br />
the point of operation of the scoreboard. This junction box should be securely mounted in a clean,<br />
dry area within ten feet of the control console. Most customers order the data cable with the junction<br />
box attached. Some customers prefer to attach the junction box after the cable is installed.<br />
Those customers must solder the data cable to the 1/4-inch stereo jack. The illustration below<br />
shows the data cable wire connection points on the rear of the 1/4-inch stereo jack.<br />
1/4-inch Stereo Jack Wiring Diagram<br />
2<br />
1<br />
3<br />
PIN 2 - RED WIRE<br />
PIN 1 - BLACK WIRE<br />
PIN 3 - SHIELD WIRE<br />
The following steps describe how to connect the data cable to the scoreboard:<br />
1. At the rear of the scoreboard feed the data cable through one of the knock-outs next to the<br />
Power and Data Chassis.<br />
2. Crimp <strong>for</strong>k terminals to the data cable wires and the shield.<br />
3. Connect the data cable red wire to the RED terminal of the Data In terminal block.<br />
4. Connect the data cable black wire to the BLK terminal of the Data In terminal block.<br />
5. Connect the data cable shield wire to the SHLD terminal of the Data In terminal block.<br />
6. Reinstall the access panel.<br />
10
<strong>LX1360</strong> Revision 5 March 11, 2013<br />
Control Console Connections<br />
The 10 ft. stereo patch cable has two molded 1/4-inch stereo plugs attached to it. It is used to connect<br />
the control console to the junction box. The following steps describe how to connect the control<br />
console:<br />
1. Plug one end of the stereo patch cable into 1/4-inch stereo jack on the junction box.<br />
2. Plug the other end into the 1/4-inch stereo jack mounted on the control console back plate.<br />
3. Plug the control console power cord into a grounded NEMA 5-15R 120 VAC receptacle.<br />
Control Console Safety Warning<br />
This product is equipped with a 3-wire grounding type plug, a plug having a third (grounding)<br />
pin. This plug will only fit into a grounding-type power outlet. This is a safety feature. If you are<br />
unable to insert the plug into the outlet, contact a qualified electrician to replace your obsolete<br />
outlet. Do not defeat the purpose of the grounding-type plug.<br />
Reversible Captions<br />
This multi-sport scoreboard includes reversible captions <strong>for</strong> Baseball and Football. Some of the<br />
bullets and digits used to display Ball, Strike, and Inning in<strong>for</strong>mation <strong>for</strong> baseball can also be used<br />
to display Down, Quarter, and Yards To Go (respectively) <strong>for</strong> football. These captions are on<br />
moveable plates and are held in place by rails instead of being part of the face of the scoreboard.<br />
To change sports, slide out the plates and select the appropriate captions <strong>for</strong> the sport being<br />
played.<br />
Note: The rails holding the reversible captions are the same color as the scoreboard face. These<br />
rails have been highlighted <strong>for</strong> added visibility.<br />
11
<strong>LX1360</strong> Revision 5 March 11, 2013<br />
Servicing the <strong>Scoreboard</strong><br />
While your scoreboard was designed <strong>for</strong> years of trouble-free operation, some problems may<br />
occasionally occur. Electro-Mech offers onsite service in some areas. In other areas, we can help<br />
you contact an independent service technician. In either case, we will make every ef<strong>for</strong>t to answer<br />
your questions. Our trained personnel are ready to provide technical support from Monday to Friday<br />
during the hours of 8 AM to 5 PM Eastern Time. Our convenient toll free number is listed on<br />
the cover page of this product guide. Be sure to know your scoreboard model number when calling.<br />
Most scoreboard replacement parts are available <strong>for</strong> immediate shipment. Damaged parts can<br />
usually be repaired at a significant cost savings.<br />
If the scoreboard turns on LEDs, but does not operate normally, make note of which functions are<br />
affected. If some LEDs either never turn on or always stay on, make note of their specific locations<br />
on the scoreboard.<br />
Display Replacement<br />
The LEDs that <strong>for</strong>m digits and indicators are soldered on circuit boards mounted behind metal<br />
masks. Do not attempt to replace individual LEDs. In case of a malfunction, the entire LED circuit<br />
board must be removed. To avoid damage to the electrical components, always turn off<br />
the power to the scoreboard when removing or replacing LED displays. The illustration<br />
below shows the components of a typical LED digit assembly.<br />
LED Digit Assembly<br />
1/8" SPACER<br />
6-32 KEP LOCK NUT<br />
MASK<br />
<br />
LED DIGIT<br />
12
<strong>LX1360</strong> Revision 5 March 11, 2013<br />
The following steps describe how to replace a defective LED display:<br />
1. Remove the sheet metal screws that fasten the mask to the face of the scoreboard. Caution:<br />
Support the mask with your hand be<strong>for</strong>e removing the last screw. The ribbon cable that<br />
connects to the rear of the circuit board is not designed to support the weight of the assembly.<br />
2. Disconnect the ribbon cable from the rear of the circuit board. For assemblies with more<br />
than one LED display PCB, it will be necessary to disconnect the ribbon cables from each<br />
circuit board. The cables are labeled to indicate the proper circuit board connection. Caution:<br />
Do not let the cable hang outside of the scoreboard. It is easily cut by sharp metal<br />
edges. Damage to the ribbon cable may create short circuit paths that will damage the<br />
other components.<br />
3. Place the assembly on a flat surface and remove the 6-32 kep lock nuts that hold the defective<br />
circuit board in place.<br />
4. Remove the circuit board from the assembly.<br />
5. Align the mounting holes in the replacement LED digit circuit board with the threaded<br />
studs on the mask and install it on the mask using the 6-32 kep lock nuts.<br />
6. Plug the ribbon cable onto the header on the back of the circuit board. Refer to the illustration<br />
below in order to plug the ribbon cable IDC connector onto the circuit board in the<br />
proper orientation.<br />
LED DIGIT HEADER<br />
RIBBON CABLE<br />
IDC SOCKET<br />
CABLE<br />
CENTER KEY<br />
CENTER KEY ON RIBBON CABLE IDC SOCKET<br />
MUST POINT IN THE SAME DIRECTION AS THE<br />
ARROW ON THE REAR OF THE LED DIGIT.<br />
7. Reinstall the assembly using the sheet metal screws.<br />
13
J6<br />
J5<br />
J4<br />
J7 J15<br />
J3 J2<br />
J10<br />
J9<br />
J8<br />
J6<br />
J5<br />
J4<br />
J7 J15<br />
J3 J2<br />
J10<br />
J9<br />
J8<br />
<strong>LX1360</strong> Revision 5 March 11, 2013<br />
Chassis Location<br />
LX17<br />
LX22<br />
#1<br />
5A<br />
Inside the chassis you will find an LX17 Driver, an LX22 Driver, a Mean Well Power Supply, a<br />
Horn Relay, and a 5 amp fuse.<br />
Chassis Contents<br />
LX17 Driver<br />
LX22 Driver<br />
Horn Relay<br />
5 Amp Fuse<br />
Mean Well<br />
Power Supply #1<br />
SP-320-24<br />
14
<strong>LX1360</strong> Revision 5 March 11, 2013<br />
Driver Replacement<br />
Electrical connections to the LX Driver Printed Circuit Boards are made with ribbon cable polarized<br />
IDC sockets and locking ramp crimp terminal housings that mate with jacks on the PCB.<br />
Four machine screws are used to secure a Driver PCB inside the scoreboard. A line drawing of an<br />
LX Driver is provided below, and on the following page is a table listing all connections <strong>for</strong> both<br />
LX Drivers.<br />
1. Unplug the electrical connections from the PCB. Do not cut the plastic tie wraps around<br />
the ribbon cables.<br />
2. Remove the four screws.<br />
3. Remove the PCB from the scoreboard.<br />
4. Insert the replacement PCB in the scoreboard.<br />
5. Secure the PCB with the four screws.<br />
6. Insert the plugs into the jacks on the module.<br />
To avoid damage to the PCB, always turn off the power to the scoreboard when removing or<br />
replacing it.<br />
Generic LX Driver<br />
15
<strong>LX1360</strong> Revision 5 March 11, 2013<br />
PCB Jack LX17 Functions LX22 Functions<br />
J2 ScoreLink Data Input (if used) Not used on this scoreboard<br />
J3 Data Output Data Output<br />
J4 Minutes units digit Home Score units digit<br />
J5<br />
Minutes tens digit<br />
Home Score tens digit /<br />
Out Indicator 1<br />
J6 Seconds units digit Guest Score units digit<br />
J7 DC Power Input DC Power Input<br />
J8 Innings & To Go units digit Innings & To Go tens digit<br />
J9<br />
J10<br />
Seconds tens digit<br />
Quarter 4 Indicator<br />
Guest Score tens digit /<br />
Out Indicator 2<br />
Quarter & Strike Indicators 1-2 /<br />
Down & Ball Indicators 1-2 /<br />
Down & Ball Indicators 3-4 /<br />
Quarter 3 Indicator<br />
J15 Horn Not used on this scoreboard<br />
SHLD,<br />
RED, BLK<br />
Input Data<br />
Input Data<br />
16
<strong>LX1360</strong> Revision 5 March 11, 2013<br />
Power Supply Replacement<br />
The Model <strong>LX1360</strong> uses a Mean Well SP-320-24 power supply module. Replacement modules<br />
are available from Electro-Mech or through distributors of Mean Well power supplies. The power<br />
supply must be set to provide 18.9 VDC output, which is how they are configured when shipped<br />
from Electro-Mech. Connections are made to a set of screw terminals along the side of the power<br />
supply as illustrated below. The table below lists each terminal and its corresponding function. To<br />
avoid damage to the power supply module, always turn off the power to the scoreboard<br />
when removing or replacing it.<br />
Terminal<br />
Function<br />
Line (L)<br />
Neutral (N)<br />
Main AC Power<br />
Ground<br />
V1 Positive (V1+)<br />
V1 Negative (V1-)<br />
V2 Positive (V2+)<br />
V2 Negative (V2-)<br />
V3 Positive (V3+)<br />
V3 Negative (V3-)<br />
LX17 Driver<br />
LX22 Driver<br />
SocreLink RF System<br />
(if used)<br />
17
<strong>LX1360</strong> Revision 5 March 11, 2013<br />
Horn Replacement<br />
The <strong>LX1360</strong> has an internally mounted horn (Federal Signal Model 350) located between the<br />
Inning and right side (Home) Score display. The horn is accessible through the front of the scoreboard.<br />
To replace the horn, you will need a 1/4-in. nut driver, Phillips head screw driver, and tools<br />
<strong>for</strong> splicing 18-gauge wire. Follow the steps described below:<br />
NOTE: ALWAYS TURN THE POWER OFF BEFORE REPLACING COMPONENTS<br />
1. Using the nut driver, remove the four self-tapping screws from the corners of the horn<br />
cover plate. The horn assembly is attached to the back side of this plate.<br />
2. Pull the cover plate and horn assembly away from the scoreboard cabinet and cut the two<br />
wires at the splice.<br />
3. With the horn assembly now completely detached from the scoreboard, remove the two<br />
Phillips head screws from the front of the cover plate. This will allow you to separate the<br />
horn assembly from the cover plate.<br />
4. To separate the weatherproof cover from the back of the horn, remove the Phillips head<br />
screws from the front of the horn assembly.<br />
5. Pull the wires through the grommet in the bottom of the weatherproof box and set aside<br />
the old horn.<br />
6. Slide new horn’s wires through the rubber grommet at the bottom of the weatherproof box.<br />
7. Secure the weatherproof cover to the back of the new horn using the Phillips head screws.<br />
8. Reattach the cover plate to the front of the horn assembly.<br />
9. Splice the new horn’s Line (black) and Neutral (white) wires to the matching wires in the<br />
scoreboard.<br />
10. Place the completed assembly back in the scoreboard and, using the nut driver, reattach it<br />
with the four self-tapping screws.<br />
18
<strong>LX1360</strong> Revision 5 March 11, 2013<br />
Warranty<br />
Electro-Mech <strong>Scoreboard</strong> Co. Five-Year Limited Warranty<br />
The electrical components of all Electro-Mech scoreboards are guaranteed <strong>for</strong> a<br />
period of five (5) years from the date of invoice against defects in workmanship or<br />
material and will be replaced or repaired without cost to the owner, provided the<br />
equipment or parts are returned postage-paid to the factory in Wrightsville, GA.<br />
Shipping back to the owner will be via UPS ground service except when air or special<br />
method of return is specified by the owner, in which case shipping will be freight collect.<br />
This warranty does not include labor charges incurred in the removal of component<br />
parts, service calls, or damages resulting from improper installation, improper operation,<br />
or problems caused by any repair, alteration or modification of the scoreboard<br />
not per<strong>for</strong>med by Electro-Mech.<br />
Equipment which is subjected to accident, neglect, abuse, misuse, or natural disasters,<br />
including but not limited to fire, wind, lightning, or flood, is not covered by this<br />
guarantee.<br />
19