DHU600_Series Quick Start Guide - Digimerge
DHU600_Series Quick Start Guide - Digimerge
DHU600_Series Quick Start Guide - Digimerge

Create successful ePaper yourself
Turn your PDF publications into a flip-book with our unique Google optimized e-Paper software.
Time<br />
Time<br />
Time<br />
Time<br />
Time<br />
under 15 minutes under 30 minutes under 60 minutes over 60 minutes<br />
SET-UP INTERNET REMOTE SECURITY<br />
under 15 minutes under 30 minutes under 60 minutes over 60 minutes<br />
SET-UP INTERNET REMOTE SECURITY<br />
under 15 minutes under 30 minutes under 60 minutes over 60 minutes<br />
SET-UP INTERNET REMOTE SECURITY<br />
under 15 minutes under 30 minutes under 60 minutes over 60 minutes<br />
SET-UP INTERNET REMOTE SECURITY<br />
under 15 minutes under 30 minutes under 60 minutes over 60 minutes<br />
SET-UP INTERNET REMOTE SECURITY<br />
Hand Tools<br />
Hardware<br />
Hi Speed<br />
MONITORING - FOR LOCAL AND<br />
Time<br />
REMOTE VIEWING<br />
Hand Tools<br />
Hardware<br />
Hi Speed<br />
MONITORING - FOR LOCAL AND<br />
Time<br />
REMOTE VIEWING<br />
Hand Tools<br />
Hardware<br />
Hi Speed<br />
MONITORING - FOR LOCAL AND<br />
Time<br />
REMOTE VIEWING<br />
Hand Tools<br />
Hardware<br />
Hi Speed<br />
MONITORING - FOR LOCAL AND<br />
Time<br />
REMOTE VIEWING<br />
Hand Tools<br />
Hardware<br />
Hi Speed<br />
MONITORING - FOR LOCAL AND<br />
Time<br />
REMOTE VIEWING<br />
STEP 3<br />
Time<br />
REMOTE VIEWING INSTALLATION Router GUIDE<br />
Time: 60 Minutes<br />
under 15 minutes Hardware<br />
under 30 minutes<br />
Skill Level<br />
PC/Router<br />
under 60 minutes<br />
Hand Tools<br />
Hardware<br />
Hi Speed<br />
Skills over 60 minutes - Advanced<br />
STEP 3<br />
Time<br />
REMOTE VIEWING INSTALLATION Router GUIDE<br />
Time: 60 Minutes<br />
under 15 minutes Hardware<br />
under 30 minutes<br />
Skill Level<br />
PC/Router<br />
under 60 minutes<br />
Hand Tools<br />
Hardware<br />
Hi Speed<br />
Skills over 60 minutes - Advanced<br />
STEP 3<br />
Time<br />
REMOTE VIEWING INSTALLATION Router GUIDE<br />
Time: 60 Minutes<br />
under 15 minutes Hardware<br />
under 30 minutes<br />
Skill Level<br />
PC/Router<br />
under 60 minutes<br />
Hand Tools<br />
Hardware<br />
Hi Speed<br />
Skills over 60 minutes - Advanced<br />
STEP 3<br />
Time<br />
REMOTE VIEWING INSTALLATION Router GUIDE<br />
Time: 60 Minutes<br />
under 15 minutes Hardware<br />
under 30 minutes<br />
Skill Level<br />
PC/Router<br />
under 60 minutes<br />
Hand Tools<br />
Hardware<br />
Hi Speed<br />
Skills over 60 minutes - Advanced<br />
STEP 3<br />
Time<br />
REMOTE VIEWING INSTALLATION Router GUIDE<br />
Time: 60 Minutes<br />
under 15 minutes Hardware<br />
under 30 minutes<br />
Skill Level<br />
PC/Router<br />
under 60 minutes<br />
Hand Tools<br />
Hardware<br />
Hi Speed<br />
Skills over 60 minutes - Advanced<br />
under 15 minutes<br />
under 30 minutes<br />
under 60 minutes<br />
over 60 minutes<br />
easy<br />
Router Intermediate<br />
advanced<br />
Continued<br />
under 15 minutes<br />
under 30 minutes<br />
under 60 minutes<br />
over 60 minutes<br />
easy<br />
Router Intermediate<br />
advanced<br />
Continued<br />
under 15 minutes<br />
under 30 minutes<br />
under 60 minutes<br />
over 60 minutes<br />
easy<br />
Router Intermediate<br />
advanced<br />
Continued<br />
under 15 minutes<br />
under 30 minutes<br />
under 60 minutes<br />
over 60 minutes<br />
easy<br />
Router Intermediate<br />
advanced<br />
Continued<br />
under 15 minutes<br />
under 30 minutes<br />
under 60 minutes<br />
over 60 minutes<br />
easy<br />
Router Intermediate<br />
advanced<br />
Hand Tools<br />
Hardware<br />
Hi Speed<br />
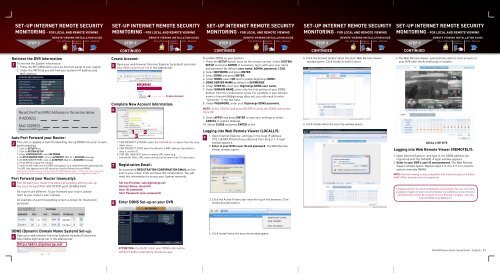
Retrieve the DVR Information<br />
1<br />
Port Forward your Router (manually):<br />
3<br />
To retrieve the System Information:<br />
easy<br />
Intermediate<br />
advanced<br />
Router<br />
1. Press the RETURN button once on the front panel of your system.<br />
Skill Level<br />
2. Under the INFO tab you will find your system’s IP address and<br />
MAC address.<br />
Port forward your router first before proceeding with the set-up.<br />
You must forward Port: 554 (TCP/IP port), 80 (Web Port)<br />
All routers are different. To port forward your router, please<br />
refer to your router’s user manual.<br />
An example of a port forwarding screen is shown for illustration<br />
purposes.<br />
EXAMPLE<br />
easy<br />
tomsmith<br />
554<br />
Intermediate<br />
Record the IP and MAC Addresses in the section below:<br />
IP ADDRESS : . . .<br />
MAC ADDRESS : : : : : :<br />
(Required for DDNS registration)<br />
advanced<br />
Auto Port Forward your Router:<br />
2<br />
This unit is capable of Auto Portwarding. Set up DDNS first prior to auto<br />
portforwarding.<br />
1. Click on SETUP Menu<br />
2. Click on SYSTEM SETUP<br />
3. Under SYSTEM SETUP, select NETWORK<br />
4. On RTSP SERVER PORT, click on AUTOPORT. Wait for a SUCCESS message<br />
5. On WEB SERVER PORT, click on AUTOPORT. Wait for a SUCCESS message<br />
6. Press APPLY to apply the changes<br />
7. Under ALIAS make sure the DDNS link appears. (e.g. http://tomsmith.digimerge.net).<br />
The URL that appears on ALIAS should be used for Remote Access (WAN).<br />
Note: Auto portforwarding will only work with the UPNP enabled routers. In the event if your router does<br />
not support auto port forwarding, please use the manual Port Forwarding as suggested in Step 3-3.<br />
Skill Level<br />
Create Account:<br />
5<br />
Hand Tools<br />
easy<br />
Intermediate<br />
advanced<br />
Open your web browser (Internet Router Explorer by default) and enter<br />
http://ddns.digimerge.net in the address bar.<br />
Skill Level<br />
easy<br />
Complete New Account Information:<br />
6<br />
7<br />
8<br />
1 2<br />
3<br />
Intermediate<br />
Hardware<br />
1. FOR PRODUCT LICENSE select the <strong>DHU600</strong> <strong>Series</strong> option from the drop<br />
down menu.<br />
2. FOR PRODUCT CODE enter the Monitor’s MAC address (recorded in<br />
step 3, section 1).<br />
3. FOR URL REQUEST enter a unique URL name (e.g.<br />
tomsmith). Note: URL name should not be more than 15 characters.<br />
Registration Email:<br />
Hi Speed<br />
advanced<br />
Skill Level<br />
Create Account<br />
An automated REGISTRATION CONFIRMATION EMAIL will be<br />
sent to your email. Print and Save this confirmation. You will<br />
need this information to access your System remotely.<br />
Service Provider: sdn.digimerge.net<br />
Domain Name: tomsmith<br />
User ID: tomsmith<br />
User Password: (your password)<br />
Enter DDNS Set-up on your DVR<br />
Hand Tools<br />
Hardware<br />
To enable DDNS on your system:<br />
1. Press the SETUP button twice on the remote control. Select SYSTEM<br />
easy<br />
Intermediate<br />
advanced<br />
Router<br />
SETUP and press ENTER. If necessary, log in with your user name<br />
and password (by default, user name: ADMIN; password: 1234).<br />
Skill Level<br />
2. Select NETWORK and press ENTER.<br />
3. Select DDNS and press ENTER.<br />
4. Under DDNS, select easy ON and Intermediate to enable advanced <strong>Digimerge</strong> DDNS.<br />
5. DDNS SERVER NAME by default is DIGIMERGE.<br />
6. Under USER ID, enter your <strong>Digimerge</strong> DDNS user name.<br />
7. Under DOMAIN NAME, enter only the first portion of your DDNS<br />
domain from the confirmation email. For example, if your domain<br />
name is tomsmith@digimerge.ddns.net, you only need to enter<br />
“tomsmith” in the text field.<br />
8. Under PASSWORD, enter your <strong>Digimerge</strong> DDNS password.<br />
NOTE: Select STATUS and press ENTER to verify the DDNS connection.<br />
Click OK.<br />
9. Select APPLY and press ENTER to save your settings or select<br />
CANCEL to restore defaults.<br />
10. Select CLOSE and press ENTER to exit.<br />
Logging into Web Remote Viewer (LOCALLY):<br />
9<br />
1. Open Internet Explorer, and type in the local IP address<br />
(192.168.XXX.XX) which you obtained from Step 3-1. A login<br />
window appears.<br />
2. Enter in your DVR’s user ID and password. The Web Remote<br />
Viewer window opens.<br />
3. Click the Active X menu bar near the top of the browser. Click<br />
Install ActiveX Control.<br />
Hi Speed<br />
Skill Level<br />
Skill Level<br />
Hand Tools<br />
Hardware<br />
Hi Speed<br />
5. Click the ActiveX toolbar when the main Web Remote Viewer<br />
window opens. Click Install ActiveX Control.<br />
easy<br />
Intermediate<br />
advanced<br />
Router<br />
Skill Level<br />
easy<br />
Intermediate<br />
advanced<br />
6. Click Install when the security window opens.<br />
Skill Level<br />
Hand Tools<br />
Hardware<br />
Hi Speed<br />
• The Web Remote Viewer automatically detects and connects to<br />
your DVR after the ActiveX plug-in installs.<br />
Skill Level<br />
easy<br />
Intermediate<br />
Router<br />
LOCAL LIVE SITE<br />
Logging into Web Remote Viewer (REMOTELY):<br />
1. Open Internet Explorer, and type in the DDNS address you<br />
registered with the <strong>DHU600</strong>. A login window appears.<br />
2. Enter in your DVR’s user ID and password. The Web Remote<br />
Viewer window opens. Repeat steps 3-9-3 to 3-9-6 to view the<br />
system remotely (WAN).<br />
NOTE: Remote viewing is only compatible with Internet Explorer & Safari<br />
(MAC).Other browsers are not supported.<br />
Congratulations! You have completed 4 successfully. You can now view,<br />
playback images on your Local Computer via LAN (local area network)<br />
and Remotely control the system on your Remote computer over the<br />
Internet (Wide Area Network).<br />
advanced<br />
easy<br />
Intermediate<br />
advanced<br />
System<br />
System<br />
554 554<br />
80 80<br />
12<br />
12<br />
DDNS (Dynamic Domain Name System) Set-up:<br />
4<br />
Open your web browser (Internet Explorer by default) and enter<br />
http://ddns.digimerge.net in the address bar.<br />
http://ddns.digimerge.net<br />
ATTENTION: You MUST enter your DDNS information<br />
LOCALLY before attempting remote access.<br />
4. Click Install when the security window opens.<br />
<strong>DHU600</strong> <strong>Series</strong> <strong>Quick</strong> Setup <strong>Guide</strong> - English - R1