D221600 Series_QSG_EN_R1 - Digimerge
D221600 Series_QSG_EN_R1 - Digimerge
D221600 Series_QSG_EN_R1 - Digimerge

Create successful ePaper yourself
Turn your PDF publications into a flip-book with our unique Google optimized e-Paper software.
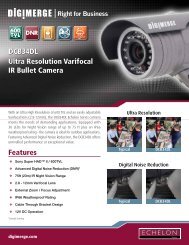
NAVIGATION & controlsMOUSE:1This System has been designed touse a Mouse as a primary modeof navigation and configuration.Connect a mouse to one of theUSB ports located on the side ofthe unit before powering on thesystem.The mouse behaves in the sameway as a PC mouse - use the Leftand Right Buttons to open menusand change options.LEFT BUTTON -• Click to select optionsin Menu, Recording andSearch Mode.• Click to change settings,select dates and performother options.• Double click on a Channelin QUAD or other displyviews to view the singlecamera in full screen.RECOMM<strong>EN</strong>DEDFOR EASY USEAND NAVIGATIONRIGHT BUTTON -• Opens a submenuto access a list ofoptions:REMOTE CONTROL:2The Remote Control can also be usedas a primary mode of navigation andconfiguration.Listed below is a quick reference ofbuttons and their functions.Group 1POWER: Press the Power Button to turnoff the Monitor Display. Press and holdthe button for 3 seconds to shut downthe entire system.MODE: Press the Mode Button to displaythe Multi-Function Mode Menu.SETUP: Displays the Setup Menu.ID: For using one remote to controlmultiple systems. Refer to user manual.DVR: Change to DVR Mode.VGA: Change to VGA Mode.COMPON<strong>EN</strong>T: Change to ComponentMode.PICTURE FRAME: Change to PictureFrame Mode.Group 2RETURN:Menu.NAVIGATION:Exits from a SystemPress the Navigation Controls to moveUp, Down, Left or Right in System andMode menus.<strong>EN</strong>TER: Press the Enter Button toselect an option in the System Menu orMulti-Function Menu.PLAYBACK:Use the Playback controls to Pause, Play,Reverse or Fastforward the Playback inDVR Mode.RECOMM<strong>EN</strong>DEDFOR USE FROM ADISTANCEPIPGROUP 1GROUP 2GROUP 3GROUP 4Group 3INFO: Displays the System Information in DVRMode.SEARCH: Displays the Video Playback SearchmenuDISPLAY: Switches the display to single, quad andmulti-screen views.PTZ: Switches to PTZ Mode.KEYLOCK: Locks the Front Panel buttons.SEQU<strong>EN</strong>CE: Changes the Monitor Display toSequence through channels (based on menu settings).ZOOM: Displays one channel with Digital Zoom.ARCHIVE: Displays the Archive menu.AUDIO: Switches between live audio channels(CH1~4 only). Press Audio & channel number.VOLUME +/-: Increase or Decrease the volume ofthe camera currently broadcasting live audio.Group 4NUMBER KEYPAD (1 - 9, 1-, 0): Use to switchbetween Cameras in live view modePIPPIP: Displays a Picture In Picture Screen. Pressagain to exit the PIP optionMONITOR FRONT PANEL:The Front Panel buttons can also be used to accessthe menus and configure the system.• Navigation Controls - Move Up/Down/Left/Right.• Enter Button - Press this button to select and changethe values in a menu option.1 2 3 4 5 6 7 81. SYSTEM POWER BUTTON2. MULTI-FUNCTION M<strong>EN</strong>U MODESPress the Multi-Function Menu button toswitch between monitor modes:• DVR Mode • VGA Mode • ComponentMode • Picture Frame Mode • InstallationGuideVirtual Keyboard Control:The Virtual Keyboard control becomes availablewhen keyboard input (A~Z, 0~9) is needed forentering information such as Names, NetworkInformation, etc.• Navigate using the arrow keys on the Front Panelor Remote Control or using the Mouse menu.• Use the <strong>EN</strong>TER key to choose the letters andnumbers.Active Option Indicator:Orange Highlight - Indicates thatthe option is in active editingmode.Blue Highlight - Indicates thatthe option is available for editing.Once the option is highlighted,press the <strong>EN</strong>TER key to edit theoption (hightlight changes toOrange).3. SETUP M<strong>EN</strong>U4. RETURN BUTTON5. NAVIGATION & <strong>EN</strong>TER CONTROLS6. POWER LED7. RECORD LED8. NETWORK LEDUSB Ports:Provides connection portsfor USB Flash Drives(thumbsticks), USBMouse (included), & USBHard Drives or CDRW/DVDRW optical drives.34www.digimerge.com<strong>D221600</strong> SERIES Quick Start Guide_<strong>R1</strong> Page
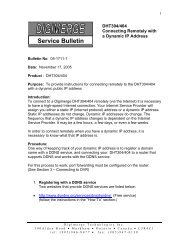
Set up INTERNET REMOTE SECURITY MONITORINGSTEP 3Timeunder 15 minutesHand Toolsunder 30 minutesHardwareunder 60 minutesunder 15 minutesRouterREMOTE VIEWING INSTALLATION GUIDEHand ToolsHardwareTime Skill Level Skills Hi Speed- Advanced60 Minutes Computer Router &over 60 minuteseasyRouter** Installation time may varybased on applicationSkill LevelHi Speedunder 30 minutesunder 60 minutesIntermediateover 60 minutes* Minimum System Requirement:Windows XP, Pentium IV, 256MBRam (512MB Recommended),200MB Storage, High SpeedInternet, DSL or Cable ModemBasic ComputeradvancedSkills, Router PortForwardinghttp://ddns.digimerge.net1Port2Port Forward Your Router:forward your router first before proceeding with the set-up. You must forwardPorts: 6100 (TCP/IP)80 (WEB)All routers are different. To port forward your router, please refer to your router’suser manual.A router configuration guide featuring the most commonly used routers in the marketis available on your DigiClient Software CD.An example of a port forwarding screen is shown for illustration purposes.EXAMPLESystemSystem6100 610080 80DDNS (Dynamic Domain Name System) Set-up:Open your web browser (Internet Explorer by default) andenter http://ddns.digimerge.net in the address bar.1212Skill Leveleasy1 23IntermediateDNS Server Name: DIGIMERGEDomain Name: tomsmithUser Name:tomsmithUser Password: (your password)DDNS Status: -----OK CANCELRouter45easyIntermediateComplete New Account Information:1. FOR PRODUCT LIC<strong>EN</strong>SE select the <strong>D221600</strong><strong>Series</strong> option from the drop down menu.2. FOR PRODUCT CODE enter the Monitor’s MACaddress (recorded in step 2, section 1).3. FOR URL REQUEST enter a unique URL nameadvanced(e.g. tomsmith). Note: URL name should not bemore than 15 characters.Registration Email:advancedAn automated REGISTRATION CONFIRMATIONEMAIL will be sent to your email. Print and Savethis confirmation. You will need this information toaccess your System remotely.16Enter DDNS Set-up on your System:Mouse navigation (recommended)3FromCreate Account:the http://ddns.digimerge.net website, clickthe CREATE ACCOUNT option.21. Right click the mouse and select SETUP and clickon SYSTEM SETUP2. On SYSTEM SETUP MAIN Menu, select SYSTEM3. Click on NETWORK to enable and add DDNSinformation. See Step 7.Create Account3DIGIMERGEwww.digimerge.com<strong>D221600</strong> SERIES Quick Start Guide_<strong>R1</strong> Page
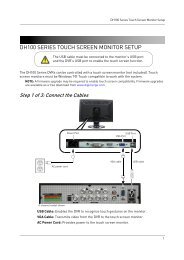
Set up INTERNET REMOTE SECURITY MONITORING (continued)STEP 313Set-up (on your remote computer):Click the Setup icon from the DigiClient SoftwareScreen16DigiClient Software - Local Configuration(on your remote computer):Select the new Group you created using the dropdown menu (1) and press the CONNECT button (2)to connect to the REMOTE LIVE site.OFFICE12SET-UP BUTTONCONNECT BUTTON14Add ‘Group’ (on your remote computer):Click on the SITE listing on the Left Panel, andRight Click to ‘ADD GROUP’.Enter a name for the GROUP, and click OK.OFFICEOFFICE15Enter Setup Information (on your remote computer):Select the GROUP you created and enterSETUP information.12345662 3 47Systemtomsmith6100ADMIN****813 4521. Enter a Name for the System2. Enter the DDNS DOMAIN NAME from theRegistration Email sent to you.3. Enter the Monitor TCP/IP port (6100 by default)4. Enter the User ID (ADMIN by default), max. 5characters5. Enter the Admin Password (1234 by default)* User ID and Password are case sensitive6. Add cameras using the drop down menus toassign camera positions7. Click ADD to add the System Location8. Click OKNOTE: The DDNS service supports DynamicIP addresses for remote connection. Whenthis feature is configured on the remotesystem, you can access it remotely usingthe domain name instead of IP address.To use this feature, the system should beregistered on the <strong>Digimerge</strong> DDNS server.Alternatively, if you have a static IP addressyou can enter it here.Please refer to the DigiClient Manual fornetwork setup and configuration.REMOTE LIVE SITE**For viewing your system from a remote locationCongratulations!You have completed Step 3 successfully.You can now view, playback images andremotely control the system on yourRemote computer over the Internet.www.digimerge.com<strong>D221600</strong> SERIES Quick Start Guide_<strong>R1</strong> Page
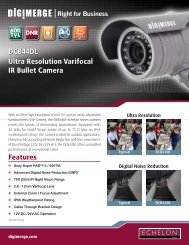
MULTIFUNCTION SYSTEM / MODESREMOTE MONITORING**Please refer to Step 3DVR MODEVGA MODE1 2DVR MODE:VGA MODE:3COMPON<strong>EN</strong>T MODE:PUBLIC VIEW MONITORINGCOMPON<strong>EN</strong>T MODEPICTURE FRAME MODEMulti-Function SYSTEMThis system contains a multi-function display, which allows the systemto function in several modes:• Mode 1: DVR Mode - Displays the DVR with live camera view.• Mode 2: VGA Mode - Displays the device connected to the VGA Porton the monitor (i.e. Computer).• Mode 3: Component Mode - Displays the device connected to theComponent green, blue, and red inputs (Y/Pb/Pr) in high resolution (i.e.DVD Player, set top box, satelite receiver).• Mode 4: Picture Frame Mode - Displays .jpg images from a USBThumbstick (not included) on the monitor as still images.• Mode 5: Installation Guide - Displays the system installation video.• For more information on the use and settings for a specific mode,please refer to the user’s manual.To access DVR Mode (from any other Mode):Front Panel:1. Press the Multi-Function Mode Button on the FrontPanel.2. Use the Up and Down arrows on the NavigationControl to select DVR.3. Press the Enter button on the Navigation Control toswitch to DVR Mode.Remote:1. Press the DVR Button on the Remote Control -or-2. Press the Mode button on the Remote Control.Use the arrows to select DVR, and press the Enterbutton.DID YOU KNOW?PIP (picture-in-picture)VGA Mode is used to display a device (i.e. a Computer)connected to the VGA Port on the monitor.To view a Computer using the Monitor:1. Connect the PC to the Monitor using a VGA Cable.NOTE: VGA Cable is not included with the system.2. Switch the Monitor to VGA mode using the MultifunctionMode button on the front of the Monitor, or bypressing the VGA Button on the Remote Control.If you press the PIP button on your remote control, youcan view your DVR in a Picture In Picture. This providesyou with the ability to view images from your cameraswhile working on your PC.PIP (picture-in-picture)Component Mode is used to display a device connectedto the Component green, blue, and red inputs (Y/Pb/Pr)in high resolution (i.e. DVD Player, Set Top Box, SatteliteReceiver) The Audio from the Component Device is connectedto the Red and White component audio inputs.To view a DVD Player using the Monitor:1.Connect a DVD Player (not included) to the systemusing component video cables (not included). Make sureto enable the YPbPr option on your DVD. Refer to yourDVD User Manual.2. Switch the Monitor to Component Mode using theMulti-function Mode button on the front of the Monitor,or by pressing the Component Button on the RemoteControl.If you press the PIP button on your remote control, youcan view your DVR in a Picture In Picture. This providesyou with the ability to view images from your cameraswhile watching a movie.NOTE: THE SYSTEM WILL CONTINUE TO RECORD WHILEIN THE OTHER MODES. THIS PROVIDES AN ADVANCEDFEATURE OF COVERT SURVEILLANCE.You can view PIP (Picturein Picture) in order to seeComponent video or VGA(PC Monitor) while in DVRmode by pressing the PIP(Picture in Picture) buttonon your remote control.www.digimerge.com<strong>D221600</strong> SERIES Quick Start Guide_<strong>R1</strong> Page
MULTIFUNCTION SYSTEM / MODES (continued)4PICTURE FRAME MODE:5PVM (Public View Monitoring):You can connect a slave monitor (not included) tothe system using the “Spot Out” output.You can configure which channels will be displayedon the slave monitor.Slave Monitor (not included)PIP (picture-in-picture)Picture Frame Mode is used to display JPG images located on a USBThumbstick (connected to a USB Port on the side of the monitor).To view JPG Images using Picture Frame Mode:1. Connect a USB Thumbstick containing JPG images to the Monitor,using one of the USB ports located on the side. JPG images cannotexceed 1600 x 1200 pixels.NOTE: A USB Thumbstick is not included with the system.2. Switch the Monitor to Picture Frame Mode using the Multi-functionMode button on the front of the Monitor, or by pressing the PictureFrame Button on the Remote Control.3. Configure the Picture Frame Menu to display the images.If you press the PIP button on your remote control you can view yourDVR in a Picture In Picture. This provides you with the ability to viewimages from your cameras while looking at your pictures.This feature is used for situations in which youwant to have the system in a back room while stilldisplaying images to the public eye, for deterrenceor advertising purposes.www.digimerge.com <strong>D221600</strong> SERIES Quick Start Guide_<strong>R1</strong> Page 10
RECOMM<strong>EN</strong>DED TIPSEfficient back panel provides a solutionfor neat cable managementDevice ConnectionsThe stand comes with a builtin cable channel to easilyorganize and conceal wiring.Connect the Power Cable,Cameras, Ethernet Cable andany other optional cables tothe System by running thecables through the hole inthe stand before connectingto the Observation System.1Storage Calculator2The Storage Calculator application is used to calculate theamount of recording time available on your Hard Drive, basedon the System Recording Settings. This application is locatedon the Software Installation CD provided with your system.Enter your specific settings and press the CALCULATE button.The Software will calculate the estimated* recording time(circled below)Example shown below is for a 8 channel system.Monitor Power Saving Tip31System Setup Menu:Select SYSTEM SETUP and press<strong>EN</strong>TER to go to the MAIN M<strong>EN</strong>U.To extend the life of your monitor, itis highly recommended that you takeadvantage of the AUTO BRIGHTNESS &MAIN DISPLAY OFF features. Enablingthese features will save power by automaticallydimming your monitor when notin use or turning the monitor OFF duringoff-peak hours (Note: recording will neverbe turned OFF or affected by these settings).Follow these simple instructionsto extend the life of your monitor.WALL MOUNTABLEVESA STANDARDNOTE: Your system can bemounted on a wall using aVESA standard mountingbracket (not included). Simplyunscrew the 4 screws toremove the stand.2MAIN M<strong>EN</strong>U:In the MAIN M<strong>EN</strong>U, selectDISPLAY. Use the down arrowkey (if you are using the remotecontrol or use mouse to select)SCRE<strong>EN</strong> SAVER menu and<strong>EN</strong>TER to activate the SCRE<strong>EN</strong>SAVER menu options.* Recording capacity may vary based on recording resolutionand quality, lighting conditions and movement in the scene.3Screen Saver Menu:Auto Brightness:Adjust Brightness by highlightingand pressing <strong>EN</strong>TER, then usethe DOWN and UP arrow keys toadjust time.Press <strong>EN</strong>TER whencomplete.Main Display OFF:Enable this option by selectingON. Set time on the ‘FROM’ and‘TO’ fields to determine the timesyou want the Main Display OFF.www.digimerge.com <strong>D221600</strong> SERIES Quick Start Guide_<strong>R1</strong> Page 11
It’s all on the Webwww.digimerge.comProduct InformationProduct Documentation Specification Sheet User’s Manual Digi Client Software Manual Quick Start GuideSoftware/HardwareUpdates & UpgradesFor detailed setup information, please refer to your User’s Manual. For additionalinformation please visit our website www.digimerge.comToll Free Technical Support - North America: 1-866-344-4674Email Support: tech@digimerge.com; info@digimerge.com