Nessus 5.0 Installation and Configuration Guide - Tenable Network
Nessus 5.0 Installation and Configuration Guide - Tenable Network
Nessus 5.0 Installation and Configuration Guide - Tenable Network

You also want an ePaper? Increase the reach of your titles
YUMPU automatically turns print PDFs into web optimized ePapers that Google loves.
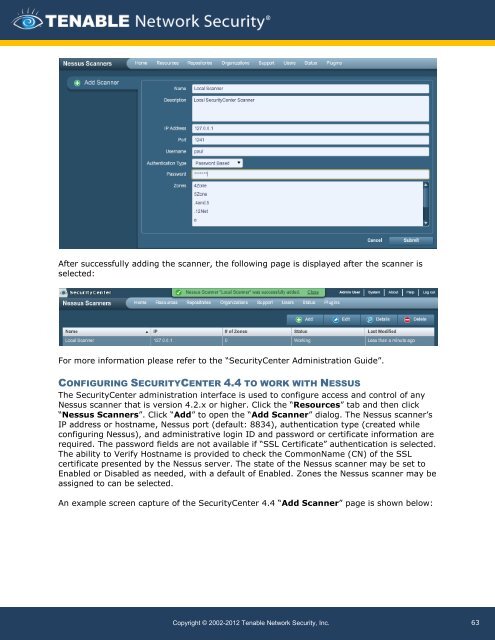
After successfully adding the scanner, the following page is displayed after the scanner is<br />
selected:<br />
For more information please refer to the “SecurityCenter Administration <strong>Guide</strong>”.<br />
CONFIGURING SECURITYCENTER 4.4 TO WORK WITH NESSUS<br />
The SecurityCenter administration interface is used to configure access <strong>and</strong> control of any<br />
<strong>Nessus</strong> scanner that is version 4.2.x or higher. Click the “Resources” tab <strong>and</strong> then click<br />
“<strong>Nessus</strong> Scanners”. Click “Add” to open the “Add Scanner” dialog. The <strong>Nessus</strong> scanner’s<br />
IP address or hostname, <strong>Nessus</strong> port (default: 8834), authentication type (created while<br />
configuring <strong>Nessus</strong>), <strong>and</strong> administrative login ID <strong>and</strong> password or certificate information are<br />
required. The password fields are not available if “SSL Certificate” authentication is selected.<br />
The ability to Verify Hostname is provided to check the CommonName (CN) of the SSL<br />
certificate presented by the <strong>Nessus</strong> server. The state of the <strong>Nessus</strong> scanner may be set to<br />
Enabled or Disabled as needed, with a default of Enabled. Zones the <strong>Nessus</strong> scanner may be<br />
assigned to can be selected.<br />
An example screen capture of the SecurityCenter 4.4 “Add Scanner” page is shown below:<br />
Copyright © 2002-2012 <strong>Tenable</strong> <strong>Network</strong> Security, Inc.<br />
63