An Introduction to Linux Device Driver Development - Computer ...
An Introduction to Linux Device Driver Development - Computer ...
An Introduction to Linux Device Driver Development - Computer ...
Create successful ePaper yourself
Turn your PDF publications into a flip-book with our unique Google optimized e-Paper software.
ECEN 449: Microprocessor System Design<br />
Department of Electrical and <strong>Computer</strong> Engineering<br />
Texas A&M University<br />
Prof. Peng Li<br />
TA: <strong>An</strong>drew Targhetta<br />
(Lab exercise created by A Targhetta and P Gratz)<br />
Labora<strong>to</strong>ry Exercise #6<br />
<strong>An</strong> <strong>Introduction</strong> <strong>to</strong> <strong>Linux</strong> <strong>Device</strong> <strong>Driver</strong> <strong>Development</strong><br />
Objective<br />
The purpose of lab this week is <strong>to</strong> experience device driver creation in an embedded <strong>Linux</strong> environment.<br />
<strong>Device</strong> drivers are a part of the operating system kernel which serve as the bridge between user applications<br />
and hardware devices. <strong>Device</strong> drivers facilitate access and sharing of hardware devices under the control of<br />
the operating system.<br />
Similar <strong>to</strong> Lab 5, you will create a kernel module, which prints messages <strong>to</strong> the kernel’s message buffer.<br />
However, this kernel module will also moderate user access <strong>to</strong> the multiplication peripheral created in Lab<br />
3. You will then extend the capabilities of your kernel module, thereby creating a complete character device<br />
driver. To test your multiplication device driver, you will also develop a simple <strong>Linux</strong> application which<br />
utilizes the device driver, providing the same functionality as seen in Lab 3.<br />
System Overview<br />
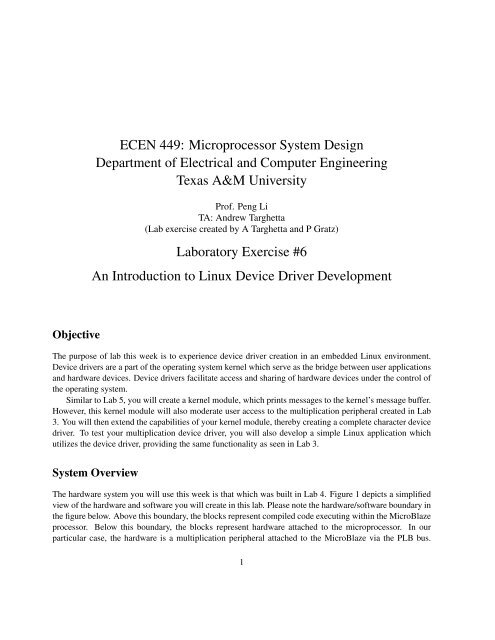
The hardware system you will use this week is that which was built in Lab 4. Figure 1 depicts a simplified<br />
view of the hardware and software you will create in this lab. Please note the hardware/software boundary in<br />
the figure below. Above this boundary, the blocks represent compiled code executing within the MicroBlaze<br />
processor. Below this boundary, the blocks represent hardware attached <strong>to</strong> the microprocessor. In our<br />
particular case, the hardware is a multiplication peripheral attached <strong>to</strong> the MicroBlaze via the PLB bus.<br />
1
2 Labora<strong>to</strong>ry Exercise #6<br />
Obviously, other hardware/software interactions exist in our system, but Figure 1 focuses on that which<br />
you will provide. Also notice the existence of the kernel-space/user-space boundary. The kernel module<br />
represents the character device driver executing in kernel space, while the user application represents the<br />
code executing in user space, reading and writing <strong>to</strong> the device file, ‘/dev/multiplier’. The device file is not a<br />
standard file in the sense that it does not reside on a disk, rather it provides an interface for user applications<br />
<strong>to</strong> interact with the kernel.<br />
User Application<br />
/dev/multiplier<br />
user space<br />
kernel space<br />
kernel module<br />
multiplication peripheral<br />
software<br />
hardware<br />
Figure 1: Hardware/Software System Diagram<br />
Procedure<br />
1. Compile a kernel module that reads and writes <strong>to</strong> the multiplication peripheral and prints the results<br />
<strong>to</strong> the kernel message buffer.<br />
(a) Create a lab6 direc<strong>to</strong>ry and copy the ‘modules’ direc<strong>to</strong>ry from your lab5 direc<strong>to</strong>ry <strong>to</strong> your lab6<br />
direc<strong>to</strong>ry.<br />
2 ECEN 449
Labora<strong>to</strong>ry Exercise #6 3<br />
(b) Navigate <strong>to</strong> the ‘modules’ direc<strong>to</strong>ry and ensure the ‘Makefile’ points <strong>to</strong> the ‘linux-2.6.35.7’<br />
kernel direc<strong>to</strong>ry.<br />
(c) Create a new kernel module source file called ‘multiply.c’.<br />
(d) Copy the following skele<strong>to</strong>n code in<strong>to</strong> ‘multiply.c’:<br />
# i n c l u d e / ∗ Needed by a l l modules ∗ /<br />
# i n c l u d e / ∗ Needed f o r KERN ∗ and p r i n t k ∗ /<br />
# i n c l u d e / ∗ Needed f o r i n i t and e x i t macros ∗ /<br />
# i n c l u d e / ∗ Needed f o r IO r e a d s and w r i t e s ∗ /<br />
# i n c l u d e ” x p a r a m e t e r s . h ” / ∗ needed f o r p h y s i c a l a d d r e s s o f m u l t i p l i e r ∗ /<br />
/ ∗ from x p a r a m e t e r s . h ∗ /<br />
# d e f i n e PHY ADDR XPAR MULTIPLIER 0 BASEADDR ; / / p h y s i c a l a d d r e s s o f m u l t i p l i e r<br />
/ ∗ s i z e o f p h y s i c a l a d d r e s s range f o r m u l t i p l y ∗ /<br />
# d e f i n e MEMSIZE XPAR MULTIPLIER 0 HIGHADDR − XPAR MULTIPLIER 0 BASEADDR+1;<br />
unsigned v i r t a d d r ; / / v i r t u a l a d d r e s s p o i n t i n g t o m u l t i p l i e r<br />
/ ∗ T h i s f u n c t i o n i s run upon module load . T h i s i s where you s e t u p data<br />
s t r u c t u r e s and r e s e r v e r e s o u r c e s used by t h e module . ∗ /<br />
s t a t i c i n t i n i t m y i n i t ( void )<br />
{<br />
/ ∗ <strong>Linux</strong> k e r n e l ’ s v e r s i o n o f p r i n t f ∗ /<br />
p r i n t k ( KERN INFO ” Mapping v i r t u a l a d d r e s s . . . \ n ” ) ;<br />
/ ∗ map v i r t u a l a d d r e s s t o m u l t i p l i e r p h y s i c a l a d d r e s s ∗ /<br />
/ / use ioremap<br />
/ ∗ w r i t e 7 t o r e g i s t e r 0 ∗ /<br />
p r i n t k ( KERN INFO ” W r i t i n g a 7 t o r e g i s t e r 0\n ” ) ;<br />
i o w r i t e 3 2 ( 7 , v i r t a d d r + 0 ) ; / / base a d d r e s s + o f f s e t<br />
/ ∗ W r i t e 2 t o r e g i s t e r 1 ∗ /<br />
p r i n t k ( KERN INFO ” W r i t i n g a 2 t o r e g i s t e r 1\n ” ) ;<br />
/ / use i o w r i t e 3 2<br />
p r i n t k ( ” Read %d from r e g i s t e r 0\n ” , i o r e a d 3 2 ( v i r t a d d r + 0 ) ) ;<br />
p r i n t k ( ” Read %d from r e g i s t e r 1\n ” , \\ use i o r e a d 3 2 ) ;<br />
p r i n t k ( ” Read %d from r e g i s t e r 2\n ” , i o r e a d 3 2 ( v i r t a d d r + 8 ) ) ;<br />
/ / A non 0 r e t u r n means i n i t m o d u l e f a i l e d ; module can ’ t be loaded .<br />
return 0 ;<br />
}<br />
/ ∗ T h i s f u n c t i o n i s run j u s t p r i o r t o t h e module ’ s removal from t h e<br />
s y s t e m . You s h o u l d r e l e a s e ALL r e s o u r c e s used by your module<br />
h ere ( o t h e r w i s e be p r e p a r e d f o r a r e b o o t ) . ∗ /<br />
s t a t i c void e x i t m y e x i t ( void )<br />
ECEN 449 3
4 Labora<strong>to</strong>ry Exercise #6<br />
{<br />
}<br />
p r i n t k (KERN ALERT ” unmapping v i r t u a l a d d r e s s s p a c e . . . . \ n ” ) ;<br />
iounmap ( ( void ∗) v i r t a d d r ) ;<br />
/ ∗ These d e f i n e i n f o t h a t can be d i s p l a y e d by modinfo ∗ /<br />
MODULE LICENSE( ”GPL” ) ;<br />
MODULE AUTHOR( ”ECEN449 S t u d e n t ( and o t h e r s ) ” ) ;<br />
MODULE DESCRIPTION( ” Simple m u l t i p l i e r module ” ) ;<br />
/ ∗ Here we d e f i n e which f u n c t i o n s we want t o use f o r i n i t i a l i z a t i o n<br />
and c l e a n u p ∗ /<br />
m o d u l e i n i t ( m y i n i t ) ;<br />
m o d u l e e x i t ( m y e x i t ) ;<br />
(e) Some required function calls have been left out of the code above. Fill in the necessary code.<br />
Consult <strong>Linux</strong> <strong>Device</strong> <strong>Driver</strong>s, 3rd Edition for help.<br />
Note: When running <strong>Linux</strong> on the MicroBlaze, your code is operating in virtual memory, and<br />
‘ioremap’ provides the physical <strong>to</strong> virtual address translation required <strong>to</strong> read and write <strong>to</strong> hardware<br />
from within virtual memory. ‘iounmap’ reverses this mapping and is essentially the cleanup<br />
function for ‘ioremap’.<br />
(f) Add a ‘printk’ statement <strong>to</strong> your initialization routine that prints the physical and virtual addresses<br />
of your multiplication peripheral <strong>to</strong> the kernel message buffer.<br />
(g) Compile your kernel module. Do not for get <strong>to</strong> source the ‘compile settins.csh’ file.<br />
(h) Load the ‘multiply.ko’ module on<strong>to</strong> the CF card and mount the card within the XUP <strong>Linux</strong><br />
system using ‘/lib/modules/2.6.35.7’ as the mount point. Consult Lab 5 if this is unclear.<br />
(i) Use ‘insmod’ <strong>to</strong> load the ‘multiply.ko’ kernel module in<strong>to</strong> the XUP <strong>Linux</strong> kernel. Demonstrate<br />
your progress <strong>to</strong> the TA.<br />
2. With a functioning kernel module that reads and writes <strong>to</strong> the multiplication peripheral, you are now<br />
ready <strong>to</strong> create a character device driver that provides applications running in user space access <strong>to</strong><br />
your multiplication peripheral.<br />
(a) From within the ‘modules’ direc<strong>to</strong>ry, create a character device driver called ‘multiplier.c’using<br />
the following guidelines:<br />
• Take a moment <strong>to</strong> examine ‘my chardev.c’, ‘my chardev mem.c’ and the appropriate header<br />
files within ‘/homes/faculty/shared/ECEN449/module examples/’. Use the character device<br />
driver examples provided in <strong>Linux</strong> <strong>Device</strong> <strong>Driver</strong>s, 3rd Edition and the labora<strong>to</strong>ry direc<strong>to</strong>ry<br />
as a starting point for your device driver.<br />
4 ECEN 449
Labora<strong>to</strong>ry Exercise #6 5<br />
• Use the ‘multiply.c’ kernel module created in Section 2 of this lab as a baseline for reading<br />
and writing <strong>to</strong> the multiplication peripheral and mapping the multiplication peripheral’s<br />
physical address <strong>to</strong> virtual memory.<br />
• Within the initialization routine, you must register your character device driver after the<br />
virtual memory mapping. The name of your device should be ‘multiplier’. Let <strong>Linux</strong> dynamically<br />
assign your device driver a major number and specify a minor number of 0. Print<br />
the major number <strong>to</strong> the kernel message buffer exactly as done in the examples provided.<br />
Be sure <strong>to</strong> handle device registration errors appropriately. You will be graded on this!<br />
• In the exit routine, unregister the device driver before the virtual memory unmapping.<br />
• For the open and close functions, do nothing except print <strong>to</strong> the kernel message buffer<br />
informing the user when the device is opened and closed.<br />
• Read up on ‘put user’ and ‘get user’ in <strong>Linux</strong> <strong>Device</strong> <strong>Driver</strong>s, 3rd Edition as you will be<br />
using these system calls in your cus<strong>to</strong>m read and write functions.<br />
• For the read function, your device driver must read bytes 0 through 11 within your peripheral’s<br />
address range and put them in<strong>to</strong> the user space buffer. Note that one of the parameters<br />
for the read function, ‘count’, specifies the number of bytes the user is requesting. Valid<br />
values for this parameter include 0 through 12. Your function should return the number of<br />
bytes actually transfered <strong>to</strong> user space (i.e. in<strong>to</strong> the buffer pointed <strong>to</strong> by char* buf). You<br />
may use ‘put user’ <strong>to</strong> transfer more than 1 byte at a time.<br />
• For the write function, your device driver must copy bytes from the user buffer <strong>to</strong> kernel<br />
space using the system call ‘get user’ <strong>to</strong> do the transfer and the variable ‘count’ as a specification<br />
of how many bytes <strong>to</strong> transfer. Furthermore, the device driver must write those bytes<br />
<strong>to</strong> the multiplication peripheral . The return value of your write function should be similar<br />
<strong>to</strong> that of your read function, returning the number of bytes successfully written <strong>to</strong> your<br />
multiplication peripheral. Only write <strong>to</strong> valid memory locations (i.e. 0 through 7) within<br />
your peripheral’s address space.<br />
(b) Modify the ‘Makefile’ <strong>to</strong> compile ‘multiplier.c’ and run ‘make ARCH=microblaze’ in the terminal<br />
<strong>to</strong> create the appropriate kernel module.<br />
(c) As with ‘multiply.ko’, load ‘multiplier.ko’ in<strong>to</strong> your XUP <strong>Linux</strong> system.<br />
(d) Use ‘dmesg’ <strong>to</strong> view the output of the kernel module after it has been loaded. Follow the instructions<br />
provided within the provided example kernel modules <strong>to</strong> create the ‘/dev/multiplier’<br />
device node. Demonstrate your progress <strong>to</strong> the TA.<br />
3. At this point, we need <strong>to</strong> create a user application that reads and writes <strong>to</strong> the device file, ‘/dev/multiplier’<br />
<strong>to</strong> test our character device driver and provides the required functionality similar <strong>to</strong> that seen in<br />
Lab 3.<br />
(a) View the man pages on ‘open’, ‘close’, ‘read’, and ‘write’ from within the CentOS workstation.<br />
You will use these system calls in your application code <strong>to</strong> read and write <strong>to</strong> the ‘/dev/multiplier’<br />
ECEN 449 5
6 Labora<strong>to</strong>ry Exercise #6<br />
device file. Accessing the man pages can be done via the terminal. For example, <strong>to</strong> view the<br />
man pages on ‘open’, type ‘man open’ in a terminal window.<br />
(b) Within the ‘modules’ direc<strong>to</strong>ry, create a source file called ‘devtest.c’ and copy the following<br />
starter text in<strong>to</strong> that file:<br />
# i n c l u d e <br />
# i n c l u d e <br />
# i n c l u d e < f c n t l . h><br />
# i n c l u d e <br />
# i n c l u d e <br />
# i n c l u d e < s t d l i b . h><br />
i n t main ( ) {<br />
unsigned i n t r e s u l t ;<br />
i n t fd ; / ∗ f i l e d e s c r i p t o r ∗ /<br />
i n t i , j ; / ∗ loop v a r i a b l e s ∗ /<br />
char i n p u t = 0 ;<br />
/ ∗ open d e v i c e f i l e f o r r e a d i n g and w r i t i n g ∗ /<br />
/ ∗ use ”open” t o open ‘ / dev / m u l t i p l i e r ’ ∗ /<br />
/ ∗ h a n d l e e r r o r opening f i l e ∗ /<br />
i f ( fd == −1){<br />
p r i n t f ( ” F a i l e d t o open d e v i c e f i l e !\ n ” ) ;<br />
return −1;<br />
}<br />
while ( i n p u t != ’ q ’ ){ / ∗ c o n t i n u e u n l e s s u s e r e n t e r e d ’ q ’ ∗ /<br />
f o r ( i =0; i
Labora<strong>to</strong>ry Exercise #6 7<br />
}<br />
}<br />
}<br />
}<br />
c l o s e ( fd ) ;<br />
return 0 ;<br />
(c) Complete the skele<strong>to</strong>n code provided above using the specified system calls.<br />
(d) Compile ‘devtest.c’ by executing the following command in the terminal window under the<br />
‘modules’ direc<strong>to</strong>ry:<br />
>mb-linux-gcc -o devtest devtest.c<br />
(e) Copy the executable file, ‘devtest’, on <strong>to</strong> the CF card and execute the application by typing the<br />
following in the XUP terminal within the CF mount point direc<strong>to</strong>ry:<br />
>./devtest<br />
(f) Examine the output as you hit the ‘enter’ key from the XUP terminal. Demonstrate your progress<br />
<strong>to</strong> the TA.<br />
Deliverables<br />
1. [5 points.] Demo the working kernel module and device driver <strong>to</strong> the TA.<br />
Submit a lab report with the following items:<br />
2. [5 points.] Correct format including an <strong>Introduction</strong>, Procedure, Results, and Conclusion.<br />
3. [4 points.] Commented C files.<br />
4. [2 points.] The output of the XUP terminal (kermit) for parts 2 through 4 of lab.<br />
5. [4 points.] <strong>An</strong>swers <strong>to</strong> the following questions:<br />
(a) Given that the multiplier hardware uses memory mapped I/O (the processor communicates with<br />
it through explicitly mapped physical addresses), why is the ioremap command required?<br />
(b) Do you expect that the overall (wall clock) time <strong>to</strong> perform a multiplication would be better in<br />
part 3 of this lab or in the original Lab 3 implementation? Why?<br />
(c) Contrast the approach in this lab with that of Lab 3. What are the benefits and costs associated<br />
with each approach?<br />
(d) Explain why it is important that the device registration is the last thing that is done in the initialization<br />
routine of a device driver. Likewise, explain why un-registering a device must happen<br />
first in the exit routine of a device driver.<br />
ECEN 449 7


