An Introduction to Linux Device Driver Development - Computer ...
An Introduction to Linux Device Driver Development - Computer ...
An Introduction to Linux Device Driver Development - Computer ...
You also want an ePaper? Increase the reach of your titles
YUMPU automatically turns print PDFs into web optimized ePapers that Google loves.
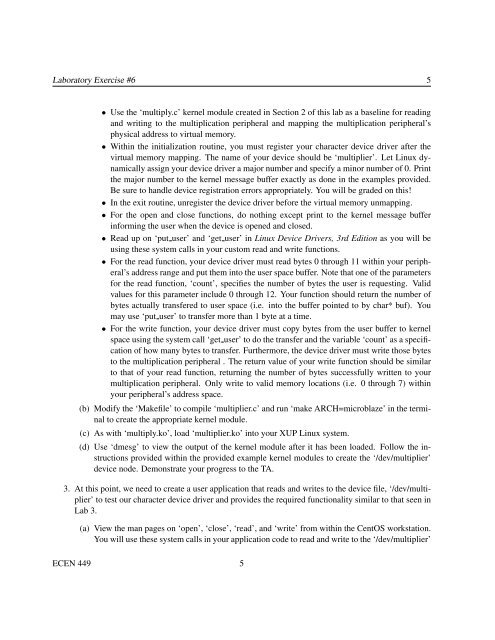
Labora<strong>to</strong>ry Exercise #6 5<br />
• Use the ‘multiply.c’ kernel module created in Section 2 of this lab as a baseline for reading<br />
and writing <strong>to</strong> the multiplication peripheral and mapping the multiplication peripheral’s<br />
physical address <strong>to</strong> virtual memory.<br />
• Within the initialization routine, you must register your character device driver after the<br />
virtual memory mapping. The name of your device should be ‘multiplier’. Let <strong>Linux</strong> dynamically<br />
assign your device driver a major number and specify a minor number of 0. Print<br />
the major number <strong>to</strong> the kernel message buffer exactly as done in the examples provided.<br />
Be sure <strong>to</strong> handle device registration errors appropriately. You will be graded on this!<br />
• In the exit routine, unregister the device driver before the virtual memory unmapping.<br />
• For the open and close functions, do nothing except print <strong>to</strong> the kernel message buffer<br />
informing the user when the device is opened and closed.<br />
• Read up on ‘put user’ and ‘get user’ in <strong>Linux</strong> <strong>Device</strong> <strong>Driver</strong>s, 3rd Edition as you will be<br />
using these system calls in your cus<strong>to</strong>m read and write functions.<br />
• For the read function, your device driver must read bytes 0 through 11 within your peripheral’s<br />
address range and put them in<strong>to</strong> the user space buffer. Note that one of the parameters<br />
for the read function, ‘count’, specifies the number of bytes the user is requesting. Valid<br />
values for this parameter include 0 through 12. Your function should return the number of<br />
bytes actually transfered <strong>to</strong> user space (i.e. in<strong>to</strong> the buffer pointed <strong>to</strong> by char* buf). You<br />
may use ‘put user’ <strong>to</strong> transfer more than 1 byte at a time.<br />
• For the write function, your device driver must copy bytes from the user buffer <strong>to</strong> kernel<br />
space using the system call ‘get user’ <strong>to</strong> do the transfer and the variable ‘count’ as a specification<br />
of how many bytes <strong>to</strong> transfer. Furthermore, the device driver must write those bytes<br />
<strong>to</strong> the multiplication peripheral . The return value of your write function should be similar<br />
<strong>to</strong> that of your read function, returning the number of bytes successfully written <strong>to</strong> your<br />
multiplication peripheral. Only write <strong>to</strong> valid memory locations (i.e. 0 through 7) within<br />
your peripheral’s address space.<br />
(b) Modify the ‘Makefile’ <strong>to</strong> compile ‘multiplier.c’ and run ‘make ARCH=microblaze’ in the terminal<br />
<strong>to</strong> create the appropriate kernel module.<br />
(c) As with ‘multiply.ko’, load ‘multiplier.ko’ in<strong>to</strong> your XUP <strong>Linux</strong> system.<br />
(d) Use ‘dmesg’ <strong>to</strong> view the output of the kernel module after it has been loaded. Follow the instructions<br />
provided within the provided example kernel modules <strong>to</strong> create the ‘/dev/multiplier’<br />
device node. Demonstrate your progress <strong>to</strong> the TA.<br />
3. At this point, we need <strong>to</strong> create a user application that reads and writes <strong>to</strong> the device file, ‘/dev/multiplier’<br />
<strong>to</strong> test our character device driver and provides the required functionality similar <strong>to</strong> that seen in<br />
Lab 3.<br />
(a) View the man pages on ‘open’, ‘close’, ‘read’, and ‘write’ from within the CentOS workstation.<br />
You will use these system calls in your application code <strong>to</strong> read and write <strong>to</strong> the ‘/dev/multiplier’<br />
ECEN 449 5


