WSCA Station Handbook and Training Manual - Prometheus Radio ...
WSCA Station Handbook and Training Manual - Prometheus Radio ...
WSCA Station Handbook and Training Manual - Prometheus Radio ...

Create successful ePaper yourself
Turn your PDF publications into a flip-book with our unique Google optimized e-Paper software.
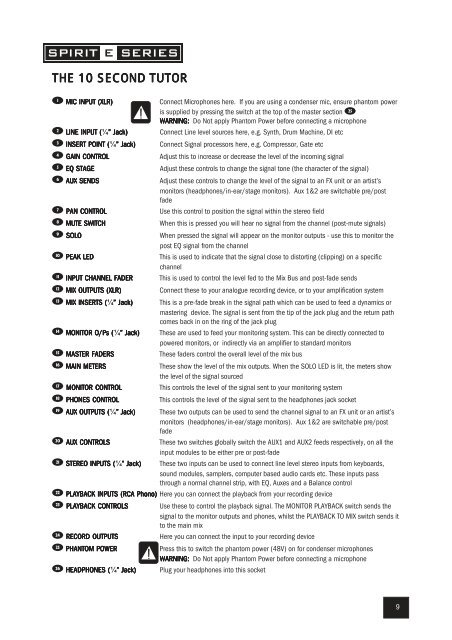
THE 10 SECOND TUTOR<br />
1 MIC INPUT (XLR)<br />
Connect Microphones here. If you are using a condenser mic, ensure phantom power<br />
is supplied by pressing the switch at the top of the master section g<br />
WARNING: Do Not apply Phantom Power before connecting a microphone<br />
2 LINE INPUT (¼” ” Jack) Connect Line level sources here, e.g. Synth, Drum Machine, DI etc<br />
3 INSERT POINT (¼” ” Jack) Connect Signal processors here, e.g. Compressor, Gate etc<br />
4 GAIN CONTROL<br />
Adjust this to increase or decrease the level of the incoming signal<br />
5 EQ STAGE<br />
Adjust these controls to change the signal tone (the character of the signal)<br />
6 AUX SENDS<br />
Adjust these controls to change the level of the signal to an FX unit or an artist’s<br />
monitors (headphones/in-ear/stage monitors). Aux 1&2 are switchable pre/post<br />
fade<br />
7 PAN CONTROL<br />
Use this control to position the signal within the stereo field<br />
8 MUTE SWITCH<br />
When this is pressed you will hear no signal from the channel (post-mute signals)<br />
9 SOLO<br />
When pressed the signal will appear on the monitor outputs - use this to monitor the<br />
post EQ signal from the channel<br />
0 PEAK LED<br />
This is used to indicate that the signal close to distorting (clipping) on a specific<br />
channel<br />
q INPUT CHANNEL FADER<br />
This is used to control the level fed to the Mix Bus <strong>and</strong> post-fade sends<br />
w MIX OUTPUTS (XLR)<br />
Connect these to your analogue recording device, or to your amplification system<br />
e MIX INSERTS (¼” ” Jack) This is a pre-fade break in the signal path which can be used to feed a dynamics or<br />
mastering device. The signal is sent from the tip of the jack plug <strong>and</strong> the return path<br />
comes back in on the ring of the jack plug<br />
r MONITOR O/Ps (¼” ” Jack) These are used to feed your monitoring system. This can be directly connected to<br />
powered monitors, or indirectly via an amplifier to st<strong>and</strong>ard monitors<br />
t MASTER FADERS<br />
These faders control the overall level of the mix bus<br />
y MAIN METERS<br />
These show the level of the mix outputs. When the SOLO LED is lit, the meters show<br />
the level of the signal sourced<br />
u MONITOR CONTROL<br />
This controls the level of the signal sent to your monitoring system<br />
i PHONES CONTROL<br />
This controls the level of the signal sent to the headphones jack socket<br />
o AUX OUTPUTS (¼” ” Jack) These two outputs can be used to send the channel signal to an FX unit or an artist’s<br />
monitors (headphones/in-ear/stage monitors). Aux 1&2 are switchable pre/post<br />
fade<br />
p AUX CONTROLS<br />
These two switches globally switch the AUX1 <strong>and</strong> AUX2 feeds respectively, on all the<br />
input modules to be either pre or post-fade<br />
a STEREO INPUTS (¼” ” Jack) These two inputs can be used to connect line level stereo inputs from keyboards,<br />
sound modules, samplers, computer based audio cards etc. These inputs pass<br />
through a normal channel strip, with EQ, Auxes <strong>and</strong> a Balance control<br />
s PLAYBACK INPUTS (RCA Phono) Here you can connect the playback from your recording device<br />
d PLAYBACK CONTROLS<br />
Use these to control the playback signal. The MONITOR PLAYBACK switch sends the<br />
signal to the monitor outputs <strong>and</strong> phones, whilst the PLAYBACK TO MIX switch sends it<br />
to the main mix<br />
f RECORD OUTPUTS<br />
Here you can connect the input to your recording device<br />
g PHANTOM POWER<br />
Press this to switch the phantom power (48V) on for condenser microphones<br />
WARNING: Do Not apply Phantom Power before connecting a microphone<br />
h HEADPHONES (¼” ” Jack) Plug your headphones into this socket<br />
9