
You also want an ePaper? Increase the reach of your titles
YUMPU automatically turns print PDFs into web optimized ePapers that Google loves.
10<br />
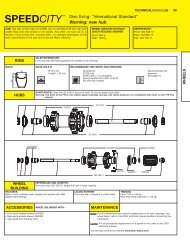
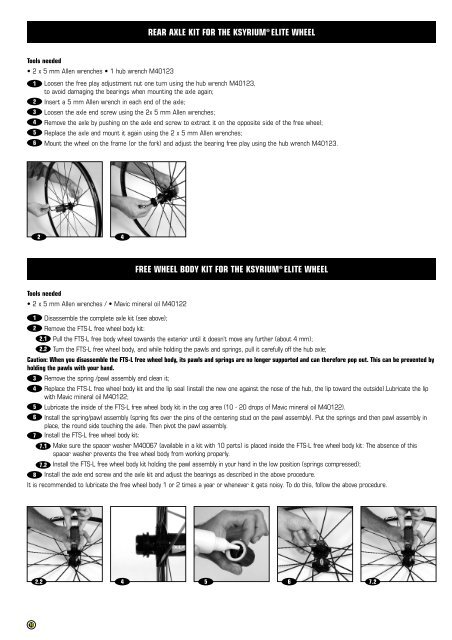
REAR AXLE KIT FOR THE KSYRIUM ® ELITE WHEEL<br />
Tools needed<br />
• 2 x 5 mm Allen wrenches • 1 hub wrench M40123<br />
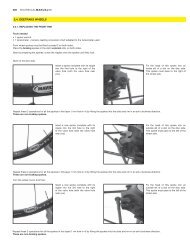
1 Loosen the free play adjustment nut one turn using the hub wrench M40123,<br />
to avoid damaging the bearings when mounting the axle again;<br />
2 Insert a 5 mm Allen wrench in each end of the axle;<br />
3 Loosen the axle end screw using the 2x 5 mm Allen wrenches;<br />
4 Remove the axle by pushing on the axle end screw to extract it on the opposite side of the free wheel;<br />
5 Replace the axle and mount it again using the 2 x 5 mm Allen wrenches;<br />
6 Mount the wheel on the frame (or the fork) and adjust the bearing free play using the hub wrench M40123.<br />
2 4<br />
Tools needed<br />
• 2 x 5 mm Allen wrenches / • Mavic mineral oil M40122<br />
FREE WHEEL BODY KIT FOR THE KSYRIUM ® ELITE WHEEL<br />
1 Disassemble the complete axle kit (see above);<br />
2 Remove the FTS-L free wheel body kit:<br />
2.1 Pull the FTS-L free body wheel towards the exterior until it doesn’t move any further (about 4 mm);<br />
2.2 Turn the FTS-L free wheel body, and while holding the pawls and springs, pull it carefully off the hub axle;<br />
Caution: When you disassemble the FTS-L free wheel body, its pawls and springs are no longer supported and can therefore pop out. This can be prevented by<br />
holding the pawls with your hand.<br />
3 Remove the spring /pawl assembly and clean it;<br />
4 Replace the FTS-L free wheel body kit and the lip seal (install the new one against the nose of the hub, the lip toward the outside).Lubricate the lip<br />
with Mavic mineral oil M40122;<br />
5 Lubricate the inside of the FTS-L free wheel body kit in the cog area (10 - 20 drops of Mavic mineral oil M40122).<br />
6 Install the spring/pawl assembly (spring fits over the pins of the centering stud on the pawl assembly). Put the springs and then pawl assembly in<br />
place, the round side touching the axle. Then pivot the pawl assembly.<br />
7 Install the FTS-L free wheel body kit:<br />
7.1 Make sure the spacer washer M40067 (available in a kit with 10 parts) is placed inside the FTS-L free wheel body kit: The absence of this<br />
spacer washer prevents the free wheel body from working properly.<br />
7.2 Install the FTS-L free wheel body kit holding the pawl assembly in your hand in the low position (springs compressed);<br />
8 Install the axle end screw and the axle kit and adjust the bearings as described in the above procedure.<br />
It is recommended to lubricate the free wheel body 1 or 2 times a year or whenever it gets noisy. To do this, follow the above procedure.<br />
2.2 4 5 6 7.2