Create successful ePaper yourself
Turn your PDF publications into a flip-book with our unique Google optimized e-Paper software.
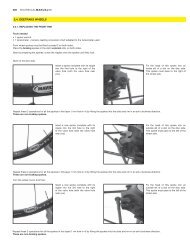
REPLACING THE RIM ON THE REAR KSYRIUM ® ELITE WHEEL<br />
Tools needed<br />
• 1 spoke wrench • 1 hollow screw wrench M40630 • 1 tensometer + tension reading conversion chart adapted to the tensometer used<br />
• 1 wire cutters • Oil • Loctite ® 243 thread lock or equivalent • A package of hollow screws M40595<br />
• A flat spoke maintenance wrench M40567<br />
1 Start on the free wheel side;<br />
2 With the rim flat, locate the valve hole and turn the rim so the raised indicator bumps are to the right of the valve hole;<br />
3 Prepare the first half of the free wheel side:<br />
3.1 Insert a hollow screw head first in the spoke. Then tighten the spoke nipple about 3 turns.<br />
3.2 Put the spoke in the slot inside the hub on the free wheel side and tighten the hollow screw one turn in the 1st hole in the rim to the right of the<br />
valve hole;<br />
3.3 Repeat the 2 procedures above for the first half of one side:<br />
1 hole out of 4 in the rim and always in the inside slot on the free wheel side;<br />
4 Then prepare the second half of the free wheel side;<br />
4.1 Insert a hollow screw head first on a spoke. Then tighten the spoke nipple about 3 turns;<br />
4.2 Put the spoke in the outside slot of the hub on the free wheel side and tighten the hollow screw one turn in the 3rd hole on the rim to the right of<br />
the valve hole;<br />
4.3 Repeat the 2 procedures above for all of the second half of the side:<br />
1 hole out of 4 on the rim and always in the outside slot on the free wheel side;<br />
5 Turn the wheel over to have the opposite of the free wheel side facing you;<br />
6 Prepare the 3rd half side, opposite the free wheel side:<br />
6.1 Insert a hollow screw head first on a spoke. Then tighten the spoke nipple about 3 turns;<br />
6.2 Put the spoke in the outside slot of the hub on the opposite free wheel side and tighten the hollow screw one turn in the 1st hole on the rim to<br />
the right of the valve hole;<br />
6.3 Repeat the 2 procedures above for all of the third half of the side:<br />
1 hole out of 4 on the rim and always in the outside slot opposite the free wheel side;<br />
7 Prepare the 4th half of the side:<br />
7.1 Insert a hollow screw head first on a spoke. Then tighten the spoke nipple about 3 turns;<br />
7.2 Put the spoke in the outside slot of the hub on the opposite free wheel side and tighten the hollow screw one turn in the 3rd hole on the rim to<br />
the right of the valve hole;<br />
7.3 Repeat the 2 procedures above for all of the fourth half side:<br />
1 hole out of 4 on the rim and always on the outside slot opposite the free wheel side;<br />
8 Once all the spokes are prepared, put thread lock on the threads of every hollow screw and completely tighten every hollow screw with the hollow<br />
screw wrench M40630. Caution, left hand thread, torque: 5.5 Nm;<br />
9 Put a drop of oil around each spoke nipple so they don’t jam against the hollow screws;<br />
10 Adjust the final tension of the wheel: 140 - 160 Kg for the rear wheel on the free wheel side.<br />
11 Check the lateral and radial truing of the wheel.<br />
3.1 3.2 4.2 6.2 7.2<br />
8 8<br />
9 10<br />
13<br />
WHEELS