You also want an ePaper? Increase the reach of your titles
YUMPU automatically turns print PDFs into web optimized ePapers that Google loves.
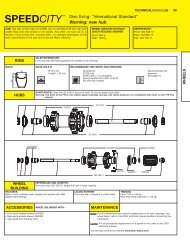
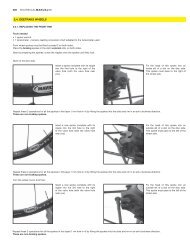
BUILDING THE X3.1 UST ® DISC RIMS<br />
Tools needed<br />
• A classic spoke wrench<br />
• A hollow screw wrench M40630<br />
• Loctite ® 243 thread lock or equivalent<br />
Build a tubeless rim in the classic manner except for the points below:<br />
1<br />
2<br />
3<br />
4<br />
5<br />
6<br />
Insert a hollow screw head first into the spoke. Then tighten the spoke nipple about 3 turns.<br />
At first, tighten the hollow screw in the corresponding rim hole only one turn.<br />
Once all the spokes are properly placed, put the Loctite® 243 thread lock or equivalent on the hollow screws.<br />
Tighten the hollow screws with the wrench M40630. Caution: Left hand thread. Torque: 5.5 Nm.<br />
Put a drop of oil around every spoke nipple so they don’t jam against the hollow screws.<br />
Adjust the spoke tension with a classic spoke wrench by using the spoke nipples. Never use the hollow screws.<br />
Recommendations for building a disc rim: see page 19.<br />
Mavic recommends using a minimum length of 16 mm spoke nipples only for 2 reasons:<br />
-To avoid losing a nipple between the 2 walls of the rim when removing or building the rim.<br />
-To avoid damaging the hollow screws with the spoke wrench, if the nipple does not sufficiently cover the screw.<br />
Do not use the hollow screws to adjust the radial truing of the wheel.<br />
The hollow screws must be glued, and then completely tightened, using a 5.5 Nm torque. The spoke nipples must be used to build and adjust the wheel.<br />
Once the tension of the wheel has been adjusted, the hollow screws must never be tightened or loosened. To remove one, first remove the spoke.<br />
1 2 3<br />
4 5<br />
21<br />
RIMS