TOURING RALLYE RACING TECHNOLOGY
TOURING RALLYE RACING TECHNOLOGY
TOURING RALLYE RACING TECHNOLOGY

Create successful ePaper yourself
Turn your PDF publications into a flip-book with our unique Google optimized e-Paper software.
<strong>TOURING</strong> <strong>RALLYE</strong> <strong>RACING</strong><br />
<strong>TECHNOLOGY</strong><br />
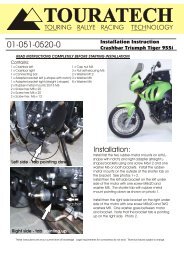
01-040-1301-0<br />
01-040-1311-0<br />
März 2002<br />
Anleitung<br />
Hard Part GV gelb / silber<br />
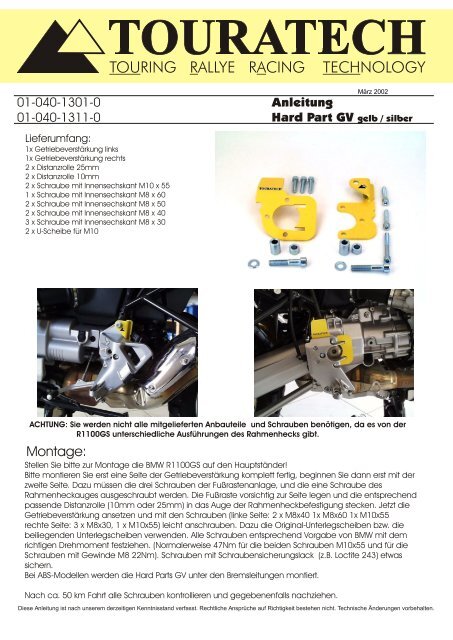
Lieferumfang:<br />
1x Getriebeverstärkung links<br />
1x Getriebeverstärkung rechts<br />
2 x Distanzrolle 25mm<br />
2 x Distanzrolle 10mm<br />
2 x Schraube mit Innensechskant M10 x 55<br />
1 x Schraube mit Innensechskant M8 x 60<br />
2 x Schraube mit Innensechskant M8 x 50<br />
2 x Schraube mit Innensechskant M8 x 40<br />
3 x Schraube mit Innensechskant M8 x 30<br />
2 x U-Scheibe für M10<br />
ACHTUNG: Sie werden nicht alle mitgelieferten Anbauteile und Schrauben benötigen, da es von der<br />
R1100GS unterschiedliche Ausführungen des Rahmenhecks gibt.<br />
Montage:<br />
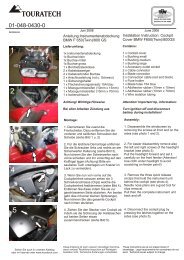
Stellen Sie bitte zur Montage die BMW R1100GS auf den Hauptständer!<br />
Bitte montieren Sie erst eine Seite der Getriebeverstärkung komplett fertig, beginnen Sie dann erst mit der<br />
zweite Seite. Dazu müssen die drei Schrauben der Fußrastenanlage, und die eine Schraube des<br />
Rahmenheckauges ausgeschraubt werden. Die Fußraste vorsichtig zur Seite legen und die entsprechend<br />
passende Distanzrolle (10mm oder 25mm) in das Auge der Rahmenheckbefestigung stecken. Jetzt die<br />
Getriebeverstärkung ansetzen und mit den Schrauben (linke Seite: 2 x M8x40 1x M8x60 1x M10x55<br />
rechte Seite: 3 x M8x30, 1 x M10x55) leicht anschrauben. Dazu die Original-Unterlegscheiben bzw. die<br />
beiliegenden Unterlegscheiben verwenden. Alle Schrauben entsprechend Vorgabe von BMW mit dem<br />
richtigen Drehmoment festziehen. (Normalerweise 47Nm für die beiden Schrauben M10x55 und für die<br />
Schrauben mit Gewinde M8 22Nm). Schrauben mit Schraubensicherungslack (z.B. Loctite 243) etwas<br />
sichern.<br />
Bei ABS-Modellen werden die Hard Parts GV unter den Bremsleitungen montiert.<br />
Nach ca. 50 km Fahrt alle Schrauben kontrollieren und gegebenenfalls nachziehen.<br />
Diese Anleitung ist nach unserem derzeitigen Kenntnisstand verfasst. Rechtliche Ansprüche auf Richtigkeit bestehen nicht. Technische Änderungen vorbehalten.
TOURATECH<br />
TOU RING <strong>RALLYE</strong> <strong>RACING</strong> TECH NOLOGY<br />
01-040-1301-0<br />
01-040-1311-0<br />
March 2002<br />
Hard Part GV<br />
For Left Side:<br />
1 support part A<br />
1 spacer 25mm<br />
1 spacer 10mm<br />
1 hex bolt 10x55mm<br />
(1.5mm thread)<br />
1 washer 10mm<br />
1 hex bolt 8x60mm<br />
1 hex bolt 8x50mm<br />
For Right Side:<br />
1 support part B<br />
1 spacer 25mm<br />
1 spacer 10mm<br />
1 hex bolt 10x55mm<br />
(1.5mm thread)<br />
1 washer 10mm<br />
1 hex bolt 8x30mm<br />
Description<br />
The BMW R1100 GS has several weak points which prevent enduro riders from riding the bike under<br />
extreme off-road conditions.<br />
Here is the solution. Problems occur when the workload on the rear frame is too high, i.e. after a jump or<br />
when riding with heavy luggage, or riding fast on very rough roads. The rear frame mount on the gearbox<br />
casing simply cracks. The broken transmission case may be covered by BMW warranty, but BMW<br />
does not come to pick up the bike in Namibia. It is better to install this brace and prevent the crack.<br />
This problem has been solved for the 1150, but for the 1100 the only solution is this hard part.<br />
Another weak point is the footpeg mount. Under extreme stress it may break the gearbox casing; i.e.<br />
when dropping the motorbike onto the footpegs or after a fall. When mounting our parts - we refer to<br />
these as hard parts - frame problems will belong to the past:<br />
Material: 4mm steel (ST 52)<br />
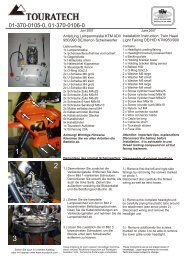
Note: The left side support must be installed completely before beginning installation of the right support.<br />
This guidance is written after our present level of knowledge. Legal equirements on correctness do not exist. Technical subject to change.
TOURATECH<br />
TOU RING <strong>RALLYE</strong> <strong>RACING</strong> TECH NOLOGY<br />
01-040-1301-0, 01-040-1311-0<br />
Hard Part GV<br />
March 2002<br />
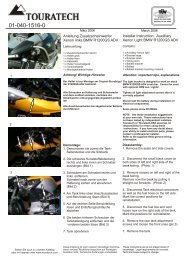
Note: The left side support must be installed completely before beginning installation of the right support.<br />
Left Side:<br />
1) Remove the 3 hex bolts holding the footpeg mount; it is not necessary to remove the shifter or shock adjuster.<br />
(With the 3 bolts removed, the footpeg mount will hang down, allowing enough space to complete the following steps.)<br />
2) Remove the large hex bolt fixing the subframe to the rear of the transmission housing. The bolt has a 8mm<br />
head-do not confuse this bolt with the swingarm pivot pin which is located behind the footpeg mount and has a<br />
12mm head w/ a 30mm locking nut.<br />
3) Place a spacer in the recess that previously contained the 8mm hex bolt. The correct spacer will sit flush with<br />
the recess. 2 different lenght spacers are included in the kit due to changes in different model years.<br />
4) With the correct spacer in position, install the TOURATECH support by threading the supplied 10x55mm bolt<br />
(with the 8mm socket head) through the TT support and spacer into the transmission housing. Finger tighten.<br />
5) Position the footpeg mount so that the holes line up with the TT suport and transmission housing. Install the<br />
original washers on the new supplied bolts. Note: the rear hole receives the 8x60mm bolt and the 2 front holes<br />
receive the 8x50 bolts.<br />
6) Thread the bolts into the transmission housing and tighten to 16 ft/lbs. With the 3 bolts tightened, torque the large<br />
hex bolt with the 8mm head to 34 ft/lbs<br />
Right Side:<br />
Note: The left side support must be installed completely before beginning installation of the right support.<br />
7) Remove 3 bolts fixing the footpeg. (These bolts to be removed have a 6mm hex head. DO NOT remove the<br />
two 5mm hex heads or the 8mm hex head). With the three bolts removed, the footpeg mount will hang on the<br />
metal brake lines going to the ABS unit. (On non-ABS models it is necessary to support the footpeg mount<br />
due to possible damage to the brake line).<br />
8) Remove the bolt with the 8mm allen head that fixes the subframe to the transmission housing. (The bolt with<br />
the 8mm head faces towards the rear of the motorcycle).<br />
9) Install the appropriate length spacer into the recess that previously held the large allen bolt with the 8mm head.<br />
The spacer should be flush with the top of the recess.<br />
10) Position the TOURATECH support behind the foodpeg mount. Install the supplied 10x55 bolt (1.5 thd) using<br />
the stock washer through thre TOURATECH support,spacer,and into the transmission housing. Finger tighten.<br />
(On ABS models it is necessary to position the TOURATECH support behind the metal brake line that go through<br />
the ABS unit. If these lines go behind the support they will be severely damaged resulting in loss of rear brake).<br />
11) Position the footpeg mount so that the bolt holes line up with the support and the transmission housing. Use<br />
the stock BMW washers on the new supplied 2x30mm bolts and thread them up into the holes. Tighten the 3 bolts<br />
to 16ft/lbs. At this time also tighten the large allen with the 8mm head to 34ft/lbs.<br />
RE-CHECK TIGHTNESS OF SCREWS AFTER THE FIRST 50 MILES<br />
This guidance is written after our present level of knowledge. Legal equirements on correctness do not exist. Technical subject to change.