English Manual.pdf
English Manual.pdf
English Manual.pdf

You also want an ePaper? Increase the reach of your titles
YUMPU automatically turns print PDFs into web optimized ePapers that Google loves.
TOURING RALLYE RACING<br />
TECHNOLOGY<br />
01-051-0520-0<br />
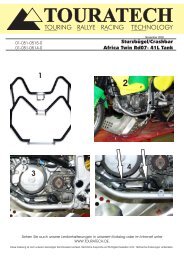
Installation Instruction<br />
Crashbar Triumph Tiger 955i<br />
READ INSTRUCTIONS COMPLETELY BEFORE STARTING INSTALLATION!<br />
Contains:<br />
1 x Crashbar left 1 x Cap nut M6<br />
1 x Crashbar right 3 x Nut self-securing M6<br />
1 x Connecting bar 2 x Washer M12<br />
1 x Adapter bracket left (L-shape with notch) 3 x Washer M8<br />
1 x Adapter bracket right (straight L-shape) 8 x Washer M6<br />
2 x Rubber-metal mounts 25/15 M6<br />
2 x Screw hex M8 x 20<br />
2 x Screw hex M6 x 20<br />
2 x Screw hex M6 x 12<br />
1<br />
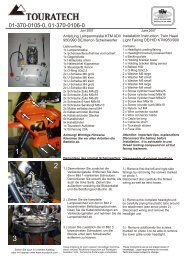
Left side - tab pointing down<br />
2<br />
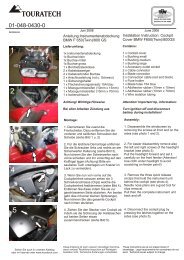
Installation:<br />
Install first the two rubber-metal mounts on left (Lshape<br />
with notch) and right adapter (straight L-<br />
shape) brackets using one screw M6x12 and one<br />
washer M6 on both brackets. Install the rubbermetal<br />
mounts on the outside of the shorter tab on<br />
the bracket. See photos 1+2.<br />
Install then the left side bracket on the left under<br />
side of the motor with one screw M8x20 and<br />
washer M8. The shorter tab with rubber metal<br />
mount pointing down as shown on photo 1.<br />
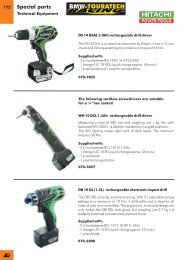
Washer<br />
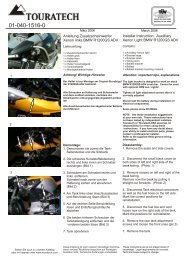
Install then the right side bracket on the right under<br />
side of the motor with one screw M8x20 and TWO<br />
washers M8. One washer goes between motor<br />
and bracket. Note that the bracket tab is pointing<br />
up on the right side. Photo 2.<br />
Right side - tab pointing up<br />
These instructions are at our current level of knowledge. Legal requirements for correctness do not exist. Technical issues subject to change.
TOURING RALLYE RACING<br />
TECHNOLOGY<br />
01-051-0520-0<br />
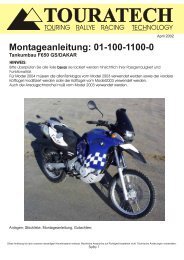
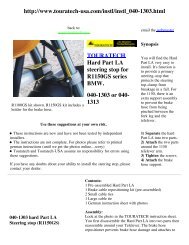
Attention! Loosen all motor attachment<br />
screws but only remove one side at the<br />
time so that the motor does not drop!<br />
Remove the motor attacment screws on the<br />
left side as well as loosen the motor<br />
mounting plate as shown on photo 3.<br />
The motor can slip slightly down after<br />
removing the attachment bolts on one<br />
side. Bolts can be then hard to put back<br />
in and a second person may be needed<br />
to support the motor. Make sure the<br />
motorcycle is standing safely.<br />
Do not tighten crash bar screws comletely<br />
until all crashbar attachment points are<br />
installed.<br />
3<br />
4<br />
Installation Instruction<br />
Crashbar Triumph Tiger 955i<br />
LEFT SIDE<br />
RIGHT SIDE<br />
Attach the left side crash bar (Photo 3) using<br />
orig. Torx 55 screw. Rear attachment point<br />
needs to be spaced with two supplied<br />
washers M12.<br />
Crash bar is attached below at the rubbermetal<br />
mount with one nylock nut M6 and a<br />
washer M6.<br />
Remove the original screws on the right side<br />
as shown on photo 4 and attach the right<br />
side crash bar using the original screws.<br />
Right side bar is attached below at the<br />
rubber-metal mount also with one nylock nut<br />
M6 and a washer M6.<br />
Install finally the crashbar crossbar in front of<br />
the motor joining both crashbar sides. It is<br />
attached on left and right crashbar using<br />
one screw M6x20, two washers M6 each side<br />
but the nylock nut M6 on right side and the<br />
cap nut M6 on the left side.<br />
Attention! Make sure motor<br />
attachment bolts are tightened to<br />
95Nm torque after installtion!<br />
These instructions are at our current level of knowledge. Legal requirements for correctness do not exist. Technical issues subject to change.