C2C Reference: ATM Quick Configuration Guide - Encore Networks
C2C Reference: ATM Quick Configuration Guide - Encore Networks
C2C Reference: ATM Quick Configuration Guide - Encore Networks

You also want an ePaper? Increase the reach of your titles
YUMPU automatically turns print PDFs into web optimized ePapers that Google loves.
encor<br />
! •<br />
enetworks TM<br />
Version A.1 module file, January 2013<br />
© 2013 <strong>Encore</strong> <strong>Networks</strong>, Inc.<br />
All rights reserved.<br />
<strong>ATM</strong> <strong>Quick</strong> <strong>Configuration</strong> <strong>Guide</strong><br />
For Connecting an <strong>ATM</strong> to a <strong>C2C</strong> or an E2C<br />
This document provides quick guidelines for configuring your automated teller machine (<strong>ATM</strong>) to use a <strong>C2C</strong> or E2C<br />
router. <strong>Configuration</strong> of the <strong>ATM</strong> is quick. And you do not need to configure the <strong>C2C</strong> or E2C router itself;<br />
configuration of the <strong>C2C</strong> or E2C is automatic, supporting its connection to one or two <strong>ATM</strong>s. Your <strong>ATM</strong> can connect<br />
to one of the following routers:<br />
• The <strong>C2C</strong>: This router has an RJ11 analog modem port and an Ethernet port. It can support one or two <strong>ATM</strong>s at the<br />
same time: one <strong>ATM</strong> that uses a dial-up connection to reach the <strong>ATM</strong> host, and/or one <strong>ATM</strong> that uses an IP connection<br />
to reach the <strong>ATM</strong> host.<br />
• The E2C: This router has a single Ethernet port. It can support one <strong>ATM</strong> that uses an IP connection to reach the <strong>ATM</strong><br />
host.<br />
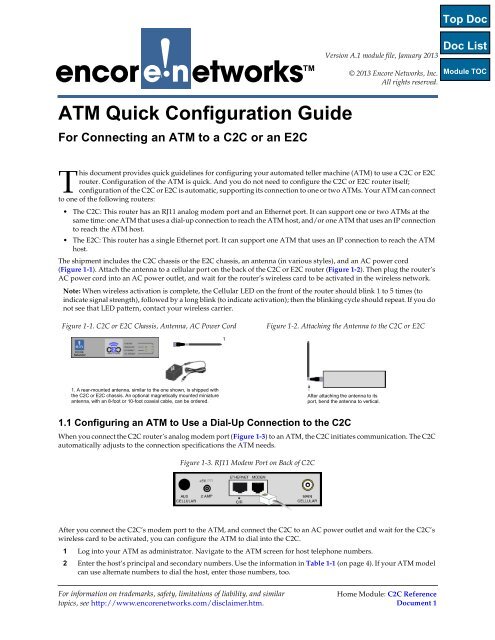
The shipment includes the <strong>C2C</strong> chassis or the E2C chassis, an antenna (in various styles), and an AC power cord<br />
(Figure 1-1). Attach the antenna to a cellular port on the back of the <strong>C2C</strong> or E2C router (Figure 1-2). Then plug the router’s<br />
AC power cord into an AC power outlet, and wait for the router’s wireless card to be activated in the wireless network.<br />
Note: When wireless activation is complete, the Cellular LED on the front of the router should blink 1 to 5 times (to<br />
indicate signal strength), followed by a long blink (to indicate activation); then the blinking cycle should repeat. If you do<br />
not see that LED pattern, contact your wireless carrier.<br />
Figure 1-1. <strong>C2C</strong> or E2C Chassis, Antenna, AC Power Cord<br />
Figure 1-2. Attaching the Antenna to the <strong>C2C</strong> or E2C<br />
1<br />
1. A rear-mounted antenna, similar to the one shown, is shipped with<br />
the <strong>C2C</strong> or E2C chassis. An optional magnetically mounted miniature<br />
antenna, with an 8-foot or 10-foot coaxial cable, can be ordered.<br />
After attaching the antenna to its<br />
port, bend the antenna to vertical.<br />
1.1 Configuring an <strong>ATM</strong> to Use a Dial-Up Connection to the <strong>C2C</strong><br />
When you connect the <strong>C2C</strong> router’s analog modem port (Figure 1-3) to an <strong>ATM</strong>, the <strong>C2C</strong> initiates communication. The <strong>C2C</strong><br />
automatically adjusts to the connection specifications the <strong>ATM</strong> needs.<br />
Figure 1-3. RJ11 Modem Port on Back of <strong>C2C</strong><br />
After you connect the <strong>C2C</strong>’s modem port to the <strong>ATM</strong>, and connect the <strong>C2C</strong> to an AC power outlet and wait for the <strong>C2C</strong>’s<br />
wireless card to be activated, you can configure the <strong>ATM</strong> to dial into the <strong>C2C</strong>.<br />
1 Log into your <strong>ATM</strong> as administrator. Navigate to the <strong>ATM</strong> screen for host telephone numbers.<br />
2 Enter the host’s principal and secondary numbers. Use the information in Table 1-1 (on page 4). If your <strong>ATM</strong> model<br />
can use alternate numbers to dial the host, enter those numbers, too.<br />
For information on trademarks, safety, limitations of liability, and similar<br />
topics, see http://www.encorenetworks.com/disclaimer.htm.<br />
Home Module: <strong>C2C</strong> <strong>Reference</strong><br />
Document 1
Page 2 <strong>C2C</strong> <strong>Reference</strong> Module, Document 1<br />
1.2 Configuring an <strong>ATM</strong> to Use an IP Connection to the <strong>C2C</strong> or E2C<br />
After you connect the <strong>C2C</strong> or E2C Ethernet port (Figure 1-4 or Figure 1-5) to the <strong>ATM</strong>, and connect the <strong>C2C</strong> or E2C<br />
router to an AC power outlet and wait for the router’s wireless card to be activated, you can configure your <strong>ATM</strong> to<br />
use the router.<br />
Figure 1-4. RJ45 Ethernet Port on Back of <strong>C2C</strong><br />
Figure 1-5. RJ45 Ethernet Port on Back of E2C<br />
Log into your <strong>ATM</strong> as administrator. Use the information in Table 1-2 (on page 4) to configure your <strong>ATM</strong> to<br />
communicate with the <strong>C2C</strong> or E2C. Follow one of the procedures below for your <strong>ATM</strong> model.<br />
Nautilus Hyosung <strong>ATM</strong>s<br />
Communication Parameters<br />
1 Navigate to the Customer Setup screen. Press the<br />
Select Processor button. The Select Processor<br />
screen is displayed.<br />
2 Select Communication. The Communication<br />
screen is displayed. Select TCP/IP until the<br />
communication type is TCP/IP.<br />
3 Select the Cancel to Return button at the bottom<br />
of the Communication screen to return to the<br />
Select Processor screen. Select TCP/IP Type. The<br />
TCP/IP Type screen is displayed.<br />
4 Following the instructions the <strong>ATM</strong> processing<br />
system gave you, do one of the following:<br />
a Select Visa Framed. Then, at the bottom right of<br />
the screen, select Next. The EOT/ENQ Option<br />
screen is displayed. Select the EOT and ENQ<br />
options specified by the <strong>ATM</strong> processing system.<br />
b Select Standard.<br />
5 Select the Cancel to Return button at the bottom<br />
of each screen until you return to the Customer<br />
Setup screen. Then, if you selected Standard in<br />
step 4 substep b, and if the <strong>ATM</strong> processing<br />
system specified Standard 3 format, select<br />
Standard3 Option. The Standard 3 Option screen<br />
is displayed. Select the CRC options (Enable or<br />
Disable) specified by the <strong>ATM</strong> processing host.<br />
System IP Parameters<br />
6 If your <strong>ATM</strong> will use dynamic IP addressing, go<br />
to DHCP Client.<br />
7 If your <strong>ATM</strong> will use a static IP address, go to<br />
Static IP Address.<br />
DHCP Client<br />
8 Navigate to the System Setup screen. Select<br />
Terminal IP. The Terminal IP screen is displayed.<br />
9 To enable DHCP, select DHCP En/Disable once<br />
or twice so that the screen does not display the<br />
<strong>ATM</strong>’s IP number. Go to Host IP Parameters.<br />
Static IP Address<br />
10 Navigate to the System Setup screen. Select<br />
Terminal IP. The Terminal IP screen is displayed.<br />
11 To disable DHCP, select DHCP En/Disable once<br />
or twice so that the screen displays the <strong>ATM</strong>’s IP<br />
number. Then set the following:<br />
IP Address: 192.168.10.2<br />
Subnet Mask: 255.255.255.0<br />
Gateway: 192.168.10.1<br />
Host IP Parameters<br />
12 Navigate to the <strong>ATM</strong>’s Host Setup screen. Select<br />
Host Address. The Host Address screen is<br />
displayed.<br />
13 Select Port Number1. In the field that is<br />
displayed, enter the <strong>ATM</strong> host’s remote port<br />
number.<br />
14 Select Address1. On the virtual keyboard that is<br />
displayed, type the <strong>ATM</strong> host’s URL or IP<br />
address. Then select OK.<br />
15 Save the information in your <strong>ATM</strong>’s<br />
configuration. Sign out of <strong>ATM</strong> administration<br />
and prepare the <strong>ATM</strong> for customer use.<br />
Tranax, Hantle, and Genmega <strong>ATM</strong>s<br />
Communication Parameters<br />
1 Navigate to the Customer Setup screen. Select the<br />
Change Processor button. The Change Processor<br />
screen is displayed.<br />
2 Select Communication. The Communication<br />
screen is displayed. Select TCP/IP until the<br />
communication type is TCP/IP.<br />
3 Select the Cancel to Return button at the bottom<br />
of the Communication screen to return to the<br />
Change Processor screen. Select TCP/IP Type.<br />
The TCP/IP Type screen is displayed.<br />
4 Following the instructions the <strong>ATM</strong> processing<br />
system gave you, do one of the following:<br />
a Select Visa Framed.<br />
b Select Standard.
<strong>ATM</strong> <strong>Quick</strong> <strong>Configuration</strong> <strong>Guide</strong> Page 3<br />
5 Select the Cancel to Return button at the bottom<br />
of each screen until you return to the Customer<br />
Setup screen. Then, if you selected Standard in<br />
step 4 substep b, and if the <strong>ATM</strong> processing<br />
system specified Standard 3 format, select<br />
Standard 3 Options. When you see the Extended<br />
Messaging options, select the CRC options<br />
(Enable or Disable) specified by the <strong>ATM</strong><br />
processing system.<br />
System IP Parameters<br />
6 If your <strong>ATM</strong> will use dynamic IP addressing, go<br />
to DHCP Client.<br />
7 If your <strong>ATM</strong> will use a static IP address, use a<br />
Static IP Address.<br />
DHCP Client<br />
8 Navigate to the System Setup screen. Select<br />
Device Setup. The Device Setup screen is<br />
displayed.<br />
9 Select <strong>ATM</strong> TCP Setup. The <strong>ATM</strong> TCP/IP<br />
Setting screen is displayed.<br />
10 To enable DHCP, select TCP/IP Mode once or<br />
twice so that the screen displays DHCP MODE.<br />
Go to Host IP Parameters.<br />
Static IP Address<br />
11 Navigate to the System Setup screen. Select<br />
Device Setup. The Device Setup screen is<br />
displayed.<br />
12 Select <strong>ATM</strong> TCP Setup. The <strong>ATM</strong> TCP/IP<br />
Setting screen is displayed.<br />
13 To disable DHCP, select TCP/IP Mode once or<br />
twice so that the screen displays the <strong>ATM</strong>’s IP<br />
number. Then set the following:<br />
IP Address: 192.168.10.2<br />
Subnet Mask: 255.255.255.0<br />
Gateway: 192.168.10.1<br />
Host IP Parameters<br />
14 Navigate to the <strong>ATM</strong>’s Host Setup screen.<br />
15 Select Change Host IP Address. In the field that<br />
is displayed, enter the <strong>ATM</strong> host’s IP address.<br />
16 Select Change Host Port. In the field that is<br />
displayed, enter the <strong>ATM</strong> host’s remote port<br />
number.<br />
17 Save the information in your <strong>ATM</strong>’s<br />
configuration. Sign out of <strong>ATM</strong> administration<br />
and prepare the <strong>ATM</strong> for customer use.<br />
Triton <strong>ATM</strong>s<br />
Communication Parameters<br />
1 On the Management Functions screen (Main<br />
Menu), select Configure Terminal.<br />
2 If you don’t see the Communication button on<br />
the Configure Terminal screen, select More.<br />
When you see the Communication button on the<br />
screen, select it.<br />
3 In the Communication screen, select<br />
Communication Protocol (or, on some <strong>ATM</strong>s,<br />
Communication Type).<br />
4 Select TCP/IP, and then select Communication<br />
Message. Refer to your <strong>ATM</strong> processor’s<br />
instructions and select one of the following<br />
formats:<br />
Triton Standard<br />
Triton Standard, No CRC<br />
Triton Standard with EOT<br />
System IP Parameters<br />
5 If your <strong>ATM</strong> will use dynamic IP addressing, go<br />
to DHCP Client.<br />
6 If your <strong>ATM</strong> will use a static IP address, go to<br />
Static IP Address.<br />
DHCP Client<br />
7 On the Main Menu, select Configure Terminal.<br />
Then select Communication, and select<br />
Communication Protocol (or, on some <strong>ATM</strong>s,<br />
Communication Type).<br />
8 Select TCP/IP. The <strong>ATM</strong> TCP/IP Setting screen is<br />
displayed.<br />
9 To enable DHCP, make sure Permanent (or<br />
Persistent) TCP/IP Connection is not selected. Go<br />
to Host IP Parameters.<br />
Static IP Address<br />
10 On the Main Menu, select Configure Terminal.<br />
The select Communication, and select<br />
Communication Protocol (or, on some <strong>ATM</strong>s,<br />
Communication Type).<br />
11 Select TCP/IP. The <strong>ATM</strong> TCP/IP Setting screen is<br />
displayed.<br />
12 To disable DHCP, make sure Permanent (or<br />
Persistent) TCP/IP Connection is selected. Then<br />
set the following:<br />
IP Address: 192.168.10.2<br />
Subnet Mask: 255.255.255.0<br />
Gateway: 192.168.10.1<br />
Host IP Parameters<br />
13 On the Management Functions screen (Main<br />
Menu), select Configure Processors. Navigate to<br />
the <strong>ATM</strong>’s Host Setup screen.<br />
14 Select Change Host IP Address. Enter the <strong>ATM</strong><br />
host’s IP address.<br />
15 Select Change Host Port. Enter the <strong>ATM</strong> host’s<br />
remote port number.<br />
16 Save the information in your <strong>ATM</strong>’s<br />
configuration. Sign out of <strong>ATM</strong> administration<br />
and prepare the <strong>ATM</strong> for customer use.
Page 4 <strong>C2C</strong> <strong>Reference</strong> Module, Document 1<br />
Table 1-1. Dial-Up Connections to <strong>ATM</strong> Processing Systems<br />
<strong>ATM</strong> Processing System Principal/Secondary/Alternate Dial<br />
Digital Network Solutions principal 1-800-816-5409<br />
secondary 1-800-816-5410<br />
EFX principal 1-855-871-1292<br />
secondary 1-866-365-2346<br />
Élan principal and secondary 1-800-472-6210<br />
alternate 2222<br />
Switch Commerce principal 1-800-931-8497<br />
secondary 1-800-931-6030<br />
alternate 3333<br />
WorldPay principal 1-800-827-5965<br />
secondary 1-800-486-5965<br />
alternate 4444<br />
Table 1-2. IP Connections to <strong>ATM</strong> Processing Systems<br />
<strong>ATM</strong> Processing System<br />
Remote DNS (using URL)<br />
or Remote IP Address<br />
Remote Port<br />
Digital Network Solutions atmssl.dnsatm.com 8002<br />
EFX myatmconnect.com 9004<br />
Élan pos.tnsi.com 5162<br />
Switch Commerce pos.tnsi.com 5231<br />
WorldPay tptrans.lynksystems.com 6660<br />
6661