

here - Snap-on Equipment
here - Snap-on Equipment
here - Snap-on Equipment

You also want an ePaper? Increase the reach of your titles
YUMPU automatically turns print PDFs into web optimized ePapers that Google loves.
Maintenance<br />
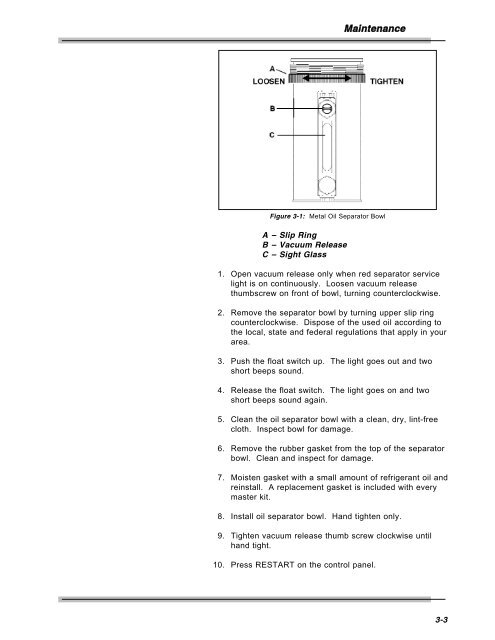
Figure 3-1: Metal Oil Separator Bowl<br />
A – Slip Ring<br />
B – Vacuum Release<br />
C – Sight Glass<br />
1. Open vacuum release <strong>on</strong>ly when red separator service<br />
light is <strong>on</strong> c<strong>on</strong>tinuously. Loosen vacuum release<br />
thumbscrew <strong>on</strong> fr<strong>on</strong>t of bowl, turning counterclockwise.<br />
2. Remove the separator bowl by turning upper slip ring<br />
counterclockwise. Dispose of the used oil according to<br />
the local, state and federal regulati<strong>on</strong>s that apply in your<br />
area.<br />
3. Push the float switch up. The light goes out and two<br />
short beeps sound.<br />
4. Release the float switch. The light goes <strong>on</strong> and two<br />
short beeps sound again.<br />
5. Clean the oil separator bowl with a clean, dry, lint-free<br />
cloth. Inspect bowl for damage.<br />
6. Remove the rubber gasket from the top of the separator<br />
bowl. Clean and inspect for damage.<br />
7. Moisten gasket with a small amount of refrigerant oil and<br />
reinstall. A replacement gasket is included with every<br />
master kit.<br />
8. Install oil separator bowl. Hand tighten <strong>on</strong>ly.<br />
9. Tighten vacuum release thumb screw clockwise until<br />
hand tight.<br />
10. Press RESTART <strong>on</strong> the c<strong>on</strong>trol panel.<br />
3-3


