

16021814 - Appliance Blog
16021814 - Appliance Blog
16021814 - Appliance Blog

Create successful ePaper yourself
Turn your PDF publications into a flip-book with our unique Google optimized e-Paper software.
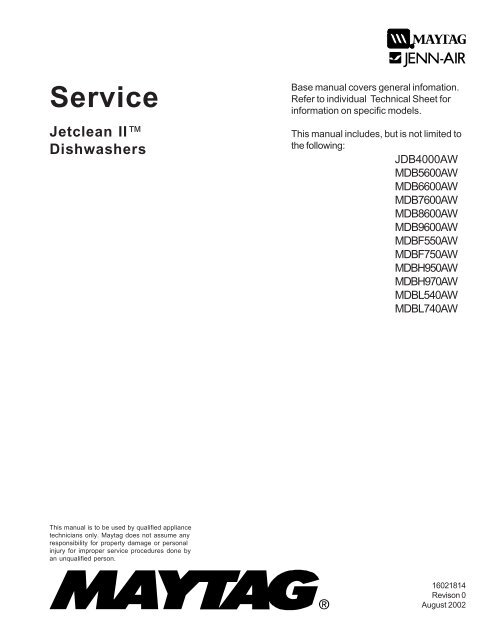
Service<br />
Jetclean II<br />
Dishwashers<br />
Base manual covers general infomation.<br />
Refer to individual Technical Sheet for<br />
information on specific models.<br />
This manual includes, but is not limited to<br />
the following:<br />
JDB4000AW<br />
MDB5600AW<br />
MDB6600AW<br />
MDB7600AW<br />
MDB8600AW<br />
MDB9600AW<br />
MDBF550AW<br />
MDBF750AW<br />
MDBH950AW<br />
MDBH970AW<br />
MDBL540AW<br />
MDBL740AW<br />
This manual is to be used by qualified appliance<br />
technicians only. Maytag does not assume any<br />
responsibility for property damage or personal<br />
injury for improper service procedures done by<br />
an unqualified person.<br />
<strong>16021814</strong><br />
Revison 0<br />
August 2002
Important Information<br />
Pride and workmanship go into every product to provide our customers with quality products. It is possible, however,<br />
that during its lifetime a product may require service. Products should be serviced only by a qualified service<br />
technician who is familiar with the safety procedures required in the repair and who is equipped with the proper tools,<br />
parts, testing instruments and the appropriate service manual. REVIEW ALL SERVICE INFORMATION IN THE<br />
APPROPRIATE SERVICE MANUAL BEFORE BEGINNING REPAIRS.<br />
Important Notices for Consumers and Servicers<br />
!<br />
WARNING<br />
To avoid risk of serious injury or death, repairs should not be attempted by unauthorized persons, dangerous<br />
conditions (such as exposure to electrical shock) may result.<br />
!<br />
CAUTION<br />
Maytag will not be responsible for any injury or property damage from improper service procedures. If performing<br />
service on your own product, assume responsibility for any personal injury or property damage which may result.<br />
To locate an authorized servicer, please consult your telephone book or the dealer from whom you purchased this<br />
product. For further assistance please contact:<br />
Customer Service Support Center<br />
CAIR Center<br />
Web Site<br />
Telephone Number<br />
WWW.AMANA.COM ........................................................................... 1-800-843-0304<br />
WWW.JENNAIR.COM ......................................................................... 1-800-536-6247<br />
WWW.MAYTAG.COM ......................................................................... 1-800-688-9900<br />
CAIR Center in Canada ...................................................................... 1-800-688-2002<br />
Amana Canada Product ...................................................................... 1-866-587-2002<br />
Recognize Safety Symbols, Words, and Labels<br />
!<br />
DANGER<br />
DANGER—Immediate hazards which WILL result in severe personal injury or death.<br />
!<br />
WARNING<br />
WARNING—Hazards or unsafe practices which COULD result in severe personal injury or death.<br />
!<br />
CAUTION<br />
CAUTION—Hazards or unsafe practices which COULD result in minor personal injury or product or property<br />
damage.<br />
2 <strong>16021814</strong> Rev. 0 ©2002 Maytag <strong>Appliance</strong> Sales Company
Table of Contents<br />
Important Information<br />
Important Notices for Consumers and Servicers .... 2<br />
Recognize Safety Symbols, Words, and Labels ... 2<br />
Section 1. Important Safety Information<br />
General Information ...............................................1-4<br />
Related Publications .............................................1-4<br />
General Precautions and Warnings .......................1-4<br />
Product Warning Labels<br />
Junction Box Warning ...........................................1-5<br />
Support Panel Warning .........................................1-5<br />
Control Cover Warning ..........................................1-6<br />
Section 2. Electrical Equipment & Testing<br />
Electrical Test Equipment .....................................2-7<br />
<strong>Appliance</strong> Test Meter ............................................2-7<br />
Continuity Testing .................................................2-7<br />
Digital Test Meter ..................................................2-7<br />
Voltage Checks ..............................................2-8<br />
Motor Test Cord ....................................................2-8<br />
Grounding Polarity ................................................2-8<br />
Electrical Tests<br />
Water Valve ..........................................................2-9<br />
Detergent / Rinse Aid Disp Wax Mtr Check ..........2-9<br />
Vent Wax Motor Check....................................... 2-10<br />
Section 3. Cycles & Options<br />
Cycles ................................................................ 3-11<br />
Options ............................................................... 3-12<br />
Display ............................................................... 3-13<br />
Control Style by Model ........................................ 3-14<br />
Control Style by Model ........................................ 3-15<br />
Section 4. Trouble Shooting<br />
Will Not Fill ......................................................... 4-16<br />
Overflows ............................................................ 4-16<br />
Poor Water Circulation........................................ 4-16<br />
Poor Washability ................................................ 4-17<br />
Will Not Drain ..................................................... 4-17<br />
Continues to Drain .............................................. 4-17<br />
Poor Drying ........................................................ 4-17<br />
Water Leaks ....................................................... 4-18<br />
Noise .................................................................. 4-18<br />
Will Not Start or Program .................................... 4-18<br />
Will Not Fill ......................................................... 4-18<br />
Will Not Wash .................................................... 4-19<br />
Will Not Drain ..................................................... 4-19<br />
Will Not Dry ........................................................ 4-19<br />
Manual Function Test ......................................... 4-19<br />
Field Service Test ............................................... 4-19<br />
Section 5. Service and Disassembly Procedures<br />
Front Support and Toe Panel Removal ................ 5-20<br />
Inner Door Panel Removal ................................... 5-21<br />
Detergent / Rinse Aid Disp .................................. 5-21<br />
Wax Motor Detergent / Rinse Aid Disp................ 5-22<br />
Vent .................................................................... 5-22<br />
Wire Cover .......................................................... 5-22<br />
Door Latch & Switch Holder Assembly................ 5-23<br />
PC Board ............................................................ 5-24<br />
Technical Sheet .................................................. 5-24<br />
Control Panel ...................................................... 5-24<br />
Door Latch Strike ................................................ 5-24<br />
Door Gasket ....................................................... 5-25<br />
Outer Door .......................................................... 5-25<br />
Door Hinge And Support ..................................... 5-26<br />
Door Spring ......................................................... 5-26<br />
Door Spring And Component Replacement .......... 5-27<br />
Over Pressure Filter ............................................ 5-27<br />
Top Wash Arm .................................................... 5-27<br />
Manifold .............................................................. 5-28<br />
Docking Station .................................................. 5-28<br />
Lower Wash Arm ................................................ 5-28<br />
Float ................................................................... 5-29<br />
Heating Element ................................................. 5-30<br />
Thermostats ....................................................... 5-31<br />
Water Valve ........................................................ 5-31<br />
Air Water Inlet .................................................... 5-32<br />
Upper Rack Removal .......................................... 5-33<br />
Tub Wheels ........................................................ 5-33<br />
Turbidity Sensor.................................................. 5-33<br />
Drain Pump ........................................................ 5-34<br />
Wash Motor Assembly ....................................... 5-34<br />
Appendix A<br />
Installation Instructions ....................................... A-2<br />
Appendix B<br />
Jenn-Air User’s Guide ......................................... B-2<br />
Appendix C<br />
MDB-3 User’s Guide ........................................... B-2<br />
Appendix D<br />
MDB-4 User’s Guide ........................................... D-2<br />
©2002 Maytag <strong>Appliance</strong> Sales Company <strong>16021814</strong> Rev. 0 3
Important Safety Information<br />
! WARNING<br />
To avoid personal injury or death from improper<br />
servicing, make sure you read and understand the<br />
descriptions and meaning of various safety symbols,<br />
words and labels used in this manual, before<br />
attempting any procedures described in the manual.<br />
Failure to understand and comply with safety<br />
information may result in severe personal injury or<br />
death.<br />
General Information<br />
This Service Manual describes the operation,<br />
disassembly, troubleshooting, and repair of Maytag ®<br />
Dishwashers. It is intended for use by authorized<br />
servicer’s who troubleshoot and repair these units.<br />
NOTE: It is assumed that users of this manual are<br />
familiar with the use of tools and equipment used<br />
to troubleshoot and repair electrical, and<br />
mechanical systems; and understand the<br />
terminology used to describe and discuss them.<br />
Related Publications<br />
This is a base service manual, covering a range of<br />
similar models. It is intended to be used in conjunction<br />
with the Parts Manual and Technical Sheet covering<br />
specific model being serviced.<br />
General Precautions and Warnings<br />
• Dispose of discarded appliance and shipping or<br />
packing material properly.<br />
• Do not allow children to play in or on dishwasher.<br />
• Do not abuse, sit, stand or play on door or racks of a<br />
dishwasher.<br />
• Use only detergents and rinse agents recommended for<br />
use in a dishwasher.<br />
• Store dishwasher detergent and rinse agents out of the<br />
reach of children.<br />
• If the dishwasher drains into a food disposer, make<br />
sure disposer is completely empty before running<br />
dishwasher.<br />
• Repairs should be done by a qualified technician.<br />
• Do not tamper with controls.<br />
• Do not touch the heating element during or immediately<br />
after use.<br />
• Load sharp knives with the handles up to reduce the<br />
risk of cut-type injuries or damaging seal.<br />
!<br />
WARNING<br />
To avoid risk of personal injury or death due to<br />
electrical shock:<br />
• Grounding wires and wires colored like grounding<br />
wires are NOT to be used as current carrying<br />
conductors.<br />
• Standard accepted color coding for ground wires<br />
is green or green with a yellow stripe.<br />
• Grounding wires should not be removed from<br />
individual components while servicing, unless<br />
component is to be removed and replaced.<br />
• Replace all removed grounding wires before<br />
completing service.<br />
WARNING<br />
To avoid death, severe personal injury, fire or<br />
electrical shock when using dishwasher observe<br />
the following:<br />
• Observe all local codes and ordinances.<br />
• Disconnect electrical power to dishwasher before<br />
servicing.<br />
• Connect dishwasher to a grounded metal,<br />
permanent wiring system.<br />
• DO NOT ground to gas line.<br />
• DO NOT ground to cold water pipe if pipe is<br />
interrupted by plastic, non-metallic gaskets, or<br />
other insulating (non-conducting) materials.<br />
• Check with a qualified electrician if you are not<br />
sure this appliance is properly grounded.<br />
• This dishwasher is designed to operate on<br />
regular house current (120 V, 60 Hz). Use a<br />
circuit equipped with a 15 ampere fuse or circuit<br />
breaker. Use a 20 ampere fuse if dishwasher is<br />
connected with a food waste disposer.<br />
• Under certain conditions, hydrogen gas may be<br />
produced in a hot water system that has not<br />
been used for 2 weeks or more. HYDROGEN<br />
GAS IS EXPLOSIVE. If hot water system has<br />
not been used for such a period, before using<br />
dishwasher, turn on all hot water faucets and let<br />
water flow from each for several minutes. This will<br />
release any accumulated hydrogen gas.<br />
HYDROGEN GAS IS FLAMMABLE. Do not<br />
smoke or use an open flame during this time.<br />
• Do not store or use combustible materials,<br />
gasoline or other flammable vapors and liquids in<br />
the vicinity of this or any other appliance.<br />
• Do not wash plastic items unless marked<br />
"dishwasher safe" or the equivalent. If not<br />
marked, check with manufacturer for<br />
recommendations. Items that are not dishwasher<br />
safe may melt and create a potential fire hazard.<br />
• To avoid entrapment and/or suffocation, remove<br />
door or door latch mechanism from any<br />
dishwasher that is discarded or not in use.<br />
1-4 <strong>16021814</strong> Rev. 0 ©2002 Maytag <strong>Appliance</strong> Sales Company<br />
!
Important Safety Information<br />
PRECAUCIÓN:<br />
Desconecte la<br />
energía eléctrica<br />
antes de darie<br />
servicio.<br />
ATENCIÓN:<br />
Solamente use<br />
conductores de<br />
cobre. Use cables de<br />
suministro adecuados<br />
para 75° (167°F).<br />
CAUTION: Disconnect electrical power<br />
before servicing.<br />
ATTENTION: Use copper conductors only.<br />
Use supply wires suitable for 75°C (167°F).<br />
ATTENTION: Débrancher de<br />
l'alimentation électrique avant tout dépannage.<br />
ATTENTION: Utiliser des conducteurs en<br />
cuivre uniquement. Utiliser des fils<br />
d'alimentation pouvant supporter une<br />
température de 75°C (167°F).<br />
GROUNDING: This unit must<br />
be grounded in accordance with local<br />
and/or national electric codes.<br />
WARNING: The heating<br />
element, drain pump, harness clip,<br />
dispenser mount, and water valve are<br />
intentionally not grounded and may<br />
present a risk of electrical shock only<br />
during servicing. Discharge motor<br />
capacitior before servicing. Failure to<br />
follow these instructions can result in<br />
death, serious injury, fire, or electrical<br />
shock.<br />
MISE Á LA TERRE: Cet appareil<br />
doit être relié à la terre conformément aux<br />
codes électriques locaux et/ou nationaux.<br />
AVERTISSEMENT: La résistance,<br />
la pompe de vidange, l'attache du hamais, la<br />
monture de distributeur et l'électrovanne ne<br />
sont pas reliés à la terre intentionnellement et<br />
peuvent présenter des risques d'électrocution<br />
uniquement en cas d'intervention de service<br />
aprés-vente. Décharger le condensateur<br />
avant toute intervention. Le non-respect de<br />
ces consignes peut entrainer la mort, des<br />
blessures graves, l'incendie ou l'électrocution.<br />
CONEXIÓN A TIERRA: Esta<br />
unidad debe estar conectada a tierra de<br />
acuerdo con los códigos eléctricos locales y<br />
nacionales.<br />
ADVERTENCIA: El elemento calentador,<br />
la bomba de drenado, el sujetador del arnés,<br />
el montaje del surtidor y la válvula de<br />
agua están sin conectar a tierra<br />
intencionalmente podrían presentar un riesgo<br />
de descargas eléctricas cuando se les da<br />
servicio solamente. El no seguir estas<br />
instrucciones podría causar la muerte, lesiones<br />
graves, incendios o descargas eléctricas.<br />
©2002 Maytag <strong>Appliance</strong> Sales Company <strong>16021814</strong> Rev. 0 1-5
Important Safety Information<br />
WARNING:<br />
ADVERTENCIA: Desco nect e la energí antes de darle ser vicio. Elcontrolelectrónicoestá<br />
Disc on nectpowerbeforeservicing . Elect ronic controliseergizedatalltimesuntil<br />
powerisdisconnected. Capacitorsoncontrolmayremainactiveafterelectricalpowerisdisconnected.<br />
F ailure to fo lowtheseintructionscanresultindeath, ser ious injur y, fir e, elec ical shock.<br />
en gizado todo e lt iem pohastaquesedesconectalaenergía. Los cap ac itoresdelcontrolpodrían<br />
permaneceractivosdespuésdedesconectarlaenergíaeléctrica . El no seguirestasinstrucciones<br />
podrícausarlamuerte, lesio nes graves , inc endios o d cargaseléctricas .<br />
AVERTISSEMENT: Dé br an cher a van t oute in t ervent io n. La com ma nde él ect roniqu est<br />
ns tammentsoustensionàmoinsquel'appareilnesoitdébranché. Le s con de nsa teurs de la<br />
commandepeuventrestersoustensionunefoisl'appareildébranché. Le non -r espe ct de c es consignes<br />
peut entraîner la mort, des blessures g raves, l'i ncen dieoul' élec ocuti on .<br />
WARNING: Disconnect power before servicing. Electronic control is energized at all times until<br />
power is disconnected. Capacitors on control may remain active after electrical power is disconnected.<br />
Failure to follow these instructions can result in death, serious injury, fire, or electrical shock.<br />
ADVERTENCIA: Desconecte la energí antes de darle servicio. El control electrónico está<br />
energizado todo el tiempo hasta que se desconecta la energía. Los capacitores del control podrían<br />
permanecer activos después de desconectar la energía eléctrica. El no seguir estas instrucciones<br />
podrí causar la muerte, lesiones graves, incendios o descargas eléctricas.<br />
AVERTISSEMENT: Débrancher avant toute intervention. La commande électronique est<br />
constamment sous tension à moins que l'appareil ne soit débranché. Les condensateurs de la<br />
commande peuvent rester sous tension une fois l'appareil débranché. Le non-respect de ces consignes<br />
peut entraîner la mort, des blessures graves, l'incendie ou l' électrocution.<br />
1-6 <strong>16021814</strong> Rev. 0 ©2002 Maytag <strong>Appliance</strong> Sales Company
Section 2. Electrical Equipment & Testing<br />
Electrical Test Equipment<br />
The equipment required to service these models depends<br />
largely upon the condition encountered. Locating a<br />
malfunction will often require the use of electrical testing<br />
equipment such as:<br />
<strong>Appliance</strong> Test Meter<br />
Clamp-On Ammeter<br />
Motor Test Cord<br />
Digital Test Meter<br />
can be used to check for open<br />
or closed circuits, measure<br />
resistance, AC and DC volts,<br />
and temperature.<br />
<strong>Appliance</strong> Test Meter<br />
An <strong>Appliance</strong> Test Meter is a multi-purpose tester<br />
combining an AC/DC voltage tester with a multi-range<br />
ohmmeter.<br />
The easiest means of testing electrical components is<br />
"Continuity Testing" with an appliance meter. Continuity<br />
is a complete or continuous path from one point in an<br />
electrical circuit to another.<br />
Analog Test Meter<br />
can be used to check for<br />
open or closed circuits,<br />
measure resistance, AC and<br />
DC volts, and temperature.<br />
The obvious advantages of being able to check electrical<br />
components and circuits without power applied is one of<br />
the features of the Ohmmeter. Multiple ranges allow<br />
accurate determination of resistances of both single<br />
components and entire circuit paths. Resistance is<br />
measured in "Ohms."<br />
!<br />
WARNING<br />
To avoid risk of personal injury or death due to<br />
electrical shock:<br />
Always be sure the power has been disconnected<br />
before making resistance measurements. Failure to<br />
do so will also result in damage to your meter!<br />
Internal batteries provide all the power needed to<br />
make resistance checks. They should be checked<br />
at least once a year and replaced as needed.<br />
Continuity Testing: is a process of eliminating electrical<br />
components involved in a given function of the appliance,<br />
until the inoperative part is found. By reviewing the list of<br />
possible electrical problems under a given condition, and<br />
then performing appropriate continuity checks of the parts<br />
involved, you should be able to locate the electrical<br />
component which is inoperative.<br />
NOTE: When checking components or circuit paths for<br />
continuity, external wiring should be disconnected to<br />
eliminate false readings through external paths. Isolate<br />
what you want to test.<br />
©2002 Maytag <strong>Appliance</strong> Sales Company <strong>16021814</strong> Rev. 0 2-7
ELECTRICAL EQUIPMENT & TESTING<br />
VOLTAGE CHECKS<br />
Generally, these checks will consist of taking readings<br />
at the wall receptacle in order to determine the<br />
availability of voltage to the product. Voltage checks on<br />
individual components of a product are not<br />
recommended due to the possibility of electrical shock.<br />
Component part testing is best accomplished through<br />
continuity checks with an <strong>Appliance</strong> Test Meter.<br />
NOTE: Use of the meter on voltage higher than the<br />
indicated range may cause permanent damage to the<br />
meter. To prevent damage, first select highest range and<br />
then lower the range for readings which fall within the<br />
lower scale.<br />
Clamp-On Ammeter<br />
can be used to detect shorts.<br />
Overloads on the circuit breaker<br />
or fuse can be traced<br />
to either the appliance<br />
or circuit breaker by<br />
checking the current<br />
draw.<br />
Each circuit in an appliance has a "Normal" current<br />
draw, which is an indication of the performance of that<br />
circuit. Current draw levels of less than or more than<br />
normal give clues to possible malfunctions. The clampon<br />
ammeter measures these circuits without breaking<br />
the circuit by measuring the strength of the magnetic<br />
field developed around each conductor. Current is read<br />
by separating the conductors and clamping the jaws of<br />
the ammeter around each conductor on which current is<br />
read. Low amperage readings indicate problems, such<br />
as damaged heating elements, etc. High amperage<br />
readings indicate the unit being tested is operating under<br />
an increased mechanical or electrical load.<br />
NOTE: Overloads on a circuit breaker or fuse can be<br />
traced to the product being tested or the circuit breaker<br />
(or fuse) by checking the products current draw. If the<br />
amperage reading is less than the breaker reading, the<br />
breaker or fuse box is at fault.<br />
Use of Ammeter on dishwasher:<br />
1. Motor Current - the reading can be taken at the<br />
leads on the motor start relay or at the male connector.<br />
2. Heating Element Current - The reading can be<br />
taken using either lead to the element.<br />
Motor Test Cord<br />
!<br />
To avoid risk of personal injury or death due to<br />
electrical shock:<br />
• Disconnect electrical power to dishwasher before<br />
servicing.<br />
• Always plug test cord into a properly grounded<br />
receptacle.<br />
• Always make connection to components before<br />
plugging test cord into receptacle.<br />
A motor test cord may be used to electrically check<br />
operation of the various electrical components without<br />
removing them from the unit. Testing in this manner<br />
merely determines whether or not the part will function<br />
independently of other electrical components. In order to<br />
make accurate tests, proper connection of the motor test<br />
cord is important. With the aid of the drawings under<br />
Drive Motor Test, installation of the motor test cord may<br />
be done quickly and accurately.<br />
Grounding and Polarity<br />
!<br />
DANGER<br />
DANGER<br />
To avoid risk of personal injury or death due to<br />
electrical shock:<br />
• Do not cut or remove the grounding prong from any<br />
plug.<br />
The receptacle used for all Maytag products operating on<br />
120 VAC must be properly grounded and polarized.<br />
The power cord used on the appliances should be<br />
equipped with a three (3) prong polarized grounding plug<br />
2-8 <strong>16021814</strong> Rev. 0 ©2002 Maytag <strong>Appliance</strong> Sales Company
Electrical Equipment & Testing<br />
for protection against shock hazard and should be<br />
plugged directly into a properly grounded and polarized<br />
receptacle.<br />
It is the responsibility of the person installing the<br />
appliance to assure it is adequately grounded and<br />
polarized at the point of installation, taking into<br />
consideration local conditions and requirements. In<br />
cases where only a two (2) prong receptacle is available,<br />
it is the personal responsibility of the consumer to have it<br />
replaced with a properly grounded three (3) prong<br />
receptacle. All grounding and wiring should be done in<br />
accordance with National, State, and Local codes. DO<br />
NOT USE AN ADAPTER PLUG WITH THIS<br />
APPLIANCE.<br />
ELECTRICAL TESTS<br />
!<br />
WARNING<br />
To avoid risk of personal injury or death due to<br />
electrical shock:<br />
Wax Motor Check<br />
Detergent / Rinse Aid Dispenser<br />
A single Wax Motor is used to activate both the release of<br />
the Detergent Cup Cover and the rinse aid from the<br />
reservoir.<br />
To check the operation of the Wax Motor, removal from<br />
the Dispenser Retainer or Inner Door is not necessary.<br />
First, snap the Detergent Cup Door shut. Then, connect<br />
a Power Test Cord across the two terminals of the Wax<br />
Motor. Plug the Power Test Cord into a 120 VAC<br />
receptacle. The plunger in the center of the Wax Motor<br />
should "push out" and actuate the Dispenser in<br />
approximately 45-60 seconds. Remove voltage to the<br />
Wax Motor and allow the plunger to retract into the Wax<br />
Motor. Apply voltage to the Wax Motor again and observe<br />
for proper lifting of the rinse aid plunger.<br />
• Disconnect electrical power to dishwasher before<br />
servicing.<br />
• Always plug test cord into a properly grounded<br />
receptacle.<br />
• Always make connection to components before<br />
plugging test cord into receptacle.<br />
WATER VALVE TEST<br />
The Water Valve may be checked without removing it from<br />
the Dishwasher.<br />
To check the Water Valve for operation, hook up the test<br />
cord as follows:<br />
©2002 Maytag <strong>Appliance</strong> Sales Company <strong>16021814</strong> Rev. 0 2-9
Electrical Equipment & Testing<br />
Wax Motor Check- Vent<br />
A single continuous duty wax motor is used to operate<br />
the vent.<br />
!<br />
WARNING<br />
To avoid risk of personal injury or death due to<br />
electrical shock:<br />
• Disconnect electrical power to dishwasher before<br />
servicing.<br />
• Always plug test cord into a properly grounded<br />
receptacle.<br />
• Always make connection to components before<br />
plugging test cord into receptacle.<br />
Connect a Power Test Cord across the two terminals of<br />
the Wax Motor. Plug the Power Test Cord into a 120 VAC<br />
receptacle. The punger should extend (push out) and<br />
force the Vent Flap tight against the vent opening in<br />
approximately 45-60 seconds. When power is removed<br />
from the Wax Motor, the plunger should retract along with<br />
the Vent Flap, opening the vent.<br />
2-10 <strong>16021814</strong> Rev. 0 ©2002 Maytag <strong>Appliance</strong> Sales Company
Section 3. Cycles & Options<br />
Cycles<br />
Washing<br />
Drying<br />
Clean<br />
QuietSeries 300<br />
Heating Delay<br />
Sanitized<br />
Options<br />
Heavy<br />
Wash<br />
Normal<br />
Wash<br />
Light<br />
Wash<br />
Rinse<br />
Only<br />
Auto<br />
Clean<br />
START/<br />
Cancel<br />
DELAY<br />
1-9<br />
3<br />
Heated<br />
Dry<br />
Sanitize<br />
Tough<br />
Scrub<br />
Extra<br />
Rinse<br />
Covers all other models<br />
Cycles<br />
Options<br />
Auto<br />
Clean<br />
Heavy<br />
Wash<br />
Normal<br />
Wash<br />
Light<br />
Wash<br />
Rinse<br />
Only<br />
Quick<br />
Wash<br />
Heated<br />
3 Dry<br />
Sanitize<br />
Extra<br />
Rinse<br />
Tough<br />
Scrub<br />
Plus<br />
160°<br />
Wash<br />
Clean<br />
Sanitized<br />
MDB9600 Only<br />
See User's Guide for specific operation.<br />
Cycle<br />
Auto Clean<br />
Heavy Wash<br />
Normal Wash<br />
Description<br />
Designed to auto select the number of fills and length of wash time based on soil level<br />
of the dish load. Water usage ranges from 3 to 8 gallons.<br />
Designed to provide a longer cycle for washing items with heavy<br />
food soils. Water usage is 8 gallons.<br />
Designed to wash loads containing dishes with normal amounts of food soils.<br />
Water usage ranges from 3 to 6 gallons.<br />
Light Wash Designed to wash loads containing dishes that are lightly soiled. Water usage is 5<br />
gallons.<br />
Quick Wash<br />
Rinse Only<br />
Designed for light food soils. The cycle ends with a rinse and does not include drying.<br />
Water usage is 4 gallons.<br />
Rinses dishes being held until the dishwasher is full, and another<br />
cycle is selected. This cycle helps reduce the potential for development of odors.<br />
Water usage is 2 gallons.<br />
©2002 Maytag <strong>Appliance</strong> Sales Company <strong>16021814</strong> Rev. 0 3-11
Cycles & Options<br />
Cycles<br />
Washing<br />
Drying<br />
Clean<br />
QuietSeries 300<br />
Heating Delay<br />
Sanitized<br />
Options<br />
Heavy<br />
Wash<br />
Normal<br />
Wash<br />
Light<br />
Wash<br />
Rinse<br />
Only<br />
Auto<br />
Clean<br />
START/<br />
Cancel<br />
DELAY<br />
1-9<br />
3<br />
Heated<br />
Dry<br />
Sanitize<br />
Tough<br />
Scrub<br />
Extra<br />
Rinse<br />
Covers all other models<br />
Cycles<br />
Options<br />
Auto<br />
Clean<br />
Heavy<br />
Wash<br />
Normal<br />
Wash<br />
Light<br />
Wash<br />
Rinse<br />
Only<br />
Quick<br />
Wash<br />
Heated<br />
3 Dry<br />
Sanitize<br />
Extra<br />
Rinse<br />
Tough<br />
Scrub<br />
Plus<br />
160°<br />
Wash<br />
Clean<br />
Sanitized<br />
MDB9600 Only<br />
See User's Guide for specific operation.<br />
Option<br />
Tough Scrub<br />
Tough Scrub Plus<br />
Sanitize<br />
Extra Rinse<br />
Description<br />
This option adds fills, heat and/or wash time to the<br />
wash cycle.<br />
This option monitors cycles for sanitization.<br />
This option adds an extra rinse to the cycle which helps in hard water situations.<br />
160° Wash This option raises temperature in the final rinse to 160° F.<br />
Heated Dry<br />
Delay<br />
Control Lock<br />
This option improves drying results by turning the heating element on and off during<br />
the dry portion of the cycle.<br />
Delays the start of the dishwasher based on user input.<br />
Lock's the control touch pads from unwanted usage. This option does not lock the<br />
door.<br />
3-12 <strong>16021814</strong> Rev. 0 ©2002 Maytag <strong>Appliance</strong> Sales Company
Cycles & Options<br />
Cycles<br />
Washing<br />
Drying<br />
Clean<br />
QuietSeries 300<br />
Heating Delay<br />
Sanitized<br />
Options<br />
Heavy<br />
Wash<br />
Normal<br />
Wash<br />
Light<br />
Wash<br />
Rinse<br />
Only<br />
Auto<br />
Clean<br />
START/<br />
Cancel<br />
DELAY<br />
1-9<br />
3<br />
Heated<br />
Dry<br />
Sanitize<br />
Tough<br />
Scrub<br />
Extra<br />
Rinse<br />
Covers all other models<br />
Cycles<br />
Options<br />
Auto<br />
Clean<br />
Heavy<br />
Wash<br />
Normal<br />
Wash<br />
Light<br />
Wash<br />
Rinse<br />
Only<br />
Quick<br />
Wash<br />
Heated<br />
3 Dry<br />
Sanitize<br />
Extra<br />
Rinse<br />
Tough<br />
Scrub<br />
Plus<br />
160°<br />
Wash<br />
Clean<br />
Sanitized<br />
START/<br />
Cancel<br />
DELAY<br />
1-9<br />
QuietSeries300<br />
MDB9600 Only<br />
Display<br />
Clean<br />
Drying<br />
Washing<br />
Heating Delay<br />
Clean/Sanitized<br />
Delay<br />
Description<br />
The "Clean" light illuminates at the end of the cycle and remains on until the door has<br />
been open continuously for 30 seconds.<br />
The "Drying" light illuminates until the cycle is complete.<br />
The "Wash" light illuminates through all the rinse and wash portions of the cycle.<br />
The "Heating Delay" light illuminates when the cycle is being extended to heat the<br />
water.<br />
These two lights illuminate from the end of cycle until the next cycle is selected,<br />
or the door has been open continuously for 30 seconds.<br />
The "Delay" light will illuminate whenever a delay count down is in progress, or until<br />
the "Delay" pad is pressed again.<br />
©2002 Maytag <strong>Appliance</strong> Sales Company <strong>16021814</strong> Rev. 0 3-13
Cycles & Options<br />
Cycles<br />
Washing<br />
Sanitized<br />
Drying QuietSeries 100 Clean<br />
Options<br />
Heavy<br />
Wash<br />
Normal<br />
Wash<br />
Light<br />
Wash<br />
Rinse<br />
Only<br />
START/<br />
Cancel<br />
DELAY<br />
2-4-6<br />
2<br />
6<br />
4<br />
3<br />
Heated<br />
Dry<br />
Sanitize<br />
Tough<br />
Scrub<br />
Extra<br />
Rinse<br />
MDB5600<br />
Cycles<br />
ENN-AIR<br />
Washing<br />
Sanitized<br />
Drying Clean<br />
Options<br />
Heavy<br />
Wash<br />
Normal<br />
Wash<br />
Light<br />
Wash<br />
Rinse<br />
Only<br />
START/<br />
Cancel<br />
DELAY<br />
2-4-6<br />
2<br />
6<br />
4<br />
3<br />
Heated<br />
Dry<br />
Sanitize<br />
Tough<br />
Scrub<br />
Extra<br />
Rinse<br />
JDB4000<br />
Cycles<br />
Washing<br />
Sanitized<br />
Drying QuietSeries 100 Clean<br />
Options<br />
Heavy<br />
Wash<br />
Normal<br />
Wash<br />
Light<br />
Wash<br />
Rinse<br />
Only<br />
START/<br />
Cancel<br />
DELAY<br />
2-4-6<br />
2<br />
6<br />
4<br />
3<br />
Heated<br />
Dry<br />
Sanitize<br />
Extra<br />
Rinse<br />
MDBH950<br />
MDBF550<br />
Cycles<br />
Washing<br />
Drying<br />
QuietSeries200<br />
Sanitized<br />
Clean<br />
Options<br />
Heavy<br />
Wash<br />
Normal<br />
Wash<br />
Light<br />
Wash<br />
Rinse<br />
Only<br />
Auto<br />
Clean<br />
START/<br />
Cancel<br />
DELAY<br />
2-4-6<br />
2<br />
6<br />
4<br />
3<br />
Heated<br />
Dry<br />
Sanitize<br />
Tough<br />
Scrub<br />
Extra<br />
Rinse<br />
MDB6600<br />
Cycles<br />
Washing<br />
Drying<br />
Clean<br />
QuietSeries 300<br />
Heating Delay<br />
Sanitized<br />
Options<br />
Heavy<br />
Wash<br />
Normal<br />
Wash<br />
Light<br />
Wash<br />
Rinse<br />
Only<br />
Auto<br />
Clean<br />
START/<br />
Cancel<br />
DELAY<br />
1-9<br />
3<br />
Heated<br />
Dry<br />
Sanitize<br />
Tough<br />
Scrub<br />
Extra<br />
Rinse<br />
MDB7600<br />
MDB8600<br />
3-14 <strong>16021814</strong> Rev. 0 ©2002 Maytag <strong>Appliance</strong> Sales Company
Cycles & Options<br />
Cycles<br />
Washing<br />
Drying<br />
Clean<br />
QuietSeries 200<br />
Heating Delay<br />
Sanitized<br />
Options<br />
Heavy<br />
Wash<br />
Normal<br />
Wash<br />
Light<br />
Wash<br />
Rinse<br />
Only<br />
Auto<br />
Clean<br />
START/<br />
Cancel<br />
DELAY<br />
1-9<br />
3<br />
Heated<br />
Dry<br />
Sanitize<br />
Tough<br />
Scrub<br />
Plus<br />
Extra<br />
Rinse<br />
MDBH970<br />
Cycles<br />
Washing<br />
Drying<br />
Clean<br />
QuietSeries 200<br />
Heating Delay<br />
Sanitized<br />
Options<br />
Heavy<br />
Wash<br />
Normal<br />
Wash<br />
Light<br />
Wash<br />
Rinse<br />
Only<br />
Auto<br />
Clean<br />
START/<br />
Cancel<br />
DELAY<br />
1-9<br />
3<br />
Heated<br />
Dry<br />
Sanitize<br />
Tough<br />
Scrub<br />
Extra<br />
Rinse<br />
MDBF750<br />
Cycles<br />
Options<br />
Auto<br />
Clean<br />
Heavy<br />
Wash<br />
Normal<br />
Wash<br />
Light<br />
Wash<br />
Rinse<br />
Only<br />
Quick<br />
Wash<br />
Heated<br />
3 Dry<br />
Sanitize<br />
Extra<br />
Rinse<br />
Tough<br />
Scrub<br />
Plus<br />
160°<br />
Wash<br />
Clean<br />
Sanitized<br />
START/<br />
Cancel<br />
DELAY<br />
1-9<br />
QuietSeries300<br />
MDB9600<br />
©2002 Maytag <strong>Appliance</strong> Sales Company <strong>16021814</strong> Rev. 0 3-15
Section 4. Electrical-Mechanical<br />
Troubleshooting<br />
! WARNING<br />
To avoid risk of electrical shock, personal injury, or death, disconnect electrical power source to unit and discharge<br />
capacitor through a 10,000 ohm resistor before attempting to service, unless test procedures require power to be<br />
connected. Ensure all ground wires are connected before certifying unit as repaired and/or operational.<br />
!<br />
CAUTION<br />
Units covered in this manual are polarized. Reversing polarity of a unit or any of its components will cause<br />
damage. To avoid reversing polarity, any wires disconnected or removed during service must be reconnected to the<br />
same location. To ensure wires are reconnected to the proper location, tag or otherwise mark the wires before<br />
disconnecting or removing.<br />
Will Not Fill<br />
Water Access Valve<br />
Check to determine if the valve is turned on and water is<br />
available to the Dishwasher. Check water pressure.<br />
Circuit Breaker/Fuse<br />
Check for tripped breaker or blown fuse. Reset or replace<br />
as necessary.<br />
Door Latch<br />
Check door switches for continuity. With door switches<br />
engaged, no continuity, replace switch.<br />
Float<br />
Check float position. If in the up position, check for<br />
obstruction or disengagement from the Float Switch Arm.<br />
Float Switch<br />
If the float is in the down position, check the switch for<br />
continuity. If no continuity, replace the Float Switch.<br />
Water Valve<br />
Check Solenoid for continuity. No continuity, replace<br />
Water Valve. Check Inlet Screen for restrictions. Clean<br />
screen or replace Water Valve as necessary. (See section<br />
5).<br />
NOTE: Low water pressure can result in failure of the<br />
Water Valve to close properly.<br />
Float<br />
Ensure that the Float isn't stuck in the down position.<br />
Check for sediment buildup. Clean and/or replace as<br />
necessary.<br />
Float Switch Actuator Lever<br />
Check the actuator lever on the bracket. It must be able<br />
to move freely. Repair or replace as necessary. (See<br />
section 5).<br />
Float Switch<br />
Check Float Switch for continuity with the Float in the up<br />
position. If continuity is present and Float moves up and<br />
down freely, replace Float Switch.<br />
POOR WATER CIRCULATION<br />
Water Level - Too Low<br />
Normal water fill should be at level depicted by arrows.<br />
Wiring/Electrical Connections<br />
Check for loose or frayed wire terminal connections.<br />
Check for broken wire within harness. Repair or replace<br />
as necessary.<br />
Overflows<br />
Water Valve<br />
Pump Assembly<br />
Check that water continues to flow when electrical power Check assembly for obstructions or restricted movement<br />
is turned off. If the water continues to flow without of parts. Repair and/or replace parts as necessary.<br />
electrical power, replace Water Valve.<br />
4-16 <strong>16021814</strong> Rev. 0 ©2002 Maytag <strong>Appliance</strong> Sales Company
Electrical-Mechanical Troubleshooting<br />
! WARNING<br />
To avoid risk of electrical shock, personal injury, or death, disconnect electrical power source to unit and discharge<br />
capacitor through a 10,000 ohm resistor before attempting to service, unless test procedures require power to be<br />
connected. Ensure all ground wires are connected before certifying unit as repaired and/or operational.<br />
Filters<br />
Check for blockage of Strainer, Over Pressure Filter.<br />
Repair as necessary.<br />
Poor Washability<br />
Spray Arms<br />
Check all Spray Arms for blockage of water ports or<br />
cracks. Check for proper rack loading to avoid interference<br />
with Spray Arms during wash action. Check for proper<br />
sealing, fastening, and movement of Spray Arms. Repair<br />
as necessary.<br />
Filters<br />
Check for blockage of Strainer, Primary Filter, and Filter<br />
Support. Repair as necessary.<br />
Detergent Cup Cover<br />
Check spring hinge operation of Detergent Cup Cover.<br />
Repair as necessary.<br />
Detergent Cup<br />
Check operation of Detergent Cup Assembly, Wax Motor,<br />
Actuator, Linkage, and Cover Latch. Repair and/or replace<br />
parts as necessary. Note: For testing of Wax Motor, see<br />
Section 2.<br />
Rinse Dispenser<br />
Check level of rinse aid in reservoir. Check rinse aid<br />
dispenser setting.<br />
Wash Delivery System<br />
Check manifold and Docking Station for good seal and no<br />
leaks.<br />
Will Not Drain<br />
Inadequate Drainage<br />
Check Drain Pump for proper operation. Check the drain<br />
pipe connections and repair as needed. If draining into the<br />
garbage disposal, check for unprocessed food waste at<br />
drain hose connection to disposer. Clean out as needed.<br />
Drain Hose<br />
Check drain hose for kink or restrictions. Reroute or<br />
remove any restriction of drain hose as needed.<br />
Pump Assembly<br />
Check pump assembly for obstructions or restricted<br />
parts. Repair or replace parts as necessary.<br />
Wiring/Electrical Connections<br />
Check for loose or frayed wire terminal connections.<br />
Check for broken wire within harness. Repair or replace<br />
as necessary.<br />
Continues To Drain<br />
Control Board<br />
Check Control Board for proper operation.<br />
Poor Drying<br />
Water Temperature<br />
Check for low water temperature. Temperature should be<br />
between 120 - 150 degrees Fahrenheit. If not, advise<br />
consumer to adjust water heater setting. Encourage<br />
consumer to purge water lines to the dishwasher area<br />
prior to starting the dishwasher.<br />
Cycle Options<br />
Advise consumer use of options available on dishwasher<br />
that improve drying. Options that improve drying are<br />
Heated Dry, and 160° Wash.<br />
Detergent<br />
Check water hardness. Instruct consumer on detergent<br />
usage, one teaspoon of detergent per grain of water<br />
hardness.<br />
Rinse Dispenser<br />
Check level of rinse aid in reservoir. Check dispenser<br />
setting under cap. Use "MAX" for hard water conditions.<br />
Improper Rack Loading<br />
Check how the consumer loads the dishes into the racks.<br />
Improper loading of some types of dishes can trap water<br />
which causes dishes not to dry.<br />
Heating Element<br />
Check load readings listed on Technical Sheet located<br />
behind Toe Panel.<br />
©2002 Maytag <strong>Appliance</strong> Sales Company <strong>16021814</strong> Rev. 0 4-17
Electrical Mechanical Troubleshooting<br />
! WARNING<br />
To avoid risk of electrical shock, personal injury, or death, disconnect electrical power source to unit and discharge<br />
capacitor through a 10,000 ohm resistor before attempting to service, unless test procedures require power to be<br />
connected. Ensure all ground wires are connected before certifying unit as repaired and/or operational.<br />
Thermostat<br />
Check mating surface of the High Limit Thermostat face<br />
to surface of tub enclosure. Contact area must be flat.<br />
Adjust the thermostat placement if necessary. See<br />
Technical Sheet, located behind Toe Panel for thermostat<br />
data.<br />
Water Leaks<br />
Installation<br />
Check Dishwasher for proper leveling and squareness in<br />
cabinet.<br />
Door Alignment<br />
Check proper alignment of Door Liner to Door Gasket.<br />
Door Gasket<br />
Check for torn or damaged Door Gasket. Repair or<br />
replace as necessary.<br />
Hoses<br />
Check for loose hose clamps or hoses that leak. Tighten<br />
hose clamps or replace hoses as needed.<br />
Spray Arms / Manifold<br />
Check for cracks and replace as necessary.<br />
Detergent / Rinse Aid Dispenser Seal<br />
Check Rinse Aid Dispenser Seal for proper positioning or<br />
cracking. Reposition or replace as needed.<br />
Water Valve<br />
Check Water Valve body for damage and leaks. Replace if<br />
necessary. Also, check plumbing connections to Water<br />
Valve.<br />
Wash Motor Assembly<br />
Check for water leak between Pump Assembly and tub.<br />
Drain Pump Assembly<br />
Check Pump Assembly Housing for cracks. Check Drain<br />
Pump "O" ring for leaks.<br />
Noise<br />
Banging<br />
Check for loose Spray Arms. Check for dishes interfering<br />
with Spray Arm rotation. See loading information in the<br />
User's Guide at the end of this manual.<br />
Hammering/Chattering<br />
Check Water Valve for, noise, low voltage, or high valve<br />
coil resistance. Replace Water Valve if needed. Also,<br />
check incoming water supply line for proper size and<br />
pressure. Make sure the supply line is secured.<br />
Grinding<br />
Check for objects in Pump Assembly. If objects are<br />
found, inspect Pump Assembly for damage. Repair as<br />
needed.<br />
Vibration<br />
Check components for source of vibration. Adjust and/or<br />
tighten as needed.<br />
Will Not Start Or Program<br />
Control Board<br />
Check incoming voltage to Control Board.<br />
Membrane Switch<br />
Check for proper operation of Membrane Switch. See<br />
membrane readings on the Technical Sheet located<br />
behind toe panel.<br />
NOTE: Make sure the pin connectors are making proper<br />
contact with pins on the Control Board. If the<br />
voltage is correct into the Control Board, and the<br />
board will not activate, replace board.<br />
Will Not Fill<br />
Water Valve<br />
Check Water Valve circuit. See Technical Sheet for water<br />
valve data located behind toe panel.<br />
NOTE: Make sure the pin connectors are making proper<br />
contact with pins on the Control Board.<br />
4-18 <strong>16021814</strong> Rev. 0 ©2002 Maytag <strong>Appliance</strong> Sales Company
Electrical Mechanical Troubleshooting<br />
! WARNING<br />
To avoid risk of electrical shock, personal injury, or death, disconnect electrical power source to unit and discharge<br />
capacitor through a 10,000 ohm resistor before attempting to service, unless test procedures require power to be<br />
connected. Ensure all ground wires are connected before certifying unit as repaired and/or operational.<br />
Will Not Wash<br />
Wash Motor<br />
Check Wash Motor circuit. See data listed on the<br />
Technical Sheet, located behind toe panel.<br />
Will Not Drain<br />
Drain Motor<br />
Check Drain Motor circuit. See data listed on the<br />
Technical Sheet, located behind Toe Panel.<br />
Will Not Dry<br />
Vent Assembly<br />
Check Vent Assembly for proper operation. Check Wax<br />
Motor.<br />
Heating Element<br />
Check Heating Element circuit. See data listed on the<br />
Technical Sheet, located behind Toe Panel.<br />
Manual Function Test<br />
See Technical Sheet, located behind Toe Panel.<br />
Field Service Test<br />
See Technical Sheet, located behind Toe Panel.<br />
©2002 Maytag <strong>Appliance</strong> Sales Company <strong>16021814</strong> Rev. 0 4-19
Section 5. Service and Disassembly Procedures<br />
! WARNING<br />
To avoid risk of electrical shock, personal injury, or death, disconnect electrical power source to unit and discharge<br />
capacitor through a 10,000 ohm resistor before attempting to service, unless test procedures require power to be<br />
connected. Ensure all ground wires are connected before certifying unit as repaired and/or operational.<br />
The following paragraphs describe how to disassemble<br />
unit under test. Disassembly to some extent is required<br />
to install unit, to perform troubleshooting procedures, and<br />
to remove and replace failed components.<br />
Component names used throughout disassembly<br />
procedures are the same as those used in Parts<br />
Manuals.<br />
For quicker reassembly, disassemble unit under test only<br />
to extent necessary to troubleshoot and repair. Unless<br />
noted, reassembly is opposite of disassembly.<br />
!<br />
WARNING<br />
To avoid risk of personal injury or death due to<br />
electrical shock, ground wires and wires colored like<br />
ground wires are NOT to be used as current carrying<br />
conductors. The standard accepted color coding for<br />
ground wires is green or green with a yellow<br />
stripe. Electrical components such as the water valve<br />
and motor are grounded through an individual wire<br />
attached to the electrical component. Ground wires<br />
should not be removed from individual components<br />
while servicing, unless the component is to be<br />
removed and replaced. It is extremely important to<br />
replace all removed ground wires before completing<br />
service.<br />
Front Support and Toe Panel Removal<br />
Removal of Front Support and Toe Panel will allow access<br />
to the Water Valve, Float Switch Assembly, Electrical<br />
Junction Box, hoses, thermostats, Start Capacitor and<br />
Motor/Pump Assembly.<br />
Removal<br />
1. Disconnect power to the machine.<br />
2. The Front Support Panel is held by 2 screws, one<br />
each side. Remove both screws.<br />
3. The Toe Panel is held by 2 screws, one each side.<br />
5-20 <strong>16021814</strong> Rev. 0 ©2002 Maytag <strong>Appliance</strong> Sales Company
Service and Disassembly Procedures<br />
! WARNING<br />
To avoid risk of electrical shock, personal injury, or death, disconnect electrical power source to unit and discharge<br />
capacitor through a 10,000 ohm resistor before attempting to service, unless test procedures require power to be<br />
connected. Ensure all ground wires are connected before certifying unit as repaired and/or operational.<br />
Inner Door Panel<br />
Removal of the Inner Door Panel will allow access to the<br />
Microprocessor Board, Door Switches, Detergent / Rinse<br />
Aid Dispenser, and Vent Assembly.<br />
Removal<br />
1. Disconnect power to the machine.<br />
2. Open the Dishwasher door.<br />
3. Remove the 11 Torx screws along the sides and<br />
top of the Inner Door Panel.<br />
4. Separate the Inner Door Panel from the Outer Door.<br />
5. Disconnect wires from the Vent and Dispenser Wax<br />
Motors before pulling the Inner Door Panel away<br />
from the Dishwasher.<br />
Detergent / Rinse Dispenser Mechanism<br />
and Reservoir<br />
Checking Operation<br />
1. Disconnect power to the machine.<br />
2. Remove the Inner Door Panel. (See paragraph Inner<br />
Door Panel removal).<br />
3. Snap the Detergent Door shut.<br />
4. Gently lift the lever of the dispenser mechanism until<br />
a click is herd. The Detergent Door releases. Release<br />
the lever.<br />
5. Lift the lever again. Now the actuator will lift the Rinse<br />
Aid Plunger.<br />
IMPORTANT: When replacing Inner Door Panel, remove<br />
Inner Door reinforcement, Bottom Seal and install on<br />
new panel.<br />
©2002 Maytag <strong>Appliance</strong> Sales Company <strong>16021814</strong> Rev. 0 5-21
Service and Disassembly Procedures<br />
! WARNING<br />
To avoid risk of electrical shock, personal injury, or death, disconnect electrical power source to unit and discharge<br />
capacitor through a 10,000 ohm resistor before attempting to service, unless test procedures require power to be<br />
connected. Ensure all ground wires are connected before certifying unit as repaired and/or operational.<br />
Wax Motor Detergent / Rinse Dispenser<br />
Removal<br />
1. Disconnect power to the machine.<br />
2. Remove the Inner Door Panel. (See paragraph Inner<br />
Door Panel removal).<br />
3. Remove the 6 mounting screws securing the<br />
Detergent Dispenser mounting bracket.<br />
4. To remove the Wax Motor, pry out of retainer.<br />
NOTE: It is not necessary to remove Detergent<br />
Dispenser before removing Wax Motor.<br />
Vent<br />
The Vent is located on the Inner Door Panel to allow<br />
moisture to be vented outside of the Dishwasher during<br />
the dry cycle.<br />
Removal<br />
1. Disconnect power to the machine.<br />
2. Remove the Inner Door Panel. (See paragraph Inner<br />
Door Panel removal).<br />
3. Rotate Vent Cover counter clockwise 1/4 turn and lift<br />
off.<br />
Wire Cover<br />
The Wire Cover retains the Wire Harness to the bottom of<br />
the Tub. It is located on the bottom side of the Tub.<br />
Removal<br />
1. Disconnect power to the machine.<br />
2. Remove Front Support and Toe Panel. (See paragraph<br />
Front Support and Toe Panel removal).<br />
3. Remove 2 screws securing Wire Cover to bottom of<br />
Tub.<br />
4. Feed Wire Harness out of bracket.<br />
5-22 <strong>16021814</strong> Rev. 0 ©2002 Maytag <strong>Appliance</strong> Sales Company
Service and Disassembly Procedures<br />
! WARNING<br />
To avoid risk of electrical shock, personal injury, or death, disconnect electrical power source to unit and discharge<br />
capacitor through a 10,000 ohm resistor before attempting to service, unless test procedures require power to be<br />
connected. Ensure all ground wires are connected before certifying unit as repaired and/or operational.<br />
Removal<br />
1. Disconnect power to the machine.<br />
2. Remove the Inner Door Panel. (See paragraph Inner<br />
Door Panel removal).<br />
3. Lift Door Latch Assembly out.<br />
Switch Removal<br />
1. Disconnect power to the machine.<br />
2. Remove the Inner Door Panel. (See paragraph Inner<br />
Door Panel removal).<br />
3. Remove Door Latch and Switch Holder Assembly.<br />
4. Depress locking tabs and lift switch from holder.<br />
Door Latch & Switch Holder Assembly<br />
Two Door Switches are used in the Latch Assembly. Both<br />
switches are normally CLOSED and will open only when<br />
engaged by the Door Latch mechanism. Each switch is<br />
in series with respect to L1 and neutral line operations.<br />
Failure of either or both switches will result in rendering<br />
the Dishwasher inoperative.<br />
NOTE: Door Switches require no field adjustment.<br />
©2002 Maytag <strong>Appliance</strong> Sales Company <strong>16021814</strong> Rev. 0 5-23
Service and Disassembly Procedures<br />
To avoid risk of electrical shock, personal injury, or death, disconnect electrical power source to unit and discharge<br />
capacitor through a 10,000 ohm resistor before attempting to service, unless test procedures require power to be<br />
connected. Ensure all ground wires are connected before certifying unit as repaired and/or operational.<br />
PC Board<br />
Removal<br />
1. Disconnect power to the machine.<br />
2. Remove the Inner Door Panel. (See paragraph Inner<br />
Door Panel removal).<br />
3. To access PC Board, remove 1/4" screw on PC<br />
Board Housing Cover.<br />
4. To remove PC Board, loosen (2) 1/4" screws<br />
securing PC Board Base to Control Panel.<br />
5. Remove pin and ribbon connectors from PC Board.<br />
6. Depress tabs on PC Board Housing to remove PC<br />
Board.<br />
Technical Sheet<br />
The Dishwasher Technical Sheet is located behind the<br />
Toe Panel. The Schematic Diagram is unique to each<br />
model and contains the following:<br />
Timing Sequence Chart<br />
Load Readings<br />
Component Specifications<br />
Manual Function Test<br />
Field Service Test<br />
Electrical Schematic<br />
Control Panel<br />
The Membrane/Facia on the Control Console is not<br />
replaceable.<br />
Removal<br />
1. Disconnect power to the machine.<br />
2. Remove the Inner Door Panel. (See paragraph Inner<br />
Door Panel removal).<br />
3. Remove PC Board Housing Cover. (See paragraph<br />
PC Board removal).<br />
4. Disconnect Membrane Switch from PC Board.<br />
5. Remove PC Board Base.<br />
6. Lift out Latch Assembly.<br />
7. Remove 4 screws securing Control Panel to Outer<br />
Door.<br />
NOTE: Facia is susceptible to damage during<br />
reinstallation.<br />
DOOR LATCH STRIKE<br />
The Door Latch serves as a mechanical actuator for Door<br />
Switch operation and provides door tension for proper<br />
door seal.<br />
5-24 <strong>16021814</strong> Rev. 0 ©2002 Maytag <strong>Appliance</strong> Sales Company
Service and Disassembly Procedures<br />
! WARNING<br />
To avoid risk of electrical shock, personal injury, or death, disconnect electrical power source to unit and discharge<br />
capacitor through a 10,000 ohm resistor before attempting to service, unless test procedures require power to be<br />
connected. Ensure all ground wires are connected before certifying unit as repaired and/or operational.<br />
Removal<br />
1. Disconnect power to the machine.<br />
2. Remove Torx screw securing Strike to Tub.<br />
5. Check for proper Door Latch adjustment to ensure<br />
proper door sealing.<br />
Outer Door<br />
Removal<br />
1. Disconnect power to the machine.<br />
2. Remove the Inner Door Panel. (See paragraph Inner<br />
Door Panel removal).<br />
3. Remove 2 screws securing PC Board Base to Inner<br />
Door Panel.<br />
4. Lift off Latch Assembly.<br />
5. Lay Outer Door to it's fully open position.<br />
6. Prop door open, by inserting an object into the 1/8"<br />
dia. hole in hinge bracket.<br />
DOOR GASKET<br />
The Door Gasket provides a seal between the Door and<br />
the Tub.<br />
Removal<br />
1. Open Door.<br />
2. From either corner, pull gasket up and out of tub<br />
recess.<br />
Replacement<br />
1. To ease installation, wet gasket with water.<br />
2. Starting in the lower right corner, Gently work gasket<br />
into the recess of Tub up the right side.<br />
3. With other end, place gasket flush with the Tub in<br />
lower left corner.<br />
4. Gently work gasket in to the recess of the Tub, up the<br />
left side, and across the top.<br />
©2002 Maytag <strong>Appliance</strong> Sales Company <strong>16021814</strong> Rev. 0 5-25
Service and Disassembly Procedures<br />
! WARNING<br />
To avoid risk of electrical shock, personal injury, or death, disconnect electrical power source to unit and discharge<br />
capacitor through a 10,000 ohm resistor before attempting to service, unless test procedures require power to be<br />
connected. Ensure all ground wires are connected before certifying unit as repaired and/or operational.<br />
7. Remove 4 screws securing Control Panel to Outer<br />
Door.<br />
8. Remove 4 screws securing Outer Door to Door<br />
Hinges. (2 each side).<br />
9. Slide Outer Door off of Door Hinges.<br />
!<br />
WARNING<br />
Do not remove Door Prop until tension is relieved from<br />
door spring.<br />
4. Disconnect Cable Link from Hinge. (See warning<br />
above).<br />
5. Lift Hinge out of Hinge Support.<br />
6. Remove 2 attachment screws if replacing hinge<br />
support.<br />
Door Spring<br />
Door Hinge and Support<br />
Removal<br />
1. Disconnect power to the machine.<br />
2. Remove the Outer Door Panel. (See paragraph Outer<br />
Door Panel removal).<br />
3. Remove Dishwasher from cabinets.<br />
The Door Springs provide a counter balance to the weight<br />
of the door.<br />
The Door Spring position is preset by model at the factory.<br />
If possible note the position of the spring. This may be<br />
determined by wear marks. Door Spring adjustment<br />
Brackets are located on the lower right and left side of the<br />
Dishwasher. Spring tension is achieved by positioning the<br />
spring in the slots provided. The higher position increases<br />
spring tension.<br />
NOTE: Always point spring hooks toward the Dishwasher.<br />
5-26 <strong>16021814</strong> Rev. 0 ©2002 Maytag <strong>Appliance</strong> Sales Company
Service and Disassembly Procedures<br />
! WARNING<br />
To avoid risk of electrical shock, personal injury, or death, disconnect electrical power source to unit and discharge<br />
capacitor through a 10,000 ohm resistor before attempting to service, unless test procedures require power to be<br />
connected. Ensure all ground wires are connected before certifying unit as repaired and/or operational.<br />
Door Spring and Component Replacement<br />
NOTE: Always point spring hooks toward the Dishwasher.<br />
1. Disconnect power to the machine.<br />
2. Remove Dishwasher from cabinets.<br />
3. Attach Door Cable Link to Door Hinge.<br />
4. Attach Cable to Cable Link.<br />
Over Pressure Filter<br />
The purpose of the Over Pressure Filter is to filter<br />
sediment missed by the lower filter rather than circulating<br />
it back through the wash.<br />
Removal<br />
1. Spread locking tabs.<br />
2. Rotate filter down and remove from manifold.<br />
5. Route Cable under Cable Roller.<br />
Top Wash Arm<br />
6. Attach Cable to short hook of Spring.<br />
7. Place large hook end of Spring into Spring Adjustment<br />
Bracket in proper location.<br />
Removal<br />
1. Spread locking tabs and remove Wash Arm Retainer.<br />
NOTE: To replace Cable Bracket, remove 2 Torx<br />
screws securing bracket to frame. See<br />
procedure above for reassembly of Spring and<br />
Cable.<br />
©2002 Maytag <strong>Appliance</strong> Sales Company <strong>16021814</strong> Rev. 0 5-27
Service and Disassembly Procedures<br />
! WARNING<br />
To avoid risk of electrical shock, personal injury, or death, disconnect electrical power source to unit and discharge<br />
capacitor through a 10,000 ohm resistor before attempting to service, unless test procedures require power to be<br />
connected. Ensure all ground wires are connected before certifying unit as repaired and/or operational.<br />
Manifold<br />
Water is supplied to the Top and Center Wash Arms<br />
through this tube via the Pump Assembly. The Manifold<br />
attaches to the Pump Assembly and runs vertically up the<br />
rear and along the top of the Dishwasher Tub. The<br />
Manifold is attached to the Tub with a clip.<br />
Removal<br />
1. Disconnect power to the machine.<br />
2. Remove Racks, Stops, and Rack Assemblies.<br />
Docking Station<br />
The purpose of the Docking Station is to seal the water<br />
flow to the upper rack Wash Arm.<br />
Removal<br />
1. Slide Upper Rack forward to gain access to Docking<br />
Station.<br />
2. Spread sides of Docking Station and remove from<br />
Manifold.<br />
3. Spread Manifold Clips located on the back and top of<br />
Tub.<br />
4. Tip top of Manifold towards door opening slightly.<br />
Disengage the snap located on the bottom of the<br />
Manifold, locking the Manifold to the Discharge<br />
Housing .<br />
5. Slide Manifold back and out of the Pump Assembly.<br />
Lower Wash Arm<br />
Water is supplied to the Lower Wash Arm via the Pump<br />
Assembly.<br />
Removal<br />
1. Disconnect power to the machine.<br />
2. Remove lower Rack Assembly.<br />
3. Loosen Wash Arm Hub and Pivot.<br />
4. Lift Wash Arm out of Dishwasher.<br />
5-28 <strong>16021814</strong> Rev. 0 ©2002 Maytag <strong>Appliance</strong> Sales Company
Service and Disassembly Procedures<br />
! WARNING<br />
To avoid risk of electrical shock, personal injury, or death, disconnect electrical power source to unit and discharge<br />
capacitor through a 10,000 ohm resistor before attempting to service, unless test procedures require power to be<br />
connected. Ensure all ground wires are connected before certifying unit as repaired and/or operational.<br />
2. Perform continuity check of switch across terminals.<br />
Closed- Actuator of switch depressed.<br />
Open- Actuator of switch released.<br />
Removal<br />
1. Disconnect power to the machine.<br />
2. Lift Float straight up from Float Guide.<br />
3. Remove Front Support and Toe Panel. (See paragraph<br />
Front Support and Toe Panel removal).<br />
4. Remove electrical connectors on switch.<br />
5. Float Switch mounting screw is located behind Float<br />
Switch mounting plate. Loosen 1/4" screw several<br />
turns to remove entire assembly.<br />
6. Spread locking tabs on Float Switch mounting plate<br />
to remove switch.<br />
Float<br />
The Float Assembly controls the amount of water fill.<br />
The Float Switch is wired in series with the Water<br />
Valve. When the Float Switch OPENS, the electrical<br />
circuit to the Water Valve is opened, causing the<br />
Water Valve to shut off.<br />
A normal fill is when water makes contact with<br />
heating element in bottom of dishwasher.<br />
To Check Float Switch<br />
1. Disconnect power to the machine.<br />
©2002 Maytag <strong>Appliance</strong> Sales Company <strong>16021814</strong> Rev. 0 5-29
Service and Disassembly Procedures<br />
! WARNING<br />
To avoid risk of electrical shock, personal injury, or death, disconnect electrical power source to unit and discharge<br />
capacitor through a 10,000 ohm resistor before attempting to service, unless test procedures require power to be<br />
connected. Ensure all ground wires are connected before certifying unit as repaired and/or operational.<br />
Heating Element<br />
The purpose of the Heating Element is to provide heat<br />
during the dry cycle and increase water temperature<br />
during portions of the wash cycle when certain options are<br />
selected.<br />
The element is dual wattage. During wash cycles, it is<br />
rated at 830 watts. During the dry portion of the cycle, it<br />
is rated at 650 watts. Increased wattage is possible<br />
because of water flowing across the element sheath.<br />
To Check Heating Element<br />
1. Disconnect power to the machine.<br />
2. Remove Front Support and Toe Panel. (See paragraph<br />
Front Support and Toe Panel removal).<br />
3. Locate element terminals, remove wires, perform<br />
continuity check across terminals.<br />
4. The resistance of the element should be<br />
approximately 22 ohms. If OPEN, replace element.<br />
5. Perform continuity check from each terminal to the<br />
element sheath. NO continuity should be present. If<br />
continuity is present, replace the element.<br />
Removal<br />
1. Disconnect power to the machine.<br />
2. Remove Front Support and Toe Panel. (See paragraph<br />
Front Support and Toe Panel removal).<br />
3. Locate element terminals and remove wires.<br />
4. Remove mounting nuts securing Heating Element to<br />
Tub.<br />
NOTE: Before reinstalling Heating Element, examine<br />
condition of O-ring seals that are located between<br />
element leads and tub basin. Replace if needed.<br />
Failure of seal will result in a water leak and<br />
possible floor damage.<br />
Wattage Checks<br />
To verify wattage of the element, take an amperage<br />
reading at the blue wire of the Heating Element. Multiply<br />
the amperage reading by voltage at the Dishwasher<br />
(Amps x Volts = Watts).<br />
Normal element amperage during the dry portion of the<br />
cycle is 5.0 to 5.5 amps. When used during a wash<br />
cycle, normal amperage is 7.0 to 7.5 amps.<br />
5. Release Heating Element by tipping Heater Support<br />
Brackets towards the Tub front corners and rotating<br />
until bracket unlocks.<br />
6. Lift element out of Tub.<br />
5-30 <strong>16021814</strong> Rev. 0 ©2002 Maytag <strong>Appliance</strong> Sales Company
Service and Disassembly Procedures<br />
! WARNING<br />
To avoid risk of electrical shock, personal injury, or death, disconnect electrical power source to unit and discharge<br />
capacitor through a 10,000 ohm resistor before attempting to service, unless test procedures require power to be<br />
connected. Ensure all ground wires are connected before certifying unit as repaired and/or operational.<br />
Thermostats<br />
Two types of thermostats are used in the Dishwasher. A<br />
Thermistor and a Limit Thermostat.<br />
The Thermistor is used to sense water temperature when<br />
certain cycles or options are selected (Refer to Cycles &<br />
Options section). The Thermistor is part of the sensor<br />
mounted in the Tub.<br />
The other thermostat is a Limit Thermostat and is used as<br />
a protective device to sense overheating of the Heating<br />
Element. It is located behind the Front Support and Toe<br />
Panel. The limit is mounted to the tub bottom. This<br />
thermostat has ¼" terminals and has a normally CLOSED<br />
position.<br />
NOTE: Refer to section labeled Technical Data for<br />
specifications on thermostat.<br />
Removal<br />
1. Disconnect power to the machine.<br />
2. Remove Front Support and Toe Panel. (See paragraph<br />
Front Support and Toe Panel removal).<br />
3. Press down on spring clip to release from Tub and<br />
rotate till clip unlocks.<br />
4. Remove wires from thermostat.<br />
NOTE: When reinstalling, proper location and wiring of<br />
thermostat(s) is critical.<br />
Water Valve<br />
The valve is located behind the Support and Toe Panel,<br />
mounted to the left side of the Tub Support. Inlet water<br />
supply to the valve is directly below the valve.<br />
NOTE: Turn off water supply to the Dishwasher before<br />
servicing this component.<br />
The valve is designed to operate at water pressures of 15 -<br />
120 psi.<br />
NOTE: Low water pressure will affect the ability of the<br />
Water Valve to properly fill Tub in the required<br />
amount of time.<br />
Incoming water temperature should be a minimum of 120<br />
degrees F. However, a higher water temperature will<br />
enhance washing and drying results.<br />
Removal<br />
1. Disconnect power to the machine.<br />
2. Turn off water supply to the Dishwasher.<br />
3. Remove Support and Toe Panels. (See paragraph<br />
Front Support and Toe Panel removal).<br />
4. Remove wires from Valve Solenoid.<br />
5. Remove 2 1/4" screws securing Water Valve to Water<br />
Valve Bracket.<br />
6. Disconnect injector hose at valve outlet.<br />
©2002 Maytag <strong>Appliance</strong> Sales Company <strong>16021814</strong> Rev. 0 5-31
Service and Disassembly Procedures<br />
! WARNING<br />
To avoid risk of electrical shock, personal injury, or death, disconnect electrical power source to unit and discharge<br />
capacitor through a 10,000 ohm resistor before attempting to service, unless test procedures require power to be<br />
connected. Ensure all ground wires are connected before certifying unit as repaired and/or operational.<br />
Checking Valve Operation<br />
No Fill<br />
1. Disconnect power to the machine.<br />
2. Remove Support and Toe Panel. (See paragraph Front<br />
Support and Toe Panel removal).<br />
3. Remove wires from Valve Solenoid.<br />
4. Perform continuity check across terminals of<br />
Solenoid. If NO continuity is present, replace Water<br />
Valve.<br />
Alternate Test: Use Motor Test Cord hooked directly to<br />
the Valve Solenoid. Turn water supply on<br />
and plug in test cord. If NO water is<br />
present, replace Water Valve.<br />
Overfill<br />
If Water Valve allows water to flow without power to Valve<br />
Solenoid, replace the Water Valve.<br />
NOTE: The Water Valve is a non-repairable component.<br />
The only servicing required is to clean the Inlet<br />
Screen if needed.<br />
Inlet Screen<br />
Sediment on the Inlet Screen can hinder water flow<br />
through the Water Valve.<br />
Cleaning<br />
1. Disconnect power to the machine.<br />
Air Water Inlet<br />
The Air Water Inlet is located on the left side of the Tub,<br />
and mounted to the exterior of Tub. Removal of the Air<br />
Water Inlet requires the removal of the Dishwasher from<br />
under the counter.<br />
Removal<br />
1. Disconnect power to the machine.<br />
2. Remove the Air Water Inlet Cover located on the left<br />
inside wall of Tub. Pull cover straight out to remove.<br />
3. Carefully pull back insulation from the left side of the<br />
Tub.<br />
4. Remove rubber hose from channel in Tub, or slip off of<br />
fitting on inlet.<br />
5. Grasp upper portion of the Air/Water Inlet. Pull and<br />
rotate the Air/Water Inlet clockwise to release it from<br />
the Tub.<br />
2. Remove Water Valve from the Dishwasher (See Water<br />
Valve Removal).<br />
3. Remove 4 screws securing valve body to Water Inlet<br />
Mounting Bracket.<br />
4. Clean screen.<br />
NOTE: Make sure to reattach the ground wire to the<br />
mounting bracket.<br />
5-32 <strong>16021814</strong> Rev. 0 ©2002 Maytag <strong>Appliance</strong> Sales Company
Service and Disassembly Procedures<br />
! WARNING<br />
To avoid risk of electrical shock, personal injury, or death, disconnect electrical power source to unit and discharge<br />
capacitor through a 10,000 ohm resistor before attempting to service, unless test procedures require power to be<br />
connected. Ensure all ground wires are connected before certifying unit as repaired and/or operational.<br />
Replacement<br />
1. Examine the Air Water Inlet Seal for damage.<br />
2. Align Air Water Inlet tabs with notches in Tub, and<br />
rotate counterclockwise into position.<br />
3. Replace Air Water Inlet Cover inside Tub.<br />
Tub Wheels<br />
To remove, unlatch rear Rack Stop. Slide track out of<br />
Dishwasher. Remove tub wheel shaft with Torx driver.<br />
NOTE: Tub wheel shaft contains a small steel washer.<br />
Turbidity Sensor<br />
The Turbidity Sensor is located on the bottom and to the<br />
left of the Pump Module Assembly. The sensor measures<br />
soil level in the water. Turbidity is determined by a beam<br />
of infrared light directed from one probe and read by the<br />
other. This information is interpreted as water soil level.<br />
Removal<br />
1. Disconnect power to the machine.<br />
2. Remove Front Support and Toe panel. (See paragraph<br />
Front Support and Toe Panel removal).<br />
Upper Rack Removal<br />
To remove Upper Rack, remove Rack Stops. Unlatch stop<br />
by moving as shown in direction of arrow toward center of<br />
Tub.<br />
3. Remove the 2 Torx screws securing the sensor to<br />
the tub bottom.<br />
4. Pull sensor straight out.<br />
NOTE: When installing sensor, examine the "O" ring seal<br />
and replace if necessary. The sensor has<br />
alignment ribs to aid in installation.<br />
©2002 Maytag <strong>Appliance</strong> Sales Company <strong>16021814</strong> Rev. 0 5-33
Service and Disassembly Procedures<br />
! WARNING<br />
To avoid risk of electrical shock, personal injury, or death, disconnect electrical power source to unit and discharge<br />
capacitor through a 10,000 ohm resistor before attempting to service, unless test procedures require power to be<br />
connected. Ensure all ground wires are connected before certifying unit as repaired and/or operational.<br />
Drain Pump<br />
The Drain Pump will drain water from the Dishwasher in<br />
various cycles. If a failure is suspected, the entire Pump<br />
Assembly needs to be replaced.<br />
Removal<br />
1. Disconnect power to the machine.<br />
2. Remove Support and Toe Panel. (See paragraph Front<br />
Support and Toe Panel removal).<br />
3. Disconnect lead wire from Pump Assembly.<br />
4. Disconnect drain hose from Pump Assembly.<br />
5. Remove Torx screw through bushing in Pump<br />
Mounting Plate.<br />
6. Rotate Pump Assembly to unlock from Tub.<br />
3. Remove Wash Manifold<br />
4. Loosen Wash Arm Hub and Pivot.<br />
5. Remove Spray Arm.<br />
6. Remove 3 Torx screws securing Filter Guard.<br />
7. Entire Wash Motor Assembly can be lifted from Tub<br />
for further disassembly.<br />
8. Remove and replace Pump Gasket if necessary.<br />
9. Disconnect wiring harness from Wash Motor<br />
Assembly.<br />
10. Remove 6 Torx screws securing Discharge<br />
Housing.<br />
11. Remove Torx screw securing Wash Impeller . See<br />
bottom side of motor for access hole to lock motor<br />
rotation while removing Torx screw. Insert screw<br />
driver tip into access hole while removing screw.<br />
Wash Motor Assembly<br />
The Wash Motor Assembly is designed to provide<br />
recirculating, filter, wash and particle chopping functions<br />
for the dishwasher cycles.<br />
Removal<br />
12. Lift off Filter/Flowplate Assembly to access Chopper<br />
Plate.<br />
13. Remove 3 Torx screws to remove Chopper Plate.<br />
1. Disconnect power to the machine.<br />
14. Lift off Chopper<br />
2. Remove racks.<br />
5-34 <strong>16021814</strong> Rev. 0 ©2002 Maytag <strong>Appliance</strong> Sales Company
Service and Disassembly Procedures<br />
! WARNING<br />
To avoid risk of electrical shock, personal injury, or death, disconnect electrical power source to unit and discharge<br />
capacitor through a 10,000 ohm resistor before attempting to service, unless test procedures require power to be<br />
connected. Ensure all ground wires are connected before certifying unit as repaired and/or operational.<br />
15. Remove Chopper Sleeve by using Impeller as a<br />
wrench. Lock motor rotation using the access hole<br />
provided in back of motor.<br />
16. Lift off Seal Seat Assembly.<br />
©2002 Maytag <strong>Appliance</strong> Sales Company <strong>16021814</strong> Rev. 0 5-35
Appendix A
Built-In Dishwasher<br />
Lavavajillas Empotrado/Lave-vaisselle encastré<br />
Installation Instructions/Instrucciones de Instalación/Instructions d’installation<br />
©2002 Maytag <strong>Appliance</strong> Sales Company <strong>16021814</strong> Rev. 0 A-2
Built-In Dishwasher<br />
Installation Instructions<br />
Leave Installation Instructions and User’s Guide with Owner<br />
CAUTION: Disconnect electrical power before you start!<br />
ALL ELECTRICAL WIRING, GROUNDING AND PLUMBING SHOULD BE DONE IN ACCORDANCE WITH<br />
NATIONAL AND LOCAL CODES BY QUALIFIED INDIVIDUALS.<br />
E L E C T R I C A L<br />
This dishwasher is designed for operation<br />
on an individual 120 VAC, 60 Hz grounded<br />
electrical circuit. Use required fuse (15 amp)<br />
or comparable circuit breaker. Two wire<br />
with ground service to the dishwasher is<br />
recommended for connection at the terminal<br />
box and for grounding.<br />
R E Q U I R E M E N T S<br />
WARNING<br />
CAUTION: To prevent accidental contact with electrical<br />
connections, built-in dishwasher models must not be<br />
connected to a power source unless the dishwasher is<br />
completely enclosed, with front panels in place. If the back<br />
or either side of the dishwasher is exposed, a panel must<br />
be used to complete this enclosure. Failure to follow this<br />
warning could result in death or serious injury.<br />
G R O U N D I N G<br />
This appliance must be connected to a<br />
grounded metal, permanent wiring system;<br />
or an equipment-grounding conductor must<br />
be run with the circuit conductors and<br />
connected to the equipment-grounding<br />
terminal or lead on the appliance.<br />
I N S T R U C T I O N S<br />
WARNING<br />
CAUTION:To prevent the possibility of electrical shock,<br />
this dishwasher, as other electrical appliances, must be<br />
adequately grounded. It is the responsibility of the installer<br />
at the point of installation, taking into consideration local<br />
conditions and requirements. Failure to follow this warning<br />
could result in death or serious injury<br />
P L U M B I N G<br />
CHECK LOCAL PLUMBING CODES<br />
FOR APPROVED PLUMBING<br />
PROCEDURES AND ACCESSORIES.<br />
ALL PLUMBING SHOULD BE DONE<br />
IN ACCORDANCE WITH NATIONAL<br />
AND LOCAL CODES.<br />
R E Q U I R E M E N T S<br />
WARNING<br />
CAUTION: Disconnect electrical<br />
power to dishwasher before you start!<br />
Failure to follow this warning could<br />
result in death or serious injury.<br />
A-3 <strong>16021814</strong> Rev. 0 ©2002 Maytag <strong>Appliance</strong> Sales Company
1<br />
2<br />
3 4<br />
©2002 Maytag <strong>Appliance</strong> Sales Company <strong>16021814</strong> Rev. 0 A-4
6<br />
23 7 ⁄8 to 24 3 ⁄8<br />
24"<br />
33.5"-35"<br />
*<br />
7<br />
1/4"<br />
8<br />
*w/o top trim strip / sin tira de adorno superior /<br />
Mesure sans la tringle de finissage<br />
X= Opening Height Minus 1/4”/X = Altura de apertura menos 0.6 cm (1/4 pulg.)/<br />
X = Hauteur d’ouverture moins 1/4 po.<br />
9<br />
11<br />
12<br />
Refer to local plumbing codes / Consulte los códigos locales<br />
de plomería / Reportez-vous aux codes locaux de la plomberie<br />
A-5 <strong>16021814</strong> Rev. 0 ©2002 Maytag <strong>Appliance</strong> Sales Company
13<br />
Optional/Opcional/Optionnel<br />
13A<br />
Optional/Opcional/Optionnel<br />
Flush with cabinet face<br />
Nivelado con el frente<br />
del armario<br />
Alignement avec l’avant<br />
du meuble<br />
Go To/Vaya a/<br />
Se référer à<br />
14<br />
Extended to match drawer<br />
and door fronts<br />
Extendido para que quede igualado con<br />
el frente de las puertas y cajones<br />
Avant encastré pour correspondre aux<br />
tiroirs et aux portes<br />
Go To/Vaya a/<br />
Se référer à<br />
13A<br />
13B<br />
Optional/Opcional/Optionnel<br />
14<br />
15<br />
16<br />
Panel damage may occur/Puede dañarse el panel/<br />
Endommagement du panneau possible<br />
OFF / APAGADO /<br />
ARRÊT<br />
17<br />
18<br />
1<br />
2<br />
4<br />
3<br />
©2002 Maytag <strong>Appliance</strong> Sales Company <strong>16021814</strong> Rev. 0 A-6
19<br />
GROUND/ PUESTA A TIERRA/ MISE À LA TERRE<br />
20<br />
BLACK TO BLACK (L1)<br />
NEGRO CON NEGRO (L1)<br />
FIL NOIR À BORNE<br />
NOIRE (L1)<br />
GROUND<br />
PUESTA A TIERRA<br />
MISE À LA TERRE<br />
WHITE TO WHITE<br />
(NEUTRAL)<br />
BLANCO CON BLANCO<br />
(NEUTRO)<br />
FIL BLANC À BORNE BLANCHE<br />
(NEUTRE)<br />
21 22<br />
23<br />
24<br />
25<br />
Level left to right and front to back/Nivele de izquierda a<br />
derecha y de adelante hacia atrás/Mettre à niveau à droite et à gauche, à l’avant et à l’arrière<br />
26<br />
3/16<br />
3/16<br />
If not level repeat 24/Si no está nivelado, repita el paso 24./ En cas de non-nivellement,<br />
voir l’étape 24<br />
A-7 <strong>16021814</strong> Rev. 0 ©2002 Maytag <strong>Appliance</strong> Sales Company
27<br />
28<br />
1/8<br />
29 30<br />
1/8<br />
31 32<br />
33<br />
34 No<br />
No<br />
1<br />
2<br />
3<br />
START<br />
CANCEL<br />
4<br />
Turn on water, power and machine / Abra la llave de agua, conecte la corriente y encienda<br />
el aparato / Ouvrir le robinet d’eau, l’alimentation et mettre en marche<br />
Check for leaks, turn off machine/Verifique si hay fugas, apague el aparato/Vérifier l’absence<br />
de fuites, mettre à l’arrêt<br />
©2002 Maytag <strong>Appliance</strong> Sales Company <strong>16021814</strong> Rev. 0 A-8
35<br />
36<br />
37<br />
38<br />
X<br />
X<br />
X<br />
On some models /<br />
En algunos modelos /<br />
S’applique à certains modèles<br />
X<br />
A-9 <strong>16021814</strong> Rev. 0 ©2002 Maytag <strong>Appliance</strong> Sales Company
Appendix B
JENN-AIR DISHWASHER<br />
JDB-2<br />
USER<br />
G U I D E<br />
T<br />
ABLE OF CONTENTS<br />
Safety Instructions ............................................................. 1<br />
Loading the Dishwasher ................................................2-4<br />
Dishwashing Essentials...................................................... 5<br />
Controls at a Glance..................................................... 6-7<br />
Operating Tips .................................................................... 7<br />
Special Care Items............................................................. 8<br />
Care & Cleaning................................................................. 8<br />
Before You Call for Service ....................................... 9-10<br />
Warranty ........................................................................... 11<br />
Guide de L’utilisateur...................................................... 12<br />
Guía del Usuario.............................................................. 26<br />
6 917456 B MCS 99002564<br />
©2002 Maytag <strong>Appliance</strong>s Sales Co.<br />
B-2 <strong>16021814</strong> Rev. 0 ©2002 Maytag <strong>Appliance</strong> Sales Company
Installer: Please leave this manual with this appliance.<br />
Consumer: Please read and keep this manual for future reference.<br />
Keep sales receipt and/or cancelled check as proof of<br />
purchase.<br />
Model Number<br />
___________________________<br />
Serial Number<br />
___________________________<br />
Date of Purchase<br />
___________________________<br />
If you have questions, call:<br />
1-800-688-1100 (USA and CANADA)<br />
1-800-688-2080 ( U.S.TTY for hearing or speech impaired)<br />
(Mon.-Fri., 8 am-8 pm Eastern Time)<br />
Internet: http://www.jennair.com<br />
In our continuing effort to improve the quality and performance<br />
of our appliances, it may be necessary to make<br />
changes to the appliance without revising this guide.<br />
For service information, see page 11.<br />
IMPORTANT SAFETY<br />
INSTRUCTIONS<br />
RECOGNIZE SAFETY SYMBOLS, WORDS,<br />
LABELS<br />
WHAT YOU NEED TO KNOW ABOUT SAFETY<br />
INSTRUCTIONS<br />
Warning and Important Safety Instructions appearing in this manual<br />
are not meant to cover all possible conditions and situations that may<br />
occur. Common sense, caution, and care must be exercised when<br />
installing, maintaining, or operating the dishwasher.<br />
Always contact your dealer, distributor, service agent, or manufacturer<br />
about problems or conditions you do not understand.<br />
WARNING:<br />
WARNING - Hazards or unsafe practices which COULD result<br />
in severe personal injury or death.<br />
CAUTION:<br />
CAUTION - Hazards or unsafe practices which COULD<br />
result in minor personal injury.<br />
WARNING:<br />
Check with the installer to make sure the appliance<br />
has been properly grounded to avoid possible electrical<br />
shock. Be sure you read the Important Personal<br />
Safety Instructions before you use this dishwasher.<br />
Products with a label have been listed with Underwriter’s<br />
Laboratories, Inc. – those with a CSA tag have been listed with<br />
Canadian Standards Association. Nevertheless, as with any other<br />
equipment using electricity and moving parts, there is a potential<br />
hazard.<br />
WARNING:<br />
When using your dishwasher, follow basic precautions,<br />
including the following:<br />
1. Read all instructions before using the dishwasher.<br />
2. Use the dishwasher only for its intended function.<br />
3. Disconnect electrical power to dishwasher before attempting<br />
to service.<br />
4. To avoid electrical shock hazard, the sides and back must be<br />
enclosed and the front panels must be attached before<br />
electrical power is applied to the dishwasher. Refer to the<br />
installation instructions for proper grounding procedures.<br />
5. Connect to a properly rated, protected and sized power<br />
supply circuit to avoid electrical overload.<br />
6. Children should never be permitted to operate, or play in,<br />
with, or around this dishwasher.<br />
7. To reduce the risk of injury when loading items to be washed,<br />
sharp or pointed items should be located with the handles up.<br />
Also, load sharp items so they are not likely to damage the<br />
door seal.<br />
8. Do not touch the heating element on the bottom of the tub<br />
during or at the completion of a cycle. It will be hot.<br />
9. Use only detergents and rinse additives designed for an<br />
automatic dishwasher. Never use soap, laundry detergent,<br />
or hand washing detergent in your dishwasher. Keep these<br />
products out of reach of children.<br />
10. Do not sit, stand on or abuse the door or dish racks of the<br />
dishwasher.<br />
11. Under certain conditions, hydrogen gas may be produced in a<br />
hot water system that has not been used for two weeks or<br />
more.Hydrogen gas is explosive. If the hot water system has<br />
not been used for such a period, turn on all hot water faucets<br />
and let the water flow from each for several minutes.This will<br />
release any accumulated hydrogen gas. As the gas is flammable,<br />
do not smoke or use an open flame during this process.<br />
12. Do not wash plastic items unless marked “dishwasher safe”<br />
or the equivalent. For plastic items not so marked, check<br />
the manufacturer’s recommendations.<br />
13. Do not tamper with controls.<br />
14. To prevent accidental child entrapment and suffocation risks,<br />
always remove the door to the washing compartment when<br />
removing an old dishwasher from service or discarding it.<br />
15. Use caution when unloading the dishwasher. Dishes will be<br />
hot if unloaded shortly after a cycle has completed.<br />
16. Certified residential dishwashers are not intended for<br />
licensed food establishments.<br />
SAVE THESE INSTRUCTIONS FOR FUTURE REFERENCE<br />
1<br />
©2002 Maytag <strong>Appliance</strong> Sales Company <strong>16021814</strong> Rev. 0 B-3
LOADING<br />
BEFORE YOU START<br />
• Don’t prerinse. Simply scrape off any<br />
bones or large food particles.<br />
• If connected to a food waste disposer,<br />
make certain the disposer is empty<br />
before starting the dishwasher.<br />
• Scrape off tomato-based food soils<br />
(see page 8).<br />
• Remove certain foods (such as mustard,<br />
mayonnaise, lemon juice, vinegar, salt<br />
or dressings) from stainless steel flatware<br />
as soon as possible. These foods<br />
may cause rusting and pitting if allowed to<br />
remain in contact with the surface for an<br />
extended period of time.<br />
GENERAL<br />
RECOMMENDATIONS<br />
• Items can be centered behind a single<br />
tine or loaded at an angle to maximize<br />
space.<br />
• Avoid blocking or preventing the spray<br />
arms from spinning freely. Do not allow<br />
items to extend beyond the racks.<br />
RECOMMENDED<br />
LOADING<br />
(Rack features vary by model)<br />
For best dishwashing results follow these<br />
guidelines to determine the best arrangement<br />
for your items.<br />
Note:<br />
• Face soiled surfaces towards the center<br />
of the dishwasher.<br />
UPPER RACK<br />
10 Place Settings<br />
Glasses, cups, stemware, light-weight plastics,<br />
plates, bowls, pans, long-handled utensils<br />
etc. can be loaded in this rack. Do not<br />
load glasses over the tines.<br />
The Stack-Rack is designed to hold<br />
stemware in place. Taller stemware will fit<br />
better on the right side as the upper rack<br />
is deeper on this side.<br />
The Vari-Lock Snugger (select models)<br />
on the left secures lightweight items in<br />
place. It can be adjusted by grasping the<br />
wavy wire and rotating it left to snug items<br />
against the outer rack or to the right to<br />
rest on top of light items. Do not load<br />
items on top of the wire.<br />
The Stack-Rack (select models) on the right<br />
side of the upper rack folds up or down for<br />
loading flexibility. Fold it down to hold longhandled<br />
knives, spatulas and spoons or short<br />
items like cups or juice glasses. Fold it up for<br />
taller items like glasses, bowls, plates, etc.<br />
The folding tines (select models) located in<br />
the front right corner provide convenient<br />
loading space for large, bulky items like<br />
pots and pans or mixing bowls<br />
The cup clips (select models) located in<br />
the center of the upper rack can be used<br />
to hold light weight plastic items, cooking<br />
utensils, knives, etc. in place. Clip the item<br />
between the tine and the clip.<br />
2<br />
For best results with tall glasses, align the<br />
Vari-Lock Snugger (select models) wavy<br />
wire with the arrow on the rack clip. Rest<br />
the bottom of the glass against the wavy<br />
wire.<br />
B-4 <strong>16021814</strong> Rev. 0 ©2002 Maytag <strong>Appliance</strong> Sales Company
LOADING CONT.<br />
ADJUSTABLE UPPER RACK<br />
(Select models)<br />
The Adjustable Upper Rack (select<br />
models) can be raised or lowered to<br />
accommodate taller plates, platters, pans,<br />
etc. in the upper or lower racks. Full size<br />
plates can be loaded in the upper rack<br />
when the upper rack is in the lower position.<br />
TO LOWER THE RACK:<br />
• Pull the rack fully out.<br />
• Place hands on each adjuster.<br />
• Press down on the top blue button and<br />
push down (the button will slide towards<br />
the center of the rack).<br />
• The rack will come to a stop when it is in<br />
position.<br />
TO RAISE THE RACK:<br />
• Pull the rack fully out.<br />
• Place hands on each adjuster.<br />
• Lift up both sides until rack comes to a<br />
stop.<br />
Note:<br />
• The dishwasher will not operate correctly<br />
if the upper rack wash arm connection is<br />
not aligned with one of the water inlet<br />
holes on back wall.<br />
• The left and right side adjusters must both<br />
be in the upward or downward position for<br />
proper connection.<br />
LOWER RACK<br />
3 saucers are<br />
loaded on the<br />
rack under<br />
the Stack-<br />
Rack Shelf<br />
(select models)<br />
A variety of large items such as dinner<br />
plates, mixing bowls, pots and pans and<br />
baking dishes can be loaded in this rack.<br />
Tall items such as bakeware and large platters<br />
can be placed on the left side.<br />
10 Place Settings<br />
Back<br />
Back<br />
With the Stack-Rack (select models)<br />
shelf raised, thin items like cookie sheets<br />
or pizza pans may be placed along the left<br />
side. With the shelf down, two levels of<br />
glasses and cups can be loaded.<br />
Positioning the Fold-Away Tines (select<br />
models) flat in the back, left corner provides<br />
convenient loading space for large,<br />
bulky items like pots and pans or mixing<br />
bowls.<br />
Convertible Tines (select models) in the<br />
back, right corner can be adjusted to provide<br />
narrow spacing for loading plates or<br />
wide spacing for loading deep bowls, pots<br />
or pans. Flip tines up for narrow spacing or<br />
down for wider spacing.<br />
©2002 Maytag <strong>Appliance</strong> Sales Company <strong>16021814</strong> Rev. 0 B-5
REMOVABLE UTENSIL BASKET<br />
(Design varies by model)<br />
For best cleaning results, prevent items<br />
from nesting together by placing some<br />
items in the basket with handles up and<br />
some with handles down. Load knives, handles<br />
up and spoons and forks handles<br />
down, through the slots in the hinged covered<br />
section(s) (when closed).<br />
Be sure that thin, finely pointed items do<br />
not extend through the basket.<br />
This could block the lower<br />
wash arm.<br />
Small, lightweight items<br />
like baby spoons and<br />
plastic measuring spoons<br />
should be placed in the section(s)<br />
with the hinged<br />
cover(s).<br />
ODDS & ENDS BASKET<br />
(Select models)<br />
Use this supplemental basket in the upper<br />
rack for loading miscellaneous items and<br />
utensils. This is also a safe<br />
place to load sharp<br />
knives and<br />
pointed<br />
items.<br />
SPLIT & FIT UTENSIL BASKET<br />
(Select models)<br />
The split silverware basket can be separated<br />
and placed in several locations in the bottom<br />
rack. Hold the basket firmly along the<br />
sides. Follow the unlock direction arrows<br />
imprinted on the basket and slide the basket<br />
apart until it splits into<br />
two. Load flatware and<br />
utensils into both<br />
sections or just one,<br />
depending upon<br />
your load.<br />
REMOVING THE UPPER<br />
RACK<br />
The upper rack can be removed when tall<br />
or oversized items need to be loaded into<br />
the lower rack. Unload rack prior to<br />
removing.<br />
TO REMOVE:<br />
• Roll the upper rack 1/3 to 1/2 of the way<br />
out.<br />
• Remove the plastic rack stop from the<br />
end of each track.To remove each plastic<br />
rack stop, push inward (towards the<br />
rack) on the ridged area of the rack stop.<br />
The rack stop will snap open and can be<br />
easily removed by pulling straight out.<br />
Take care to support the track while<br />
removing rack stops.<br />
• Roll the rack all the way out of the track<br />
and remove from the dishwasher.<br />
• Reverse the above procedure to replace<br />
the upper rack into the dishwasher.<br />
Rack Stop<br />
B-6 <strong>16021814</strong> Rev. 0 ©2002 Maytag <strong>Appliance</strong> Sales Company
DISHWASHING ESSENTIALS<br />
HOT WATER<br />
For optimal cleaning and drying<br />
results, hot water is necessary. The<br />
incoming water temperature should<br />
be 120–140° F (49-60° C) to properly<br />
activate the detergent and melt<br />
greasy food soils.<br />
To check the incoming water temperature,<br />
turn on the hot water faucet nearest the<br />
dishwasher and let it run into a glass in the<br />
sink. Place a candy thermometer in the<br />
glass and check the temperature once it<br />
has stopped rising. If the temperature is<br />
below 120° F (49° C), have a qualified person<br />
raise the water heater thermostat setting.<br />
Before starting the dishwasher, turn on the<br />
hot water faucet and let it run until the<br />
water is hot.This assures that the initial fill<br />
of water is hot.<br />
DETERGENT<br />
Use a detergent designed specifically for<br />
use in an automatic dishwasher. Be sure it<br />
is fresh and stored in a cool, dry place (not<br />
under the sink).<br />
RECOMMENDED AMOUNT<br />
Too little detergent results in poor cleaning,<br />
hard water filming/spotting and poor<br />
drying. Too much detergent can cause permanent<br />
etching/cloudiness.<br />
The amount of detergent to use is determined<br />
by the hardness of the water and<br />
soil level of the load. Refer to the following<br />
chart for detergent usage recommendations.<br />
Do not use detergent with Rinse Only.<br />
Leave the detergent lid open when running<br />
Rinse Only.<br />
In extremely hard water conditions (13<br />
grains per gallon or more*), it is difficult to<br />
achieve good results with any dishwasher.<br />
A mechanical water softener may be necessary<br />
to improve water quality, detergent<br />
effectiveness, and protect the dishwasher<br />
parts from the damage that hard water can<br />
cause.<br />
Water Hardness* Soil Level Detergent Amount**<br />
Soft (0-4 gpg) Light Soil 5 teaspoons<br />
Normal Soil<br />
6 teaspoons<br />
Heavy Soil<br />
8 teaspoons<br />
Medium (5-9 gpg) Light Soil 7 teaspoons<br />
Normal Soil<br />
8 teaspoons<br />
Heavy Soil<br />
10 teaspoons<br />
Hard (10-12 gpg) Light Soil 9 teaspoons<br />
Normal Soil<br />
10 teaspoons<br />
Heavy Soil<br />
12 teaspoons<br />
*Your local water utility or state university extension<br />
service can tell you the degree of water<br />
hardness in your area.<br />
** Add recommended amount of detergent to<br />
either side of the Main Wash compartment.<br />
RINSE AID<br />
Regular use of a rinse aid improves<br />
drying, reduces spotting and filming,<br />
and reduces moisture left on the<br />
dishwasher interior.<br />
An automatic rinse aid dispenser is located<br />
next to the detergent cups. The window<br />
next to the dispenser cap indicates when<br />
the rinse aid reservoir needs to be refilled.<br />
When the level of rinse aid is below the<br />
indicator marks and the window is nearly<br />
clear, it is time to refill the dispenser.<br />
Check the dispenser monthly.<br />
To add rinse aid to the dispenser, turn the<br />
cap counterclockwise to open. Remove<br />
the cap and pour liquid rinse aid into the<br />
opening. The amount of rinse aid dispensed<br />
during the cycle is adjustable by moving the<br />
lever inside the reservoir area. For most<br />
water conditions use manufacturers recommended<br />
setting of “3”. Adjust it up to<br />
the “MAX” setting for hard water. Set the<br />
lever anywhere between these amounts as<br />
needed to get the best results. Replace the<br />
cap and turn it clockwise to close.<br />
©2002 Maytag <strong>Appliance</strong> Sales Company <strong>16021814</strong> Rev. 0 B-7
CONTROLS AT A GLANCE<br />
CYCLES AND WATER<br />
USAGE<br />
NORMAL WASH<br />
Medium cycle for average food soils. The<br />
soil sensor is active with this cycle.<br />
Depending on the number of fills, water<br />
usage ranges from 3 to 6 gallons.<br />
HEAVY WASH<br />
Long cycle for heavy food soils. 8 gallons.<br />
LIGHT WASH<br />
Short cycle for light food soils. Water<br />
usage is 5 gallons.<br />
AUTO CLEAN (select models)<br />
Normal dishloads vary from day to day.<br />
Auto Clean is designed to select the<br />
number of water fills best suited for the<br />
soil level of each load. Depending on the<br />
number of fills required, water usage<br />
ranges from 3 to 8 gallons.<br />
RINSE ONLY<br />
Rinses dishes being held until there is a full<br />
load. Controls odors. 2 gallons.<br />
Note:<br />
• Cycle times shown in the numerical<br />
display (select models) increase or<br />
decrease, based on each load’s soil<br />
level, water temperature and selected<br />
options.<br />
• Using the Extra Rinse option will increase<br />
water consumption by 1 1 ⁄2 gallons.<br />
OPTIONS<br />
TOUGH SCRUB OR TOUGH<br />
SCRUB PLUS (select models)<br />
Select this option (select models) when<br />
washing loads with hard-to-remove food<br />
soils. Tough Scrub or Tough Scrub Plus <br />
can be selected with any cycle (except<br />
Rinse Only). Depending which cycle is<br />
being used, this option adds fills, heat and/or<br />
wash time to the wash cycle.<br />
For baked-on, dried-on soils, select Heavy<br />
Wash along with Tough Scrub or Tough<br />
Scrub Plus option.<br />
SANITIZE<br />
Select Sanitize with Auto Clean (select<br />
models), Heavy, Normal, or Light<br />
Wash to sanitize dishware. At the end of<br />
the cycle, when the cycle monitor recognizes<br />
that the proper conditions have been<br />
met, the SANITIZED light illuminates.<br />
Sanitization may not be achieved if there is<br />
an interruption of the cycle, power failure<br />
or if the incoming water temperature is<br />
below 120° F (49° C).<br />
EXTRA RINSE (select models)<br />
Select Extra Rinse to add an additional<br />
rinse to the cycle. An extra rinse helps to<br />
improve results in hard water situations.<br />
HEATED DRY<br />
Select Heated Dry to turn on the heating<br />
element during dry for enhanced drying<br />
results. When Heated Dry is not selected,<br />
towel drying of some items such as<br />
plastic and teflon may be necessary and<br />
more moisture may be noticed adhering to<br />
the dishwasher interior. With either dry<br />
option, it is normal to notice vapor escaping<br />
from the door vent.<br />
START/CANCEL<br />
To start a cycle, close the door and press<br />
the START/Cancel pad once. To cancel<br />
when a cycle is running, press the<br />
START/Cancel pad once. The dishwasher<br />
will drain, then shut off. To turn the dishwasher<br />
off without draining, press the<br />
START/Cancel pad twice.<br />
The dishwasher remembers your last cycle<br />
so you do not have to reset the cycle each<br />
time. To start the dishwasher using the<br />
same cycle and options selected on the<br />
previous wash, just press the START/<br />
Cancel pad.<br />
INDICATOR LIGHTS<br />
The CLEAN light illuminates at the end<br />
of the cycle and remains lit until the door<br />
has been open for 30 seconds continuously.<br />
The DRYING (select models) light illuminates<br />
during the entire dry period and goes<br />
out when the cycle is completed.<br />
The WASHING (select models) light illuminates<br />
during all rinse and wash portions<br />
of the cycle.<br />
The HEATING DELAY (select models)<br />
light illuminates when the cycle is being<br />
extended to heat the water.<br />
The CLEAN and SANITIZED (select<br />
models) indicator lights will not reilluminate<br />
after a power failure until after the<br />
next cycle is run.<br />
The SANITIZED (select models) light illuminates<br />
at the end of the cycle when conditions<br />
have been met to achieve sanitization.<br />
The light will remain lit until the door has<br />
been open for 30 seconds continuously.<br />
Note:<br />
• When Sanitize is selected, cycles<br />
are monitored to assure sanitization.<br />
Unusually low water temperature<br />
will prevent sanitization from<br />
being satisfied and the SANI-<br />
TIZED light will not illuminate at<br />
the end of the cycle.<br />
• Only these certified cycles have<br />
been designed to meet NSF<br />
requirements: Auto Clean Cycle,<br />
Heavy Cycle, Normal Cycle and<br />
Light Cycle.<br />
6<br />
B-8 <strong>16021814</strong> Rev. 0 ©2002 Maytag <strong>Appliance</strong> Sales Company
CONTROLS AT A GLANCE CONT.<br />
DELAY<br />
The Delay option can be used to automatically<br />
start the cycle at a later time to<br />
reduce daytime heat buildup in the home<br />
or to take advantage of reduced energy<br />
costs if available in your area.<br />
TO SET UP A DELAY:<br />
1. Close the door. Select the appropriate<br />
cycle and options for the load.<br />
2. Press the Delay pad until the desired<br />
amount of delay time is selected.<br />
3. The Delay indicator will flash until the<br />
START/Cancel pad is pressed.<br />
4. As soon as the START/Cancel pad is<br />
pressed, the flashing will stop and the<br />
delay time will begin counting down.<br />
The Delay indicator will remain lit<br />
until the delay time has counted down.<br />
5. The cycle will automatically start as<br />
soon as the delay time expires.<br />
Note:<br />
• If 30 seconds elapse between setting<br />
the cycle and options and pressing<br />
the START/Cancel pad, the dishwasher<br />
will turn off.<br />
TO CANCEL A DELAY:<br />
When the delay is counting down, press<br />
the Delay pad again.The indicator light will<br />
go out and the cycle will start or resume<br />
immediately.<br />
TO CANCEL A DELAY AND<br />
CYCLE:<br />
• Press START/Cancel once to drain and<br />
turn off the dishwasher.<br />
Or<br />
• Press START/Cancel twice to turn<br />
dishwasher off without draining.<br />
CONTROL LOCK OPTION<br />
(select models)<br />
The control touchpads can be locked to<br />
prevent unwanted use. If this feature is<br />
activated between cycles, the dishwasher<br />
cannot be operated until the controls are<br />
unlocked. If desired, the controls can be<br />
locked after a cycle or delay has started.<br />
SETTING THE CONTROL LOCK:<br />
1. Press the Heated Dry pad for three<br />
seconds.<br />
2. An indicator light next to the lock<br />
graphic will illuminate when the controls<br />
are locked.<br />
TO CANCEL:<br />
1. Press the Heated Dry pad for three<br />
seconds.<br />
2. The indicator light will go off.<br />
Note:<br />
• If a cycle or option pad is pressed after<br />
the controls have been locked, the<br />
indicator light next to the lock graphic<br />
will flash five times. On selected<br />
models with a countdown display, the<br />
display will flash an “L” simultaneously<br />
with the lock indicator.<br />
• This option does not lock the door,<br />
only the dishwasher controls.<br />
OPERATING TIPS<br />
STARTING THE<br />
DISHWASHER<br />
1. After loading the dishwasher and adding<br />
detergent, close the dishwasher by<br />
pressing the door until the latch clicks.<br />
2. To start the dishwasher, select the<br />
desired cycle and options. The indicator<br />
lights for the selected cycle and<br />
options will illuminate.<br />
3. Press the START/Cancel pad.After a<br />
pause, the fill will begin. The display<br />
countdown will flash until START/<br />
Cancel is pressed.<br />
4. To cancel an option, press the pad<br />
again. To cancel a running cycle, press<br />
the START/Cancel pad.<br />
5. To prevent unplanned cycle or option<br />
changes, these selections are “locked<br />
in” after 1 minute.<br />
Note:<br />
• If a cycle pad is pressed after the controls<br />
have been “locked in”, the light<br />
above the current cycle will flash<br />
three times.<br />
• If START/Cancel is not pressed<br />
within 30 seconds, the dishwasher<br />
will turn off.<br />
ADDING A<br />
FORGOTTEN ITEM<br />
For best cleaning, the forgotten item<br />
should be added early in the cycle.<br />
1. Grasp door handle and unlatch door<br />
without opening completely. All lights<br />
will flash to indicate that the cycle is<br />
suspended.<br />
2. Wait for the water circulation to stop.<br />
3. Open the door and add the item.<br />
4. Close and latch the door. Lights will<br />
stop flashing when the door is properly<br />
shut.<br />
5. After a slight delay, the cycle resumes<br />
automatically at the point of interruption.<br />
Note:<br />
• If the door is opened during a running<br />
cycle, there may be up to a 30<br />
second delay before the unit restarts<br />
after closing the door.<br />
• Extended interruption of the wash<br />
cycle is not recommended.<br />
7<br />
©2002 Maytag <strong>Appliance</strong> Sales Company <strong>16021814</strong> Rev. 0 B-9
SPECIAL CARE ITEMS<br />
Most tableware, cookware and flatware can safely be washed in your dishwasher. Check with the manufacturer.<br />
Material Dishwasher Safe? Special Informatiion<br />
Aluminum<br />
Cast Iron<br />
China/<br />
Stoneware<br />
Crystal<br />
Filters<br />
Glass<br />
Gold-Plated<br />
Flatware<br />
Pewter,Tin<br />
Plastics<br />
Stainless Steel<br />
Sterling Silver or<br />
Silverplate<br />
Wooden Items<br />
Yes, except anodized.<br />
No<br />
No, if antique or handpainted.<br />
No, if antique or delicate<br />
crystal.<br />
Not recommended.<br />
Yes<br />
No<br />
No<br />
Yes, top rack.<br />
Yes<br />
No, if has commercial<br />
“darkening”.<br />
No<br />
High water temperature and detergents may affect finish.<br />
Seasoning will be removed, and iron will rust.<br />
Always check manufacturer’s recommendation before washing. Antique, hand-painted or<br />
over-the-glaze patterns may fade. Gold leaf may discolor.<br />
Always check manufacturer’s recommendation before washing. Some types of leaded<br />
crystal may etch with repeated washings.<br />
May leave a dingy deposit or stain on dishwasher interior.<br />
Milkglass can yellow with repeated dishwasher washing.<br />
Will discolor.<br />
Always check manufacturer’s recommendation before washing. Plastics vary in their<br />
capacity to withstand high water temperatures and detergents. Disposable plastic items<br />
are not dishwasher safe for this reason.<br />
Run a Rinse Only cycle if not washing immediately. Prolonged contact with foods containing<br />
salt, vinegar, milk products or juice could damage finish.<br />
Always check manufacturer’s recommendation before washing. Run a Rinse Only cycle if<br />
not washing immediately. Prolonged contact with food containing salt, acid or sulfide<br />
(eggs, mayonnaise and seafood) could damage finish. Commercial “darkening” may be<br />
removed by detergent.<br />
Wood may warp, crack or discolor.<br />
CARE AND CLEANING<br />
INTERIOR<br />
The dishwasher interior is normally self-cleaning.<br />
Periodically check the bottom of the dishwasher<br />
tub to see if any large particles have not gone<br />
through the strainer portion of the module.<br />
Wipe the edge of the inner door liner to<br />
remove any food soil splashes which occurred<br />
during loading.<br />
The color from some tomato-based food soils<br />
may occasionally adhere to various components<br />
of the dishwasher interior, causing temporary<br />
discoloration. To minimize this:<br />
• Remove excess tomato-based food soils off of<br />
dishes, prior to loading.<br />
• Run the Heavy Wash cycle when washing<br />
loads containing tomato-based food soils.<br />
• Change dishwasher detergent and be sure to<br />
use a dishwasher detergent that contains<br />
chlorine to better fight staining.<br />
EXTERIOR<br />
The front of the dishwasher can be cleaned<br />
with a soft damp cloth and liquid spray cleaner.<br />
Do not use abrasive powders or cleaning pads.<br />
Stainless Steel Care and Cleaning<br />
(select models)<br />
Do not use a cleaning product containing chlorine<br />
bleach. Always wipe with the grain of the<br />
stainless steel. For daily cleaning and light<br />
soil, use a soft cloth or sponge and one of the<br />
following: mild detergent and water, a solution<br />
of white vinegar and water, Formula 409 Glass<br />
and Surface Cleaner* or a similar multi-surface<br />
cleaner. Rinse and dry. To polish and to help<br />
prevent fingerprints, follow with Stainless Steel<br />
Magic Spray* (part No. 20000008)**.<br />
For moderate to heavy soil, clean with Bon<br />
Ami*, using a soft cloth or damp sponge. Rinse<br />
and dry. To restore luster and to remove streaks,<br />
follow with Stainless Steel Magic Spray*.<br />
8<br />
For discoloration, wipe with Cameo Stainless<br />
Steel Cleaner*, using a damp sponge or soft<br />
cloth. Rinse immediately and dry. To restore<br />
luster and to remove streaks, follow with<br />
Stainless Steel Magic Spray*.<br />
*Brand names are the trademarks of the<br />
respective manufacturer.<br />
** Call 1-800-688-8408 to order<br />
STORAGE/MOVING<br />
Fill both detergent cups with a fresh-scented<br />
dishwasher detergent or baking soda and select<br />
the Normal Wash cycle. Allow the dishwasher<br />
to complete the cycle. Then turn the water<br />
supply off and drain the dishwasher. To drain,<br />
press the START/Cancel pad once. Operate<br />
the drain twice to ensure most of the water is<br />
removed. Last, disconnect the electrical supply<br />
and prop open the door.<br />
When turning the water supply to the home<br />
off, the water shut off at the dishwasher must<br />
be turned off also.<br />
8<br />
B-10 <strong>16021814</strong> Rev. 0 ©2002 Maytag <strong>Appliance</strong> Sales Company
BEFORE YOU CALL FOR SERVICE<br />
CHECK THESE POINTS TO HELP SAVE YOU TIME AND MONEY.<br />
Dishwasher Will Not Fill:<br />
• Press the START/Cancel pad to start the dishwasher.<br />
• Be sure door is latched securely.<br />
• Be sure the water is turned on.<br />
• Check that the pad is properly selected for a cycle.<br />
• Allow time to pause before filling.<br />
• Check your home‘s circuit breaker or fuse box.<br />
• Check inlet hose for a kink.<br />
• Check water valve inlet for sediment and clean if necessary.<br />
Dishwasher Will Not Drain/Water In Tub Bottom:<br />
• If hooked up to a food waste disposer, be sure the knock-out is removed from the disposer inlet.<br />
• Check for food obstruction in the drain or disposer.<br />
• Check drain hose for a kink.<br />
• Check your home‘s circuit breaker or fuse box.<br />
• Check that the cycle is completed.<br />
Dishwasher Adds Water at END of Cycle:<br />
• This is normal. The sensor (select models) in the pump must stay submerged so a short fill of water is added after the cycle’s last drain.<br />
Detergent Cup Is Not Empty:<br />
• Check that the cycle is completed.<br />
• Be sure dispenser is not blocked.<br />
• Use fresh detergent stored in a cool, dry place.<br />
Dishwasher Seems Noisy:<br />
• A water valve hiss during fill is normal.<br />
• Water circulation sounds are normal.<br />
• A thumping sound may be a wash arm bumping an item that is extending beyond the racks.<br />
• Chopping or grinding sounds may be heard during drain as the internal food disposer chops hard items like fruit seeds, nuts, etc.<br />
• Humming during the drain is normal.<br />
• A snap noise is the detergent cup lid hitting the door liner when the dishwasher door is opened at the end of the cycle.This is normal.<br />
• Proper installation affects the noise level.<br />
Cycle Takes Too Long (Heating Delay Light Stays On):<br />
• Tough Scrub or Tough Scrub Plus (select models) or Sanitize has been selected and the cycle is extended to heat water.<br />
• Check to see that the incoming water temperature is 120-140° F (49-60° C).<br />
Dishwasher has an Odor:<br />
• Run dishes being held in the dishwasher through a Rinse Only cycle.<br />
• Many dishwashers have a “new” smell when first installed.This will dissipate with use.<br />
• Dishwasher may not be draining properly. (See “Dishwasher Will Not Drain” section.)<br />
• For a strong odor, place baking soda in both sides of the detergent cup. Select Light Wash and allow the water to circulate for about 10 minutes.<br />
Interrupt the cycle by unlatching the door and let it stand overnight. Restart the dishwasher by latching the door and allow it to complete<br />
the cycle. Another alternative is to use dishwasher cleaning product such as Jet-Dry Dishwasher Cleaner*.<br />
Dishwasher Leaks:<br />
• Check that the dishwasher is level. (Refer to the Installation Instructions.)<br />
• Suds can cause the dishwasher to overflow. Measure the detergent carefully and use only detergents designed for use in a dishwasher. Less detergent<br />
is needed in soft water.Try another brand if sudsing continues.<br />
• Follow directions closely on how to add a forgotten item (pg. 7).<br />
• To avoid rinse aid lid leaking from the dispenser, be sure the lid is securely attached.<br />
Display Time Suddenly Drops or Increases by Several Minutes (select models):<br />
• This is normal when the Auto Clean or Normal cycle (select models) is selected and the dishwasher decides to skip or add a drain and refill.<br />
Dishwasher Door Will Not Close:<br />
• Be sure upper rack is properly adjusted to upper or lower position (select models) (pg. 3).<br />
*Brand names are the trademarks of the respective manufacturer.<br />
Continued<br />
©2002 Maytag <strong>Appliance</strong> Sales Company <strong>16021814</strong> Rev. 0 B-11
Indicator Lights Flashing:<br />
• The countdown display (select models) flashes after a cycle is selected until the START/Cancel pad is pressed.<br />
• The countdown display (select models) and the delay indicator flash after a delay is selected until the START/Cancel pad is pressed.<br />
• All active display indicators flash if the door is opened during a running cycle or delay.<br />
• The currently selected cycle flashes if the consumer attempts to change the cycle after cycle “lock-in”.<br />
• The lock indicator flashes and the countdown display (selected models) flashes an “L” if a pad is pressed while the control lock is enabled.<br />
Glasses Are Cloudy/Spotted:<br />
• Select Extra Rinse (select models).<br />
• Check water temperature. Incoming water should be 120°-140° F (49-60° C).<br />
• Always use a rinse aid.<br />
• Confirm that the cloudiness is removable by soaking the item in white vinegar for approximately 5 minutes. If removed, the problem is due to hard<br />
water. Adjust detergent amount being used to match water hardness (pg. 5). Be sure detergent is fresh, stored properly and is a high quality brand.<br />
• If cloudiness is not removable, it is etching. This is an erosion of the surface of the glassware and can be caused by water that is too hot, from<br />
using too much detergent or by prewashing. Detergent needs food soil to act upon. If etching has occurred, the glassware is permanently damaged.<br />
To prevent further etching, adjust the detergent amount to match the water hardness, stop prewashing, and be sure incoming water temperature<br />
is not greater than 140° F (60° C). Use water heating options only when incoming water temperature is below 120° F (49° C).<br />
Food Soil Remains on Dishes:<br />
• Check water temperature (pg 5).<br />
• Run hot water at the sink before starting the dishwasher.<br />
• Select Tough Scrub or Tough Scrub Plus (select models).<br />
• Check water hardness and adjust detergent amount accordingly (pg. 5).<br />
• Use fresh detergent stored in a cool dry place.<br />
• Select proper cycle for the soil level.<br />
• Make sure the upper rack wash arm connector is correctly aligned in one of the water inlet holes (pg. 3).<br />
• Load items so they do not block the wash arms (pg. 2-4).<br />
• Load the utensil basket with knife handles up and spoon and fork handles down through the slots in the covers.<br />
• Do not place glasses over tines.<br />
• Prior to loading, scrape off burnt on foods and wipe the starchy film from utensils used with pasta, rice and oatmeal. These soils require more<br />
energy than the rest of the load to clean.<br />
Items Washed In The Dishwasher Or The Dishwasher Tub Itself Are Stained/Discolored:<br />
• Aluminum utensils or pans can leave marks when they rub against other items. Leave a slight space between items.<br />
• Iron deposits in the water can leave a yellow, brown or orange film on dishes or the dishwasher tub. A filter may be needed, check with a water<br />
treatment company.<br />
• Separate silver or silver-plated silverware from stainless steel. These metals can be damaged by contact with each other during washing.<br />
• Color from tomato sauces may adhere to the tub (pg. 8). If light staining has occurred, leave the door open to oxidize the stain away. For removal<br />
of heavier stains, try Cascade Plastic Booster Plastic Cleaning Additive*. Change dishwasher detergent and be sure to use a dishwasher detergent<br />
that contains chlorine to better fight staining.<br />
Items Not Properly Dried/Moisture Is Present On The Dishwasher Interior After The Dry Cycle:<br />
• Be sure Heated Dry is selected.<br />
• Water droplets may form on the inner door as part of the drying process.<br />
• Use a rinse aid like Jet Dry* or Cascade Rinse Aid*. Turn adjustable rinse aid cap to the MAX setting.<br />
• Check water temperature (pg. 5).<br />
• Select Sanitize.<br />
• Increase detergent amount to match water hardness (pg. 5).<br />
• Load properly (pg. 2-4)<br />
• Plastic and teflon items are difficult to dry because they have a porous surface which tends to collect water droplets.Towel drying may be necessary.<br />
• Glasses and cups with concave bottoms hold water and require towel drying. Locate these items on the more slanted side of the rack for<br />
improved results.<br />
Dishware is Chipped:<br />
• Load dishes according to instructions so they do not strike each other (pg. 2-4).<br />
• Washing fine, antique china or crystal in the dishwasher is not recommended.<br />
• Do not load glasses over the tines.<br />
• Do not overload.<br />
Sanitized Indicator Does Not Illuminate at the End of the Cycle (select models):<br />
• Sanitize was not selected.<br />
• Sanitization can only be achieved with the Auto Clean (select models), Heavy, Normal or Light wash cycles.<br />
• Sanitization may not be achieved if there is an interruption of the cycle, power failure or if incoming water temperature is below 120° F (49° C).<br />
B-12 <strong>16021814</strong> Rev. 0 ©2002 Maytag <strong>Appliance</strong> Sales Company
DISHWASHER WARRANTY<br />
Full One Year Warranty<br />
For one (1) year from the date of original retail purchase,<br />
any part which fails in normal home use will be<br />
repaired or replaced free of charge.<br />
Limited Second Year Warranty<br />
After the first year from the date of original retail<br />
purchase, through the second year, parts which fail in<br />
normal home use will be repaired or replaced free of<br />
charge for the part itself, with the owner paying all<br />
other costs, including labor, mileage and transportation.<br />
Limited Third Through Fifth Year Warranty<br />
After the second year from the date of original retail<br />
purchase, through the fifth year, all of the following<br />
components which fail in normal home use will be<br />
repaired or replaced free of charge for the part itself,<br />
with the owner paying all other costs, including labor,<br />
mileage and transportation. These components<br />
include:<br />
Any parts of the wash system for all models, including<br />
the complete power module assembly, soil sensor,<br />
spray arms, wash manifold and motor.<br />
Computer Touch Control models only - any microprocessor<br />
and touch pad assemblies.<br />
All models against rust, including exterior cabinet<br />
and front panels of convertible models, the exterior<br />
front panels and accessory side panels of built-in<br />
models, and premium DuraGuard coated racks<br />
(available on select models).<br />
Full Twenty-Year Warranty<br />
First through the twentieth year: From the date of<br />
the original retail purchase through the twentieth<br />
year, should the tub develop a water leak in normal<br />
home use, the dishwasher itself will be replaced<br />
FREE OF CHARGE.<br />
First through the twentieth year: From the date of<br />
the original retail purchase through the twentieth<br />
year, should the door liner develop a water leak in<br />
normal home use, repair or replacement of the door<br />
liner will be made FREE OF CHARGE.<br />
PLEASE NOTE: These full warranties apply only<br />
when the dishwasher is located in the United States<br />
or Canada. Dishwashers located elsewhere are covered<br />
by the limited warranties only, including a limited<br />
warranty for parts which fail during the first year.<br />
Canadian Residents<br />
These warranties cover only those dishwashers<br />
installed in Canada that have been listed with<br />
Canadian Standards Association unless the dishwashers<br />
are brought into Canada due to transfer of residence<br />
from the United States to Canada.<br />
The specific warranties expressed above are the<br />
ONLY warranties provided by the manufacturer.<br />
These warranties give you specific legal rights, and<br />
you may also have other rights that vary from state<br />
to state.<br />
WHAT IS NOT COVERED BY THESE WARRANTIES:<br />
1. Conditions and damages resulting from any of the following:<br />
a. Improper installation, delivery, or maintenance.<br />
b. Any repair, modification, alteration, or adjustment not authorized by the<br />
manufacturer or an authorized servicer.<br />
c. Misuse, abuse, accidents, or unreasonable use.<br />
d. Incorrect electric current, voltage, or supply.<br />
e. Improper setting of any control.<br />
2. Warranties are void if the original serial numbers have been removed,<br />
altered, or cannot be readily determined.<br />
3. Products purchased for commercial or industrial use.<br />
4. The cost of service or service call to:<br />
a. Correct installation errors.<br />
b. Instruct the user on the proper use of the product.<br />
c. Transport the appliance to the servicer.<br />
5. Consequential or incidental damages sustained by any person as a result of<br />
any breach of these warranties. Some states do not allow the exclusion or<br />
limitation of consequential or incidental damages, so the above exclusion<br />
may not apply.<br />
TO RECEIVE WARRANTY SERVICE<br />
To locate an authorized service company in your area contact the Jenn-Air dealer<br />
from whom your appliance was purchased or call Maytag <strong>Appliance</strong>s Sales<br />
Company, Jenn-Air Customer Assistance at the number listed below. Should you<br />
not receive satisfactory warranty service, please call or write:<br />
Maytag <strong>Appliance</strong>s Sales Company<br />
Attn: CAIR ® Center<br />
P.O. Box 2370<br />
Cleveland,TN 37320–2370<br />
U.S. and CANADA 1-800-688-1100<br />
U.S. customers using TTY for deaf, hearing impaired or<br />
speech impaired, call 1-800-688-2080.<br />
NOTE: When writing or calling about a service problem, please include the<br />
following information:<br />
a. Your name, address and telephone number;<br />
b. Model number and serial number of your appliance ;<br />
c. Name and address of your dealer or servicer and the date the appliance<br />
was purchased;<br />
d. A clear description of the problem you are having;<br />
e. Water hardness, detergent brand and amount, water temperature and<br />
cycle used;<br />
f. Proof of purchase (sales receipt).<br />
User’s guides, service manuals and parts information are available from Maytag<br />
<strong>Appliance</strong>s Sales Company, Jenn-Air Customer Assistance.<br />
Jenn-Air • 403 West Fourth Street North • P.O. Box 39 • Newton, Iowa 50208<br />
©2002 Maytag <strong>Appliance</strong> Sales Company <strong>16021814</strong> Rev. 0 B-13
Appendix C
DISHWASHER: MDB-3<br />
®<br />
Installer: Please leave this manual with<br />
this appliance.<br />
Consumer: Please read and keep this<br />
manual for future reference. Keep sales<br />
receipt and/or cancelled check as proof of<br />
purchase.<br />
Model Number<br />
Serial Number<br />
Date of Purchase<br />
In our continuing effort to improve<br />
the quality and performance<br />
of our appliances, it may<br />
be necessary to make changes<br />
to the appliance without revising<br />
this guide.<br />
If you have questions, call:<br />
1-800-688-9900 (USA)<br />
1-800-688-2002 (CANADA)<br />
1-800-688-2080 ( U.S. TTY for<br />
hearing or speech impaired)<br />
(Mon.-Fri., 8 am-8 pm Eastern Time)<br />
Internet: http://www.maytag.com<br />
For service information, see page 11.<br />
SAFETY INSTRUCTIONS<br />
LOADING<br />
DISHWASHING ESSENTIALS<br />
CONTROLS AT A GLANCE<br />
OPERATING TIPS<br />
SPECIAL CARE ITEMS<br />
CARE AND CLEANING<br />
GUIá DEL USUARIO<br />
Page 1<br />
Pages 2-4<br />
Page 5<br />
Page 6-7<br />
Page 7<br />
Page 8<br />
Page 8<br />
Pages 9-10<br />
Page 11<br />
Page 12<br />
Page 26<br />
Part No. 6 917283 B h t t p : / / w w w . m a y t a g . c o m 99002562 Litho U.S.A .<br />
©2002 Maytag <strong>Appliance</strong>s Sales Co.<br />
©2002 Maytag <strong>Appliance</strong> Sales Company <strong>16021814</strong> Rev. 0 C-2
Important Safety Instructions<br />
Recognize safety symbols, words, labels<br />
WHAT YOU NEED TO KNOW ABOUT SAFETY<br />
INSTRUCTIONS<br />
Warning and Important Safety Instructions appearing in this<br />
manual are not meant to cover all possible conditions and<br />
situations that may occur. Common sense, caution, and care<br />
must be exercised when installing, maintaining, or operating the<br />
dishwasher.<br />
Always contact your dealer, distributor, service agent, or<br />
manufacturer about problems or conditions you do not<br />
understand.<br />
WARNING<br />
Check with the installer to make sure the appliance<br />
has been properly grounded to avoid possible<br />
electrical shock. Be sure you read the Important<br />
Personal Safety Instructions before you use this<br />
dishwasher.<br />
Products with a label have been listed with Underwriter’s<br />
Laboratories, Inc. – those with a CSA tag have been listed<br />
with Canadian Standards Association. Nevertheless, as with<br />
any other equipment using electricity and moving parts,<br />
there is a potential hazard.<br />
WARNING<br />
When using your dishwasher, follow basic<br />
precautions, including the following:<br />
1. Read all instructions before using the dishwasher.<br />
2. Use the dishwasher only for its intended function.<br />
3. Disconnect electrical power to dishwasher before<br />
attempting to service.<br />
4. To avoid electrical shock hazard, the sides and back<br />
must be enclosed and the front panels must be<br />
attached before electrical power is applied to the<br />
dishwasher. Refer to the installation instructions for<br />
proper grounding procedures.<br />
5. Connect to a properly rated, protected and sized<br />
power supply circuit to avoid electrical overload.<br />
6. Children should never be permitted to operate, or<br />
play in, with, or around this dishwasher.<br />
7. To reduce the risk of injury when loading items to be<br />
WARNING<br />
WARNING - Hazards or unsafe practices which COULD result<br />
in severe personal injury or death.<br />
CAUTION<br />
CAUTION - Hazards or unsafe practices which COULD result in<br />
minor personal injury.<br />
washed, sharp or pointed items should be located with<br />
the handles up. Also, load sharp items so they are not<br />
likely to damage the door seal.<br />
8. Do not touch the heating element on the bottom of the<br />
tub during or at the completion of a cycle. It will be hot.<br />
9. Use only detergents and rinse additives designed for a<br />
residential automatic dishwasher. Never use soap,<br />
laundry detergent, or hand washing detergent in your<br />
dishwasher. Keep these products out of reach of<br />
children.<br />
10. Do not sit, stand on or abuse the door or dish racks of<br />
the dishwasher.<br />
11. Under certain conditions, hydrogen gas may be<br />
produced in a hot water system that has not been used<br />
for two weeks or more. Hydrogen gas is explosive. If<br />
the hot water system has not been used for such a<br />
period, turn on all hot water faucets and let the water<br />
flow from each for several minutes. This will release any<br />
accumulated hydrogen gas. As the gas is flammable, do<br />
not smoke or use an open flame during this process.<br />
12. Do not wash plastic items unless marked “dishwasher<br />
safe” or the equivalent. For plastic items not so marked,<br />
check the manufacturer’s recommendations.<br />
13. Do not tamper with controls.<br />
14. To prevent accidental child entrapment and suffocation<br />
risks, always remove the door to the washing<br />
compartment when removing an old dishwasher from<br />
service or discarding it.<br />
15. Use caution when unloading the dishwasher. Dishes will<br />
be hot if unloaded shortly after a cycle has completed.<br />
16. Certified residential dishwashers are not intended for<br />
licensed food establishments.<br />
Save These Instructions for Future Reference<br />
C-3 <strong>16021814</strong> Rev. 0 ©2002 Maytag <strong>Appliance</strong> Sales Company
Loading<br />
Before you start<br />
➢ Don’t prerinse. Simply scrape off any<br />
bones or large food particles.<br />
➢ If connected to a food waste disposer,<br />
make certain the disposer is empty<br />
before starting the dishwasher.<br />
➢ Scrape off tomato-based food soils<br />
(see page 8).<br />
➢ Remove certain foods (such as<br />
mustard, mayonnaise, lemon juice,<br />
vinegar, salt or dressings) from<br />
stainless steel flatware as soon as<br />
possible. These foods may cause<br />
rusting and pitting if allowed to remain<br />
in contact with the surface for an<br />
extended period of time.<br />
Upper rack<br />
10 Place Settings (Models with folding<br />
and bowl tines in the lower rack.)<br />
10 Place Settings (Models without folding<br />
and bowl tines in the lower rack.)<br />
Glasses, cups, stemware, light-weight<br />
plastics, plates, bowls, pans, long-handled<br />
utensils etc. can be loaded in this rack. Do<br />
not load glasses over the tines.<br />
General<br />
recommendations<br />
➢<br />
➢<br />
Items can be centered behind a single<br />
tine or loaded at an angle to maximize<br />
space.<br />
Avoid blocking or preventing the spray<br />
arms from spinning freely. Do not<br />
allow items to extend beyond the<br />
racks.<br />
The Stack-Rack (select models) on the right<br />
side of the upper rack folds up or down for<br />
loading flexibility. Fold it down to hold longhandled<br />
knives, spatulas and spoons or short<br />
items like cups or juice glasses. Fold it up for<br />
taller items like glasses, bowls, plates, etc.<br />
The Stack-Rack is designed to hold<br />
stemware in place. Taller stemware will fit<br />
better on the right side as the upper rack is<br />
deeper on this side.<br />
The folding tines (select models) located in<br />
the front right corner provide convenient<br />
loading space for large, bulky items like<br />
pots and pans or mixing bowls<br />
The cup clips (select models) located in<br />
the center of the upper rack can be used to<br />
Recommended loading<br />
(Rack features vary by model)<br />
For best dishwashing results follow these<br />
guidelines to determine the best<br />
arrangement for your items.<br />
❚<br />
NOTE<br />
Face soiled surfaces towards the<br />
center of the dishwasher.<br />
hold light weight plastic items, cooking<br />
utensils, knives, etc. in place. Clip the item<br />
between the tine and the clip.<br />
The Vari-Lock Snugge r (select models)<br />
on the left secures lightweight items in<br />
place. It can be adjusted by grasping the<br />
wavy wire and rotating it left to snug items<br />
against the outer rack or to the right to rest<br />
on top of light items. Do not load items on<br />
top of the wire.<br />
For best results with tall glasses, align the<br />
Vari-Lock Snugger (select models) wavy<br />
wire with the arrow on the rack clip. Rest the<br />
bottom of the glass against the wavy wire.<br />
2LOADING<br />
©2002 Maytag <strong>Appliance</strong> Sales Company <strong>16021814</strong> Rev. 0 C-4
Loading (continued)<br />
ADJUSTABLE UPPER RACK<br />
(select models)<br />
the upper rack is in the lower position.<br />
To lower the rack:<br />
The Adjustable Upper Rack (select<br />
models) can be raised or lowered to<br />
accommodate taller plates, platters, pans,<br />
etc. in the upper or lower racks. Full size<br />
plates can be loaded in the upper rack when<br />
➢ Pull the rack fully out.<br />
➢ Place hands on each adjuster.<br />
➢ Press down on the top blue button and<br />
push down (the button will slide<br />
towards the center of the rack).<br />
➢ The rack will come to a stop when it is<br />
in position.<br />
To raise the rack:<br />
➢ Pull the rack fully out.<br />
➢ Place hands on each adjuster.<br />
➢ Lift up both sides until rack comes to a<br />
stop.<br />
❚<br />
❚<br />
NOTE<br />
The dishwasher will not operate<br />
correctly if the upper rack wash<br />
arm connection is not aligned with<br />
one of the water inlet holes on<br />
back wall.<br />
The left and right side adjusters<br />
must both be in the upward or<br />
downward position for proper<br />
connection.<br />
3 saucers are<br />
loaded on the<br />
rack under<br />
the Stack-<br />
Rack Shelf<br />
(select<br />
models)<br />
Lower rack<br />
3 saucers are<br />
loaded on the<br />
rack under<br />
the Stack-<br />
Rack Shelf<br />
(select<br />
models)<br />
A variety of large items such as dinner<br />
plates, mixing bowls, pots and pans and<br />
baking dishes can be loaded in this rack.<br />
10 Place Settings (Models with<br />
folding and bowl tines.)<br />
10 Place Settings (Models without<br />
folding and bowl tines.)<br />
Tall items such as bakeware and large platters<br />
can be placed on the left side.<br />
Back<br />
Back<br />
3<br />
With the Stack-Rack (select models) shelf<br />
raised, thin items like cookie sheets or<br />
pizza pans may be placed along the left<br />
side. With the shelf down, two levels of<br />
glasses and cups can be loaded.<br />
Positioning the Fold-Away Tines (select<br />
models) flat in the back, left corner<br />
provides convenient loading space for<br />
large, bulky items like pots and pans or<br />
mixing bowls.<br />
Convertible Tines (select models) in the<br />
back, right corner can be adjusted to<br />
provide narrow spacing for loading plates<br />
or wide spacing for loading deep bowls,<br />
pots or pans. Flip tines up for narrow<br />
spacing or down for wider spacing.<br />
C-5 <strong>16021814</strong> Rev. 0 ©2002 Maytag <strong>Appliance</strong> Sales Company
REMOVABLE UTENSIL<br />
BASKET (Design varies by model)<br />
For best cleaning results, prevent items<br />
from nesting together by placing some<br />
items in the basket with handles up and<br />
some with handles down. Load knives,<br />
handles up and spoons and forks handles<br />
down, through the slots in the hinged<br />
covered section(s) (when closed).<br />
Be sure that thin, finely pointed items do<br />
not extend through the basket.<br />
This could block the lower<br />
wash arm.<br />
Small, lightweight items<br />
like baby spoons and<br />
plastic measuring spoons<br />
should be placed in the<br />
section(s) with the hinged<br />
cover(s).<br />
ODDS & ENDS BASKET<br />
(Select models)<br />
Use this supplemental basket in the upper<br />
rack for loading miscellaneous items and<br />
utensils. This is also a safe<br />
place to load sharp<br />
knives and<br />
pointed<br />
items.<br />
SPLIT & FIT UTENSIL<br />
BASKET (Select models)<br />
The split silverware basket can be<br />
separated and placed in several locations in<br />
the bottom rack. Hold the basket firmly<br />
along the sides. Follow the unlock direction<br />
arrows imprinted on the basket and slide<br />
the basket apart until it splits into two. Load<br />
flatware and utensils into<br />
both sections or just one,<br />
depending upon your<br />
load.<br />
LOADING<br />
Removing the upper rack<br />
The upper rack can be removed when tall<br />
or oversized items need to be loaded into<br />
the lower rack. Unload the rack prior to<br />
removing.<br />
TO REMOVE:<br />
➢ Roll the upper rack 1/3 to 1/2 of the<br />
way out.<br />
➢ Remove the plastic rack stop from the<br />
end of each track. To remove each<br />
plastic rack stop, push inward<br />
(towards the rack) on the ridged area<br />
of the rack stop. The rack stop will<br />
snap open and can be easily removed<br />
by pulling straight out. Take care to<br />
support the track while removing rack<br />
stops.<br />
➢ Roll the rack all the way out of the<br />
track and remove from the<br />
dishwasher.<br />
➢ Reverse the above procedure to<br />
replace the upper rack into the<br />
dishwasher.<br />
Rack Stop<br />
4<br />
©2002 Maytag <strong>Appliance</strong> Sales Company <strong>16021814</strong> Rev. 0 C-6
Dishwashing essentials<br />
Hot water<br />
For optimal cleaning and drying<br />
results, hot water is necessary. The<br />
incoming water temperature should be<br />
120–140° F (49-60° C) to properly<br />
activate the detergent and melt greasy<br />
food soils.<br />
Detergent<br />
Use a detergent designed specifically for<br />
use in an automatic dishwasher. Be sure it<br />
is fresh and stored in a cool, dry place (not<br />
under the sink).<br />
RECOMMENDED AMOUNT<br />
Too little detergent results in poor cleaning,<br />
hard water filming/spotting and poor<br />
drying. Too much detergent can cause<br />
permanent etching/cloudiness.<br />
To check the incoming water temperature,<br />
turn on the hot water faucet nearest the<br />
dishwasher and let it run into a glass in the<br />
sink. Place a candy thermometer in the<br />
glass and check the temperature once it<br />
has stopped rising. If the temperature is<br />
below 120° F (49° C), have a qualified<br />
person raise the water heater thermostat<br />
setting.<br />
The amount of detergent to use is<br />
determined by the hardness of the water<br />
and soil level of the load. Refer to the<br />
following chart for detergent usage<br />
recommendations.<br />
Do not use detergent with the Rinse Only<br />
cycle. Leave the detergent lid open when<br />
running Rinse Only .<br />
In extremely hard water conditions (13<br />
grains per gallon or more*), it is difficult to<br />
achieve good results with any dishwasher.<br />
A mechanical water softener may be<br />
necessary to improve water quality,<br />
Before starting the dishwasher, turn on the<br />
hot water faucet and let it run until the<br />
water is hot. This assures that the initial fill<br />
of water is hot.<br />
detergent effectiveness, and protect the<br />
dishwasher parts from the damage that<br />
hard water can cause.<br />
Water Hardness* Soil Level Detergent Amount**<br />
Soft (0-4 gpg) Light Soil 5 teaspoons<br />
Normal Soil<br />
6 teaspoons<br />
Heavy Soil<br />
8 teaspoons<br />
Medium (5-9 gpg) Light Soil 7 teaspoons<br />
Normal Soil<br />
8 teaspoons<br />
Heavy Soil<br />
10 teaspoons<br />
Hard (10-12 gpg) Light Soil 9 teaspoons<br />
Normal Soil<br />
10 teaspoons<br />
Heavy Soil<br />
12 teaspoons<br />
*Your local water utility or state<br />
university extension service can tell you<br />
the degree of water hardness in your<br />
area.<br />
** Add recommended amount of<br />
detergent to either side of the Main<br />
Wash compartment.<br />
5<br />
Rinse aid<br />
Regular use of a rinse aid improves<br />
drying, reduces spotting and filming,<br />
and reduces moisture left on the<br />
dishwasher interior.<br />
An automatic rinse aid dispenser is<br />
located next to the detergent cup. The<br />
window next to the dispenser cap<br />
indicates when the rinse aid reservoir<br />
needs to be refilled. When the level of<br />
rinse aid is below the indicator marks and<br />
the window is nearly clear, it is time to refill<br />
the dispenser. Check the dispenser<br />
monthly.<br />
To add rinse aid to the dispenser, turn the<br />
cap counterclockwise to open. Remove<br />
the cap and pour liquid rinse aid into the<br />
opening. The amount of rinse aid<br />
dispensed during the cycle is adjustable by<br />
moving the lever inside the reservoir area.<br />
For most water conditions use<br />
manufacturers recommended setting of<br />
“3”. Adjust it up to the “MAX” setting for<br />
hard water. Set the lever anywhere<br />
between these amounts as needed to get<br />
the best results. Replace the cap and turn<br />
it clockwise to close.<br />
C-7 <strong>16021814</strong> Rev. 0 ©2002 Maytag <strong>Appliance</strong> Sales Company
Controls at a glance<br />
Cycles and water usage<br />
NORMAL WASH<br />
Medium cycle for average food soils. The<br />
soil sensor is active with this cycle.<br />
Depending on the number of fills, water<br />
usage ranges from 3 to 6 gallons.<br />
HEAVY WASH<br />
Long cycle for heavy food soils. 8 gallons.<br />
LIGHT WASH<br />
Short cycle for light food soils. Water<br />
usage is 5 gallons.<br />
Options<br />
TOUGH SCRUB OR TOUGH<br />
SCRUB PLUS (select models)<br />
Select this option (select models) when<br />
washing loads with hard-to-remove food<br />
soils. Tough Scrub or Tough Scrub <br />
Plus can be selected with any cycle (except<br />
Rinse Only ). Depending on which cycle is<br />
being used, this option adds fills, heat<br />
and/or wash time to the wash cycle.<br />
For baked-on, dried-on soils, select Heavy<br />
Wash along with the Tough Scrub or<br />
Tough Scrub Plus option.<br />
SANITIZE<br />
Select Sanitize with Auto Clean (select<br />
models) , Heavy, Normal , or Light Wash<br />
Display (select models)<br />
The display will show the approximate<br />
cycle time. “2H” will appear in the display<br />
representing any cycle time greater than<br />
99 minutes.<br />
Indicator lights<br />
The CLEAN light illuminates at the end of<br />
the cycle and remains lit until the door has<br />
been open for 30 seconds continuously.<br />
The DRYING (select models) light<br />
illuminates during the entire dry period and<br />
goes out when the cycle is completed.<br />
AUTO CLEAN (select models)<br />
Normal dishloads vary from day to day.<br />
Auto Clean is designed to select the<br />
number of water fills best suited for the soil<br />
level of each load. Depending on the<br />
number of fills required water usage<br />
ranges from 3 to 8 gallons.<br />
RINSE ONLY<br />
Rinses dishes being held until there is a<br />
full load. Controls odors. 2 gallons.<br />
to sanitize dishware. At the end of the<br />
cycle, when the cycle monitor recognizes<br />
that the proper conditions have been met,<br />
the SANITIZED light illuminates.<br />
Sanitization may not be achieved if there is<br />
an interruption of the cycle, power failure<br />
or if the incoming water temperature is<br />
below 120° F (49° C).<br />
EXTRA RINSE (select models)<br />
Select Extra Rinse to add an additional<br />
rinse to the cycle. An extra rinse helps to<br />
improve results in hard water situations.<br />
HEATED DRY<br />
Select Heated Dry to turn on the heating<br />
element during dry for enhanced drying<br />
results. When Heated Dry is not selected,<br />
The WASHING (select models) light<br />
illuminates during all rinse and wash<br />
portions of the cycle.<br />
The HEATING DELAY (select models)<br />
light illuminates when the cycle is being<br />
extended to heat the water.<br />
The CLEAN and SANITIZED (select<br />
models) indicator lights will not reilluminate<br />
after a power failure until after<br />
the next cycle is run.<br />
The SANITIZED (select models) light<br />
illuminates at the end of the cycle when<br />
conditions have been met to achieve<br />
sanitization. The light will remain lit until the<br />
door has been open for 30 seconds<br />
continuously.<br />
NOTE<br />
❚ Cycle times shown in the<br />
numerical display (select models)<br />
increase or decrease, based on<br />
each load’s soil level, water<br />
temperature and selected options.<br />
❚ Using the Extra Rinse option will<br />
increase water consumption by<br />
1 1 ⁄2 gallons.<br />
towel drying of some items such as plastic<br />
and teflon may be necessary and more<br />
moisture may be noticed adhering to the<br />
dishwasher interior. With either dry option, it<br />
is normal to notice vapor escaping from the<br />
door vent.<br />
START/CANCEL<br />
To start a cycle, close the door and press the<br />
START/Cancel pad once. To cancel when a<br />
cycle is running, press the START/Cancel<br />
pad once. The dishwasher will drain, then<br />
shut off. To turn the dishwasher off without<br />
draining, press the START/Cancel pad twice.<br />
The dishwasher remembers your last cycle<br />
so you do not have to reset the cycle each<br />
time. To start the dishwasher using the same<br />
cycle and options selected on the previous<br />
wash, just press the START/Cancel pad.<br />
NOTE<br />
❚ When Sanitize is selected,<br />
cycles are monitored to assure<br />
sanitization. Unusually low water<br />
temperature will prevent sanitization<br />
from being satisfied and<br />
the SANITIZED light will not<br />
illuminate at the end of the cycle.<br />
❚ Only these certified cycles have<br />
been designed to meet NSF<br />
requirements: Auto Clean Cycle,<br />
Heavy Cycle, Normal Cycle and<br />
Light Cycle.<br />
6CONTROLS AT A GLANCE<br />
©2002 Maytag <strong>Appliance</strong> Sales Company <strong>16021814</strong> Rev. 0 C-8
Controls at a glance (Continued)<br />
Delay<br />
The Delay option can be used to<br />
automatically start the cycle at a later time<br />
to reduce daytime heat buildup in the<br />
home or to take advantage of reduced<br />
energy costs if available in your area.<br />
TO SET UP A DELAY:<br />
1. Close the door. Select the appropriate<br />
cycle and options for the load.<br />
2. Press the Delay pad until the desired<br />
amount of delay time is selected.<br />
3. The Delay indicator and the count down<br />
display (select models) will flash until<br />
the START/Cancel pad is pressed.<br />
4. As soon as the START/Cancel pad is<br />
pressed, the flashing will stop and the<br />
delay time will begin counting down.<br />
The delay indicator will remain lit until<br />
the delay time has counted down.<br />
5. The cycle will automatically start as<br />
soon as the delay time expires.<br />
❚<br />
NOTE<br />
If 30 seconds elapse between<br />
setting the cycle and options and<br />
pressing the START/Cancel pad,<br />
the dishwasher will turn off.<br />
TO CANCEL A DELAY:<br />
When the delay is counting down, press<br />
the Delay pad again. The indicator light<br />
will go out and the cycle will start or<br />
resume immediately.<br />
TO CANCEL A DELAY AND CYCLE:<br />
➢ Press START/Cancel once to drain<br />
and turn off the dishwasher.<br />
Or<br />
➢ Press START/Cancel twice to turn<br />
dishwasher off without draining.<br />
Control lock option<br />
(select models)<br />
The control touchpads can be locked to<br />
prevent unwanted use. If this feature is<br />
activated between cycles, the dishwasher<br />
cannot be operated until the controls are<br />
unlocked. If desired, the controls can be<br />
locked after a cycle or delay has started.<br />
SETTING THE CONTROL LOCK:<br />
1. Press the Heated Dry pad for three<br />
seconds.<br />
2. An indicator light next to the lock<br />
graphic will illuminate when the<br />
controls are locked.<br />
TO CANCEL:<br />
1. Press the Heated Dry pad for three<br />
seconds.<br />
2. The indicator light will go off.<br />
❚<br />
❚<br />
NOTE<br />
If a cycle or option pad is pressed<br />
after the controls have been<br />
locked, the indicator light next to<br />
the lock graphic will flash five<br />
times. On selected models with a<br />
countdown display, the display<br />
will flash an “L” simultaneously<br />
with the lock indicator.<br />
This option does not lock the door,<br />
only the dishwasher controls.<br />
7<br />
Operating tips<br />
Starting the dishwasher<br />
1. After loading the dishwasher and adding<br />
detergent, close the dishwasher by<br />
pressing the door until the latch clicks.<br />
2. To start the dishwasher, select the<br />
desired cycle and options. The<br />
indicator lights for the selected cycle<br />
and options will illuminate.<br />
3. Press the START/Cancel pad. After a<br />
pause, the fill will begin. The display<br />
countdown will flash until START/<br />
Cancel is pressed.<br />
4. To cancel an option, press the pad<br />
again. To cancel a running cycle,<br />
press the START/Cancel pad.<br />
5. To prevent unplanned cycle or option<br />
changes, these selections are “locked<br />
in” after 1 minute.<br />
❚<br />
❚<br />
NOTE<br />
If a cycle pad is pressed after the<br />
controls have been “locked in”,<br />
the light above the current cycle<br />
will flash three times.<br />
If START/Cancel is not pressed<br />
within 30 seconds, the dishwasher<br />
will turn off.<br />
Adding a forgotten item<br />
For best cleaning, the forgotten item<br />
should be added early in the cycle.<br />
1. Grasp door handle and unlatch door<br />
without opening completely. All lights<br />
will flash to indicate that the cycle is<br />
suspended.<br />
2. Wait for the water circulation to stop.<br />
3. Open the door and add the item.<br />
4. Close and latch the door. Lights will stop<br />
flashing when the door is properly shut.<br />
5. After a slight delay, the cycle resumes<br />
automatically at the point of interruption.<br />
❚<br />
❚<br />
NOTE<br />
If the door is opened during a<br />
running cycle, there may be up to<br />
a 30 second delay before the unit<br />
restarts after closing the door.<br />
Extended interruption of the wash<br />
cycle is not recommended.<br />
C-9 <strong>16021814</strong> Rev. 0 ©2002 Maytag <strong>Appliance</strong> Sales Company
Special care items<br />
Most tableware, cookware and flatware can safely be washed in your dishwasher. Check with the manufacturer.<br />
Material Dishwasher Safe? Special Informatiion<br />
Aluminum<br />
Cast Iron<br />
China/Stoneware<br />
Crystal<br />
Filters<br />
Glass<br />
Gold-Plated Flatware<br />
Pewter, Tin<br />
Plastics<br />
Stainless Steel<br />
Sterling Silver or<br />
Silverplate<br />
Wooden Items<br />
Interior<br />
Yes, except anodized.<br />
No<br />
No, if antique or hand-painted.<br />
No, if antique or delicate<br />
crystal.<br />
Not recommended.<br />
Yes<br />
No<br />
No<br />
Yes, top rack.<br />
Yes<br />
No, if has commercial<br />
“darkening”.<br />
No<br />
Care and cleaning<br />
The dishwasher interior is normally selfcleaning.<br />
Periodically check the bottom of<br />
the dishwasher tub to see if any large<br />
particles have not gone through the strainer<br />
portion of the module.<br />
Wipe the edge of the inner door liner to<br />
remove any food soil splashes which<br />
occurred during loading.<br />
The color from some tomato-based food<br />
soils may occasionally adhere to various<br />
components of the dishwasher interior,<br />
causing temporary discoloration. To<br />
minimize this:<br />
➢ Remove excess tomato-based food<br />
soils off of dishes, prior to loading.<br />
➢ Run the Heavy Wash cycle when<br />
washing loads containing tomato-based<br />
food soils.<br />
➢ Change dishwasher detergent and be<br />
sure to use a dishwasher detergent that<br />
contains chlorine to better fight staining.<br />
Exterior<br />
High water temperature and detergents may affect finish.<br />
Seasoning will be removed, and iron will rust.<br />
Always check manufacturer’s recommendation before washing. Antique, hand-painted or overthe-glaze<br />
patterns may fade. Gold leaf may discolor.<br />
Always check manufacturer’s recommendation before washing. Some types of leaded crystal<br />
may etch with repeated washings.<br />
May leave a dingy deposit or stain on dishwasher interior.<br />
Milkglass can yellow with repeated dishwasher washing.<br />
Will discolor.<br />
Always check manufacturer’s recommendation before washing. Plastics vary in their capacity<br />
to withstand high water temperatures and detergents. Disposable plastic items are not<br />
dishwasher safe for this reason.<br />
Run a Rinse Only cycle if not washing immediately. Prolonged contact with foods containing<br />
salt, vinegar, milk products or juice could damage finish.<br />
Always check manufacturer’s recommendation before washing. Run a Rinse Only cycle if not<br />
washing immediately. Prolonged contact with food containing salt, acid or sulfide (eggs,<br />
mayonnaise and seafood) could damage finish. Commercial “darkening” may be removed by<br />
detergent.<br />
Wood may warp, crack or discolor.<br />
The front of the dishwasher can be cleaned<br />
with a soft damp cloth and liquid spray<br />
cleaner. Do not use abrasive powders or<br />
cleaning pads.<br />
Stainless Steel Care and Cleaning (select<br />
models)<br />
Do not use a cleaning product containing<br />
chlorine bleach. Always wipe with the<br />
grain of the stainless steel. For daily<br />
cleaning and light soil , use a soft cloth or<br />
sponge and one of the following: mild<br />
detergent and water, a solution of white<br />
vinegar and water, Formula 409 Glass and<br />
Surface Cleaner* or a similar multi-surface<br />
cleaner. Rinse and dry. To polish and to<br />
help prevent fingerprints, follow with<br />
Stainless Steel Magic Spray* (part No.<br />
20000008)**.<br />
For moderate to heavy soil , clean with<br />
Bon Ami*, using a soft cloth or damp<br />
sponge. Rinse and dry. To restore luster<br />
and to remove streaks, follow with Stainless<br />
Steel Magic Spray*.<br />
For discoloration , wipe with Cameo<br />
Stainless Steel Cleaner*, using a damp<br />
sponge or soft cloth. Rinse immediately and<br />
dry. To restore luster and to remove streaks,<br />
follow with Stainless Steel Magic Spray*.<br />
Storage/moving<br />
Fill detergent cup with a fresh-scented<br />
dishwasher detergent or baking soda and<br />
select the Normal Wash cycle. Allow the<br />
dishwasher to complete the cycle. Then turn<br />
the water supply off and drain the<br />
dishwasher. To drain, press the<br />
START/Cancel pad once. Operate the drain<br />
twice to ensure most of the water is<br />
removed. Last, disconnect the electrical<br />
supply and prop open the door.<br />
When turning the water supply to the home<br />
off, the water shut off at the dishwasher must<br />
be turned off also.<br />
*Brand names are the trademarks of the respective manufacturer.<br />
CARE ITEMS<br />
** Call 1-800-688-8408 to order.<br />
8SPECIAL<br />
©2002 Maytag <strong>Appliance</strong> Sales Company <strong>16021814</strong> Rev. 0 C-10
Before you call<br />
CHECK THESE POINTS TO HELP SAVE YOU TIME AND MONEY.<br />
9<br />
Dishwasher Will Not Fill:<br />
• Press the START/Cancel pad to start the dishwasher.<br />
• Be sure door is latched securely.<br />
• Be sure the water is turned on.<br />
• Check that the pad is properly selected for a cycle.<br />
• Allow time to pause before filling.<br />
• Check your home‘s circuit breaker or fuse box.<br />
• Check inlet hose for a kink.<br />
• Check water valve inlet for sediment and clean if necessary.<br />
Dishwasher Will Not Drain/Water In Tub Bottom:<br />
• If hooked up to a food waste disposer, be sure the knock-out is removed from the disposer inlet.<br />
• Check for food obstruction in the drain or disposer.<br />
• Check drain hose for a kink.<br />
• Check your home‘s circuit breaker or fuse box.<br />
• Check that the cycle is completed.<br />
Dishwasher Adds Water at END of Cycle:<br />
• This is normal. The sensor (select models) in the pump must stay submerged so a short fill of water is added after the cycle’s last drain.<br />
Detergent Cup Is Not Empty:<br />
• Check that the cycle is completed.<br />
• Be sure dispenser is not blocked.<br />
• Use fresh detergent stored in a cool, dry place.<br />
Dishwasher Seems Noisy:<br />
• A water valve hiss during fill is normal.<br />
• Water circulation sounds are normal.<br />
• A thumping sound may be a wash arm bumping an item that is extending beyond the racks.<br />
• Chopping or grinding sounds may be heard as the internal food disposer chops hard items like fruit seeds, nuts, etc.<br />
• Humming during the drain is normal.<br />
• A snap noise is the detergent cup lid hitting the door liner when the dishwasher door is opened at the end of the cycle. This is normal.<br />
• Proper installation affects the noise level.<br />
Cycle Takes Too Long (Heating Delay Light Stays On [select models]):<br />
• Tough Scrub or Tough Scrub Plus (select models) or Sanitize has been selected and the cycle is extended to heat water.<br />
• Check to see that the incoming water temperature is 120-140° F (49-60° C).<br />
Dishwasher has an Odor:<br />
• Run dishes being held in the dishwasher through a Rinse Only cycle.<br />
• Many dishwashers have a “new” smell when first installed. This will dissipate with use.<br />
• Dishwasher may not be draining properly. (See “Dishwasher Will Not Drain” section.)<br />
• For a strong odor, place baking soda in both sides of the detergent cup. Select Light Wash and allow the water to circulate for about 10<br />
minutes. Interrupt the cycle by unlatching the door and let it stand overnight. Restart the dishwasher by latching the door and allow it to<br />
complete the cycle. Another alternative is to use a dishwasher cleaning product such as Jet-Dry Dishwasher Cleaner*.<br />
Dishwasher Leaks:<br />
• Check that the dishwasher is level. (Refer to the Installation Instructions.)<br />
• Suds can cause the dishwasher to overflow. Measure the detergent carefully and use only detergents designed for use in a dishwasher. Less<br />
detergent is needed in soft water. Try another brand if sudsing continues.<br />
• Follow directions closely on how to add a forgotten item (pg. 7).<br />
• To avoid rinse aid leaking from the dispenser, be sure the lid is securely attached.<br />
Display Time Suddenly Drops or Increases by Several Minutes (select models):<br />
• This is normal when the Auto Clean or Normal cycle (select models) is selected and the dishwasher decides to skip or add a drain and refill.<br />
Indicator Lights Flashing:<br />
• The countdown display (select models) flashes after a cycle is selected until the START/Cancel pad is pressed.<br />
• The countdown display (select models) and the delay indicator flash after a delay is selected until the START/Cancel pad is pressed.<br />
• All active display indicators flash if the door is opened during a running cycle or delay.<br />
• The currently selected cycle flashes if the consumer attempts to change the cycle after cycle “lock-in”.<br />
• The lock indicator flashes and the countdown display (selected models) flashes an “L” if a pad is pressed while the control lock is enabled.<br />
C-11 <strong>16021814</strong> Rev. 0 ©2002 Maytag <strong>Appliance</strong> Sales Company
Glasses Are Cloudy/Spotted:<br />
• Select Extra Rinse (select models).<br />
• Check water temperature. Incoming water should be 120° -140° F (49-60° C).<br />
• Always use a rinse aid.<br />
• Confirm that the cloudiness is removable by soaking the item in white vinegar for approximately 5 minutes. If removed, the problem is due<br />
to hard water. Adjust detergent amount being used to match water hardness (pg. 5). Be sure detergent is fresh, stored properly and is a<br />
high quality brand.<br />
• If cloudiness is not removable, it is etching . This is an erosion of the surface of the glassware and can be caused by water that is too hot,<br />
from using too much detergent or by prewashing. Detergent needs food soil to act upon. If etching has occurred, the glassware is<br />
permanently damaged. To prevent further etching, adjust the detergent amount to match the water hardness, stop prewashing, and be sure<br />
incoming water temperature is not greater than 140° F (60° C). Use water heating options only when incoming water temperature is below<br />
120° F (49° C).<br />
Food Soil Remains on Dishes:<br />
• Check water temperature (pg 5).<br />
• Run hot water at the sink before starting the dishwasher.<br />
• Select Tough Scrub or Tough Scrub Plus (select models).<br />
• Check water hardness and adjust detergent amount accordingly (pg. 5).<br />
• Use fresh detergent stored in a cool dry place.<br />
• Select proper cycle for the soil level.<br />
• Make sure the upper rack wash arm connector is correctly aligned in one of the water inlet holes (pg. 3).<br />
• Load items so they do not block the wash arms (pg. 2-4).<br />
• Load the utensil basket with knife handles up and spoon and fork handles down through the slots in the covers.<br />
• Do not place glasses over tines.<br />
• Prior to loading, scrape off burnt on foods and wipe the starchy film from utensils used with pasta, rice and oatmeal. These soils require<br />
more energy than the rest of the load to clean.<br />
Items Washed In The Dishwasher Or The Dishwasher Tub Itself Are Stained/Discolored:<br />
• Aluminum utensils or pans can leave marks when they rub against other items. Leave a slight space between items.<br />
• Iron deposits in the water can leave a yellow, brown or orange film on dishes or the dishwasher tub. A filter may be needed, check with a<br />
water treatment company.<br />
• Separate silver or silver-plated silverware from stainless steel. These metals can be damaged by contact with each other during washing.<br />
• Color from tomato sauces may adhere to the tub (pg. 8). If light staining has occurred, leave the door open to oxidize the stain away. For<br />
removal of heavier stains, try Cascade Plastic Booster Plastic Cleaning Additive*. Change dishwasher detergent and be sure to use a<br />
dishwasher detergent that contains chlorine to better fight staining.<br />
Items Not Properly Dried/Moisture Is Present On The Dishwasher Interior After The Dry Cycle:<br />
• Be sure Heated Dry is selected.<br />
• Water droplets may form on the inner door as part of the drying process.<br />
• Use a rinse aid like Jet Dry* or Cascade Rinse Aid* regularly, to improve drying. Turn the rinse aid selector towards the MAX setting.<br />
• Check water temperature (pg. 5).<br />
• Select Sanitize.<br />
• Increase detergent amount to match water hardness (pg. 5).<br />
• Load properly (pg. 2-4).<br />
• Plastic and teflon items are difficult to dry because they have a porous surface which tends to collect water droplets. Towel drying may be<br />
necessary.<br />
• Glasses and cups with concave bottoms hold water and require towel drying. Locate these items on the more slanted side of the rack for<br />
improved results.<br />
Dishware is Chipped :<br />
• Load dishes according to instructions so they do not strike each other (pg. 2-4).<br />
• Washing fine antique china/crystal in the dishwasher is not recommended.<br />
• Do not load glasses over the tines.<br />
• Do not overload.<br />
Sanitized Light Does Not Illuminate at the End of the Cycle (select models) :<br />
• Sanitize was not selected.<br />
• Sanitization can only be achieved with the Auto Clean (select models), Heavy, Normal or Light wash cycles.<br />
• Sanitization may not be achieved if there is an interruption of the cycle, power failure or if incoming water temperature is below 120° F (49° C).<br />
Dishwasher Door Will Not Close :<br />
• Be sure upper rack is properly adjusted to upper or lower position (pg. 3).<br />
BEFORE YOU CALL<br />
*Brand names are the trademarks of the respective manufacturer.<br />
** Call 1-800-688-8408 to order.<br />
10<br />
©2002 Maytag <strong>Appliance</strong> Sales Company <strong>16021814</strong> Rev. 0 C-12
Dishwasher warranty<br />
Full One Year Warranty<br />
For ONE (1) year from the date of original retail<br />
purchase, any part which fails in normal home use<br />
will be repaired or replaced free of charge.<br />
Limited Second Year Warranty<br />
After the first year from the date of original retail<br />
purchase, through the second year, parts which fail in<br />
normal home use will be repaired or replaced free of<br />
charge for the part itself, with the owner paying all other<br />
costs, including labor, mileage and transportation.<br />
Limited Third Through Fifth Year Warranty<br />
After the second year from the date of original retail<br />
purchase, through the fifth year, all of the following<br />
components which fail in normal home use will be<br />
repaired or replaced free of charge for the part itself,<br />
with the owner paying all other costs, including labor,<br />
mileage and transportation. These components<br />
include:<br />
Any parts of the Jetclean II ® wash system for all<br />
models, including the complete power module<br />
assembly, soil sensor, spray arms, wash manifold,<br />
and motor.<br />
Any microprocessor and touch pad assemblies.<br />
All models against rust, including exterior cabinet<br />
and front panels of convertible models, the exterior<br />
front panels and accessory side panels of built-in<br />
models, and premium DuraGuard ® coated racks<br />
(available on select models).<br />
Full Twenty-Year Warranty<br />
From the date of original purchase through the<br />
twentieth year, should the tub develop a water leak<br />
in normal home use, the dishwasher itself will be<br />
replaced FREE OF CHARGE.<br />
From the date of original purchase through the<br />
twentieth year, should the door liner develop a water<br />
leak in normal home use, repair or replacement of<br />
the door liner will be made FREE OF CHARGE.<br />
PLEASE NOTE: These full warranties apply only<br />
when the dishwasher is located in the United States<br />
or Canada. Dishwashers located elsewhere are<br />
covered by the limited warranties only, including a<br />
limited warranty for parts which fail during the first<br />
year.<br />
Canadian Residents<br />
These warranties cover only those dishwashers<br />
installed in Canada that have been listed with<br />
Canadian Standards Association unless the<br />
dishwashers are brought into Canada due to transfer<br />
of residence from the United States to Canada.<br />
The specific warranties expressed above are the<br />
ONLY warranties provided by the manufacturer.<br />
These warranties give you specific legal rights, and<br />
you may also have other rights that vary from state<br />
to state.<br />
What is not covered by these warranties:<br />
1. Conditions and damages resulting from any of the following:<br />
a. Improper installation, delivery, or maintenance.<br />
b. Any repair, modification, alteration, or adjustment not authorized by the<br />
manufacturer or an authorized servicer.<br />
c. Misuse, abuse, accidents, or unreasonable use.<br />
d. Incorrect electric current, voltage, or supply.<br />
e. Improper setting of any control.<br />
2. Warranties are void if the original serial numbers have been removed,<br />
altered, or cannot be readily determined.<br />
3. Products purchased for commercial or industrial use.<br />
4. The cost of service or service call to:<br />
a. Correct installation errors.<br />
b. Instruct the user on the proper use of the product.<br />
c. Transport the appliance to the servicer.<br />
5. Consequential or incidental damages sustained by any person as a result<br />
of any breach of these warranties. Some states do not allow the exclusion<br />
or limitation of consequential or incidental damages, so the above exclusion<br />
may not apply.<br />
To receive warranty service<br />
To locate an authorized service company in your area contact the Maytag dealer<br />
from whom your appliance was purchased or call Maytag <strong>Appliance</strong>s Sales<br />
Company, Maytag Customer Assistance at the number listed below. Should you<br />
not receive satisfactory warranty service, please call or write:<br />
Maytag <strong>Appliance</strong>s Sales Company<br />
Attn: CAIR ® Center<br />
P.O. Box 2370<br />
Cleveland, TN 37320–2370<br />
U.S. 1-800-688-9900<br />
CANADA 1-800-688-2002<br />
U.S. customers using TTY for deaf, hearing impaired or speech<br />
impaired, call 1-800-688-2080.<br />
NOTE: When writing or calling about a service problem, please include the<br />
following information:<br />
a. Your name, address and telephone number;<br />
b. Model number and serial number of your appliance ;<br />
c. Name and address of your dealer or servicer and the date the appliance<br />
was purchased;<br />
d. A clear description of the problem you are having;<br />
e. Water hardness, detergent brand and amount, water temperature and<br />
cycle used;<br />
f. Proof of purchase (sales receipt).<br />
User’s guides, service manuals and parts information are available from Maytag<br />
<strong>Appliance</strong>s Sales Company, Maytag Customer Assistance.<br />
11<br />
MAYTAG • 403 West Fourth Street North • P.O. Box 39 • Newton, Iowa 50208<br />
C-13 <strong>16021814</strong> Rev. 0 ©2002 Maytag <strong>Appliance</strong> Sales Company
Appendix D
DISHWASHER: MDB-4<br />
®<br />
Installer: Please leave this manual with<br />
this appliance.<br />
Consumer: Please read and keep this<br />
manual for future reference. Keep sales<br />
receipt and/or cancelled check as proof of<br />
purchase.<br />
Model Number<br />
Serial Number<br />
Date of Purchase<br />
In our continuing effort to improve<br />
the quality and performance<br />
of our appliances, it may<br />
be necessary to make changes<br />
to the appliance without revising<br />
this guide.<br />
If you have questions, call:<br />
1-800-688-9900 (USA)<br />
1-800-688-2002 (CANADA)<br />
1-800-688-2080 ( U.S. TTY for<br />
hearing or speech impaired)<br />
(Mon.-Fri., 8 am-8 pm Eastern Time)<br />
Internet: http://www.maytag.com<br />
For service information, see page 11.<br />
SAFETY INSTRUCTIONS<br />
LOADING<br />
DISHWASHING ESSENTIALS<br />
CONTROLS AT A GLANCE<br />
OPERATING TIPS<br />
SPECIAL CARE ITEMS<br />
CARE AND CLEANING<br />
GUIá DEL USUARIO<br />
Page 1<br />
Pages 2-4<br />
Page 5<br />
Page 6-7<br />
Page 7<br />
Page 8<br />
Page 8<br />
Pages 9-10<br />
Page 11<br />
Page 12<br />
Page 26<br />
Part No. 6 917455 B h t t p : / / w w w . m a y t a g . c o m 99002563 Litho U.S.A .<br />
©2002 Maytag <strong>Appliance</strong>s Sales Co.<br />
D-2 <strong>16021814</strong> Rev. 0 ©2002 Maytag <strong>Appliance</strong> Sales Company
Important Safety Instructions<br />
Recognize safety symbols, words, labels<br />
WHAT YOU NEED TO KNOW ABOUT SAFETY<br />
INSTRUCTIONS<br />
Warning and Important Safety Instructions appearing in this<br />
manual are not meant to cover all possible conditions and<br />
situations that may occur. Common sense, caution, and care<br />
must be exercised when installing, maintaining, or operating the<br />
dishwasher.<br />
Always contact your dealer, distributor, service agent, or<br />
manufacturer about problems or conditions you do not<br />
understand.<br />
WARNING<br />
WARNING - Hazards or unsafe practices which COULD result<br />
in severe personal injury or death.<br />
CAUTION<br />
CAUTION - Hazards or unsafe practices which COULD result in<br />
minor personal injury.<br />
1<br />
WARNING<br />
Check with the installer to make sure the appliance<br />
has been properly grounded to avoid possible<br />
electrical shock. Be sure you read the Important<br />
Personal Safety Instructions before you use this<br />
dishwasher.<br />
Products with a label have been listed with Underwriter’s<br />
Laboratories, Inc. – those with a CSA tag have been listed<br />
with Canadian Standards Association. Nevertheless, as with<br />
any other equipment using electricity and moving parts,<br />
there is a potential hazard.<br />
WARNING<br />
When using your dishwasher, follow basic<br />
precautions, including the following:<br />
1. Read all instructions before using the dishwasher.<br />
2. Use the dishwasher only for its intended function.<br />
3. Disconnect electrical power to dishwasher before<br />
attempting to service.<br />
4. To avoid electrical shock hazard, the sides and back<br />
must be enclosed and the front panels must be<br />
attached before electrical power is applied to the<br />
dishwasher. Refer to the installation instructions for<br />
proper grounding procedures.<br />
5. Connect to a properly rated, protected and sized<br />
power supply circuit to avoid electrical overload.<br />
6. Children should never be permitted to operate, or<br />
play in, with, or around this dishwasher.<br />
7. To reduce the risk of injury when loading items to be<br />
washed, sharp or pointed items should be located with<br />
the handles up. Also, load sharp items so they are not<br />
likely to damage the door seal.<br />
8. Do not touch the heating element on the bottom of the<br />
tub during or at the completion of a cycle. It will be hot.<br />
9. Use only detergents and rinse additives designed for a<br />
residential automatic dishwasher. Never use soap,<br />
laundry detergent, or hand washing detergent in your<br />
dishwasher. Keep these products out of reach of<br />
children.<br />
10. Do not sit, stand on or abuse the door or dish racks of<br />
the dishwasher.<br />
11. Under certain conditions, hydrogen gas may be<br />
produced in a hot water system that has not been used<br />
for two weeks or more. Hydrogen gas is explosive. If<br />
the hot water system has not been used for such a<br />
period, turn on all hot water faucets and let the water<br />
flow from each for several minutes. This will release any<br />
accumulated hydrogen gas. As the gas is flammable, do<br />
not smoke or use an open flame during this process.<br />
12. Do not wash plastic items unless marked “dishwasher<br />
safe” or the equivalent. For plastic items not so marked,<br />
check the manufacturer’s recommendations.<br />
13. Do not tamper with controls.<br />
14. To prevent accidental child entrapment and suffocation<br />
risks, always remove the door to the washing<br />
compartment when removing an old dishwasher from<br />
service or discarding it.<br />
15. Use caution when unloading the dishwasher. Dishes will<br />
be hot if unloaded shortly after a cycle has completed.<br />
16. Certified residential dishwashers are not intended for<br />
licensed food establishments.<br />
Save These Instructions for Future Reference<br />
©2002 Maytag <strong>Appliance</strong> Sales Company <strong>16021814</strong> Rev. 0 D-3
Loading<br />
Before you start<br />
➢ Don’t prerinse. Simply scrape off any<br />
bones or large food particles.<br />
➢ If connected to a food waste disposer,<br />
make certain the disposer is empty<br />
before starting the dishwasher.<br />
➢ Scrape off tomato-based food soils<br />
(see page 8).<br />
➢ Remove certain foods (such as<br />
mustard, mayonnaise, lemon juice,<br />
vinegar, salt or dressings) from<br />
stainless steel flatware as soon as<br />
possible. These foods may cause<br />
rusting and pitting if allowed to remain<br />
in contact with the surface for an<br />
extended period of time.<br />
Upper rack<br />
10 Place Settings<br />
Glasses, cups, stemware, light-weight<br />
plastics, plates, bowls, pans, long-handled<br />
utensils etc. can be loaded in this rack. Do<br />
not load glasses over the tines.<br />
The Stack-Rack (select models) on the right<br />
side of the upper rack folds up or down for<br />
loading flexibility. Fold it down to hold longhandled<br />
knives, spatulas and spoons or short<br />
items like cups or juice glasses. Fold it up for<br />
taller items like glasses, bowls, plates, etc.<br />
General recommendations<br />
➢<br />
➢<br />
Items can be centered behind a single<br />
tine or loaded at an angle to maximize<br />
space.<br />
Avoid blocking or preventing the spray<br />
arms from spinning freely. Do not<br />
allow items to extend beyond the<br />
racks.<br />
The Stack-Rack (select models) is<br />
designed to hold stemware in place. Taller<br />
stemware will fit better on the right side as<br />
the upper rack is deeper on this side.<br />
The folding tines (select models) located in<br />
the front right corner provide convenient<br />
loading space for large, bulky items like<br />
pots and pans or mixing bowls<br />
The cup clips (select models) located in<br />
the center of the upper rack can be used to<br />
hold light weight plastic items, cooking<br />
utensils, knives, etc. in place. Clip the item<br />
between the tine and the clip.<br />
Recommended loading<br />
(Rack features vary by model)<br />
For best dishwashing results follow these<br />
guidelines to determine the best arrangement<br />
for your items.<br />
The features on your dishwasher rack may<br />
vary from the drawings shown.<br />
❚<br />
NOTE<br />
Face soiled surfaces towards the<br />
center of the dishwasher.<br />
The Vari-Lock Snugge r (select models)<br />
on the left secures lightweight items in<br />
place. It can be adjusted by grasping the<br />
wavy wire and rotating it left to snug items<br />
against the outer rack or to the right to rest<br />
on top of light items. Do not load items on<br />
top of the wire.<br />
For best results with tall glasses, align the<br />
Vari-Lock Snugger (select models) wavy<br />
wire with the arrow on the rack clip. Rest the<br />
bottom of the glass against the wavy wire.<br />
2LOADING<br />
D-4 <strong>16021814</strong> Rev. 0 ©2002 Maytag <strong>Appliance</strong> Sales Company
1 saucer is<br />
loaded behind<br />
dinner plates.<br />
Loading (continued)<br />
Middle rack<br />
3<br />
10 Place Settings<br />
A variety of items such as cups, glasses,<br />
dinner plates, mixing bowls, pots and pans<br />
and baking dishes can be loaded in this rack.<br />
Lower flexload rack<br />
A variety of large items such as casserole<br />
dishes, baking pans, mixing bowls, and<br />
pots and pans can be loaded in the lower<br />
rack. When deeper dishes or pots and<br />
pans are located in this rack the middle<br />
rack can be raised. For good wash action,<br />
place items so soiled surfaces face down<br />
in the rack.<br />
Utensil baskets<br />
SPLIT & FIT UTENSIL BASKET<br />
For best cleaning results, prevent items<br />
from nesting together by placing a utensil<br />
in each slot. Load knives, handles up and<br />
spoons and forks handles down through<br />
the slots. The split silverware basket can<br />
be separated in the event both sections are<br />
not needed to hold silverware. Hold the<br />
basket firmly along the<br />
sides. Unlock<br />
baskets as<br />
shown here.<br />
Be sure that thin, finely<br />
pointed items do not<br />
extend through the basket.<br />
This could block the wash arm.<br />
When covers are not in use, place flatware<br />
in basket some handles up and some<br />
Positioning the Fold-Away Tines (select<br />
models) flat in front or back of the<br />
silverware basket provides convenient<br />
loading space for large, bulky items like<br />
casserole dishes, water pitchers, pots and<br />
pans or mixing bowls.<br />
10 Place Settings<br />
down to avoid nesting.<br />
Small, lightweight items<br />
like baby spoons and<br />
plastic measuring<br />
spoons should be<br />
placed in a section<br />
of the basket with<br />
cover closed.<br />
ODDS & ENDS BASKET (select<br />
models)<br />
Use this supplemental basket in the upper<br />
or middle rack for loading miscellaneous<br />
items and utensils. This is also a<br />
safe place to load sharp knives<br />
and pointed items.<br />
©2002 Maytag <strong>Appliance</strong> Sales Company <strong>16021814</strong> Rev. 0 D-5
UTILITY BASKET FOR LOWER<br />
RACK (select models)<br />
This basket is designed to load<br />
miscellaneous items like silverware,<br />
cooking utensils, knives and other larger<br />
utensils.<br />
LOADING<br />
Adjustable rack (select models)<br />
The Adjustable Upper Rack (select<br />
models) and Adjustable Middle Rack can<br />
be raised or lowered to accommodate taller<br />
plates, platters, pans, etc. in the upper,<br />
middle or lower racks. Full size dinner<br />
plates can be loaded in the upper rack if it<br />
is in the lower position.<br />
To lower the rack:<br />
➢ Pull the rack fully out.<br />
➢ Place hands on each adjuster.<br />
➢ Press down on the top blue button and<br />
push down (the button will slide<br />
towards the center of the rack).<br />
➢ The rack will come to a stop when it is<br />
in position.<br />
To raise the rack:<br />
➢ Pull the rack fully out.<br />
➢ Place hands on each adjuster.<br />
➢ Lift up both sides until rack comes to a<br />
stop.<br />
❚<br />
❚<br />
NOTE<br />
The dishwasher will not operate<br />
correctly if the upper rack wash<br />
arm connection is not aligned with<br />
one of the water inlet holes on<br />
back wall.<br />
The left and right side adjusters<br />
must both be in the upward or<br />
downward position for proper<br />
connection.<br />
Removing the upper and<br />
middle racks<br />
The racks can be removed when tall or<br />
oversized items need to be loaded into the<br />
middle or lower rack. Unload the rack prior<br />
to removing.<br />
TO REMOVE:<br />
➢ Roll the rack 1/3 to 1/2 of the way out.<br />
➢ Remove the plastic rack stop from the<br />
end of each track. To remove each<br />
plastic rack stop, push inward<br />
(towards the rack) on the ridged area<br />
of the rack stop. The rack stop will<br />
snap open and can be easily removed<br />
by pulling straight out. Take care to<br />
support the track while removing rack<br />
stops.<br />
➢ Roll the rack all the way out of the track<br />
and remove from the dishwasher.<br />
➢ Reverse the above procedure to<br />
replace the rack into the dishwasher.<br />
Rack Stop<br />
4<br />
D-6 <strong>16021814</strong> Rev. 0 ©2002 Maytag <strong>Appliance</strong> Sales Company
Dishwashing essentials<br />
Hot water<br />
For optimal cleaning and drying<br />
results, hot water is necessary. The<br />
incoming water temperature should be<br />
120–140° F (49-60° C) to properly<br />
activate the detergent and melt greasy<br />
food soils.<br />
Detergent<br />
Use a detergent designed specifically for<br />
use in an automatic dishwasher. Be sure it<br />
is fresh and stored in a cool, dry place (not<br />
under the sink).<br />
RECOMMENDED AMOUNT<br />
Too little detergent results in poor cleaning,<br />
hard water filming/spotting and poor<br />
drying. Too much detergent can cause<br />
permanent etching/cloudiness.<br />
To check the incoming water temperature,<br />
turn on the hot water faucet nearest the<br />
dishwasher and let it run into a glass in the<br />
sink. Place a candy thermometer in the<br />
glass and check the temperature once it<br />
has stopped rising. If the temperature is<br />
below 120° F (49° C), have a qualified<br />
person raise the water heater thermostat<br />
setting.<br />
The amount of detergent to use is<br />
determined by the hardness of the water<br />
and soil level of the load. Refer to the<br />
following chart for detergent usage<br />
recommendations.<br />
Do not use detergent with the Rinse Only<br />
cycle. Leave the detergent lid open when<br />
running Rinse Only .<br />
In extremely hard water conditions (13<br />
grains per gallon or more*), it is difficult to<br />
achieve good results with any dishwasher.<br />
A mechanical water softener may be<br />
Before starting the dishwasher, turn on the<br />
hot water faucet and let it run until the<br />
water is hot. This assures that the initial fill<br />
of water is hot.<br />
necessary to improve water quality,<br />
detergent effectiveness, and protect the<br />
dishwasher parts from the damage that<br />
hard water can cause.<br />
Water Hardness* Soil Level Detergent Amount**<br />
Soft (0-4 gpg) Light Soil 5 teaspoons<br />
Normal Soil<br />
6 teaspoons<br />
Heavy Soil<br />
8 teaspoons<br />
Medium (5-9 gpg) Light Soil 7 teaspoons<br />
Normal Soil<br />
8 teaspoons<br />
Heavy Soil<br />
10 teaspoons<br />
Hard (10-12 gpg) Light Soil 9 teaspoons<br />
Normal Soil<br />
10 teaspoons<br />
Heavy Soil<br />
12 teaspoons<br />
*Your local water utility or state<br />
university extension service can tell you<br />
the degree of water hardness in your<br />
area.<br />
** Add recommended amount of<br />
detergent to either side of the Main<br />
Wash compartment.<br />
5<br />
Rinse aid<br />
Regular use of a rinse aid improves<br />
drying, reduces spotting and filming,<br />
and reduces moisture left on the<br />
dishwasher interior.<br />
An automatic rinse aid dispenser is<br />
located next to the detergent cup. The<br />
window next to the dispenser cap<br />
indicates when the rinse aid reservoir<br />
needs to be refilled. When the level of<br />
rinse aid is below the indicator marks and<br />
the window is nearly clear, it is time to refill<br />
the dispenser. Check the dispenser<br />
monthly.<br />
To add rinse aid to the dispenser, turn the<br />
cap counterclockwise to open. Remove<br />
the cap and pour liquid rinse aid into the<br />
opening. The amount of rinse aid<br />
dispensed during the cycle is adjustable by<br />
moving the lever inside the reservoir area.<br />
For most water conditions use<br />
manufacturer recommended setting of “2”.<br />
Adjust it up to the “MAX” setting for hard<br />
water. Set the lever anywhere between<br />
these amounts as needed to get the best<br />
results. Replace the cap and turn it<br />
clockwise to close.<br />
©2002 Maytag <strong>Appliance</strong> Sales Company <strong>16021814</strong> Rev. 0 D-7
Controls at a glance<br />
Cycles and water usage<br />
NORMAL WASH<br />
Medium cycle for average food soils. The<br />
soil sensor is active with this cycle.<br />
Depending on the number of fills, water<br />
usage ranges from 4 to 8 gallons.<br />
HEAVY WASH<br />
Long cycle for heavy food soils. 10 gallons.<br />
LIGHT WASH<br />
Short cycle for light food soils. Water<br />
usage is 6 gallons.<br />
Options<br />
TOUGH SCRUB OR TOUGH<br />
SCRUB PLUS (select models)<br />
Select this option when washing loads with<br />
hard-to-remove food soils. Tough Scrub <br />
or Tough Scrub Plus can be selected with<br />
any cycle (except Rinse Only and Quick<br />
Wash). Depending on which cycle is being<br />
used, this option adds fills, heat and/or wash<br />
time to the wash cycle.<br />
For baked-on, dried-on soils, select Heavy<br />
Wash along with the Tough Scrub or<br />
Tough Scrub Plus option.<br />
SANITIZE<br />
Select Sanitize with Auto Clean , Heavy,<br />
Normal , or Light Wash to sanitize<br />
dishware. At the end of the cycle, when<br />
the cycle monitor recognizes that the<br />
Display (select models)<br />
The display will show the approximate<br />
cycle time. “2H” will appear in the display<br />
representing any cycle time greater than<br />
99 minutes.<br />
Indicator lights<br />
The CLEAN light illuminates at the end of<br />
the cycle and remains lit until the door has<br />
been open for 30 seconds continuously.<br />
The DRYING (select models) light<br />
illuminates during the entire dry period and<br />
goes out when the cycle is completed.<br />
QUICK WASH (select models)<br />
Quick cycle for light food soils. The cycle<br />
ends with a rinse and does not include<br />
drying. 4 gallons.<br />
AUTO CLEAN<br />
Normal dishloads vary from day to day.<br />
Auto Clean is designed to select the<br />
number of water fills best suited for the soil<br />
level of each load. Depending on the<br />
number of fills required water usage<br />
ranges from 4 to 10 gallons.<br />
proper conditions have been met, the<br />
SANITIZED light illuminates.<br />
Sanitization may not be achieved if there is<br />
an interruption of the cycle, power failure<br />
or if the incoming water temperature is<br />
below 120° F (49° C).<br />
EXTRA RINSE (select models)<br />
Select Extra Rinse to add an additional<br />
rinse to the cycle. An extra rinse helps to<br />
improve results in hard water situations.<br />
160° WASH (select models)<br />
Raises temperature in the final rinse to<br />
160° F. This option can be used with any<br />
cycle except Quick Wash and Rinse Only .<br />
HEATED DRY<br />
Select Heated Dry to turn on the heating<br />
element during dry for enhanced drying<br />
The WASHING (select models) light<br />
illuminates during all rinse and wash<br />
portions of the cycle.<br />
The HEATING DELAY (select models)<br />
light illuminates when the cycle is being<br />
extended to heat the water.<br />
The CLEAN and SANITIZED (select<br />
models) indicator lights will not reilluminate<br />
after a power failure until after<br />
the next cycle is run.<br />
The SANITIZED (select models) light<br />
illuminates at the end of the cycle when<br />
conditions have been met to achieve<br />
sanitization. The light will remain lit until<br />
the door has been open for 30 seconds<br />
continuously.<br />
RINSE ONLY<br />
Rinses dishes being held until there is a<br />
full load. Controls odors. 2 gallons.<br />
results. When Heated Dry is not selected,<br />
towel drying of some items such as plastic<br />
and teflon may be necessary and more<br />
moisture may be noticed adhering to the<br />
dishwasher interior. With either dry option,<br />
it is normal to notice vapor escaping from<br />
the door vent.<br />
START/CANCEL<br />
To start a cycle, close the door and press the<br />
START/Cancel pad once. To cancel when a<br />
cycle is running, press the START/Cancel<br />
pad once. The dishwasher will drain, then<br />
shut off. To turn the dishwasher off without<br />
draining, press the START/Cancel pad twice.<br />
The dishwasher remembers your last cycle<br />
so you do not have to reset the cycle each<br />
time. To start the dishwasher using the same<br />
cycle and options selected on the previous<br />
wash, just press the START/Cancel pad.<br />
NOTE<br />
❚ When Sanitize is selected,<br />
cycles are monitored to assure<br />
sanitization. Unusually low water<br />
temperature will prevent<br />
sanitization from being satisfied<br />
and the SANITIZED light will not<br />
illuminate at the end of the cycle.<br />
❚<br />
NOTE<br />
❚ Cycle times shown in the<br />
numerical display (select models)<br />
increase or decrease, based on<br />
each load’s soil level, water<br />
temperature and selected options.<br />
❚ Using the Extra Rinse option will<br />
increase water consumption by<br />
2 gallons.<br />
Only these certified cycles have<br />
been designed to meet NSF<br />
requirements: Auto Clean Cycle,<br />
Heavy Cycle, Normal Cycle and<br />
Light Cycle.<br />
6CONTROLS AT A GLANCE<br />
D-8 <strong>16021814</strong> Rev. 0 ©2002 Maytag <strong>Appliance</strong> Sales Company
Controls at a glance (continued)<br />
Delay<br />
The Delay option can be used to<br />
automatically start the cycle at a later time<br />
to reduce daytime heat buildup in the<br />
home or to take advantage of reduced<br />
energy costs if available in your area.<br />
TO SET UP A DELAY:<br />
1. Select the appropriate cycle and<br />
options for the load. Close the door.<br />
2. Press the Delay pad until the desired<br />
amount of delay time is selected.<br />
3. The Delay indicator and the count down<br />
display (select models) will flash until<br />
the START/Cancel pad is pressed.<br />
Control lock option<br />
(select models)<br />
The control touchpads can be locked to<br />
prevent unwanted use. If this feature is<br />
activated between cycles, the dishwasher<br />
cannot be operated until the controls are<br />
unlocked. If desired, the controls can be<br />
locked after a cycle or delay has started.<br />
4. As soon as the START/Cancel pad is<br />
pressed, the flashing will stop and the<br />
delay time will begin counting down.<br />
The Delay indicator will remain lit until<br />
the delay time has counted down.<br />
5. The cycle will automatically start as<br />
soon as the delay time expires.<br />
❚<br />
NOTE<br />
If 30 seconds elapse between<br />
setting the cycle and options and<br />
pressing the START/Cancel pad,<br />
the dishwasher will turn off.<br />
SETTING THE CONTROL LOCK:<br />
1. Press the Heated Dry pad for three<br />
seconds.<br />
2. An indicator light next to the lock<br />
graphic will illuminate when the<br />
controls are locked.<br />
TO CANCEL:<br />
1. Press the Heated Dry pad for three<br />
seconds.<br />
2. The indicator light will go off.<br />
TO CANCEL A DELAY:<br />
When the delay is counting down, press<br />
the Delay pad again. The indicator light<br />
will go out and the cycle will start or<br />
resume immediately.<br />
TO CANCEL A DELAY AND CYCLE:<br />
➢ Press START/Cancel once to drain<br />
and turn off the dishwasher.<br />
Or<br />
➢ Press START/Cancel twice to turn<br />
dishwasher off without draining.<br />
❚<br />
❚<br />
NOTE<br />
If a cycle or option pad is pressed<br />
after the controls have been<br />
locked, the indicator light next to<br />
the lock graphic will flash five<br />
times. On selected models with a<br />
countdown display, the display<br />
will flash an “L” simultaneously<br />
with the lock indicator.<br />
This option does not lock the door,<br />
only the dishwasher controls.<br />
7<br />
Operating Tips<br />
Starting the dishwasher<br />
1. After loading the dishwasher and adding<br />
detergent, select the desired cycle and<br />
options by pressing the pads. The<br />
indicator lights for the selected cycle<br />
and options will illuminate. To cancel<br />
an option press the pad again.<br />
2. Close the door until it latches then<br />
press the START/Cancel pad. After a<br />
pause, the fill will begin. The display<br />
countdown (select models) will flash<br />
until START/Cancel is pressed.<br />
3. To cancel a running cycle, press the<br />
START/Cancel pad.<br />
4. To prevent unplanned cycle or option<br />
changes, these selections are “locked<br />
in” after 1 minute.<br />
❚<br />
❚<br />
NOTE<br />
If a cycle pad is pressed after the<br />
controls have been “locked in”,<br />
the light above the current cycle<br />
will flash three times.<br />
If START/Cancel is not pressed<br />
within 30 seconds, the dishwasher<br />
will turn off.<br />
Adding a forgotten item<br />
For best cleaning, the forgotten item<br />
should be added early in the cycle.<br />
1. Grasp door handle and unlatch door<br />
without opening completely. All lights<br />
will flash to indicate that the cycle is<br />
suspended.<br />
2. Wait for the water circulation to stop.<br />
3. Open the door and add the item.<br />
4. Close and latch the door. Lights will stop<br />
flashing when the door is properly shut.<br />
5. After a slight delay, the cycle resumes<br />
automatically at the point of interruption.<br />
❚<br />
❚<br />
NOTE<br />
If the door is opened during a<br />
running cycle, there may be up to<br />
a 30 second delay before the unit<br />
restarts after closing the door.<br />
Extended interruption of the wash<br />
cycle is not recommended.<br />
©2002 Maytag <strong>Appliance</strong> Sales Company <strong>16021814</strong> Rev. 0 D-9
Special care items<br />
Most tableware, cookware and flatware can safely be washed in your dishwasher. Check with the manufacturer.<br />
Material Dishwasher Safe? Special Informatiion<br />
Aluminum<br />
Cast Iron<br />
China/Stoneware<br />
Crystal<br />
Filters<br />
Glass<br />
Gold-Plated Flatware<br />
Pewter, Tin<br />
Plastics<br />
Stainless Steel<br />
Sterling Silver or<br />
Silverplate<br />
Wooden Items<br />
Interior<br />
Yes, except anodized.<br />
No<br />
No, if antique or hand-painted.<br />
No, if antique or delicate<br />
crystal.<br />
Not recommended.<br />
Yes<br />
No<br />
No<br />
Yes, top rack.<br />
Yes<br />
No, if has commercial<br />
“darkening”.<br />
No<br />
Care and cleaning<br />
The dishwasher interior is normally self-cleaning.<br />
Periodically check the bottom of the dishwasher<br />
tub to see if any large particles have not gone<br />
through the strainer portion of the module.<br />
Wipe the edge of the inner door liner to remove<br />
any food soil splashes which occurred during<br />
loading.<br />
The color from some tomato-based food soils<br />
may occasionally adhere to various components<br />
of the dishwasher interior, causing temporary<br />
discoloration. To minimize this:<br />
➢ Remove excess tomato-based food soils off<br />
of dishes, prior to loading.<br />
➢ Run the Heavy Wash cycle when washing<br />
loads containing tomato-based food soils.<br />
➢ Change dishwasher detergent and be<br />
sure to use a dishwasher detergent that<br />
contains chlorine to better fight staining.<br />
Exterior<br />
High water temperature and detergents may affect finish.<br />
Seasoning will be removed, and iron will rust.<br />
Always check manufacturer’s recommendation before washing. Antique, hand-painted or overthe-glaze<br />
patterns may fade. Gold leaf may discolor.<br />
Always check manufacturer’s recommendation before washing. Some types of leaded crystal<br />
may etch with repeated washings.<br />
May leave a dingy deposit or stain on dishwasher interior.<br />
Milkglass can yellow with repeated dishwasher washing.<br />
Will discolor.<br />
Always check manufacturer’s recommendation before washing. Plastics vary in their capacity<br />
to withstand high water temperatures and detergents. Disposable plastic items are not<br />
dishwasher safe for this reason.<br />
Run a Rinse Only cycle if not washing immediately. Prolonged contact with foods containing<br />
salt, vinegar, milk products or juice could damage finish.<br />
Always check manufacturer’s recommendation before washing. Run a Rinse Only cycle if not<br />
washing immediately. Prolonged contact with food containing salt, acid or sulfide (eggs,<br />
mayonnaise and seafood) could damage finish. Commercial “darkening” may be removed by<br />
detergent.<br />
Wood may warp, crack or discolor.<br />
The front of the dishwasher can be cleaned<br />
with a soft damp cloth and liquid spray cleaner.<br />
Do not use abrasive powders or cleaning pads.<br />
Stainless Steel Care and Cleaning (select<br />
models)<br />
Do not use a cleaning product containing<br />
chlorine bleach. Always wipe with the grain<br />
of the stainless steel. For daily cleaning and<br />
light soil , use a soft cloth or sponge and one of<br />
the following: mild detergent and water, a<br />
solution of white vinegar and water, Formula<br />
409 Glass and Surface Cleaner* or a similar<br />
multi-surface cleaner. Rinse and dry. To<br />
polish and to help prevent fingerprints, follow<br />
with Stainless Steel Magic Spray* (part No.<br />
20000008)**.<br />
For moderate to heavy soil , clean with Bon<br />
Ami*, using a soft cloth or damp sponge. Rinse<br />
and dry. To restore luster and to remove streaks,<br />
follow with Stainless Steel Magic Spray*.<br />
For discoloration , wipe with Cameo<br />
Stainless Steel Cleaner*, using a damp<br />
sponge or soft cloth. Rinse immediately and<br />
dry. To restore luster and to remove streaks,<br />
follow with Stainless Steel Magic Spray*.<br />
Storage/moving<br />
Fill detergent cup with a fresh-scented<br />
dishwasher detergent or baking soda and<br />
select the Normal Wash cycle. Allow the<br />
dishwasher to complete the cycle. Then turn<br />
the water supply off and drain the dishwasher.<br />
To drain, press the START/Cancel pad once.<br />
Operate the drain twice to ensure most of the<br />
water is removed. Last, disconnect the<br />
electrical supply and prop open the door.<br />
When turning the water supply to the home off,<br />
the water shut off at the dishwasher must be<br />
turned off also.<br />
*Brand names are the trademarks of the respective manufacturer.<br />
CARE ITEMS<br />
** Call 1-800-688-8408 to order.<br />
8SPECIAL<br />
D-10 <strong>16021814</strong> Rev. 0 ©2002 Maytag <strong>Appliance</strong> Sales Company
Before you call<br />
CHECK THESE POINTS TO HELP SAVE YOU TIME AND MONEY.<br />
Dishwasher Will Not Fill:<br />
• Press the START/Cancel pad to start the dishwasher.<br />
• Be sure door is latched securely.<br />
• Be sure the water is turned on.<br />
• Check that the pad is properly selected for a cycle.<br />
• Allow time to pause before filling.<br />
• Check your home‘s circuit breaker or fuse box.<br />
• Check inlet hose for a kink.<br />
• Check water valve inlet for sediment and clean if necessary.<br />
Dishwasher Will Not Drain/Water In Tub Bottom:<br />
• If hooked up to a food waste disposer, be sure the knock-out is removed from the disposer inlet.<br />
• Check for food obstruction in the drain or disposer.<br />
• Check drain hose for a kink.<br />
• Check your home‘s circuit breaker or fuse box.<br />
• Check that the cycle is completed.<br />
Dishwasher Adds Water at END of Cycle:<br />
• This is normal. The sensor (select models) in the pump must stay submerged so a short fill of water is added after the cycle’s last drain.<br />
Detergent Cup Is Not Empty:<br />
• Check that the cycle is completed.<br />
• Be sure dispenser is not blocked.<br />
• Use fresh detergent stored in a cool, dry place.<br />
Dishwasher Seems Noisy:<br />
• A water valve hiss during fill is normal.<br />
• Water circulation sounds are normal.<br />
• A thumping sound may be a wash arm bumping an item that is extending beyond the racks.<br />
• Chopping or grinding sounds may be heard as the internal food disposer chops hard items like fruit seeds, nuts, etc.<br />
• Humming during the drain is normal.<br />
• A snap noise is the detergent cup lid hitting the door liner when the dishwasher door is opened at the end of the cycle. This is normal.<br />
• Proper installation affects the noise level.<br />
Cycle Takes Too Long (Heating Delay Light Stays On [select models]):<br />
• Tough Scrub or Tough Scrub Plus (select models) or Sanitize has been selected and the cycle is extended to heat water.<br />
• Check to see that the incoming water temperature is 120-140° F (49-60° C).<br />
Dishwasher has an Odor:<br />
• Run dishes being held in the dishwasher through a Rinse Only cycle.<br />
• Many dishwashers have a “new” smell when first installed. This will dissipate with use.<br />
• Dishwasher may not be draining properly. (See “Dishwasher Will Not Drain” section.)<br />
• For a strong odor, place baking soda in both sides of the detergent cup. Select Light Wash and allow the water to circulate for about 10<br />
minutes. Interrupt the cycle by unlatching the door and let it stand overnight. Restart the dishwasher by latching the door and allow it to<br />
complete the cycle. Another alternative is to use a dishwasher cleaning product such as Jet-Dry Dishwasher Cleaner*.<br />
Dishwasher Leaks:<br />
• Check that the dishwasher is level. (Refer to the Installation Instructions.)<br />
• Suds can cause the dishwasher to overflow. Measure the detergent carefully and use only detergents designed for use in a dishwasher. Less<br />
detergent is needed in soft water. Try another brand if sudsing continues.<br />
• Follow directions closely on how to add a forgotten item (pg. 7).<br />
• To avoid rinse aid leaking from the dispenser, be sure the lid is securely attached.<br />
Display Time Suddenly Drops or Increases by Several Minutes (select models):<br />
• This is normal when the Auto Clean or Normal cycle (select models) is selected and the dishwasher decides to skip or add a drain and refill.<br />
Indicator Lights Flashing:<br />
• The countdown display (select models) flashes after a cycle is selected until the START/Cancel pad is pressed.<br />
• The countdown display (select models) and the delay indicator flash after a delay is selected until the START/Cancel pad is pressed.<br />
• All active display indicators flash if the door is opened during a running cycle or delay.<br />
• The currently selected cycle flashes if the consumer attempts to change the cycle after cycle “lock-in”.<br />
• The lock indicator flashes and the countdown display (selected models) flashes an “L” if a pad is pressed while the control lock is enabled.<br />
©2002 Maytag <strong>Appliance</strong> Sales Company <strong>16021814</strong> Rev. 0 D-11
Glasses Are Cloudy/Spotted:<br />
• Select Extra Rinse (select models).<br />
• Check water temperature. Incoming water should be 120° -140° F (49-60° C).<br />
• Always use a rinse aid.<br />
• Confirm that the cloudiness is removable by soaking the item in white vinegar for approximately 5 minutes. If removed, the problem is due<br />
to hard water. Adjust detergent amount being used to match water hardness (pg. 5). Be sure detergent is fresh, stored properly and is a<br />
high quality brand.<br />
• If cloudiness is not removable, it is etching . This is an erosion of the surface of the glassware and can be caused by water that is too hot,<br />
from using too much detergent or by prewashing. Detergent needs food soil to act upon. If etching has occurred, the glassware is<br />
permanently damaged. To prevent further etching, adjust the detergent amount to match the water hardness, stop prewashing, and be sure<br />
incoming water temperature is not greater than 140° F (60° C). Use water heating options only when incoming water temperature is below<br />
120° F (49° C).<br />
Food Soil Remains on Dishes:<br />
• Check water temperature (pg 5).<br />
• Run hot water at the sink before starting the dishwasher.<br />
• Select Tough Scrub or Tough Scrub Plus (select models).<br />
• Check water hardness and adjust detergent amount accordingly (pg. 5).<br />
• Use fresh detergent stored in a cool dry place.<br />
• Select proper cycle for the soil level.<br />
• Make sure the upper and middle rack wash arm connector is correctly aligned in one of the water inlet holes (pg. 4).<br />
• Load items so they do not block the wash arms (pg. 2-4).<br />
• Load the utensil basket with knife handles up and spoon and fork handles down through the slots in the covers.<br />
• Do not place glasses over tines.<br />
• Prior to loading, scrape off burnt on foods and wipe the starchy film from utensils used with pasta, rice and oatmeal. These soils require<br />
more energy than the rest of the load to clean.<br />
Items Washed In The Dishwasher Or The Dishwasher Tub Itself Are Stained/Discolored:<br />
• Aluminum utensils or pans can leave marks when they rub against other items. Leave a slight space between items.<br />
• Iron deposits in the water can leave a yellow, brown or orange film on dishes or the dishwasher tub. A filter may be needed, check with a<br />
water treatment company.<br />
• Separate silver or silver-plated silverware from stainless steel. These metals can be damaged by contact with each other during washing.<br />
• Color from tomato sauces may adhere to the tub (pg. 8). If light staining has occurred, leave the door open to oxidize the stain away. For<br />
removal of heavier stains, try Cascade Plastic Booster Plastic Cleaning Additive*. Change dishwasher detergent and be sure to use a<br />
dishwasher detergent that contains chlorine to better fight staining.<br />
Items Not Properly Dried/Moisture Is Present On The Dishwasher Interior After The Dry Cycle:<br />
• Be sure Heated Dry is selected.<br />
• Water droplets may form on the inner door as part of the drying process.<br />
• Use a rinse aid like Jet Dry* or Cascade Rinse Aid* regularly, to improve drying. Turn the rinse aid selector towards the MAX setting.<br />
• Check water temperature (pg. 5).<br />
• Select Sanitize.<br />
• Increase detergent amount to match water hardness (pg. 5).<br />
• Load properly. (pg. 2-4)<br />
• Plastic and teflon items are difficult to dry because they have a porous surface which tends to collect water droplets. Towel drying may be<br />
necessary.<br />
• Glasses and cups with concave bottoms hold water and require towel drying. Locate these items on the more slanted side of the rack for<br />
improved results.<br />
Dishware is Chipped :<br />
• Load dishes according to instructions so they do not strike each other (pg. 2-4).<br />
• Washing fine antique china/crystal in the dishwasher is not recommended.<br />
• Do not load glasses over the tines.<br />
• Do not overload.<br />
Sanitized Light Does Not Illuminate at the End of the Cycle (select models) :<br />
• Sanitize was not selected.<br />
• Sanitization can only be achieved with the Auto Clean (select models), Heavy, Normal or Light wash cycles.<br />
• Sanitization may not be achieved if there is an interruption of the cycle, power failure or if incoming water temperature is below 120° F (49° C).<br />
Dishwasher Door Will Not Close :<br />
• Be sure adjustable racks (select models) are properly adjusted to upper or lower position (pg. 4).<br />
BEFORE YOU CALL<br />
*Brand names are the trademarks of the respective manufacturer.<br />
** Call 1-800-688-8408 to order.<br />
10<br />
D-12 <strong>16021814</strong> Rev. 0 ©2002 Maytag <strong>Appliance</strong> Sales Company
Dishwasher warranty<br />
Full One Year Warranty<br />
For ONE (1) year from the date of original retail<br />
purchase, any part which fails in normal home use<br />
will be repaired or replaced free of charge.<br />
Limited Second Year Warranty<br />
After the first year from the date of original retail<br />
purchase, through the second year, parts which fail in<br />
normal home use will be repaired or replaced free of<br />
charge for the part itself, with the owner paying all other<br />
costs, including labor, mileage and transportation.<br />
Limited Third Through Fifth Year Warranty<br />
After the second year from the date of original retail<br />
purchase, through the fifth year, all of the following<br />
components which fail in normal home use will be<br />
repaired or replaced free of charge for the part itself,<br />
with the owner paying all other costs, including labor,<br />
mileage and transportation. These components<br />
include:<br />
Any parts of the Jetclean II ® wash system for all<br />
models, including the complete power module<br />
assembly, soil sensor, spray arms, wash manifold,<br />
and motor.<br />
Any microprocessor and touch pad assemblies.<br />
All models against rust, including exterior cabinet<br />
and front panels of convertible models, the exterior<br />
front panels and accessory side panels of built-in<br />
models, and premium DuraGuard ® coated racks<br />
(available on select models).<br />
Full Twenty-Year Warranty<br />
From the date of original purchase through the<br />
twentieth year, should the tub develop a water leak<br />
in normal home use, the dishwasher itself will be<br />
replaced FREE OF CHARGE.<br />
From the date of original purchase through the<br />
twentieth year, should the door liner develop a water<br />
leak in normal home use, repair or replacement of<br />
the door liner will be made FREE OF CHARGE.<br />
PLEASE NOTE: These full warranties apply only<br />
when the dishwasher is located in the United States<br />
or Canada. Dishwashers located elsewhere are<br />
covered by the limited warranties only, including a<br />
limited warranty for parts which fail during the first<br />
year.<br />
Canadian Residents<br />
These warranties cover only those dishwashers<br />
installed in Canada that have been listed with<br />
Canadian Standards Association unless the<br />
dishwashers are brought into Canada due to transfer<br />
of residence from the United States to Canada.<br />
The specific warranties expressed above are the<br />
ONLY warranties provided by the manufacturer.<br />
These warranties give you specific legal rights, and<br />
you may also have other rights that vary from state<br />
to state.<br />
What is not covered by these warranties:<br />
1. Conditions and damages resulting from any of the following:<br />
a. Improper installation, delivery, or maintenance.<br />
b. Any repair, modification, alteration, or adjustment not authorized by the<br />
manufacturer or an authorized servicer.<br />
c. Misuse, abuse, accidents, or unreasonable use.<br />
d. Incorrect electric current, voltage, or supply.<br />
e. Improper setting of any control.<br />
2. Warranties are void if the original serial numbers have been removed,<br />
altered, or cannot be readily determined.<br />
3. Products purchased for commercial or industrial use.<br />
4. The cost of service or service call to:<br />
a. Correct installation errors.<br />
b. Instruct the user on the proper use of the product.<br />
c. Transport the appliance to the servicer.<br />
5. Consequential or incidental damages sustained by any person as a result<br />
of any breach of these warranties. Some states do not allow the exclusion<br />
or limitation of consequential or incidental damages, so the above exclusion<br />
may not apply.<br />
To receive warranty service<br />
To locate an authorized service company in your area contact the Maytag dealer<br />
from whom your appliance was purchased or call Maytag <strong>Appliance</strong>s Sales<br />
Company, Maytag Customer Assistance at the number listed below. Should you<br />
not receive satisfactory warranty service, please call or write:<br />
Maytag <strong>Appliance</strong>s Sales Company<br />
Attn: CAIR ® Center<br />
P.O. Box 2370<br />
Cleveland, TN 37320–2370<br />
U.S. 1-800-688-9900<br />
CANADA 1-800-688-2002<br />
U.S. customers using TTY for deaf, hearing impaired or speech<br />
impaired, call 1-800-688-2080.<br />
NOTE: When writing or calling about a service problem, please include the<br />
following information:<br />
a. Your name, address and telephone number;<br />
b. Model number and serial number of your appliance ;<br />
c. Name and address of your dealer or servicer and the date the appliance<br />
was purchased;<br />
d. A clear description of the problem you are having;<br />
e. Water hardness, detergent brand and amount, water temperature and<br />
cycle used;<br />
f. Proof of purchase (sales receipt).<br />
User’s guides, service manuals and parts information are available from Maytag<br />
<strong>Appliance</strong>s Sales Company, Maytag Customer Assistance.<br />
11<br />
MAYTAG • 403 West Fourth Street North • P.O. Box 39 • Newton, Iowa 50208<br />
©2002 Maytag <strong>Appliance</strong> Sales Company <strong>16021814</strong> Rev. 0 D-13


