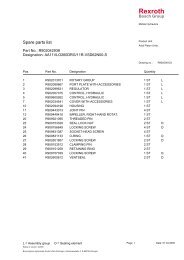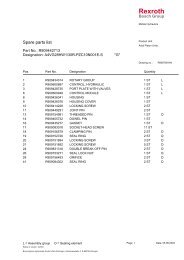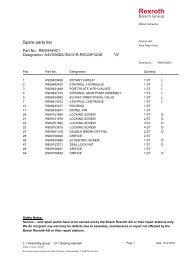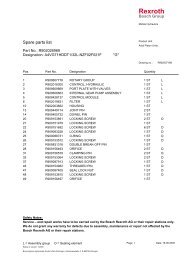
LT3-00032-2-A - DDKS Industries, hydraulic components distributor
LT3-00032-2-A - DDKS Industries, hydraulic components distributor
LT3-00032-2-A - DDKS Industries, hydraulic components distributor

You also want an ePaper? Increase the reach of your titles
YUMPU automatically turns print PDFs into web optimized ePapers that Google loves.
INSTALLATION<br />
FILLING CASE<br />
It is essential to make certain that the case (pump housing) is as full of fluid as possible<br />
and remains full during operation and at rest.<br />
Always fill to the highest available point. Remove a plug or screw and allow the oil to<br />
escape through this point.<br />
Recommended fill points:<br />
Mounting orientation vertical, shaft up. D1 or D2 (drain) port in housing.<br />
Vent DG2 port in mounting flange (new units) or<br />
one of the upper screws which attach the control.<br />
See installation drawing.<br />
Vertical, shaft down 1) or horizontal<br />
drain ports to the side.<br />
D1 or D2 (drain) port in housing.<br />
1) Vent DG (case gage) port in port block.<br />
SERVICE INFORMATION<br />
MAINTENANCE<br />
START UP PROCEDURES FOR<br />
NEW INSTALLATIONS<br />
These <strong>hydraulic</strong> products are designed to give long dependable service when properly<br />
applied and their systems properly maintained. These general instructions apply to typical<br />
systems. Specific instructions for particular equipment can be developed from<br />
them.<br />
This pump is self-lubricating and preventative maintenance is limited to keeping system<br />
fluid clean by changing filters frequently. Keep all fittings and screws tight. Do not<br />
operate at pressures and speeds in excess of the recommended limit. If the pump<br />
does not operate properly, check the troubleshooting chart before attempting to overhaul<br />
the unit. Overhauling may be accomplished by referring to the disassembly,<br />
rework limits of wear parts, and assembly procedures.<br />
•Read and understand the instruction manual. Identify <strong>components</strong> and their function.<br />
•Visually inspect <strong>components</strong> and lines for possible damage.<br />
•Check reservoir for cleanliness and drain and clean as required.<br />
•Check fluid level and fill as required with filtered fluid at least as clean as that recom<br />
mended. Fill pump case with clean oil prior to starting.<br />
•Check alignment of drive.<br />
•Check oil cooler and activate it, if included in circuit.<br />
•Reduce pressure settings of relief valve or compensator. Make sure accurate pressure<br />
readings can be made at appropriate places.<br />
•If solenoids are included in system, check for actuation.<br />
•Start pump drive first by jogging prime mover. Make sure pump and motor fill properly.<br />
Caution: Ensure that the servo/replenish pump primes at startup. This is important on a<br />
newly installed application or one that allows the servo/replenish pump to lose its<br />
prime during shutdown. Failure to adequately prime can damage the main pump or the<br />
servo/replenish pump.<br />
•Bleed system of air. Re-check fluid level.<br />
•Cycle unloaded machine at low pressure and observe actuation (at low speed, if<br />
possible).<br />
•Increase pressure settings gradually in steps. Check for leaks in all lines, especially<br />
pump and motor inlet lines.<br />
•Make correct pressure adjustments.<br />
•Gradually increase speed. Be alert for trouble as indicated by changes in sounds, system<br />
shocks and air in fluid.<br />
•Equipment is operational.<br />
7