TraumaCad Admin Guide - Voyant Health
TraumaCad Admin Guide - Voyant Health
TraumaCad Admin Guide - Voyant Health

You also want an ePaper? Increase the reach of your titles
YUMPU automatically turns print PDFs into web optimized ePapers that Google loves.
12<br />
Getting Started with the <strong>TraumaCad</strong> Server<br />
<strong>TraumaCad</strong> <strong>Admin</strong>istrator’s <strong>Guide</strong><br />
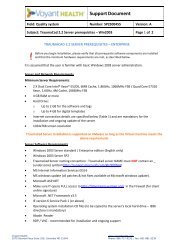
Step 1: Verifying System Requirements: Verify that the machine on<br />
which the <strong>TraumaCad</strong> server will be installed and the machines on which<br />
the <strong>TraumaCad</strong> clients will be installed meet the requirements listed in<br />
the System Requirements section on page 13.<br />
Step 2: Preparing for Installation: Before installing the <strong>TraumaCad</strong><br />
server, follow the instructions in the Preparing for Installation section on<br />
page 16.<br />
Step 3: Installing the <strong>TraumaCad</strong> Server: Install the <strong>TraumaCad</strong><br />
server software, as described in the Installing the <strong>TraumaCad</strong> Server<br />
section on page 17.<br />
Step 4: Configuring the <strong>TraumaCad</strong> Server: Configure the<br />
<strong>TraumaCad</strong> server, as described in Chapter 3, Configuring the<br />
<strong>TraumaCad</strong> Server on page 29.<br />
The first two sections of this chapter (Configuring the PACS Servers<br />
and Configuring DICOM Properties) must be configured before the<br />
server can operate.<br />
All other settings are installed with defaults that will enable you to work<br />
comfortably.<br />
Step 5: Verifying Proper <strong>TraumaCad</strong> Server Operation: Check that<br />
at least one <strong>TraumaCad</strong> client can connect to the <strong>TraumaCad</strong> server<br />
and that it can query, retrieve and commit images from and to the PACS, as<br />
described in the Verifying Proper Operation section on page 23.<br />
Step 6: Configuring Security Settings: [Optional] Configure<br />
<strong>TraumaCad</strong> security settings so that each time a <strong>TraumaCad</strong> client is<br />
launched it requests an authorized user name and password, as described in<br />
the Chapter 4, Configuring Security Settings section on page 49.<br />
Step 7: Installing <strong>TraumaCad</strong> Clients: <strong>TraumaCad</strong> Clients can now<br />
be installed.