NORAS Immobilization and Biopsy System MR-BI320-PA ...
NORAS Immobilization and Biopsy System MR-BI320-PA ...
NORAS Immobilization and Biopsy System MR-BI320-PA ...

You also want an ePaper? Increase the reach of your titles
YUMPU automatically turns print PDFs into web optimized ePapers that Google loves.
4<br />
6<br />
Localization <strong>and</strong> <strong>Biopsy</strong><br />
Process<br />
• In case the marker-lesion axis should intersect with one of the three horizontal<br />
struts of the slat lateral plate <strong>and</strong> thus prevent direct access to the lesion, or the<br />
penetration should not be made in the direction of the thorax, the angulation angle<br />
of the marker (<strong>and</strong> thus of the subsequent needle guidance) can be readjusted to<br />
- 0°, -15°, + 15°, + 0°.Your toolbox will then give you the new distance between<br />
marker <strong>and</strong> lesion with the new angle as described in the following:<br />
• First, you must complete Steps 1 through 4 as described above (Steps 5 through<br />
7 are not relevant in this case).<br />
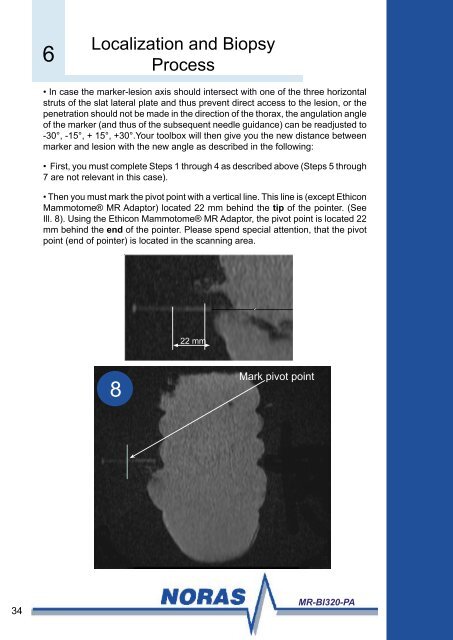
• Then you must mark the pivot point with a vertical line. This line is (except Ethicon<br />
Mammotome® <strong>MR</strong> Adaptor) located 22 mm behind the tip of the pointer. (See<br />
Ill. ). Using the Ethicon Mammotome® <strong>MR</strong> Adaptor, the pivot point is located 22<br />
mm behind the end of the pointer. Please spend special attention, that the pivot<br />
point (end of pointer) is located in the scanning area.<br />
22 mm<br />
Mark pivot point<br />
<strong>MR</strong>-<strong>BI320</strong>-<strong>PA</strong>