What is Packet Capture? - SonicWALL
What is Packet Capture? - SonicWALL
What is Packet Capture? - SonicWALL

You also want an ePaper? Increase the reach of your titles
YUMPU automatically turns print PDFs into web optimized ePapers that Google loves.
Configuring the <strong>Packet</strong> <strong>Capture</strong> Feature<br />
on SonicOS Enhanced<br />
Document Scope<br />
Th<strong>is</strong> solutions document describes how to configure and use the packet capture feature in <strong>SonicWALL</strong><br />
SonicOS Enhanced release 3.6 and later.<br />
Th<strong>is</strong> document contains the following sections:<br />
• “Feature Overview” section on page 2<br />
• “Using <strong>Packet</strong> <strong>Capture</strong>” section on page 5<br />
• “Configuring <strong>Packet</strong> <strong>Capture</strong>” section on page 10<br />
• “Verifying <strong>Packet</strong> <strong>Capture</strong> Activity” section on page 19<br />
• “Related Information” section on page 21<br />
• “Glossary” section on page 24<br />
SonicOS Enhanced <strong>Packet</strong> <strong>Capture</strong><br />
1
Feature Overview<br />
Feature Overview<br />
Th<strong>is</strong> section provides an introduction to the <strong>SonicWALL</strong> SonicOS Enhanced packet capture feature. Th<strong>is</strong><br />
section contains the following subsections:<br />
• “<strong>What</strong> <strong>is</strong> <strong>Packet</strong> <strong>Capture</strong>?” section on page 2<br />
• “Benefits” section on page 2<br />
• “How Does <strong>Packet</strong> <strong>Capture</strong> Work?” section on page 3<br />
• “Platforms” section on page 4<br />
<strong>What</strong> <strong>is</strong> <strong>Packet</strong> <strong>Capture</strong>?<br />
<strong>Packet</strong> capture <strong>is</strong> a mechan<strong>is</strong>m that allows you to capture and examine the contents of individual data packets<br />
that traverse your <strong>SonicWALL</strong> firewall appliance. The captured packets contain both data and addressing<br />
information. The captured addressing information from the packet header includes the following:<br />
• Interface identification<br />
• MAC addresses<br />
• Ethernet type<br />
• Internet Protocol (IP) type<br />
• Source and destination IP addresses<br />
• Port numbers<br />
• L2TP payload details<br />
• PPP negotiations details<br />
You can configure the packet capture feature in the SonicOS Enhanced user interface (UI). The UI provides<br />
a way to configure the capture criteria, d<strong>is</strong>play settings, and file export settings, and d<strong>is</strong>plays the captured<br />
packets.<br />
Benefits<br />
The SonicOS Enhanced packet capture feature provides the functionality and flexibility that you need to<br />
examine network traffic without the use of external utilities, such as Wireshark (formerly known as<br />
Ethereal). SonicOS Enhanced 3.6 and above include the following improvements in the packet capture tool:<br />
• <strong>Capture</strong> control mechan<strong>is</strong>m with improved granularity for custom filtering<br />
• D<strong>is</strong>play filter settings independent from capture filter settings<br />
• <strong>Packet</strong> status indicates if the packet was dropped, forwarded, generated, or consumed by the firewall<br />
• Three-window output in the UI:<br />
– L<strong>is</strong>t of packets<br />
– Decoded output of selected packet<br />
– Hexadecimal dump of selected packet<br />
• Export capabilities include text or HTML format with hex dump of packets, plus CAP file format<br />
• Automatic export to FTP server when the buffer <strong>is</strong> full<br />
• Bidirectional packet capture based on IP address and port<br />
• Configurable wrap-around of packet capture buffer when full<br />
2 SonicOS Enhanced <strong>Packet</strong> <strong>Capture</strong>
Feature Overview<br />
How Does <strong>Packet</strong> <strong>Capture</strong> Work?<br />
As an admin<strong>is</strong>trator, you can configure the general settings, capture filter, d<strong>is</strong>play filter, advanced settings,<br />
and FTP settings of the packet capture tool. As network packets enter the packet capture subsystem, the<br />
capture filter settings are applied and the resulting packets are written to the capture buffer. The d<strong>is</strong>play filter<br />
settings are applied as you view the buffer contents in the UI. You can log the capture buffer to view in the<br />
UI, or you can configure automatic transfer to the FTP server when the buffer <strong>is</strong> full.<br />
Default settings are provided so that you can start using packet capture without configuring it first. The basic<br />
functionality <strong>is</strong> as follows:<br />
Start:<br />
Stop:<br />
Reset:<br />
Refresh:<br />
Export As:<br />
Click Start to begin capturing all packets except those used for communication<br />
between the <strong>SonicWALL</strong> appliance and the UI on your console system.<br />
Click Stop to stop the packet capture.<br />
Click Reset to clear the status counters that are d<strong>is</strong>played at the top of the <strong>Packet</strong><br />
<strong>Capture</strong> page.<br />
Click Refresh to d<strong>is</strong>play new buffer data in the <strong>Capture</strong>d <strong>Packet</strong>s window. You can<br />
then click any packet in the window to d<strong>is</strong>play its header information and data in the<br />
<strong>Packet</strong> Detail and Hex Dump windows.<br />
D<strong>is</strong>play or save a snapshot of the current buffer in the file format that you select<br />
from the drop-down l<strong>is</strong>t. Saved files are placed on your local management system<br />
(where the UI <strong>is</strong> running). Choose from the following formats:<br />
• CAP - Select CAP format if you want to view the data with the Wireshark<br />
(formerly Ethereal) network protocol analyzer. Th<strong>is</strong> <strong>is</strong> also known as libcap or<br />
pcap format. A dialog box allows you to open the buffer file with Wireshark, or<br />
save it to your local hard drive with the extension .pcap.<br />
• HTML - Select HTML to view the data with a browser. You can use File > Save<br />
As to save a copy of the buffer to your hard drive.<br />
• Text - Select Text to view the data in a text editor. A dialog box allows you to<br />
open the buffer file with the reg<strong>is</strong>tered text editor, or save it to your local hard<br />
drive with the extension .wri.<br />
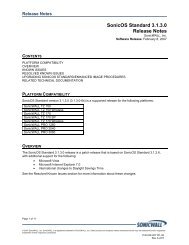
Refer to the figure below to see a high level view of the packet capture subsystem. Th<strong>is</strong> shows the different<br />
filters and how they are applied.<br />
SonicOS Enhanced <strong>Packet</strong> <strong>Capture</strong><br />
3
Feature Overview<br />
Figure 1<br />
High Level <strong>Packet</strong> <strong>Capture</strong> on Subsystem View<br />
Platforms<br />
The updated packet capture feature <strong>is</strong> available on the <strong>SonicWALL</strong> TZ 190 running SonicOS Enhanced<br />
release 3.6. It will be widely available on all platforms running later releases of SonicOS Enhanced, except<br />
for SonicPoint.<br />
4 SonicOS Enhanced <strong>Packet</strong> <strong>Capture</strong>
Using <strong>Packet</strong> <strong>Capture</strong><br />
Using <strong>Packet</strong> <strong>Capture</strong><br />
Th<strong>is</strong> section contains the following subsections:<br />
• “Accessing <strong>Packet</strong> <strong>Capture</strong> in the UI” section on page 5<br />
• “Starting and Stopping <strong>Packet</strong> <strong>Capture</strong>” section on page 6<br />
• “Viewing the <strong>Capture</strong>d <strong>Packet</strong>s” section on page 6<br />
Accessing <strong>Packet</strong> <strong>Capture</strong> in the UI<br />
Th<strong>is</strong> section describes how to access the packet capture tool in the SonicOS UI. There are two ways to access<br />
the <strong>Packet</strong> <strong>Capture</strong> screen.<br />
Step 1<br />
Step 2<br />
Log in to the SonicOS UI as admin.<br />
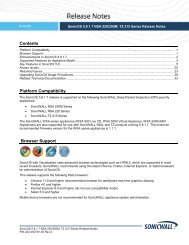
To go directly to the <strong>Packet</strong> <strong>Capture</strong> screen, in the left pane, under System, click <strong>Packet</strong> <strong>Capture</strong>.<br />
Figure 2<br />
<strong>Packet</strong> <strong>Capture</strong> Screen<br />
Step 3<br />
Step 4<br />
Alternatively, to access packet capture from the Diagnostics screen, in the left pane, under System, click<br />
Diagnostics.<br />
In the right pane, in the Diagnostic Tool l<strong>is</strong>t, click <strong>Packet</strong> <strong>Capture</strong>.<br />
SonicOS Enhanced <strong>Packet</strong> <strong>Capture</strong><br />
5
Using <strong>Packet</strong> <strong>Capture</strong><br />
Starting and Stopping <strong>Packet</strong> <strong>Capture</strong><br />
The <strong>Packet</strong> <strong>Capture</strong> screen has buttons for starting and stopping a packet capture. You can start a packet<br />
capture that uses default settings without configuring specific criteria for packet capture, d<strong>is</strong>play, FTP<br />
export, and other settings. If you start a default packet capture, the <strong>SonicWALL</strong> appliance will capture all<br />
packets except those for internal communication, and will stop when the buffer <strong>is</strong> full or when you click<br />
Stop.<br />
Starting <strong>Packet</strong> <strong>Capture</strong><br />
Step 1<br />
Step 2<br />
Step 3<br />
Step 4<br />
Navigate to the <strong>Packet</strong> <strong>Capture</strong> page in the UI.<br />
See “Accessing <strong>Packet</strong> <strong>Capture</strong> in the UI” on page 5.<br />
Under <strong>Packet</strong> <strong>Capture</strong>, optionally click Reset.<br />
The <strong>Packet</strong> <strong>Capture</strong> page d<strong>is</strong>plays several lines of stat<strong>is</strong>tics above the Start and Stop buttons. You can click<br />
Reset to set the stat<strong>is</strong>tics back to zero.<br />
Under <strong>Packet</strong> <strong>Capture</strong>, click Start.<br />
To refresh the packet d<strong>is</strong>play windows to show new buffer data, click Refresh.<br />
You can view the captured packets in the <strong>Capture</strong>d <strong>Packet</strong>s, <strong>Packet</strong> Detail, and Hex Dump sections of the<br />
screen. See “Viewing the <strong>Capture</strong>d <strong>Packet</strong>s” on page 6.<br />
Stopping <strong>Packet</strong> <strong>Capture</strong><br />
Step 1<br />
Step 2<br />
Navigate to the <strong>Packet</strong> <strong>Capture</strong> page in the UI.<br />
See “Accessing <strong>Packet</strong> <strong>Capture</strong> in the UI” on page 5.<br />
Under <strong>Packet</strong> <strong>Capture</strong>, click Stop.<br />
Viewing the <strong>Capture</strong>d <strong>Packet</strong>s<br />
The UI provides three windows to d<strong>is</strong>play different views of the captured packets. The following sections<br />
describe the viewing windows:<br />
• “About the <strong>Capture</strong>d <strong>Packet</strong>s Window” on page 6<br />
• “About the <strong>Packet</strong> Detail Window” on page 8<br />
• “About the Hex Dump Window” on page 9<br />
About the <strong>Capture</strong>d <strong>Packet</strong>s Window<br />
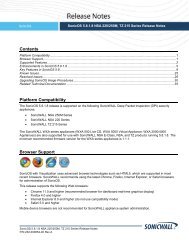
The <strong>Capture</strong>d <strong>Packet</strong>s window d<strong>is</strong>plays the following stat<strong>is</strong>tics about each packet:<br />
• # - The packet number relative to the start of the capture<br />
• Time - The date and time that the packet was captured<br />
• Ingress - The <strong>SonicWALL</strong> appliance interface on which the packet arrived <strong>is</strong> marked with an aster<strong>is</strong>k<br />
(*). The subsystem type abbreviation <strong>is</strong> shown in parentheses. Subsystem type abbreviations are defined<br />
in Table 1.<br />
6 SonicOS Enhanced <strong>Packet</strong> <strong>Capture</strong>
Using <strong>Packet</strong> <strong>Capture</strong><br />
Table 1<br />
Abbreviation<br />
i<br />
hc<br />
sc<br />
m<br />
r<br />
s<br />
ip<br />
f<br />
Subsystem Types<br />
Definition<br />
Interface<br />
Hardware based encryption or decryption<br />
Software based encryption or decryption<br />
Multicast<br />
<strong>Packet</strong> reassembly<br />
System stack<br />
IP helper<br />
Fragmentation<br />
Figure 3<br />
<strong>Capture</strong>d <strong>Packet</strong>s Window<br />
• Egress - The <strong>SonicWALL</strong> appliance interface on which the packet was captured when sent out<br />
The subsystem type abbreviation <strong>is</strong> shown in parentheses. See Table 1 for definitions of subsystem type<br />
abbreviations.<br />
• Source IP - The source IP address of the packet<br />
• Destination IP - The destination IP address of the packet<br />
• Ether Type - The Ethernet type of the packet from its Ethernet header<br />
• <strong>Packet</strong> Type - The type of the packet depending on the Ethernet type; for example:<br />
– For IP packets, the packet type might be TCP, UDP, or another protocol that runs over IP<br />
– For PPPoE packets, the packet type might be PPPoE D<strong>is</strong>covery or PPPoE Session<br />
– For ARP packets, the packet type might be Request or Reply<br />
• Ports [Src,Dst] - The source and destination TCP or UDP ports of the packet<br />
• Status - The status field for the packet<br />
SonicOS Enhanced <strong>Packet</strong> <strong>Capture</strong><br />
7
Using <strong>Packet</strong> <strong>Capture</strong><br />
The status field shows the state of the packet with respect to the firewall. A packet can be dropped,<br />
generated, consumed or forwarded by the <strong>SonicWALL</strong> appliance. You can position the mouse pointer<br />
over dropped or consumed packets to show the following information.<br />
<strong>Packet</strong> status D<strong>is</strong>played value Definition of d<strong>is</strong>played value<br />
Dropped Module-ID = Value for the protocol subsystem ID<br />
Drop-code = Reason for dropping the packet<br />
Reference-ID: <strong>SonicWALL</strong>-specific data<br />
Consumed Module-ID = Value for the protocol subsystem ID<br />
• Length [Actual] - Length value <strong>is</strong> the number of bytes captured in the buffer for th<strong>is</strong> packet. Actual<br />
value, in brackets, <strong>is</strong> the number of bytes transmitted in the packet.<br />
You can configure the number of bytes to capture. See “Configuring General Settings” on page 10.<br />
About the <strong>Packet</strong> Detail Window<br />
When you click on a packet in the <strong>Capture</strong>d <strong>Packet</strong>s window, the packet header fields are d<strong>is</strong>played in the<br />
<strong>Packet</strong> Detail window. The d<strong>is</strong>play will vary depending on the type of packet that you select.<br />
Figure 4<br />
<strong>Packet</strong> Detail Window d<strong>is</strong>playing ARP packet<br />
Figure 5<br />
<strong>Packet</strong> <strong>Capture</strong> Detail Window D<strong>is</strong>playing IP <strong>Packet</strong><br />
8 SonicOS Enhanced <strong>Packet</strong> <strong>Capture</strong>
Using <strong>Packet</strong> <strong>Capture</strong><br />
About the Hex Dump Window<br />
When you click on a packet in the <strong>Capture</strong>d <strong>Packet</strong>s window, the packet data <strong>is</strong> d<strong>is</strong>played in hexadecimal and<br />
ASCII format in the Hex Dump window. The hex format <strong>is</strong> shown on the left side of the window, with the<br />
corresponding ASCII characters d<strong>is</strong>played to the right for each line. When the hex value <strong>is</strong> zero, the ASCII<br />
value <strong>is</strong> d<strong>is</strong>played as a dot.<br />
Figure 6<br />
Hex Dump Window<br />
SonicOS Enhanced <strong>Packet</strong> <strong>Capture</strong><br />
9
Configuring <strong>Packet</strong> <strong>Capture</strong><br />
Configuring <strong>Packet</strong> <strong>Capture</strong><br />
You can access the packet capture tool on the System > <strong>Packet</strong> <strong>Capture</strong> page of the SonicOS UI. There are<br />
five main areas of configuration for the packet capture tool. The following sections describe the<br />
configuration options, and provide procedures for accessing and configuring packet capture:<br />
Configuring General Settings<br />
• “Configuring General Settings” section on page 10<br />
• “Configuring <strong>Capture</strong> Filter Settings” section on page 11<br />
• “Configuring D<strong>is</strong>play Filter Settings” section on page 13<br />
• “Configuring Logging Settings” section on page 15<br />
• “Configuring Advanced Settings” section on page 16<br />
• “Restarting FTP Logging” section on page 17<br />
Th<strong>is</strong> section describes how to configure packet capture general settings, including the number of bytes to<br />
capture per packet and the buffer wrap option. You can specify the number of bytes using either decimal or<br />
hexadecimal, with a minimum value of 14. The buffer wrap option enables the packet capture to continue<br />
even when the buffer becomes full, by overwriting the buffer from the beginning.<br />
Step 1<br />
Step 2<br />
Step 3<br />
Navigate to the <strong>Packet</strong> <strong>Capture</strong> page in the UI.<br />
See “Accessing <strong>Packet</strong> <strong>Capture</strong> in the UI” on page 5.<br />
Under <strong>Packet</strong> <strong>Capture</strong>, click Configure.<br />
In the <strong>Packet</strong> <strong>Capture</strong> Configuration window, click the General tab.<br />
Figure 7<br />
General Settings Window<br />
Step 4<br />
Step 5<br />
In the Number of Bytes To <strong>Capture</strong> (per packet) box, type a number.<br />
The minimum value <strong>is</strong> 14.<br />
To continue capturing packets after the buffer fills up, select the Wrap <strong>Capture</strong> Buffer Once Full<br />
checkbox.<br />
10 SonicOS Enhanced <strong>Packet</strong> <strong>Capture</strong>
Configuring <strong>Packet</strong> <strong>Capture</strong><br />
Step 6<br />
Selecting th<strong>is</strong> option will cause packet capture to start writing captured packets at the beginning of the buffer<br />
again after the buffer fills.<br />
Click OK.<br />
Configuring <strong>Capture</strong> Filter Settings<br />
Th<strong>is</strong> section describes how to configure packet capture capture filter settings, including the following:<br />
• Interface on your <strong>SonicWALL</strong> appliance<br />
You can specify up to ten interfaces separated by commas. Refer to the Network > Interfaces screen in<br />
the UI for the available interface names. For example, for a <strong>SonicWALL</strong> PRO Series, you could specify:<br />
X0, X1, X2, X3. You can also use a negative value to configure all interfaces except the one(s) specified;<br />
for example: !X0, !X1. For the TZ 190, you could specify WAN, LAN, WWAN, OPT, or !WWAN, !OPT.<br />
• Ethernet type of the packets that you want to capture<br />
You can specify up to ten Ethernet types separated by commas. Currently, the following Ethernet types<br />
are supported: ARP, IP, PPPoE-SES, and PPPoE-DIS. The latter two can be specified by PPPoE alone.<br />
Th<strong>is</strong> option <strong>is</strong> not case-sensitive. For example, to capture all supported types, you could enter: ARP, ip,<br />
PPPOE. You can use one or more negative values to capture all Ethernet types except those specified;<br />
for example: !ARP, !PPPoE. You can also use hexadecimal values to represent the Ethernet types, or<br />
mix hex values with the standard representations; for example: ARP, 0x800, IP. Normally you would<br />
only use hex values for Ethernet types that are not supported by acronym in SonicOS Enhanced. See<br />
“Supported <strong>Packet</strong> Types” on page 21.<br />
• IP type of the packets that you want to capture<br />
You can specify up to ten IP types separated by commas. The following IP types are supported: TCP,<br />
UDP, ICMP, GRE, IGMP, AH, ESP. Th<strong>is</strong> option <strong>is</strong> not case-sensitive. You can use one or more negative<br />
values to capture all IP types except those specified; for example: !TCP, !UDP. You can also use<br />
hexadecimal values to represent the IP types, or mix hex values with the standard representations; for<br />
example: TCP, 0x1, 0x6. See “Supported <strong>Packet</strong> Types” on page 21.<br />
• Source IP addresses(es) from which to capture packets<br />
You can specify up to ten IP addresses separated by commas; for example: 10.1.1.1, 192.2.2.2. You can<br />
use one or more negative values to capture packets from all but the specified addresses; for example:<br />
!10.3.3.3, !10.4.4.4.<br />
• Source port(s) from which to capture packets<br />
You can specify up to ten port numbers separated by commas; for example: 20, 21, 22, 25. You can use<br />
one or more negative values to capture packets from all but the specified ports; for example: !80, !8080.<br />
• Destination IP address(es) for which to capture packets<br />
You can specify up to ten IP addresses separated by commas; for example: 10.1.1.1, 192.2.2.2. You can<br />
use one or more negative values to capture packets destined for all but the specified addresses; for<br />
example: !10.3.3.3, !10.4.4.4.<br />
• Destination port(s) for which to capture packets<br />
You can specify up to ten port numbers separated by commas; for example: 20, 21, 22, 25. You can use<br />
one or more negative values to capture packets destined for all but the specified ports; for example: !80,<br />
!8080.<br />
• Bidirectional address and port mapping<br />
When th<strong>is</strong> option <strong>is</strong> selected, IP addresses and ports specified here will be matched against both the<br />
source and destination fields in each packet.<br />
SonicOS Enhanced <strong>Packet</strong> <strong>Capture</strong><br />
11
Configuring <strong>Packet</strong> <strong>Capture</strong><br />
Note<br />
If a field <strong>is</strong> left blank, no filtering <strong>is</strong> done on that field. <strong>Packet</strong>s are captured without regard<br />
to the value contained in that field of their headers.<br />
Step 1<br />
Step 2<br />
Step 3<br />
Navigate to the <strong>Packet</strong> <strong>Capture</strong> page in the UI.<br />
See “Accessing <strong>Packet</strong> <strong>Capture</strong> in the UI” on page 5.<br />
Under <strong>Packet</strong> <strong>Capture</strong>, click Configure.<br />
In the <strong>Packet</strong> <strong>Capture</strong> Configuration window, click the <strong>Capture</strong> Filter tab.<br />
Figure 8<br />
<strong>Capture</strong> Filter Window<br />
Step 4<br />
Step 5<br />
Step 6<br />
Step 7<br />
Step 8<br />
Step 9<br />
Step 10<br />
In the Interface Name(s) box, type the <strong>SonicWALL</strong> appliance interfaces on which to capture packets, or<br />
use the negative format (!X0) to capture packets from all interfaces except those specified. To capture on all<br />
interfaces, leave blank.<br />
In the Ether Type(s) box, enter the Ethernet types for which you want to capture packets, or use the<br />
negative format (!ARP) to capture packets from all Ethernet types except those specified. To capture all<br />
Ethernet types, leave blank.<br />
In the IP Type(s) box, enter the IP packet types for which you want to capture packets, or use the negative<br />
format (!UDP) to capture packets from all IP types except those specified. To capture all IP types, leave<br />
blank.<br />
In the Source IP Address(es) box, type the IP addresses from which you want to capture packets, or use<br />
the negative format (!10.1.2.3) to capture packets from all source addresses except those specified. To<br />
capture packets from all source addresses, leave blank.<br />
In the Source Port(s) box, type the port numbers from which you want to capture packets, or use the<br />
negative format (!25) to capture packets from all source ports except those specified. To capture packets<br />
from all source ports, leave blank.<br />
In the Destination IP Address(es) box, type the IP addresses for which you want to capture packets, or<br />
use the negative format (!10.1.2.3) to capture packets with all destination addresses except those specified.<br />
To capture packets for all destination addresses, leave blank.<br />
In the Destination Port(s) box, type the port numbers for which you want to capture packets, or use the<br />
negative format (!80) to capture packets with all destination ports except those specified. To capture packets<br />
for all destination ports, leave blank.<br />
12 SonicOS Enhanced <strong>Packet</strong> <strong>Capture</strong>
Configuring <strong>Packet</strong> <strong>Capture</strong><br />
Step 11<br />
To match the values in the source and destination fields against either the source or destination information<br />
in each packet, select the Enable Bidirectional Address and Port Matching checkbox.<br />
Configuring D<strong>is</strong>play Filter Settings<br />
Th<strong>is</strong> section describes how to configure packet capture d<strong>is</strong>play filter settings. The values that you provide<br />
here are compared to corresponding fields in the captured packets, and only those packets that match are<br />
d<strong>is</strong>played. D<strong>is</strong>play filter settings include the following:<br />
• Interface on your <strong>SonicWALL</strong> appliance<br />
You can specify up to ten interfaces separated by commas. Refer to the Network > Interfaces screen in<br />
the UI for the available interface names. For example, for a <strong>SonicWALL</strong> PRO Series, you could specify:<br />
X0, X1, X2, X3. You can also use a negative value to configure all interfaces except the one(s) specified;<br />
for example: !X0, !X1. For the TZ 190, you could specify WAN, LAN, WWAN, OPT, or !WWAN, !OPT.<br />
• Ethernet type of the packets that you want to d<strong>is</strong>play<br />
You can specify up to ten Ethernet types separated by commas. Currently, the following Ethernet types<br />
are supported: ARP, IP, PPPoE-SES, and PPPoE-DIS. The latter two can be specified by PPPoE alone.<br />
Th<strong>is</strong> option <strong>is</strong> not case-sensitive. For example, to d<strong>is</strong>play all supported types, you could enter: ARP, ip,<br />
PPPOE. You can use one or more negative values to d<strong>is</strong>play all Ethernet types except those specified;<br />
for example: !ARP, !PPPoE. You can also use hexadecimal values to represent the Ethernet types, or<br />
mix hex values with the standard representations; for example: ARP, 0x800, IP. Normally you would<br />
only use hex values for Ethernet types that are not supported by acronym in SonicOS Enhanced. See<br />
“Supported <strong>Packet</strong> Types” on page 21.<br />
• IP type of the packets that you want to d<strong>is</strong>play<br />
You can specify up to ten IP types separated by commas. The following IP types are supported: TCP,<br />
UDP, ICMP, GRE, IGMP, AH, ESP. Th<strong>is</strong> option <strong>is</strong> not case-sensitive. You can use one or more negative<br />
values to d<strong>is</strong>play all IP types except those specified; for example: !TCP, !UDP. You can also use<br />
hexadecimal values to represent the IP types, or mix hex values with the standard representations; for<br />
example: TCP, 0x1, 0x6. See “Supported <strong>Packet</strong> Types” on page 21.<br />
• Source IP addresses(es) from which to d<strong>is</strong>play packets<br />
You can specify up to ten IP addresses separated by commas; for example: 10.1.1.1, 192.2.2.2. You can<br />
use one or more negative values to d<strong>is</strong>play packets with all but the specified source addresses; for<br />
example: !10.3.3.3, !10.4.4.4.<br />
• Source port(s) from which to d<strong>is</strong>play packets<br />
You can specify up to ten port numbers separated by commas; for example: 20, 21, 22, 25. You can use<br />
one or more negative values to d<strong>is</strong>play packets with all but the specified source ports; for example: !80,<br />
!8080.<br />
• Destination IP address(es) for which to d<strong>is</strong>play packets<br />
You can specify up to ten IP addresses separated by commas; for example: 10.1.1.1, 192.2.2.2. You can<br />
use one or more negative values to d<strong>is</strong>play packets with all but the specified destination addresses; for<br />
example: !10.3.3.3, !10.4.4.4.<br />
• Destination port(s) for which to d<strong>is</strong>play packets<br />
You can specify up to ten port numbers separated by commas; for example: 20, 21, 22, 25. You can use<br />
one or more negative values to capture packets with all but the specified destination ports; for example:<br />
!80, !8080.<br />
• Bidirectional address and port mapping<br />
When th<strong>is</strong> option <strong>is</strong> selected, IP addresses and ports specified in either the source or destination fields<br />
are matched against both the source and destination fields in each packet.<br />
• <strong>Packet</strong> status values<br />
SonicOS Enhanced <strong>Packet</strong> <strong>Capture</strong><br />
13
Configuring <strong>Packet</strong> <strong>Capture</strong><br />
SonicOS Enhanced adds one of four possible packet status values to each captured packet: forwarded,<br />
generated, consumed, and dropped. You can select one or more of these status values to match when<br />
d<strong>is</strong>playing packets. The status value shows the state of the packet with respect to the firewall, as follows:<br />
– Forwarded - The packet arrived on one interface and the <strong>SonicWALL</strong> appliance sent it out on<br />
another interface.<br />
– Generated - The <strong>SonicWALL</strong> appliance created the packet during the process of encryption or<br />
decryption, fragmentation or reassembly, or as a result of certain protocols.<br />
– Consumed - The packet was destined for the <strong>SonicWALL</strong> appliance.<br />
– Dropped - The <strong>SonicWALL</strong> appliance did nothing further with the packet. The firewall might have<br />
identified the packet as malformed, malicious, on the deny l<strong>is</strong>t, or not on the allow l<strong>is</strong>t.<br />
Note<br />
If a field <strong>is</strong> left blank, no filtering <strong>is</strong> done on that field. <strong>Packet</strong>s are d<strong>is</strong>played without regard<br />
to the value contained in that field of their headers.<br />
Step 1<br />
Step 2<br />
Step 3<br />
Navigate to the <strong>Packet</strong> <strong>Capture</strong> page in the UI.<br />
See “Accessing <strong>Packet</strong> <strong>Capture</strong> in the UI” on page 5.<br />
Under <strong>Packet</strong> <strong>Capture</strong>, click Configure.<br />
In the <strong>Packet</strong> <strong>Capture</strong> Configuration window, click the D<strong>is</strong>play Filter tab.<br />
Figure 9<br />
Filter Settings Window<br />
Step 4<br />
Step 5<br />
Step 6<br />
In the Interface Name(s) box, type the <strong>SonicWALL</strong> appliance interfaces for which to d<strong>is</strong>play packets, or<br />
use the negative format (!X0) to d<strong>is</strong>play packets captured from all interfaces except those specified. To<br />
d<strong>is</strong>play packets captured on all interfaces, leave blank.<br />
In the Ether Type(s) box, enter the Ethernet types for which you want to d<strong>is</strong>play packets, or use the<br />
negative format (!ARP) to d<strong>is</strong>play packets of all Ethernet types except those specified. To d<strong>is</strong>play all<br />
Ethernet types, leave blank.<br />
In the IP Type(s) box, enter the IP packet types for which you want to d<strong>is</strong>play packets, or use the negative<br />
format (!UDP) to d<strong>is</strong>play packets of all IP types except those specified. To d<strong>is</strong>play all IP types, leave blank.<br />
14 SonicOS Enhanced <strong>Packet</strong> <strong>Capture</strong>
Configuring <strong>Packet</strong> <strong>Capture</strong><br />
Step 7<br />
Step 8<br />
Step 9<br />
Step 10<br />
Step 11<br />
Step 12<br />
Step 13<br />
Step 14<br />
Step 15<br />
In the Source IP Address(es) box, type the IP addresses from which you want to d<strong>is</strong>play packets, or use<br />
the negative format (!10.1.2.3) to d<strong>is</strong>play packets captured from all source addresses except those specified.<br />
To d<strong>is</strong>play packets from all source addresses, leave blank.<br />
In the Source Port(s) box, type the port numbers from which you want to d<strong>is</strong>play packets, or use the<br />
negative format (!25) to d<strong>is</strong>play packets captured from all source ports except those specified. To d<strong>is</strong>play<br />
packets from all source ports, leave blank.<br />
In the Destination IP Address(es) box, type the IP addresses for which you want to d<strong>is</strong>play packets, or<br />
use the negative format (!10.1.2.3) to d<strong>is</strong>play packets with all destination addresses except those specified.<br />
To d<strong>is</strong>play packets for all destination addresses, leave blank.<br />
In the Destination Port(s) box, type the port numbers for which you want to d<strong>is</strong>play packets, or use the<br />
negative format (!80) to d<strong>is</strong>play packets with all destination ports except those specified. To d<strong>is</strong>play packets<br />
for all destination ports, leave blank.<br />
To match the values in the source and destination fields against either the source or destination information<br />
in each captured packet, select the Enable Bidirectional Address and Port Matching checkbox.<br />
To d<strong>is</strong>play captured packets that the <strong>SonicWALL</strong> appliance forwarded, select the Forwarded checkbox.<br />
To d<strong>is</strong>play captured packets that the <strong>SonicWALL</strong> appliance generated, select the Generated checkbox.<br />
To d<strong>is</strong>play captured packets that the <strong>SonicWALL</strong> appliance consumed, select the Consumed checkbox.<br />
To d<strong>is</strong>play captured packets that the <strong>SonicWALL</strong> appliance dropped, select the Dropped checkbox.<br />
Configuring Logging Settings<br />
Th<strong>is</strong> section describes how to configure packet capture logging settings. These settings provide a way to<br />
configure automatic logging of the capture buffer to an external FTP server. When the buffer fills up, the<br />
packets are transferred to the FTP server. The capture continues without interruption.<br />
If you configure automatic logging, th<strong>is</strong> supercedes the setting for wrapping the buffer when full. With<br />
automatic FTP logging, the capture buffer <strong>is</strong> effectively wrapped when full, but you also retain all the data<br />
rather than overwriting it each time the buffer wraps.<br />
Step 1<br />
Navigate to the <strong>Packet</strong> <strong>Capture</strong> page in the UI.<br />
See “Accessing <strong>Packet</strong> <strong>Capture</strong> in the UI” on page 5.<br />
Figure 10<br />
Logging Settings Window<br />
SonicOS Enhanced <strong>Packet</strong> <strong>Capture</strong><br />
15
Configuring <strong>Packet</strong> <strong>Capture</strong><br />
Step 2 Under <strong>Packet</strong> <strong>Capture</strong>, click Configure.<br />
Step 3 In the <strong>Packet</strong> <strong>Capture</strong> Configuration window, click the Logging tab.<br />
Step 4 In the FTP Server IP Address box, type the IP address of the FTP server. For example, type 10.1.2.3.<br />
Note<br />
Make sure that the FTP server IP address <strong>is</strong> reachable by the <strong>SonicWALL</strong> appliance.<br />
An IP address that <strong>is</strong> reachable only via a VPN tunnel <strong>is</strong> not supported.<br />
Step 5<br />
Step 6<br />
Step 7<br />
Step 8<br />
Step 9<br />
Step 10<br />
Step 11<br />
In the Login ID box, type the login name that the <strong>SonicWALL</strong> appliance should use to connect to the FTP<br />
server.<br />
In the Password box, type the password that the <strong>SonicWALL</strong> appliance should use to connect to the FTP<br />
server.<br />
In the Directory Path box, type the directory location for the transferred files. The files are written to th<strong>is</strong><br />
location relative to the default FTP root directory.<br />
For libcap format, files are named “packet-log--.cap”, where the contains a run number and date<br />
including hour, month, day, and year. For example, packet-log--3-22-08292006.cap. For HTML format, file<br />
names are in the form: “packet-log_h-.html”. An example of an HTML file name <strong>is</strong>:<br />
packet-log_h-3-22-08292006.html.<br />
To enable automatic transfer of the capture file to the FTP server when the buffer <strong>is</strong> full, select the Log To<br />
FTP Server Automatically checkbox. Files are transferred in both libcap and HTML format.<br />
To enable transfer of the file in HTML format as well as libcap format, select the Log HTML File Along<br />
With .cap File (FTP).<br />
To test the connection to the FTP server and transfer the capture buffer contents to it, click Log Now.<br />
In th<strong>is</strong> case the file name will contain an ‘F’. For example, packet-log-F-3-22-08292006.cap or<br />
packet-log_h-F-3-22-08292006.html.<br />
To save your settings and exit the screen, click OK.<br />
Configuring Advanced Settings<br />
Th<strong>is</strong> section describes how to configure settings for the following:<br />
• Capturing packets generated by the <strong>SonicWALL</strong> appliance<br />
• Capturing intermediate packets generated by the appliance<br />
• Excluding traffic from <strong>SonicWALL</strong> Global Management System (GMS)<br />
• Excluding management traffic<br />
• Excluding syslog traffic<br />
Step 1<br />
Step 2<br />
Step 3<br />
Navigate to the <strong>Packet</strong> <strong>Capture</strong> page in the UI.<br />
See “Accessing <strong>Packet</strong> <strong>Capture</strong> in the UI” on page 5.<br />
Under <strong>Packet</strong> <strong>Capture</strong>, click Configure.<br />
In the <strong>Packet</strong> <strong>Capture</strong> Configuration window, click the Advanced tab.<br />
16 SonicOS Enhanced <strong>Packet</strong> <strong>Capture</strong>
Configuring <strong>Packet</strong> <strong>Capture</strong><br />
Figure 11<br />
Advanced Settings Window<br />
Step 4<br />
Step 5<br />
Step 6<br />
Step 7<br />
Step 8<br />
To capture packets generated by the <strong>SonicWALL</strong> appliance, select the <strong>Capture</strong> Firewall Generated<br />
<strong>Packet</strong>s checkbox.<br />
Even when interfaces specified in the capture filters do not match, th<strong>is</strong> option ensures that packets<br />
generated by the <strong>SonicWALL</strong> appliance are captured. Th<strong>is</strong> includes packets generated by HTTP(S), L2TP,<br />
DHCP servers, PPP, PPPOE, and routing protocols. <strong>Capture</strong>d packets are marked with ‘s’ in the incoming<br />
interface area when they are from the system stack. Otherw<strong>is</strong>e, the incoming interface <strong>is</strong> not specified.<br />
To capture intermediate packets generated by the <strong>SonicWALL</strong> appliance, select the <strong>Capture</strong> Intermediate<br />
<strong>Packet</strong>s checkbox.<br />
Intermediate packets include packets generated as a result of fragmentation or reassembly, intermediate<br />
encrypted packets, IP helper generated packets, and replicated multicast packets.<br />
To exclude encrypted management or syslog traffic to or from GMS, select the Exclude encrypted GMS<br />
traffic checkbox.<br />
Th<strong>is</strong> setting only affects encrypted traffic within a configured primary or secondary GMS tunnel. GMS<br />
management traffic <strong>is</strong> not excluded if it <strong>is</strong> sent via a separate tunnel.<br />
To exclude management traffic, select the Exclude Management Traffic checkbox and select one or more<br />
checkboxes for HTTP/HTTPS, SNMP, or SSH.<br />
If management traffic <strong>is</strong> sent via a tunnel, the packets are not excluded.<br />
To exclude syslog traffic to a server, select the Exclude Syslog Traffic to checkbox and select one or more<br />
checkboxes for Syslog Servers or GMS Server.<br />
If syslog traffic <strong>is</strong> sent via a tunnel, the packets are not excluded.<br />
Restarting FTP Logging<br />
If automatic FTP logging <strong>is</strong> off, either because of a failed connection or simply d<strong>is</strong>abled, you can restart it<br />
in Configure > Logging.<br />
Step 1<br />
Navigate to the <strong>Packet</strong> <strong>Capture</strong> page in the UI.<br />
SonicOS Enhanced <strong>Packet</strong> <strong>Capture</strong><br />
17
Configuring <strong>Packet</strong> <strong>Capture</strong><br />
Step 2<br />
Step 3<br />
Step 4<br />
Step 5<br />
Step 6<br />
See “Accessing <strong>Packet</strong> <strong>Capture</strong> in the UI” on page 5.<br />
Under <strong>Packet</strong> <strong>Capture</strong>, click Configure.<br />
In the <strong>Packet</strong> <strong>Capture</strong> Configuration window, click the Logging tab.<br />
Verify that the settings are correct for each item on the page.<br />
See “Configuring Logging Settings” on page 15.<br />
To change the FTP logging status on the main packet capture page to “active”, select the Log To FTP<br />
Server Automatically checkbox.<br />
Click OK.<br />
18 SonicOS Enhanced <strong>Packet</strong> <strong>Capture</strong>
Verifying <strong>Packet</strong> <strong>Capture</strong> Activity<br />
Verifying <strong>Packet</strong> <strong>Capture</strong> Activity<br />
Th<strong>is</strong> section describes how to tell if your packet capture <strong>is</strong> working correctly according to the configuration.<br />
It contains the following sections:<br />
• “Understanding Status Indicators” section on page 19<br />
• “Resetting the Status Information” section on page 20<br />
Understanding Status Indicators<br />
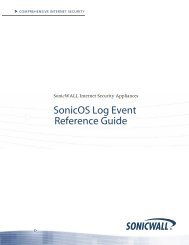
The main <strong>Packet</strong> <strong>Capture</strong> screen d<strong>is</strong>plays status indicators for packet capture and FTP logging. The packet<br />
capture status indicator shows one of the following three conditions:<br />
• Red: <strong>Capture</strong> <strong>is</strong> stopped<br />
• Green: <strong>Capture</strong> <strong>is</strong> running and the buffer <strong>is</strong> not full<br />
• Orange: <strong>Capture</strong> <strong>is</strong> running, but the buffer <strong>is</strong> full<br />
Figure 12<br />
Main <strong>Packet</strong> <strong>Capture</strong> Window<br />
The UI also d<strong>is</strong>plays the buffer size, the number of packets captured, the percentage of buffer space used,<br />
and how much of the buffer has been lost. Lost packets occur when automatic FTP logging <strong>is</strong> turned on,<br />
but the file transfer <strong>is</strong> slow for some reason. If the transfer <strong>is</strong> not fin<strong>is</strong>hed by the time the buffer <strong>is</strong> full again,<br />
the data in the newly filled buffer <strong>is</strong> lost.<br />
Note<br />
Although the buffer wrap option clears the buffer upon wrapping to the beginning, th<strong>is</strong><br />
<strong>is</strong> not considered lost data.<br />
SonicOS Enhanced <strong>Packet</strong> <strong>Capture</strong><br />
19
Verifying <strong>Packet</strong> <strong>Capture</strong> Activity<br />
The FTP logging status indicator shows one of the following three conditions:<br />
• Red: Automatic FTP logging <strong>is</strong> off<br />
• Green: Automatic FTP logging <strong>is</strong> on<br />
• Orange: The last attempt to contact the FTP server failed, and logging <strong>is</strong> now off<br />
To restart automatic FTP logging, see “Restarting FTP Logging” on page 17.<br />
Next to the FTP logging indicator, the UI also d<strong>is</strong>plays the number of successful and failed attempts to<br />
transfer the buffer contents to the FTP server, the current state of the FTP process thread, and the status<br />
of the capture buffer.<br />
Under the FTP logging indicator, on the Current Buffer Stat<strong>is</strong>tics line, the UI d<strong>is</strong>plays the number of packets<br />
dropped, forwarded, consumed, generated, or unknown.<br />
On the Current Configurations line, you can hover your mouse pointer over Filters, General, or Logging to<br />
view the currently configured value for each setting in that category. The Filters d<strong>is</strong>play includes the capture<br />
filter and d<strong>is</strong>play filter settings. The d<strong>is</strong>play for General includes both the general and advanced settings. The<br />
Logging d<strong>is</strong>play shows the FTP logging settings.<br />
Resetting the Status Information<br />
You can reset the d<strong>is</strong>played stat<strong>is</strong>tics for the capture buffer and FTP logging. If a capture <strong>is</strong> in progress, it<br />
<strong>is</strong> not interrupted when you reset the stat<strong>is</strong>tics d<strong>is</strong>play.<br />
Step 1<br />
Step 2<br />
Navigate to the <strong>Packet</strong> <strong>Capture</strong> page in the UI.<br />
See “Accessing <strong>Packet</strong> <strong>Capture</strong> in the UI” on page 5.<br />
Under <strong>Packet</strong> <strong>Capture</strong>, click Reset.<br />
20 SonicOS Enhanced <strong>Packet</strong> <strong>Capture</strong>
Related Information<br />
Related Information<br />
Th<strong>is</strong> section contains the following:<br />
• “Supported <strong>Packet</strong> Types” section on page 21<br />
• “File Formats for Export As” section on page 21<br />
Supported <strong>Packet</strong> Types<br />
When specifying the Ethernet or IP packet types that you want to capture or d<strong>is</strong>play, you can use either the<br />
standard acronym for the type, if supported, or the corresponding hexadecimal representation. To<br />
determine the hex value for a protocol, refer to the RFC for the number assigned to it by IANA. The<br />
protocol acronyms that SonicOS Enhanced currently supports are as follows:<br />
Supported Ethernet types: • ARP<br />
• IP<br />
• PPPoE-DIS<br />
• PPPoE-SES<br />
To specify both PPPoE-DIS and PPPoE-SES, you can<br />
simply use PPPoE.<br />
Supported IP types: • TCP<br />
• UDP<br />
• ICMP<br />
• IGMP<br />
• GRE<br />
• AH<br />
• ESP<br />
File Formats for Export As<br />
Th<strong>is</strong> section contains the following examples of the file formats available in the Export As option:<br />
• “HTML Format” on page 22<br />
• “Text File Format” on page 23<br />
SonicOS Enhanced <strong>Packet</strong> <strong>Capture</strong><br />
21
Related Information<br />
HTML Format<br />
You can view the HTML format in a browser. The following <strong>is</strong> an example showing the header and part of<br />
the data for the first packet in the buffer.<br />
Figure 13<br />
HTML Output from Export As<br />
22 SonicOS Enhanced <strong>Packet</strong> <strong>Capture</strong>
Related Information<br />
Text File Format<br />
You can view the text format output in a text editor. The following <strong>is</strong> an example showing the header and<br />
part of the data for the first packet in the buffer.<br />
Figure 14<br />
Text Format Output from Export As<br />
SonicOS Enhanced <strong>Packet</strong> <strong>Capture</strong><br />
23
Glossary<br />
Glossary<br />
AH<br />
ARP<br />
CAP<br />
DHCP<br />
ESP<br />
FTP<br />
GMS<br />
GRE<br />
HTML<br />
HTTP<br />
HTTPS<br />
ICMP<br />
IGMP<br />
IP<br />
L2TP<br />
MAC<br />
PPP<br />
PPPoE-DIS<br />
PPPoE-SES<br />
RFC<br />
SNMP<br />
SSH<br />
TCP<br />
UDP<br />
UI<br />
Authentication Header<br />
Address Resolution Protocol<br />
Converged Application Platform, used by Wireshark/Ethereal<br />
Dynamic Host Configuration Protocol<br />
Encapsulating Security Payload<br />
File Transfer Protocol<br />
Global Management System<br />
Generic Route Encapsulation<br />
Hypertext Markup Language<br />
Hypertext Transfer Protocol<br />
Secure Hypertext Transfer Protocol<br />
Internet Control Message Protocol<br />
Internet Group Management Protocol<br />
Internet Protocol<br />
Layer 2 Tunneling Protocol<br />
Media Access Control<br />
Point to Point Protocol<br />
Point to Point Protocol over Ethernet - D<strong>is</strong>covery<br />
Point to Point Protocol over Ethernet - Session<br />
Request for Comments<br />
Simple Network Management Protocol<br />
Secure Shell<br />
Transm<strong>is</strong>sion Control Protocol<br />
User Datagram Protocol<br />
User Interface<br />
24 SonicOS Enhanced <strong>Packet</strong> <strong>Capture</strong> PN 232-001203-00 Rev B