Autopilot System Installation Instructions - New Holland PLM Portal
Autopilot System Installation Instructions - New Holland PLM Portal
Autopilot System Installation Instructions - New Holland PLM Portal

You also want an ePaper? Increase the reach of your titles
YUMPU automatically turns print PDFs into web optimized ePapers that Google loves.
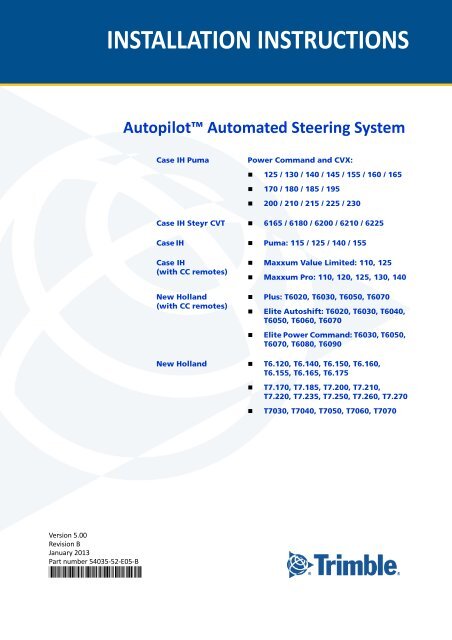
INSTALLATION INSTRUCTIONS<br />
<strong>Autopilot</strong> Automated Steering <strong>System</strong><br />
Case IH Puma<br />
Power Command and CVX:<br />
• 125 / 130 / 140 / 145 / 155 / 160 / 165<br />
• 170 / 180 / 185 / 195<br />
• 200 / 210 / 215 / 225 / 230<br />
Case IH Steyr CVT • 6165 / 6180 / 6200 / 6210 / 6225<br />
Case IH • Puma: 115 / 125 / 140 / 155<br />
Case IH<br />
(with CC remotes)<br />
<strong>New</strong> <strong>Holland</strong><br />
(with CC remotes)<br />
• Maxxum Value Limited: 110, 125<br />
• Maxxum Pro: 110, 120, 125, 130, 140<br />
• Plus: T6020, T6030, T6050, T6070<br />
• Elite Autoshift: T6020, T6030, T6040,<br />
T6050, T6060, T6070<br />
• Elite Power Command: T6030, T6050,<br />
T6070, T6080, T6090<br />
<strong>New</strong> <strong>Holland</strong> • T6.120, T6.140, T6.150, T6.160,<br />
T6.155, T6.165, T6.175<br />
• T7.170, T7.185, T7.200, T7.210,<br />
T7.220, T7.235, T7.250, T7.260, T7.270<br />
• T7030, T7040, T7050, T7060, T7070<br />
Version 5.00<br />
Revision B<br />
January 2013<br />
Part number 54035-52-E05-B<br />
*54035-52-E05-B*
Legal Notices<br />
Agriculture Business Area<br />
Trimble Agriculture Division<br />
10355 Westmoor Drive<br />
Suite #100<br />
Westminster, CO 80021<br />
USA<br />
trimble_support@trimble.com<br />
www.trimble.com<br />
Copyright and Trademarks<br />
© 1999–2012, Trimble Navigation Limited. All rights reserved.<br />
Trimble, the Globe & Triangle logo, AgGPS, and FmX are trademarks of<br />
Trimble Navigation Limited, registered in the United States and in other<br />
countries. <strong>Autopilot</strong>, Autosense, and CFX-750 are trademarks of<br />
Trimble Navigation Limited.<br />
Developed under a License of the European Union and the European<br />
Space Agency.<br />
All other trademarks are the property of their respective owners.<br />
Release Notice<br />
This is the January 2013 release (Revision B) of the <strong>Autopilot</strong><br />
Automated Steering <strong>System</strong> <strong>Installation</strong> <strong>Instructions</strong>, part number<br />
54035-52-E05-B. It applies to version 5.00 of the <strong>Autopilot</strong> automated<br />
steering system.<br />
The following limited warranties give you specific legal rights. You may<br />
have others, which vary from state/jurisdiction to state/jurisdiction.<br />
Product Limited Warranty<br />
Trimble warrants that this Trimble product and its internal components<br />
(the “Product”) shall be free from defects in materials and<br />
workmanship and will substantially conform to Trimble’s applicable<br />
published specifications for the Product for a period of one (1) year,<br />
starting from the earlier of (i) the date of installation, or (ii) six (6)<br />
months from the date of product shipment from Trimble. This<br />
warranty applies only to the Product if installed by Trimble or a<br />
distributor authorized by Trimble to perform Product installation<br />
services.<br />
Software Components and Enhancements<br />
All Product software components (sometimes hereinafter also referred<br />
to as “Software”) are licensed and not sold. Any Software accompanied<br />
by a separate End User License Agreement (“EULA”) shall be governed<br />
by the terms, conditions, restrictions and limited warranty terms of<br />
such EULA notwithstanding the preceding paragraph. During the<br />
limited warranty period you will be entitled to receive, at no additional<br />
charge, such Fix Updates and Minor Updates to the Product software<br />
as Trimble may develop for general release, subject to the procedures<br />
for delivery to purchasers of Trimble products generally. If you have<br />
purchased the Product from an authorized Trimble distributor rather<br />
than from Trimble directly, Trimble may, at its option, forward the<br />
software Fix Update or Minor Update to the Trimble distributor for<br />
final distribution to you. Major Upgrades, new products, or<br />
substantially new software releases, as identified by Trimble are<br />
expressly excused from this enhancement process and limited<br />
warranty. Receipt of software updates shall not serve to extend the<br />
limited warranty period.<br />
For purposes of this warranty the following definitions shall apply: (1)<br />
“Fix Update” means an error correction or other update created to fix<br />
a previous software version that does not substantially conform to its<br />
published specifications; (2) “Minor Update” occurs when<br />
enhancements are made to current features in a software program;<br />
and (3) “Major Upgrade” occurs when significant new features are<br />
added to software, or when a new product containing new features<br />
replaces the further development of a current product line. Trimble<br />
reserves the right to determine, in its sole discretion, what constitutes<br />
a significant new feature and Major Upgrade.<br />
Warranty Remedies<br />
Trimble’s sole liability and your exclusive remedy under the warranties<br />
set forth above shall be, at Trimble’s option, to repair or replace any<br />
Product that fails to conform to such warranty (“Nonconforming<br />
Product”), and/or issue a cash refund up to the purchase price paid by<br />
you for any such Nonconforming Product, excluding costs of<br />
installation, upon your return of the Nonconforming Product to<br />
Trimble in accordance with Trimble’s standard return material<br />
authorization process. Such remedy may include reimbursement of the<br />
cost of repairs for damage to third-party equipment onto which the<br />
Product is installed, if such damage is found to be directly caused by<br />
the Product as reasonably determined by Trimble following a root<br />
cause analysis.<br />
Warranty Exclusions and Disclaimer<br />
These warranties shall be applied only in the event and to the extent<br />
that (i) the Products and Software are properly and correctly installed,<br />
configured, interfaced, maintained, stored, and operated in<br />
accordance with Trimble's relevant operator's manual and<br />
specifications, and; (ii) the Products and Software are not modified or<br />
misused. The preceding warranties shall not apply to, and Trimble shall<br />
not be responsible for defects or performance problems resulting from<br />
(i) the combination or utilization of the Product or Software with<br />
hardware or software products, information, data, systems, interfaces<br />
or devices not made, supplied or specified by Trimble; (ii) the<br />
operation of the Product or Software under any specification other<br />
than, or in addition to, Trimble's standard specifications for its<br />
products; (iii) the unauthorized, installation, modification, or use of the<br />
Product or Software; (iv) damage caused by accident, lightning or<br />
other electrical discharge, fresh or salt water immersion or spray; or (v)<br />
normal wear and tear on consumable parts (e.g., batteries). Trimble<br />
does not warrant or guarantee the results obtained through the use of<br />
the Product.<br />
THE WARRANTIES ABOVE STATE TRIMBLE'S ENTIRE LIABILITY, AND YOUR<br />
EXCLUSIVE REMEDIES, RELATING TO PERFORMANCE OF THE PRODUCTS<br />
AND SOFTWARE. EXCEPT AS OTHERWISE EXPRESSLY PROVIDED HEREIN,<br />
THE PRODUCTS, SOFTWARE, AND ACCOMPANYING DOCUMENTATION AND<br />
MATERIALS ARE PROVIDED “AS-IS” AND WITHOUT EXPRESS OR IMPLIED<br />
WARRANTY OF ANY KIND BY EITHER TRIMBLE NAVIGATION LIMITED OR<br />
ANYONE WHO HAS BEEN INVOLVED IN ITS CREATION, PRODUCTION,<br />
INSTALLATION, OR DISTRIBUTION INCLUDING, BUT NOT LIMITED TO, THE<br />
IMPLIED WARRANTIES OF MERCHANTABILITY AND FITNESS FOR A<br />
PARTICULAR PURPOSE, TITLE, AND NONINFRINGEMENT. THE STATED<br />
EXPRESS WARRANTIES ARE IN LIEU OF ALL OBLIGATIONS OR LIABILITIES<br />
ON THE PART OF TRIMBLE ARISING OUT OF, OR IN CONNECTION WITH, ANY<br />
PRODUCTS OR SOFTWARE. SOME STATES AND JURISDICTIONS DO NOT<br />
ALLOW LIMITATIONS ON DURATION OR THE EXCLUSION OF AN IMPLIED<br />
WARRANTY, SO THE ABOVE LIMITATION MAY NOT APPLY TO YOU.<br />
TRIMBLE NAVIGATION LIMITED IS NOT RESPONSIBLE FOR THE OPERATION<br />
OR FAILURE OF OPERATION OF GPS SATELLITES OR THE AVAILABILITY OF<br />
GPS SATELLITE SIGNALS.<br />
Limitation of Liability<br />
TRIMBLE’S ENTIRE LIABILITY UNDER ANY PROVISION HEREIN SHALL BE<br />
LIMITED TO THE AMOUNT PAID BY YOU FOR THE PRODUCT OR SOFTWARE<br />
LICENSE. TO THE MAXIMUM EXTENT PERMITTED BY APPLICABLE LAW, IN<br />
NO EVENT SHALL TRIMBLE OR ITS SUPPLIERS BE LIABLE FOR ANY<br />
INDIRECT, SPECIAL, INCIDENTAL OR CONSEQUENTIAL DAMAGES<br />
WHATSOEVER UNDER ANY CIRCUMSTANCE OR LEGAL THEORY RELATING<br />
IN ANY WAY TO THE PRODUCTS, SOFTWARE AND ACCOMPANYING<br />
DOCUMENTATION AND MATERIALS, (INCLUDING, WITHOUT LIMITATION,<br />
DAMAGES FOR LOSS OF BUSINESS PROFITS, BUSINESS INTERRUPTION, LOSS<br />
OF BUSINESS INFORMATION, OR ANY OTHER PECUNIARY LOSS),<br />
REGARDLESS WHETHER TRIMBLE HAS BEEN ADVISED OF THE POSSIBILITY<br />
OF ANY SUCH LOSS AND REGARDLESS OF THE COURSE OF DEALING WHICH<br />
DEVELOPS OR HAS DEVELOPED BETWEEN YOU AND TRIMBLE. BECAUSE<br />
SOME STATES AND JURISDICTIONS DO NOT ALLOW THE EXCLUSION OR<br />
LIMITATION OF LIABILITY FOR CONSEQUENTIAL OR INCIDENTAL<br />
DAMAGES, THE ABOVE LIMITATION MAY NOT APPLY TO YOU.<br />
NOTE: THE ABOVE LIMITED WARRANTY PROVISIONS MAY NOT APPLY TO<br />
PRODUCTS OR SOFTWARE PURCHASED IN THE EUROPEAN UNION. PLEASE<br />
CONTACT YOUR TRIMBLE DEALER FOR APPLICABLE WARRANTY<br />
INFORMATION.<br />
Notices<br />
Class B Statement – Notice to Users. This equipment has been tested<br />
and found to comply with the limits for a Class B digital device,<br />
pursuant to Part 15 of the FCC rules. These limits are designed to<br />
provide reasonable protection against harmful interference in a<br />
residential installation. This equipment generates, uses, and can<br />
radiate radio frequency energy and, if not installed and used in<br />
accordance with the instructions, may cause harmful interference to<br />
radio communication. However, there is no guarantee that<br />
interference will not occur in a particular installation. If this equipment<br />
does cause harmful interference to radio or television reception, which<br />
can be determined by turning the equipment off and on, the user is<br />
encouraged to try to correct the interference by one or more of the<br />
following measures:<br />
– Reorient or relocate the receiving antenna.<br />
– Increase the separation between the equipment and the receiver.<br />
– Connect the equipment into an outlet on a circuit different from<br />
that to which the receiver is connected.<br />
– Consult the dealer or an experienced radio/TV technician for help.<br />
Changes and modifications not expressly approved by the<br />
manufacturer or registrant of this equipment can void your authority<br />
to operate this equipment under Federal Communications Commission<br />
rules.<br />
Notice to Our European Union Customers<br />
For product recycling instructions and more information, please go to:<br />
www.trimble.com/ev.shtml<br />
Recycling in Europe: To recycle Trimble WEEE, Call<br />
+31 497 53 2430, and ask for the "WEEE Associate"<br />
Or<br />
Mail a request for recycling instructions to:<br />
Trimble Europe BV<br />
c/o Menlo Worldwide Logistics<br />
Meerheide 45<br />
5521 DZ Eersel, NL<br />
AUTOPILOT AUTOMATED STEERING SYSTEM INSTALLATION INSTRUCTIONS 2
Safety Information<br />
Always follow the instructions that accompany a Warning or Caution. The information they provide is<br />
intended to minimize the risk of personal injury and/or damage to property. In particular, observe<br />
safety instructions that are presented in the following format:<br />
C<br />
C<br />
WARNING – This alert warns of a potential hazard, which, if not avoided, can cause severe<br />
injury.<br />
CAUTION – This alert warns of a hazard or unsafe practice which, if not avoided, can cause<br />
injury or damage.<br />
Note – An absence of specific alerts does not mean that there are no safety risks involved.<br />
Warnings<br />
C<br />
WARNING – When you are working on the vehicle’s hydraulic systems, vehicle attachments<br />
that are suspended can drop. If you are working around the vehicle, you could suffer serious<br />
injury if an attachment dropped on you. To avoid this risk, lower all vehicle attachments to the<br />
ground before you begin work.<br />
C<br />
C<br />
C<br />
WARNING – If someone else attempts to drive the vehicle while you are working on or under<br />
it, you can suffer serious or fatal injuries. To avoid this possibility, install a lockout box on the<br />
battery terminal to prevent the battery from being reconnected, remove the key from the<br />
vehicle’s ignition switch, and attach a “Do not operate” tag in the cab.<br />
WARNING – Agricultural chemicals can pose serious health risks. If the vehicle has been used<br />
to apply agricultural chemicals, steam clean the vehicle to remove any chemical residue from<br />
the areas of the vehicle where you will be working.<br />
WARNING – Vehicle cabs can be quite high in the air. To avoid potentially serious injury<br />
through falling from this height, always use the steps and handrails, and face the vehicle, when<br />
you enter or exit it.<br />
AUTOPILOT AUTOMATED STEERING SYSTEM INSTALLATION INSTRUCTIONS 3
– Safety Information<br />
Cautions<br />
C<br />
CAUTION – When the vehicle has been running, parts of the vehicle, including the engine and<br />
exhaust, can become extremely hot and can cause serious burns. To avoid burns, allow hot<br />
machine parts to cool before you begin working on them.<br />
C<br />
C<br />
C<br />
C<br />
C<br />
CAUTION – The system installation may bring you into contact with chemical substances, such<br />
as oil, which can cause poisoning. Wash your hands thoroughly after you finish working on the<br />
system.<br />
CAUTION – Battery posts, terminals, and related accessories contain lead and lead<br />
compounds, which can cause serious illness. To avoid ingesting lead, wash your hands<br />
thoroughly after touching the battery.<br />
CAUTION – Always wear protective equipment appropriate to the job conditions and the<br />
nature of the vehicle. This includes wearing protective glasses when you use pressurized air or<br />
water, and correct protective welder’s clothing when welding. Avoid wearing loose clothing or<br />
jewelry that can catch on machine parts or tools.<br />
CAUTION – Parts of the vehicle may be under pressure. To avoid injury from pressurized parts,<br />
relieve all pressure in oil, air, and water systems before you disconnect any lines, fittings, or<br />
related items. To avoid being sprayed by pressurized liquids, hold a rag over fill caps, breathers,<br />
or hose connections when you remove them. Do not use your bare hands to check for<br />
hydraulic leaks. Use a board or cardboard instead.<br />
CAUTION – Do not direct pressurized water at:<br />
- electronic or electrical components or connectors<br />
- bearings<br />
- hydraulic seals<br />
- fuel injection pumps<br />
- any other sensitive parts or components<br />
Set the hose pressure as low as practicable, and spray at a 45° to 90° angle. Keep the nozzle of<br />
the power washer away from the machine at the distance recommended by the manufacturer.<br />
AUTOPILOT AUTOMATED STEERING SYSTEM INSTALLATION INSTRUCTIONS<br />
4
Contents<br />
Safety Information . . . . . . . . . . . . . . . . . . . . . . . . . . . . . . . . . . . . . 3<br />
Warnings . . . . . . . . . . . . . . . . . . . . . . . . . . . . . . . . . . . . . . . . . . . . . . . . . . . . . 3<br />
Cautions . . . . . . . . . . . . . . . . . . . . . . . . . . . . . . . . . . . . . . . . . . . . . . . . . . . . . 4<br />
1 Introduction. . . . . . . . . . . . . . . . . . . . . . . . . . . . . . . . . . . . . . . . . 7<br />
Technical assistance . . . . . . . . . . . . . . . . . . . . . . . . . . . . . . . . . . . . . . . . . . . . . . . 7<br />
Manual system upgrade to <strong>Autopilot</strong> . . . . . . . . . . . . . . . . . . . . . . . . . . . . . . . . . . . . . 8<br />
FmX integrated display and CFX-750 display . . . . . . . . . . . . . . . . . . . . . . . . . . . . . . . 8<br />
Required components . . . . . . . . . . . . . . . . . . . . . . . . . . . . . . . . . . . . . . . . . . . . . . 8<br />
Antenna mounting kits . . . . . . . . . . . . . . . . . . . . . . . . . . . . . . . . . . . . . . . . . . . 8<br />
Accessory kits . . . . . . . . . . . . . . . . . . . . . . . . . . . . . . . . . . . . . . . . . . . . . . . . 8<br />
<strong>Autopilot</strong> hardware organization: As shipped . . . . . . . . . . . . . . . . . . . . . . . . . . . . . . . . . 9<br />
Preparing the vehicle for installation. . . . . . . . . . . . . . . . . . . . . . . . . . . . . . . . . . . . . .10<br />
2 Hydraulic Control Valve <strong>Installation</strong>. . . . . . . . . . . . . . . . . . . . . . . . . . . 11<br />
Vehicle types . . . . . . . . . . . . . . . . . . . . . . . . . . . . . . . . . . . . . . . . . . . . . . . . . . .12<br />
Hydraulic control valve components . . . . . . . . . . . . . . . . . . . . . . . . . . . . . . . . . . . . . .13<br />
Assembling the hydraulic control valve . . . . . . . . . . . . . . . . . . . . . . . . . . . . . . . . . . . .14<br />
Preparing the counterbalance valve . . . . . . . . . . . . . . . . . . . . . . . . . . . . . . . . . . . . . .18<br />
Installing the <strong>Autopilot</strong> manifold . . . . . . . . . . . . . . . . . . . . . . . . . . . . . . . . . . . . . . . .20<br />
Option A . . . . . . . . . . . . . . . . . . . . . . . . . . . . . . . . . . . . . . . . . . . . . . . . . . .20<br />
Option B . . . . . . . . . . . . . . . . . . . . . . . . . . . . . . . . . . . . . . . . . . . . . . . . . . .23<br />
Option C . . . . . . . . . . . . . . . . . . . . . . . . . . . . . . . . . . . . . . . . . . . . . . . . . . .26<br />
Option D . . . . . . . . . . . . . . . . . . . . . . . . . . . . . . . . . . . . . . . . . . . . . . . . . . .28<br />
Installing the counterbalance valve . . . . . . . . . . . . . . . . . . . . . . . . . . . . . . . . . . . . . .29<br />
Option 1 . . . . . . . . . . . . . . . . . . . . . . . . . . . . . . . . . . . . . . . . . . . . . . . . . . .30<br />
Option 2 . . . . . . . . . . . . . . . . . . . . . . . . . . . . . . . . . . . . . . . . . . . . . . . . . . .31<br />
Option 3 . . . . . . . . . . . . . . . . . . . . . . . . . . . . . . . . . . . . . . . . . . . . . . . . . . .34<br />
Making the hydraulic hose connections . . . . . . . . . . . . . . . . . . . . . . . . . . . . . . . . . . . .35<br />
Steering line connections . . . . . . . . . . . . . . . . . . . . . . . . . . . . . . . . . . . . . . . . . .36<br />
Connecting the steering lines to the counterbalance valve . . . . . . . . . . . . . . . . . . . . . . . . .37<br />
Option A . . . . . . . . . . . . . . . . . . . . . . . . . . . . . . . . . . . . . . . . . . . . . . . . . . .38<br />
Option B . . . . . . . . . . . . . . . . . . . . . . . . . . . . . . . . . . . . . . . . . . . . . . . . . . .40<br />
Pressure, Tank, and LS connections . . . . . . . . . . . . . . . . . . . . . . . . . . . . . . . . . . . . . .42<br />
Connections for Type 1 machines . . . . . . . . . . . . . . . . . . . . . . . . . . . . . . . . . . . . .42<br />
Connections for Type 2 machines . . . . . . . . . . . . . . . . . . . . . . . . . . . . . . . . . . . . .47<br />
Connecting P, T and LS to the <strong>Autopilot</strong> manifold. . . . . . . . . . . . . . . . . . . . . . . . . . . . . . .53<br />
3 Autosense Steering Device <strong>Installation</strong> . . . . . . . . . . . . . . . . . . . . . . . . . 55<br />
Autosense steering device components . . . . . . . . . . . . . . . . . . . . . . . . . . . . . . . . . . . .56<br />
Installing the Autosense steering device. . . . . . . . . . . . . . . . . . . . . . . . . . . . . . . . . . . .57<br />
Preparing the harness (P/N 54602 Rev C) . . . . . . . . . . . . . . . . . . . . . . . . . . . . . . . . . . .60<br />
4 Antenna/External Receiver (If Used) <strong>Installation</strong> . . . . . . . . . . . . . . . . . . . 62<br />
Antenna and receiver installation options . . . . . . . . . . . . . . . . . . . . . . . . . . . . . . . . . . .63<br />
Possible mounting methods . . . . . . . . . . . . . . . . . . . . . . . . . . . . . . . . . . . . . . . .63<br />
AUTOPILOT AUTOMATED STEERING SYSTEM INSTALLATION INSTRUCTIONS 5
Mounting an adjustable spar to roof bolts. . . . . . . . . . . . . . . . . . . . . . . . . . . . . . . . . . .64<br />
Attaching the plate with VHB adhesive . . . . . . . . . . . . . . . . . . . . . . . . . . . . . . . . . .66<br />
AG-372 receiver with AgGPS 450/900 radio module (if equipped) components . . . . . . . . . . . . . .69<br />
Installing the AG-372 GPS receiver with<br />
AgGPS 450/900 radio module (if equipped) . . . . . . . . . . . . . . . . . . . . . . . . . . . . . . . . .70<br />
Removable installation . . . . . . . . . . . . . . . . . . . . . . . . . . . . . . . . . . . . . . . . . . .70<br />
Permanent installation . . . . . . . . . . . . . . . . . . . . . . . . . . . . . . . . . . . . . . . . . . .71<br />
Installing an AG-372 receiver with magnetic feet . . . . . . . . . . . . . . . . . . . . . . . . . . . . . . .76<br />
AgGPS 542 receiver components . . . . . . . . . . . . . . . . . . . . . . . . . . . . . . . . . . . . . . .78<br />
Installing the AgGPS 542 receiver . . . . . . . . . . . . . . . . . . . . . . . . . . . . . . . . . . . . . . .79<br />
5 Display <strong>Installation</strong> . . . . . . . . . . . . . . . . . . . . . . . . . . . . . . . . . . . . 82<br />
CFX-750 display components . . . . . . . . . . . . . . . . . . . . . . . . . . . . . . . . . . . . . . . . . .83<br />
FmX integrated display components . . . . . . . . . . . . . . . . . . . . . . . . . . . . . . . . . . . . . .84<br />
Preparing the CFX-750 display . . . . . . . . . . . . . . . . . . . . . . . . . . . . . . . . . . . . . . . . .85<br />
Installing the CFX-750 display. . . . . . . . . . . . . . . . . . . . . . . . . . . . . . . . . . . . . . . . . .86<br />
CFX-750 display: Installing the wiring harness. . . . . . . . . . . . . . . . . . . . . . . . . . . . . . . . .86<br />
Preparing the FmX integrated display . . . . . . . . . . . . . . . . . . . . . . . . . . . . . . . . . . . . .87<br />
Installing the FmX integrated display. . . . . . . . . . . . . . . . . . . . . . . . . . . . . . . . . . . . . .88<br />
FmX integrated display: Installing the wiring harness . . . . . . . . . . . . . . . . . . . . . . . . . . . .89<br />
CFX-750 display and FmX integrated display: Connecting accessory options . . . . . . . . . . . . . . . .90<br />
AgCam . . . . . . . . . . . . . . . . . . . . . . . . . . . . . . . . . . . . . . . . . . . . . . . . . . . .90<br />
CFX-750 and FmX displays: Installing the GNSS antenna and plate . . . . . . . . . . . . . . . . . . . . .92<br />
Spar mount method . . . . . . . . . . . . . . . . . . . . . . . . . . . . . . . . . . . . . . . . . . . . .92<br />
VHB adhesive method. . . . . . . . . . . . . . . . . . . . . . . . . . . . . . . . . . . . . . . . . . . .92<br />
CFX-750 and FmX displays: Installing the RTK radio antenna. . . . . . . . . . . . . . . . . . . . . . . . .96<br />
6 Power Harness <strong>Installation</strong> . . . . . . . . . . . . . . . . . . . . . . . . . . . . . . . 97<br />
FmX integrated display components . . . . . . . . . . . . . . . . . . . . . . . . . . . . . . . . . . . . . .98<br />
CFX-750 display components . . . . . . . . . . . . . . . . . . . . . . . . . . . . . . . . . . . . . . . . . .99<br />
FmX and CFX-750 displays: Installing the power harness. . . . . . . . . . . . . . . . . . . . . . . . . . 101<br />
FmX and CFX-750 displays: Configuring the power bus options . . . . . . . . . . . . . . . . . . . . . . 103<br />
Display power button is used to turn on the <strong>Autopilot</strong> system . . . . . . . . . . . . . . . . . . . . 103<br />
External switch is used to turn on the <strong>Autopilot</strong> system . . . . . . . . . . . . . . . . . . . . . . . . 103<br />
Ignition is used to turn on the <strong>Autopilot</strong> system . . . . . . . . . . . . . . . . . . . . . . . . . . . . 105<br />
7 Remote Engage Switch <strong>Installation</strong> . . . . . . . . . . . . . . . . . . . . . . . . . . .106<br />
Remote engage switch components: Rocker switch . . . . . . . . . . . . . . . . . . . . . . . . . . . . 107<br />
Remote engage switch components: Foot switch . . . . . . . . . . . . . . . . . . . . . . . . . . . . . 108<br />
Preparing the remote engage cable . . . . . . . . . . . . . . . . . . . . . . . . . . . . . . . . . . . . . 109<br />
Using the remote engage switch . . . . . . . . . . . . . . . . . . . . . . . . . . . . . . . . . . . . . . . 112<br />
8 Controller <strong>Installation</strong> . . . . . . . . . . . . . . . . . . . . . . . . . . . . . . . . . .113<br />
Installing the controller . . . . . . . . . . . . . . . . . . . . . . . . . . . . . . . . . . . . . . . . . . . . 114<br />
Back method: When the rear ECU slot is free . . . . . . . . . . . . . . . . . . . . . . . . . . . . . . 114<br />
Seat mounting . . . . . . . . . . . . . . . . . . . . . . . . . . . . . . . . . . . . . . . . . . . . . . . 119<br />
Installing the controller cables . . . . . . . . . . . . . . . . . . . . . . . . . . . . . . . . . . . . . . . . 129<br />
Controller connections . . . . . . . . . . . . . . . . . . . . . . . . . . . . . . . . . . . . . . . . . . . . 130<br />
9 Final Machine Check . . . . . . . . . . . . . . . . . . . . . . . . . . . . . . . . . . .133<br />
AUTOPILOT AUTOMATED STEERING SYSTEM INSTALLATION INSTRUCTIONS 6
CHAPTER<br />
1<br />
Introduction 1<br />
In this chapter:<br />
• Technical assistance<br />
• Manual system upgrade to <strong>Autopilot</strong><br />
• Required components<br />
• <strong>Autopilot</strong> hardware organization: As shipped<br />
• Preparing the vehicle for installation<br />
This manual describes how to install the<br />
Trimble ® <strong>Autopilot</strong> automated steering<br />
system.<br />
Even if you have used other Global Navigation<br />
Satellite <strong>System</strong> (GNSS) such as the United<br />
States', Trimble recommends that you spend<br />
some time reading this manual to learn about<br />
the special features of this product. If you are<br />
not familiar with GNSS, visit the Trimble website<br />
(www.trimble.com) for an interactive look at<br />
Trimble and GNSS.<br />
Technical assistance<br />
If you have a problem and cannot find the information you need in the product documentation,<br />
contact Trimble technical support:<br />
1. Log into http://agpartners.trimble.com.<br />
2. Click the Feedback link at the right of the screen. A form appears.<br />
3. Complete the form and then click Submit Feedback.<br />
AUTOPILOT AUTOMATED STEERING SYSTEM INSTALLATION INSTRUCTIONS 7
1 – Introduction<br />
Manual system upgrade to <strong>Autopilot</strong><br />
FmX integrated display and CFX-750 display<br />
Retain<br />
Trimble FmX ® integrated display: P/N 93000-xx<br />
Antenna for display: P/N 60600-02 (DGPS) or<br />
77038-00 (OmniStar/RTK)<br />
Antenna to receiver cable: P/N 50449<br />
Power cable FmX® integrated display:<br />
P/N 66694<br />
Trimble CFX-750 display: P/N 94000-xx<br />
Power cable CFX-750 display: P/N 77282<br />
Basic cable (both displays): P/N 67258<br />
Remove<br />
Required components<br />
Kits required<br />
Platform kit: P/N 54035-52<br />
Hydraulic hose kit: P/N 63579<br />
Special tools<br />
10.5 mm drill bit<br />
Allen wrench set (metric and imperial)<br />
Antenna mounting kits<br />
Kits required<br />
Select the spar mount that is correct for your tractor model, based on the measurements below. For more<br />
information, see page 64.<br />
Bracket, GPS spar 36.5" - 46.5": P/N 53676<br />
Bracket, GPS spar 54" - 64”: P/N 66774<br />
Accessory kits<br />
Accessory options<br />
Remote engage switch assembly – standard Euro: P/N 57227-10<br />
Remote engage switch assembly – full Euro: P/N 57227-20<br />
Remote engage foot pedal: P/N 57259<br />
AUTOPILOT AUTOMATED STEERING SYSTEM INSTALLATION INSTRUCTIONS<br />
8
1 – Introduction<br />
<strong>Autopilot</strong> hardware organization: As shipped<br />
Hardware Component See...<br />
Platform kit: P/N 54035-52<br />
Hydraulic valve<br />
Hydraulic manifold<br />
Transducer flow switch<br />
Manual override cable<br />
Hydraulic brackets and bolt kits<br />
Hydraulic valve cable<br />
Autosense steering device and cabling<br />
Autosense mounting bracket and hardware<br />
Chapter 2<br />
Chapter 3<br />
Power switch Chapter 6<br />
Bolt kit controller Chapter 8<br />
Common parts Controller Chapter 8<br />
GNSS receiver<br />
Display<br />
Hydraulic hose kit: P/N 63579<br />
Roof bracket kit: P/N 62388-02<br />
Bracket, GPS spar 36.5" - 46.5":<br />
P/N 53676<br />
Bracket, GPS spar 54" - 64:<br />
P/N 66774<br />
Controller mounting bracket Chapter 1<br />
Cable kit:<br />
• Main wiring harness<br />
• Power bus auxiliary wiring harness<br />
• Sonalert alarm<br />
GNSS receiver<br />
GNSS antenna<br />
GNSS receiver power/data cable<br />
RTK radio, cable, and radio antenna<br />
FmX integrated display<br />
CFX-750 display<br />
Display cable<br />
Mounting bracket<br />
Hydraulic hoses<br />
Hydraulic adaptors<br />
Roof brackets<br />
Bolt kit, roof bracket<br />
Chapter 8<br />
Chapter 4<br />
Chapter 5<br />
Chapter 2<br />
Chapter 4<br />
AUTOPILOT AUTOMATED STEERING SYSTEM INSTALLATION INSTRUCTIONS<br />
9
1 – Introduction<br />
Preparing the vehicle for installation<br />
1. Park the vehicle on a hard, level surface. Block the front and rear wheels.<br />
2. Align the steering straight ahead. On an articulated vehicle, install the articulation locks.<br />
3. Remove all dirt and debris from the areas of the vehicle where the <strong>Autopilot</strong> system will be<br />
installed.<br />
4. Open all kit boxes and check the contents of the box against the packing list/s. Lay all of the parts<br />
out on a clean workbench.<br />
Note – The left and right sides of the vehicle are referenced while standing behind the unit, facing the<br />
normal direction of travel.<br />
AUTOPILOT AUTOMATED STEERING SYSTEM INSTALLATION INSTRUCTIONS<br />
10
CHAPTER<br />
2<br />
Hydraulic Control Valve <strong>Installation</strong> 2<br />
In this chapter:<br />
• Vehicle types<br />
• Hydraulic control valve components<br />
• Assembling the hydraulic control valve<br />
• Preparing the counterbalance valve<br />
• Installing the <strong>Autopilot</strong> manifold<br />
• Installing the counterbalance valve<br />
• Making the hydraulic hose connections<br />
• Connecting the steering lines to the<br />
counterbalance valve<br />
• Pressure, Tank, and LS connections<br />
• Connecting P, T and LS to the <strong>Autopilot</strong><br />
manifold<br />
This chapter describes how to install the<br />
hydraulic control valve and hoses.<br />
AUTOPILOT AUTOMATED STEERING SYSTEM INSTALLATION INSTRUCTIONS 11
2 – Hydraulic Control Valve <strong>Installation</strong><br />
Vehicle types<br />
Depending on the type of machine that you use, select the appropriate installation option to<br />
configure the <strong>Autopilot</strong> valve.<br />
Machine<br />
type<br />
Valve configuration<br />
1. The LS check valve is inserted in<br />
the GP-LS2 port in the H3 valve.<br />
2. The 160 psi Pcomp cartridge is<br />
inserted into the valve.<br />
Valve stack description<br />
Vehicle remotes are split into two columns; one on<br />
each side of the upper three-point link.<br />
1<br />
2<br />
1. The LS Check valve is removed<br />
from the GP-LS2 port in the H3<br />
valve and replaced with a -4ORB<br />
plug<br />
2. The 80 psi Pcomp cartridge is<br />
inserted into the valve.<br />
Vehicle remotes are in one column on the right side<br />
of the tractor.<br />
AUTOPILOT AUTOMATED STEERING SYSTEM INSTALLATION INSTRUCTIONS<br />
12
2 – Hydraulic Control Valve <strong>Installation</strong><br />
Hydraulic control valve components<br />
k<br />
n<br />
q<br />
s<br />
i<br />
h<br />
c<br />
e<br />
f<br />
k<br />
j<br />
u<br />
q<br />
j<br />
p<br />
g<br />
n<br />
f<br />
d<br />
l<br />
j<br />
j<br />
r<br />
o<br />
f<br />
p<br />
f<br />
Item Description Part number Item Description Part number<br />
c 113" hose F451TCJSJ9-08-08-08-113 m Fitting (not shown) 4 HP50N-S<br />
d 113" hose F451TCJSJ7-08-08-08-113 n Fitting (x2) 8 FNL-S<br />
e 113" hose F451TCJSJ7-04-04-04-113 o Fitting 4F5OLO-S<br />
f 28" hose (x4) F451TCJSJ9-06-06-06-28 p Fitting (x2) 6R6LO-S<br />
g Fitting 8-12F42EDMLO q Fitting (x2) 8R6LO-S<br />
h Fitting 8M22F87OMLO-S r Fitting 8C5OLO-S<br />
i Fitting 4M12F87OMLO-S s Fitting 4C6LO-S<br />
j Fitting (x4) 6-8F5OLO-S t Fitting (not shown) HP-B-13-RFL<br />
k Fitting (x2) 6-8C5OLO-S u Fitting 8M27F870ML0<br />
l Fitting 8F5OLO-S<br />
Note – Part numbers are Parker numbers and are for reference only.<br />
AUTOPILOT AUTOMATED STEERING SYSTEM INSTALLATION INSTRUCTIONS<br />
13
2 – Hydraulic Control Valve <strong>Installation</strong><br />
Assembling the hydraulic control valve<br />
WARNING – To avoid potentially serious personal injury or illness, and to prevent damage to<br />
Cequipment, make sure that you read and understand the Safety Information chapter.<br />
Step 1<br />
Place the hydraulic control valve and<br />
components on a clean working<br />
surface, including the 300 PSI pressure<br />
compensation valve and the 300 PSI<br />
check valve.<br />
Step 2<br />
Remove the existing check valve from<br />
above the T port as shown.<br />
Step 3<br />
Install the supplied 300 PSI check valve,<br />
which is stamped “CV1-10-P-0-300”.<br />
AUTOPILOT AUTOMATED STEERING SYSTEM INSTALLATION INSTRUCTIONS<br />
14
2 – Hydraulic Control Valve <strong>Installation</strong><br />
Step 4<br />
Install the following fittings in the ports<br />
as shown:<br />
• -8 ORFS 90 degree elbow with jam<br />
nut c into the T port.<br />
Note – Keep the jam nut loose for now.<br />
• -4 ORFS straight d into the LS2 port.<br />
c<br />
d<br />
Step 5<br />
There are two options for the check<br />
valve installed in the GP-LS2 port; the<br />
option that you use will depend on the<br />
type of machine you have.<br />
To determine the correct option to use,<br />
see Vehicle types, page 12.<br />
Machine type 1<br />
If it is not already fitted, install the<br />
check valve in the port, as shown.<br />
Machine type 2<br />
If it is already fitted, remove the check<br />
valve.<br />
Step 6<br />
Install a -4 ORFS plug in place of the<br />
check valve.<br />
AUTOPILOT AUTOMATED STEERING SYSTEM INSTALLATION INSTRUCTIONS<br />
15
2 – Hydraulic Control Valve <strong>Installation</strong><br />
Step 7<br />
Install two -6 ORFS straight fittings into<br />
the A and B ports.<br />
Step 8<br />
Determine the best option for the<br />
vehicle and install either a -8 ORFS<br />
straight fitting or a -8 ORS-ORB 90°<br />
fitting in the P port.<br />
AUTOPILOT AUTOMATED STEERING SYSTEM INSTALLATION INSTRUCTIONS<br />
16
2 – Hydraulic Control Valve <strong>Installation</strong><br />
Step 9<br />
Locate the pressure compensation<br />
cartridge.<br />
There are two options for the pressure<br />
compensation cartridge; the option<br />
that you use will depend on the type of<br />
machine you have.<br />
To determine the correct option to use,<br />
see Vehicle types, page 12.<br />
Machine type 1<br />
Use the cartridge stamped<br />
“DPS2-10-F-F-0-160”.<br />
Machine type 2<br />
Use the cartridge stamped<br />
“DPS2-10-F-F-0-080”.<br />
Step 10<br />
Insert the P-Comp cartridge into the<br />
P-Comp port.<br />
Note – To seal the cavity correctly, the<br />
o-rings and backup rings must be clean<br />
and in place.<br />
AUTOPILOT AUTOMATED STEERING SYSTEM INSTALLATION INSTRUCTIONS<br />
17
2 – Hydraulic Control Valve <strong>Installation</strong><br />
Preparing the counterbalance valve<br />
Step 1<br />
Locate the dual counterbalance valve<br />
(DCBV) and fittings. Remove any plastic<br />
caps.<br />
Step 2<br />
Install a -6 ORFS, 90° fitting into the V1<br />
and V2 ports.<br />
For more information about the<br />
orientation of the fitting, see<br />
Connecting P, T and LS to the <strong>Autopilot</strong><br />
manifold, page 53.<br />
Step 3<br />
Install -6 ORFS straight connectors c<br />
into the C1 and C2 ports.<br />
Attach -6 ORFS swivel tees d to each of<br />
the straight connectors on the C1 and<br />
C2 ports.<br />
For more information about the<br />
orientation of the fittings, see<br />
Connecting P, T and LS to the <strong>Autopilot</strong><br />
manifold, page 53<br />
c d<br />
c<br />
d<br />
AUTOPILOT AUTOMATED STEERING SYSTEM INSTALLATION INSTRUCTIONS<br />
18
2 – Hydraulic Control Valve <strong>Installation</strong><br />
Step 4<br />
Connect the pressure sensor to the<br />
counterbalance manifold.<br />
AUTOPILOT AUTOMATED STEERING SYSTEM INSTALLATION INSTRUCTIONS<br />
19
2 – Hydraulic Control Valve <strong>Installation</strong><br />
Installing the <strong>Autopilot</strong> manifold<br />
There are different possible locations for mounting both the H3 valve and the DCBV, depending on<br />
the locations available on your vehicle. Review the options and then choose the location that the<br />
space configuration on your machine allows.<br />
Option A<br />
Step 1<br />
Locate the area in front of the machine<br />
ECU mounting plate. Mount the<br />
<strong>Autopilot</strong> manifold in this location.<br />
Step 2<br />
Install the <strong>Autopilot</strong> manifold in the<br />
location shown.<br />
Step 3<br />
Use the <strong>Autopilot</strong> manifold to carefully<br />
mark the location of the mounting<br />
holes.<br />
AUTOPILOT AUTOMATED STEERING SYSTEM INSTALLATION INSTRUCTIONS<br />
20
2 – Hydraulic Control Valve <strong>Installation</strong><br />
Step 4<br />
Before drilling holes in the ECU<br />
mounting plate, unbolt the ECU from<br />
the machine.<br />
Make sure that you remove the ECU at<br />
this step so that it is not damaged when<br />
you drill the holes for mounting the<br />
<strong>Autopilot</strong> manifold.<br />
Removing the ECU also provides access<br />
to the mounting hardware.<br />
AUTOPILOT AUTOMATED STEERING SYSTEM INSTALLATION INSTRUCTIONS<br />
21
2 – Hydraulic Control Valve <strong>Installation</strong><br />
Step 5<br />
Drill two 7 / 16 " holes for the supplied 3 / 8 "<br />
manifold mounting hardware.<br />
Mount the manifold to the ECU<br />
mounting plate then reattach the<br />
engine ECU to the mounting plate.<br />
AUTOPILOT AUTOMATED STEERING SYSTEM INSTALLATION INSTRUCTIONS<br />
22
2 – Hydraulic Control Valve <strong>Installation</strong><br />
Option B<br />
Step 1<br />
Locate the area in front of the machine<br />
ECU mounting plate. Mount the<br />
<strong>Autopilot</strong> manifold in this location.<br />
Step 2<br />
On some machines this valve is in the<br />
location of the <strong>Autopilot</strong> manifold<br />
mounting; to install the <strong>Autopilot</strong><br />
manifold relocate this valve to an<br />
alternate location that is out of the way.<br />
Step 3<br />
Use the <strong>Autopilot</strong> manifold to carefully<br />
mark the location of the mounting<br />
holes.<br />
AUTOPILOT AUTOMATED STEERING SYSTEM INSTALLATION INSTRUCTIONS<br />
23
2 – Hydraulic Control Valve <strong>Installation</strong><br />
Step 4<br />
Make sure that the marked holes do<br />
not interfere with the mounting bosses<br />
for the machine ECU on the other side<br />
of the plate.<br />
Before drilling holes in the ECU<br />
mounting plate, unbolt the ECU from<br />
the machine. Make sure that you<br />
remove the ECU at this step so that it is<br />
not damaged when you drill the holes<br />
for mounting the <strong>Autopilot</strong> manifold.<br />
Removing the ECU also provides access<br />
to the mounting hardware.<br />
Step 5<br />
Drill two 7 / 16 " holes for the supplied 3 / 8 "<br />
manifold mounting hardware.<br />
Mount the manifold to the ECU<br />
mounting plate then re attach the<br />
engine ECU to the mounting plate..<br />
AUTOPILOT AUTOMATED STEERING SYSTEM INSTALLATION INSTRUCTIONS<br />
24
2 – Hydraulic Control Valve <strong>Installation</strong><br />
AUTOPILOT AUTOMATED STEERING SYSTEM INSTALLATION INSTRUCTIONS<br />
25
2 – Hydraulic Control Valve <strong>Installation</strong><br />
Option C<br />
Step 1<br />
Mark and drill two 5 / 16 " holes<br />
approximately 5 ¼" inches apart. The<br />
holes should be drilled on the metal<br />
support angle pieces under the hood of<br />
the machine in front of the cab.<br />
Step 2<br />
Mount the counterbalance manifold<br />
mounting plate to the <strong>Autopilot</strong><br />
manifold as shown.<br />
Step 3<br />
Attach the counterbalance manifold to<br />
the mounting plate using the provided<br />
hardware. Assemble two<br />
-6 run T-fittings to the fittings on the C1<br />
c and C2 d ports of the manifold.<br />
d<br />
c<br />
AUTOPILOT AUTOMATED STEERING SYSTEM INSTALLATION INSTRUCTIONS<br />
26
2 – Hydraulic Control Valve <strong>Installation</strong><br />
Step 4<br />
Attach the <strong>Autopilot</strong> manifold and the<br />
counterbalance manifold assembly to<br />
the tractor using the provided<br />
hardware.<br />
AUTOPILOT AUTOMATED STEERING SYSTEM INSTALLATION INSTRUCTIONS<br />
27
2 – Hydraulic Control Valve <strong>Installation</strong><br />
Option D<br />
Some machines require the <strong>Autopilot</strong> manifold be installed on the right-side hood support rail<br />
instead of the standard left-side rail.<br />
Step 1<br />
Mark and drill two 5 / 16 " holes<br />
approximately 5 ¼" inches apart, on the<br />
right-hand side hood support rail c.<br />
c<br />
Step 2<br />
Use the provided hardware to attach<br />
the <strong>Autopilot</strong> manifold to the machine.<br />
AUTOPILOT AUTOMATED STEERING SYSTEM INSTALLATION INSTRUCTIONS<br />
28
2 – Hydraulic Control Valve <strong>Installation</strong><br />
Installing the counterbalance valve<br />
There are three options for installing the DCBV; the option that you use will depend on the type of<br />
machine that you have.<br />
Option 1<br />
Step 1<br />
On the right side of the machine locate<br />
the ECU mounting plate.<br />
Fit the DCBV to the side of the<br />
mounting plate.<br />
Step 2<br />
Use the DCBV as a template to mark<br />
and drill two 5 / 16 " holes.<br />
Step 3<br />
Use the supplied ¼” hardware to attach<br />
to the ECU mounting plate .<br />
AUTOPILOT AUTOMATED STEERING SYSTEM INSTALLATION INSTRUCTIONS<br />
29
2 – Hydraulic Control Valve <strong>Installation</strong><br />
Option 2<br />
Step 1<br />
Install the DCBV under the hood<br />
mounting area on the machine. Use<br />
the DCBV as a template to mark the<br />
location to drill two mounting holes.<br />
Step 2<br />
The hole on the left side of the machine<br />
should be approximately 2 inches from<br />
the plate (as shown), and ¾" from the<br />
edge of the mounting surface.<br />
Two inches<br />
AUTOPILOT AUTOMATED STEERING SYSTEM INSTALLATION INSTRUCTIONS<br />
30
2 – Hydraulic Control Valve <strong>Installation</strong><br />
3/4 inch<br />
Step 3<br />
Drill two 5 / 16 ” mounting holes.<br />
AUTOPILOT AUTOMATED STEERING SYSTEM INSTALLATION INSTRUCTIONS<br />
31
2 – Hydraulic Control Valve <strong>Installation</strong><br />
Step 4<br />
Use the supplied hardware to attach<br />
the DCBV.<br />
AUTOPILOT AUTOMATED STEERING SYSTEM INSTALLATION INSTRUCTIONS<br />
32
2 – Hydraulic Control Valve <strong>Installation</strong><br />
Option 3<br />
Step 1<br />
Mount the counterbalance manifold<br />
next to the <strong>Autopilot</strong> manifold as<br />
shown.<br />
Step 2<br />
Mark and drill a 5 / 16 " hole at c and<br />
then use the supplied hardware to<br />
mount the dual counterbalance valve.<br />
c<br />
AUTOPILOT AUTOMATED STEERING SYSTEM INSTALLATION INSTRUCTIONS<br />
33
2 – Hydraulic Control Valve <strong>Installation</strong><br />
Making the hydraulic hose connections<br />
Steering line connections<br />
Step 1<br />
Locate the clamped steel lines on the<br />
left side of the engine. Label the upper<br />
line and hose as B and the lower line<br />
and hose as A, as shown.<br />
Disconnect the hoses.<br />
L<br />
M<br />
Step 2<br />
Disconnect the steering hoses from the<br />
A and B hard lines. Route the steering<br />
hoses to the V1 and V2 ports of the<br />
DCBV.<br />
L<br />
M<br />
Step 3<br />
Connect the C1 c and C2 d hoses to<br />
the A and B hard lines, where the hoses<br />
were removed from in Step 2 above.<br />
Route the C1 and C2 hoses to the C1<br />
and C2 ports of the DCBV.<br />
c<br />
d<br />
AUTOPILOT AUTOMATED STEERING SYSTEM INSTALLATION INSTRUCTIONS<br />
34
2 – Hydraulic Control Valve <strong>Installation</strong><br />
Connecting the steering lines to the counterbalance<br />
valve<br />
There are two options for connecting the steering lines to the dual counterbalance valve (DCBV); the<br />
option that you use will depend on the type of machine that you have.<br />
Option A<br />
Step 1<br />
Route the existing machine hoses<br />
(removed from the hard lines in<br />
Steering line connections, page 36) to<br />
the V1 and V2 ports of the DCBV.<br />
Connect the A line to the V1 port, and<br />
the B line to the V2 port.<br />
V2<br />
V1<br />
Step 2<br />
Connect the 90° ends of the C1 and C2<br />
hoses to the end of the run tee fittings<br />
on the C1 and C2 ports of the DCBV<br />
manifold.<br />
C2<br />
C1<br />
Step 3<br />
Connect the 90° ends of the A and B<br />
hoses to the branch of the run tee<br />
fittings on the C1 and C2 ports of the<br />
DCBV manifold.<br />
M<br />
L<br />
AUTOPILOT AUTOMATED STEERING SYSTEM INSTALLATION INSTRUCTIONS<br />
35
2 – Hydraulic Control Valve <strong>Installation</strong><br />
Step 4<br />
Route the A and B hoses to the A and B<br />
ports of the <strong>Autopilot</strong> manifold and<br />
then connect them to the fittings on<br />
the A and B ports.<br />
AUTOPILOT AUTOMATED STEERING SYSTEM INSTALLATION INSTRUCTIONS<br />
36
2 – Hydraulic Control Valve <strong>Installation</strong><br />
Option B<br />
Step 1<br />
Connect the straight ends of the A and<br />
B hoses to the branches of the run tee<br />
fittings on the C1 and C2 ports of the<br />
DCBV.<br />
L M<br />
Step 2<br />
Connect the 90° ends of the C1 and C2<br />
hoses to the end of the run tee fittings<br />
on the C1 and C2 ports of the DCBV.<br />
Step 3<br />
Connect the machines steering lines<br />
(removed from the hard lines in<br />
Steering line connections, page 36) to<br />
the V1 and V2 ports of the DCBV<br />
manifold.<br />
V2<br />
V1<br />
AUTOPILOT AUTOMATED STEERING SYSTEM INSTALLATION INSTRUCTIONS<br />
37
2 – Hydraulic Control Valve <strong>Installation</strong><br />
Step 4<br />
Connect the 90° ends of the A and B<br />
hoses to the fittings on the A and B<br />
ports of the <strong>Autopilot</strong> manifold.<br />
AUTOPILOT AUTOMATED STEERING SYSTEM INSTALLATION INSTRUCTIONS<br />
38
2 – Hydraulic Control Valve <strong>Installation</strong><br />
Pressure, Tank, and LS connections<br />
Depending on the type of machine that you have, use one of the following options. To determine the<br />
correct option to use, see Vehicle types, page 12.<br />
Connections for Type 1 machines<br />
Step 1<br />
Locate the Power Beyond P and LS<br />
ports on the valve stack at the rear of<br />
the tractor.<br />
LS<br />
P<br />
For machines with electronic remotes:<br />
• c Load sense<br />
• d Pressure<br />
c<br />
d<br />
Step 2<br />
Remove the plug from the P port and<br />
install a -8 ORFS straight fitting.<br />
Remove the plug from the LS port and<br />
install a -4 ORFS straight fitting.<br />
AUTOPILOT AUTOMATED STEERING SYSTEM INSTALLATION INSTRUCTIONS<br />
39
2 – Hydraulic Control Valve <strong>Installation</strong><br />
Step 3<br />
Install a -8 swivel tee on the P port and<br />
a -8 ORFS plug to the run side of the<br />
tee.<br />
Step 4<br />
Install a -4 ORFS 90° elbow in the<br />
LS port.<br />
Step 5<br />
Locate the T port c at the back of the<br />
tractor, underneath the valve stack.<br />
c<br />
AUTOPILOT AUTOMATED STEERING SYSTEM INSTALLATION INSTRUCTIONS<br />
40
2 – Hydraulic Control Valve <strong>Installation</strong><br />
Step 6<br />
Install a -8 straight fitting into the<br />
T port.<br />
Step 7<br />
Install a -8 swivel tee on the T port and<br />
a -8 ORFS plug to the run side of the<br />
tee.<br />
Step 8<br />
Locate the provided 113" P hose, the<br />
113" T hose, and the 113" LS2 hose.<br />
Route them underneath the cab from<br />
the back of the tractor toward the<br />
<strong>Autopilot</strong> manifold.<br />
AUTOPILOT AUTOMATED STEERING SYSTEM INSTALLATION INSTRUCTIONS<br />
41
2 – Hydraulic Control Valve <strong>Installation</strong><br />
Step 9<br />
Connect the 45° end of the T hose to<br />
the branch of the tee on the T port.<br />
Step 10<br />
Connect the straight end of the P hose<br />
to the branch of the tee on the P port.<br />
Keep the connection loose at this stage.<br />
Step 11<br />
Connect the straight end of the LS hose<br />
to the 90° elbow on the LS port.<br />
AUTOPILOT AUTOMATED STEERING SYSTEM INSTALLATION INSTRUCTIONS<br />
42
2 – Hydraulic Control Valve <strong>Installation</strong><br />
Step 12<br />
Check that the P, T, and LS hoses are<br />
routed properly underneath the cab<br />
toward the <strong>Autopilot</strong> valve to minimize<br />
the risk of damage.<br />
Note – This tractor is fitted with a soft<br />
cab suspension that can cause large<br />
cab movements in rough terrain<br />
conditions. Therefore, attach the hoses<br />
to the chassis rather than the cab to<br />
prevent the hoses from being damaged.<br />
AUTOPILOT AUTOMATED STEERING SYSTEM INSTALLATION INSTRUCTIONS<br />
43
2 – Hydraulic Control Valve <strong>Installation</strong><br />
Connections for Type 2 machines<br />
Step 1<br />
At the rear of the machine locate the<br />
remote valve stack; this is where you<br />
will make the pressure, tank, and load<br />
sense connections.<br />
Step 2<br />
The LS connection point is on the back<br />
of the valve stack, between the cab and<br />
the valve stack, as shown.<br />
Step 3<br />
Locate and remove the plug in the LS<br />
connection port.<br />
AUTOPILOT AUTOMATED STEERING SYSTEM INSTALLATION INSTRUCTIONS<br />
44
2 – Hydraulic Control Valve <strong>Installation</strong><br />
Step 4<br />
Install the supplied fitting into the LS<br />
connection port.<br />
Mechanical remote valve stack LS port<br />
Step 5<br />
Insert an M12 ORB to -4 ORFS straight<br />
adaptor.<br />
Adaptor in LS port:<br />
Mechanical remote vave stack<br />
AUTOPILOT AUTOMATED STEERING SYSTEM INSTALLATION INSTRUCTIONS<br />
45
2 – Hydraulic Control Valve <strong>Installation</strong><br />
Step 6<br />
Attach the straight end of the LS hose<br />
to the fitting installed in Step 4 above,<br />
in the LS connection port.<br />
Adaptor in LS port:<br />
Electro-hydraulic valve stack<br />
Step 7<br />
The pressure and tank connection<br />
points are located in the area just<br />
below the valve stack, as shown.<br />
N<br />
V<br />
AUTOPILOT AUTOMATED STEERING SYSTEM INSTALLATION INSTRUCTIONS<br />
46
2 – Hydraulic Control Valve <strong>Installation</strong><br />
Step 8<br />
Remove the plugs in the P and T ports.<br />
Tapping on the plug with a mallet may<br />
help to loosen them.<br />
Step 9<br />
Assemble the supplied M27x2.0- 8ORS<br />
fitting into the tank port, as shown.<br />
AUTOPILOT AUTOMATED STEERING SYSTEM INSTALLATION INSTRUCTIONS<br />
47
2 – Hydraulic Control Valve <strong>Installation</strong><br />
Step 10<br />
Attach the straight end of the T hose to<br />
the branch of the run tee fitting.<br />
Step 11<br />
Remove the plug in the P port of the<br />
machine.<br />
Step 12<br />
Assemble the provided M22 fitting,<br />
then assemble the run tee fitting (with<br />
the cap on the end of the run tee<br />
fitting).<br />
AUTOPILOT AUTOMATED STEERING SYSTEM INSTALLATION INSTRUCTIONS<br />
48
2 – Hydraulic Control Valve <strong>Installation</strong><br />
Step 13<br />
Assemble the straight end of the P hose<br />
to the branch of the run tee fitting on<br />
the P port.<br />
Route all of the hoses under the cab to<br />
the <strong>Autopilot</strong> manifold.<br />
AUTOPILOT AUTOMATED STEERING SYSTEM INSTALLATION INSTRUCTIONS<br />
49
2 – Hydraulic Control Valve <strong>Installation</strong><br />
Connecting P, T and LS to the <strong>Autopilot</strong> manifold<br />
Step 1<br />
Assemble the 90° end of the P hose to<br />
the P port on the <strong>Autopilot</strong> manifold.<br />
Tighten both ends of the hose.<br />
Step 2<br />
Fit the T hose to the T port of the<br />
<strong>Autopilot</strong> manifold,<br />
Fit the LS hose to the LS2 port on the<br />
<strong>Autopilot</strong> manifold.<br />
The images to the right show the<br />
different hose orientations for the<br />
different manifold and DCBV mounting<br />
options.<br />
AUTOPILOT AUTOMATED STEERING SYSTEM INSTALLATION INSTRUCTIONS<br />
50
2 – Hydraulic Control Valve <strong>Installation</strong><br />
.<br />
AUTOPILOT AUTOMATED STEERING SYSTEM INSTALLATION INSTRUCTIONS<br />
51
CHAPTER<br />
3<br />
Autosense Steering Device<br />
<strong>Installation</strong> 3<br />
In this chapter:<br />
• Autosense steering device components<br />
• Installing the Autosense steering device<br />
• Preparing the harness (P/N 54602 Rev C)<br />
This chapter describes how to install the<br />
Autosense steering device.<br />
If the required mounting location is not<br />
accessible, chose a different place. To ensure<br />
proper function, the Autosense device must be<br />
located where it is free of obstructions and can<br />
rotate with the wheels when they turn.<br />
On articulated vehicles, mount the Autosense<br />
device on the opposite side of the pivot point to<br />
the <strong>Autopilot</strong> controller.<br />
Mount the device base down or base up so that<br />
it maintains a level orientation. Do not mount it<br />
on its side. An angle of up to 10° in any direction<br />
is acceptable.<br />
To avoid stretching the cable, leave adequate<br />
length on the service loop.<br />
AUTOPILOT AUTOMATED STEERING SYSTEM INSTALLATION INSTRUCTIONS 55
3 – Autosense Steering Device <strong>Installation</strong><br />
Autosense steering device components<br />
f<br />
g<br />
c<br />
e<br />
d<br />
Item Description Trimble part number<br />
c P-6 connector<br />
d<br />
e<br />
Power connector<br />
Autosense connector<br />
f Jumper cable 57560<br />
g Autosense steering cable 57885<br />
AUTOPILOT AUTOMATED STEERING SYSTEM INSTALLATION INSTRUCTIONS<br />
56
3 – Autosense Steering Device <strong>Installation</strong><br />
Installing the Autosense steering device<br />
C<br />
WARNING – To avoid potentially serious personal injury or illness, and to prevent damage to<br />
equipment, make sure that you read and understand the Safety Information chapter.<br />
Step 1<br />
Locate the mounting location at the left<br />
kingpin.<br />
Remove the two bolts shown.<br />
Step 2<br />
Use the existing hardware to mount the<br />
Autosense bracket as shown.<br />
Step 3<br />
Mount the Autosense device on the<br />
bracket with the connector pointing<br />
toward the center of the vehicle. Use<br />
the six provided #6 x ½" socket head<br />
screws.<br />
AUTOPILOT AUTOMATED STEERING SYSTEM INSTALLATION INSTRUCTIONS<br />
57
3 – Autosense Steering Device <strong>Installation</strong><br />
Step 4<br />
Turn the vehicle steering as far to the<br />
right as possible (the mechanical lock)<br />
to ensure that there is no risk of<br />
damage to the Autosense connector<br />
from the bolt that reduces the rotation<br />
of the fender.<br />
Step 5<br />
Standard axle<br />
If the tractor is fitted with a standard<br />
axle, route the steering cable to the<br />
steering device along the tie-rod and<br />
then connect it to the steering device.<br />
Supersteer axle<br />
If the tractor is fitted with a SuperSteer<br />
axle, route the steering cable along the<br />
main axle and then connect it to the<br />
steering device.<br />
STANDARD AXLE<br />
SUPERSTEER AXLE<br />
AUTOPILOT AUTOMATED STEERING SYSTEM INSTALLATION INSTRUCTIONS<br />
58
3 – Autosense Steering Device <strong>Installation</strong><br />
Step 6<br />
Secure the cable with cable ties or<br />
adhesive plastic consoles (not<br />
supplied).<br />
Leave adequate length on the service<br />
loop to avoid stretching the cable.<br />
CABLE TIES<br />
Step 7<br />
Connect the steering device cable<br />
connection to P-6 on the main wiring<br />
harness. P-6 is labeled “Steering<br />
Sensor”.<br />
ADHESIVE PLASTIC CONSOLES<br />
AUTOPILOT AUTOMATED STEERING SYSTEM INSTALLATION INSTRUCTIONS<br />
59
3 – Autosense Steering Device <strong>Installation</strong><br />
Preparing the harness (P/N 54602 Rev C)<br />
Step 1<br />
Remove the black Deutsch DTM<br />
receptacle from the P-13 sensors leg of<br />
the auxiliary harness. See Chapter 8,<br />
Controller <strong>Installation</strong>.<br />
Step 2<br />
Remove the plug from cavity number 1.<br />
Step 3<br />
Remove the wedge from the connector.<br />
AUTOPILOT AUTOMATED STEERING SYSTEM INSTALLATION INSTRUCTIONS<br />
60
3 – Autosense Steering Device <strong>Installation</strong><br />
Step 4<br />
Insert the DTM pin labeled “Cavity 1”<br />
into the connector.<br />
Step 5<br />
Pull back on the wire to seat the pin.<br />
Replace the wedge in the connector.<br />
AUTOPILOT AUTOMATED STEERING SYSTEM INSTALLATION INSTRUCTIONS<br />
61
CHAPTER<br />
4<br />
Antenna/External Receiver (If Used)<br />
<strong>Installation</strong> 4<br />
In this chapter:<br />
• Antenna and receiver installation options<br />
• Mounting an adjustable spar to roof bolts<br />
• AG-372 receiver with AgGPS 450/900 radio<br />
module (if equipped) components<br />
• Installing the AG-372 GPS receiver with<br />
AgGPS 450/900 radio module (if equipped)<br />
• Installing an AG-372 receiver with magnetic<br />
feet<br />
• AgGPS 542 receiver components<br />
• Installing the AgGPS 542 receiver<br />
This chapter describes how to install the<br />
required receiver and antenna, and radio<br />
module (if used).<br />
To install the antenna for the CFX-750 or FmX<br />
display, see Chapter 5, Display <strong>Installation</strong>.<br />
AUTOPILOT AUTOMATED STEERING SYSTEM INSTALLATION INSTRUCTIONS 62
4 – Antenna/External Receiver (If Used) <strong>Installation</strong><br />
Antenna and receiver installation options<br />
There are several options for mounting components (the antenna, radio module, or GNSS receiver)<br />
on the cab roof depending on the accuracy required and the antenna type:<br />
• Spar mount – This bracket mounts directly to the roof bolts and is required for all high accuracy<br />
applications such as RTK and OmniSTAR. Trimble recommends this method for mounting an<br />
AG-372 receiver. Bolt a metal spar to the roof or to a light bracket and then attach either a V plate<br />
for magnetic mounting or an AG-372 receiver plate for permanent mounting.<br />
• VHB mount – Attach a 4" x 6" plate or a V plate directly to the roof with VHB (Very High Bond)<br />
adhesive for magnetic mounting. See page 66.<br />
• Magnetic mounting – Magnetic mounting for quick release is available for both VHB and spar<br />
type mounting.<br />
Possible mounting methods<br />
GNSS receiver VHB mounted plate VHB V mounted plate AG15/AG25/Zephyr/<br />
AG-372 bolted to spar<br />
mount<br />
CFX-750 display;<br />
FmX integrated display<br />
<br />
AG-372 receiver <br />
AgGPS 542 receiver <br />
Notes:<br />
– For quick release magnetic mounting with an AG-372 receiver, order the kit listed in Antenna<br />
mounting kits, page 8 and bolt the V plate to the spar.<br />
– With all other antennas, bolt the V plate to the spar for high accuracy and repeatability.<br />
– For WAAS, EGNOS, OmniSTAR VBS, Beacon, and DGPS applications, place either of the plates in a<br />
firm location using the VHB.<br />
AUTOPILOT AUTOMATED STEERING SYSTEM INSTALLATION INSTRUCTIONS<br />
63
4 – Antenna/External Receiver (If Used) <strong>Installation</strong><br />
Mounting an adjustable spar to roof bolts<br />
C<br />
WARNING – To avoid potentially serious personal injury or illness, and to prevent damage to<br />
equipment, make sure that you read and understand the Safety Information.<br />
Step 1<br />
Locate the cab bolts on the roof of the<br />
vehicle.<br />
Measure the length between the bolts<br />
on the roof of the vehicle and order the<br />
appropriate spar:<br />
• Spar 36.5" - 46.5": P/N 53676<br />
• Spar 54" - 64": P/N 66774<br />
If a light bracket already occupies the<br />
roof studs, mount the spar directly onto<br />
the light bracket.<br />
Step 2<br />
If required, replace the existing bolts<br />
with longer bolts.<br />
AUTOPILOT AUTOMATED STEERING SYSTEM INSTALLATION INSTRUCTIONS<br />
64
4 – Antenna/External Receiver (If Used) <strong>Installation</strong><br />
If you use the light bracket, drill two<br />
holes to match the spar width.<br />
Step 3<br />
Use the slotted holes to center the spar<br />
and then tighten the bolts. If required,<br />
use the spacers and flat washers<br />
provided to secure the spar.<br />
Note – If the receiver is offset to the left<br />
or the right of the vehicle, <strong>Autopilot</strong><br />
system performance may be affected.<br />
Before you tighten the cab bolts, make<br />
sure that the GNSS antenna is aligned<br />
with the center of the vehicle.<br />
Step 4<br />
For either of the following applications:<br />
• A single magnet antenna mount<br />
• An AG-372 receiver with magnetic<br />
option for quick removal<br />
Attach a V plate with four ¼" flathead<br />
screws.<br />
The narrow end points to the front of<br />
the vehicle.<br />
V plate on the spar<br />
AUTOPILOT AUTOMATED STEERING SYSTEM INSTALLATION INSTRUCTIONS<br />
65
4 – Antenna/External Receiver (If Used) <strong>Installation</strong><br />
Magnetic mount on the V plate<br />
If you use a standard AG-372 plate for<br />
permanent mounting, install the radio<br />
antenna first. Use four ¼" flathead<br />
screws to attach the plate, with the<br />
handle toward the back of the vehicle.<br />
Front of vehicle<br />
Plate on the spar<br />
AUTOPILOT AUTOMATED STEERING SYSTEM INSTALLATION INSTRUCTIONS<br />
66
4 – Antenna/External Receiver (If Used) <strong>Installation</strong><br />
Attaching the plate with VHB adhesive<br />
C<br />
WARNING – To avoid potentially serious personal injury or illness, and to prevent damage to<br />
equipment, make sure that you read and understand the Safety Information.<br />
Standard 4" x 6" plates are provided in most kits. You can use the VHB mounting method to attach<br />
either a 4" x 6" plate or a V plate.<br />
• RTK, OmniSTAR, DGPS, GLONASS applications – To use this method for high accuracy, the surface<br />
must be rigid and free of “oil panning”. For RTK or OmniSTAR HP corrections, the spar method is<br />
recommended. The V plate provides repeatable positioning of the antenna.<br />
• WAAS, EGNOS, OmniSTAR VBS, Beacon applications – Use a 4" x 6" plate for simplified<br />
installation in applications where high accuracy is not critical.<br />
Step 1<br />
Clean the antenna location on the roof<br />
of the cab with a light solvent to<br />
remove oil and dust. Apply force to the<br />
roof to find a firm location.<br />
Step 2<br />
V plate only<br />
Remove the backing from one side of<br />
the VHB strips provided and then apply<br />
the strips to the plate.<br />
Note – The VHB strips are pre-applied<br />
to the 4" x 6" plate.<br />
AUTOPILOT AUTOMATED STEERING SYSTEM INSTALLATION INSTRUCTIONS<br />
67
4 – Antenna/External Receiver (If Used) <strong>Installation</strong><br />
Step 3<br />
Remove the backing from the other<br />
side of the VHB strips and then apply<br />
the plate to the cab roof. The narrow<br />
end of the plate points forward. Ensure<br />
that the VHB strips make even contact<br />
with the surface. Apply pressure and<br />
then leave for approximately 30<br />
minutes to adhere.<br />
Note – The arrow points to the front of<br />
the vehicle.<br />
V plate<br />
4" x 6" plate<br />
AUTOPILOT AUTOMATED STEERING SYSTEM INSTALLATION INSTRUCTIONS<br />
68
4 – Antenna/External Receiver (If Used) <strong>Installation</strong><br />
AG-372 receiver with AgGPS 450/900 radio module (if<br />
equipped) components<br />
❺<br />
❹<br />
❶<br />
❸<br />
❷<br />
Item Description Trimble part number<br />
❶ AgGPS 450 or 900 radio (if equipped)<br />
❷ Radio antenna cable and magnetic mount<br />
❸ AgGPS 450 or 900 radio antenna<br />
❹ Antenna/receiver cable 54608<br />
❺ <strong>Autopilot</strong> controller<br />
AUTOPILOT AUTOMATED STEERING SYSTEM INSTALLATION INSTRUCTIONS<br />
69
4 – Antenna/External Receiver (If Used) <strong>Installation</strong><br />
Installing the AG-372 GPS receiver with<br />
AgGPS 450/900 radio module (if equipped)<br />
C<br />
WARNING – To avoid potentially serious personal injury or illness, and to prevent damage to<br />
equipment, make sure that you read and understand the Safety Information.<br />
To attach the AG-372 receiver plate to the cab roof, do one of the following:<br />
• For a removable installation, attach a V plate to a spar and then stick the receiver plate to the V<br />
plate with magnets.<br />
• For a permanent installation, bolt the receiver plate to a spar.<br />
Removable installation<br />
Step 1<br />
V plate<br />
Attach the V plate to the spar using the<br />
¼" flathead screws provided in the V<br />
plate bolt kit. Ensure that the narrow<br />
end points forward.<br />
For spar mounting instructions, see<br />
page 64.<br />
Mounting plate<br />
Attach the three provided magnets to<br />
the plate with the ¼" flathead screws<br />
and hardware provided.<br />
Underside of plate<br />
AUTOPILOT AUTOMATED STEERING SYSTEM INSTALLATION INSTRUCTIONS<br />
70
4 – Antenna/External Receiver (If Used) <strong>Installation</strong><br />
Permanent installation<br />
Step 1<br />
Use the four provided ¼" flathead screws ❶<br />
to attach the receiver mounting bracket to the<br />
spar.<br />
For spar mounting instructions, see page 64.<br />
❶<br />
Step 2<br />
Remove the blanking plate and set it<br />
aside.<br />
Step 3<br />
Place the integrated radio inside the<br />
AG-372 receiver. Ensure that the circuit<br />
board is aligned with the slot in the<br />
vertical wall of the receiver.<br />
AUTOPILOT AUTOMATED STEERING SYSTEM INSTALLATION INSTRUCTIONS<br />
71
4 – Antenna/External Receiver (If Used) <strong>Installation</strong><br />
Step 4<br />
Slide the integrated radio back so that it<br />
is flush with the vertical wall of the<br />
receiver.<br />
Step 5<br />
Use a #1 or #2 Phillips screwdriver and<br />
the supplied screws to install the<br />
integrated radio. First insert and tighten<br />
the two screws on the horizontal wall<br />
(arrowed), and then insert the<br />
remaining screws.<br />
Step 6<br />
Install the supplied antenna cable.<br />
Note – The housing can accommodate<br />
a cable diameter of up to ¼".<br />
AUTOPILOT AUTOMATED STEERING SYSTEM INSTALLATION INSTRUCTIONS<br />
72
4 – Antenna/External Receiver (If Used) <strong>Installation</strong><br />
Step 7<br />
Route the cable through the cable<br />
channel and then insert the cable cover.<br />
This image shows the unit with the<br />
cable routed through the channel.<br />
Step 8<br />
Attach the antenna base to the rear of<br />
the plate with the two flathead screws<br />
provided.<br />
AUTOPILOT AUTOMATED STEERING SYSTEM INSTALLATION INSTRUCTIONS<br />
73
4 – Antenna/External Receiver (If Used) <strong>Installation</strong><br />
Step 9<br />
Attach the radio antenna to the<br />
antenna base.<br />
Step 10<br />
Position the AG-372 receiver and radio<br />
on the mounting plate with the<br />
connector ports facing the radio<br />
antenna. Align the three bolt holes with<br />
the receiver, radio, and mounting plate.<br />
Step 11<br />
Insert the nylon bushings provided.<br />
AUTOPILOT AUTOMATED STEERING SYSTEM INSTALLATION INSTRUCTIONS<br />
74
4 – Antenna/External Receiver (If Used) <strong>Installation</strong><br />
Step 12<br />
Insert the bolts through the receiver,<br />
radio, and mounting bracket. Place nuts<br />
on the bolt ends and then tighten<br />
them.<br />
Step 13<br />
Magnet method<br />
Place the receiver on the roof by<br />
aligning the magnets with the V plate.<br />
Ensure that the handle ❶ is toward<br />
the back of the vehicle.<br />
❶<br />
Step 14<br />
Both methods<br />
Connect the cable from the cab<br />
controller into port A ❶ of the AG-372<br />
receiver. Bolt the cable clamp ❷ to the<br />
left side of the receiver.<br />
Route the cable into the cab and into<br />
the controller.<br />
❷<br />
❶<br />
AUTOPILOT AUTOMATED STEERING SYSTEM INSTALLATION INSTRUCTIONS<br />
75
4 – Antenna/External Receiver (If Used) <strong>Installation</strong><br />
Installing an AG-372 receiver with magnetic feet<br />
C<br />
WARNING – To avoid potentially serious personal injury or illness, and to prevent damage to<br />
equipment, make sure that you read and understand the Safety Information.<br />
Use this option only when all other options are unavailable. It requires a firm surface for mounting to<br />
avoid vertical vibration and is not an easily repeatable location when moving receivers. Many cabs do<br />
not offer roof bolts; you may need to drill or to construct a firm location.<br />
Step 1<br />
Attach the magnets to the receiver<br />
mounting plate. Use the three ¼" bolts<br />
to mount the AG-372 receiver.<br />
Place the nuts on the receiver side.<br />
Step 2<br />
Turn the mounting plate upside down.<br />
Stick the covers onto the magnets as<br />
shown.<br />
Step 3<br />
Clean the antenna location on the roof<br />
of the cab with a light solvent to<br />
remove oil and dust.<br />
Remove the backing from the VHB<br />
strips and then apply the plates to the<br />
cab roof.<br />
Attach the three mounting plates so<br />
that the receiver is as firm as possible.<br />
Rear of the cab<br />
78 mm 78 mm<br />
(3-1/8") (3-1/8")<br />
276 mm<br />
276 mm<br />
(11") (11")<br />
Front of the cab<br />
AUTOPILOT AUTOMATED STEERING SYSTEM INSTALLATION INSTRUCTIONS<br />
76
4 – Antenna/External Receiver (If Used) <strong>Installation</strong><br />
Step 4<br />
Stick the antenna magnetic mounts at<br />
the center of the mounting plates.<br />
Rear of the cab<br />
Front of the cab<br />
Step 5<br />
Connect the antenna cable to port A of<br />
the AG-372 GPS receiver and then<br />
route the cable toward the<br />
NavController II harness.<br />
AUTOPILOT AUTOMATED STEERING SYSTEM INSTALLATION INSTRUCTIONS<br />
77
4 – Antenna/External Receiver (If Used) <strong>Installation</strong><br />
AgGPS 542 receiver components<br />
i<br />
j<br />
k<br />
c<br />
e<br />
d<br />
h<br />
g<br />
f<br />
Item Description Trimble part number<br />
c<br />
d<br />
e<br />
f<br />
g<br />
Radio antenna magnetic base<br />
Radio antenna<br />
Radio antenna cable<br />
AgGPS 542 GPS receiver<br />
Antenna cable<br />
h Receiver cable 62037<br />
i<br />
j<br />
k<br />
To controller “P3 GPS”<br />
Antenna magnetic mount<br />
AgGPS 542 GPS receiver<br />
AUTOPILOT AUTOMATED STEERING SYSTEM INSTALLATION INSTRUCTIONS<br />
78
4 – Antenna/External Receiver (If Used) <strong>Installation</strong><br />
Installing the AgGPS 542 receiver<br />
C<br />
WARNING – To avoid potentially serious personal injury or illness, and to prevent damage to<br />
equipment, make sure that you read and understand the Safety Information chapter.<br />
Step 1<br />
Attach the large magnet with a 5 / 8 " stud<br />
to the GPS antenna.<br />
If the antenna has magnets built in, skip<br />
this step.<br />
Step 2<br />
GLONASS,RTK, OmniSTAR, DGPS<br />
applications<br />
For repeatable positioning, place the antenna<br />
against the lip at the narrow end of the V plate.<br />
AUTOPILOT AUTOMATED STEERING SYSTEM INSTALLATION INSTRUCTIONS<br />
79
4 – Antenna/External Receiver (If Used) <strong>Installation</strong><br />
Step 3<br />
Attach the antenna/receiver cable to<br />
the antenna and then route the cable<br />
into the cab through the rubber<br />
grommet at the base of the rear<br />
window. Secure the cable along the<br />
way.<br />
Step 4<br />
Mount the receiver in a convenient<br />
location in the cab. Route the antenna<br />
cable to the receiver and then connect<br />
it.<br />
Step 5<br />
Identify the correct adaptor for the<br />
radio connection:<br />
• c Reverse polarity TNC-to-N for<br />
900 MHz radios<br />
• d Normal polarity TNC-to-N for<br />
400 MHz radios<br />
c<br />
d<br />
Step 6<br />
Attach the adaptor to the radio port.<br />
AUTOPILOT AUTOMATED STEERING SYSTEM INSTALLATION INSTRUCTIONS<br />
80
4 – Antenna/External Receiver (If Used) <strong>Installation</strong><br />
Step 7<br />
Connect the radio antenna cable to the<br />
radio port adaptor.<br />
Step 8<br />
Connect the controller cable to the 26-<br />
pin connector of the receiver.<br />
Controller cable connections will be<br />
completed in Chapter 8, Controller<br />
<strong>Installation</strong>.<br />
Step 9<br />
Connect the radio antenna to the<br />
magnetic antenna base.<br />
Step 10<br />
Attach the magnetic radio antenna base<br />
to the rear of the V plate on the roof. If<br />
the cable does not reach the V plate,<br />
use the 4" x 6" plate with the VHB<br />
provided to relocate the antenna.<br />
AUTOPILOT AUTOMATED STEERING SYSTEM INSTALLATION INSTRUCTIONS<br />
81
CHAPTER<br />
5<br />
Display <strong>Installation</strong> 5<br />
In this chapter:<br />
• CFX-750 display components<br />
• FmX integrated display components<br />
• Preparing the CFX-750 display<br />
• Installing the CFX-750 display<br />
• CFX-750 display: Installing the wiring harness<br />
• Preparing the FmX integrated display<br />
• Installing the FmX integrated display<br />
• FmX integrated display: Installing the wiring<br />
harness<br />
• CFX-750 display and FmX integrated display:<br />
Connecting accessory options<br />
• CFX-750 and FmX displays: Installing the<br />
GNSS antenna and plate<br />
• CFX-750 and FmX displays: Installing the RTK<br />
radio antenna<br />
This chapter describes how to install and<br />
connect the FmX integrated display or the<br />
CFX-750 display in the vehicle.<br />
AUTOPILOT AUTOMATED STEERING SYSTEM INSTALLATION INSTRUCTIONS 82
5 – Display <strong>Installation</strong><br />
CFX-750 display components<br />
❶<br />
⓫<br />
❾<br />
❿<br />
❽<br />
❼<br />
❷<br />
P3 / GNSS<br />
connector<br />
❺<br />
⓬<br />
❻<br />
❹<br />
❸<br />
C<br />
CAUTION – Connecting the Port Replicator on the FmX to NavController II cable ❺ to the P4 or<br />
P12 connector of the NavController II harness ⓬ will result in damage to the FmX / FM-1000<br />
integrated display, and will void the warranty.<br />
Item Description Trimble part number<br />
❶ CFX-750 display<br />
93100-02<br />
Note – RTK password required.<br />
❷ CFX-750 power cable 66694<br />
❸ CFX-750 power cable with relay and switch (power bus) 67259<br />
❹ Basic power cable 67258<br />
❺ FmX to NavController II cable with port replicator 75741<br />
❻ 2 pin DTM to 2 pin DT power adaptor 67095<br />
❼ NavController II 55563-00<br />
❽ 8 m GNSS TNC/TNC RT angle cable 50449<br />
❾ AG25 GNSS antenna 77038-00<br />
❿ NMO to TNC 20ft antenna cable and base 72122<br />
⓫ 900 MHz radio antenna kit 22882-10<br />
⓬ Main NavController II cable 54601<br />
AUTOPILOT AUTOMATED STEERING SYSTEM INSTALLATION INSTRUCTIONS<br />
83
5 – Display <strong>Installation</strong><br />
FmX integrated display components<br />
❾<br />
❶<br />
⓫<br />
❼<br />
❽<br />
❿<br />
❺<br />
⓬<br />
❷<br />
❻<br />
❹<br />
❸<br />
C<br />
CAUTION – Connecting the Port Replicator on the FmX to NavController II cable ❺ to the P4 or<br />
P12 connector of the NavController II harness ⓬ will result in damage to the FmX / FM-1000<br />
integrated display, and will void the warranty.<br />
Item Description Trimble part number<br />
❶ FmX integrated display 93100-02<br />
❷ FmX power cable 66694<br />
❸ FmX power cable with relay and switch (power bus) 67259<br />
❹ Basic power cable 67258<br />
❺ FmX to NavController II cable with port replicator 75741<br />
❻ 2 pin DTM to 2 pin DT power adaptor 67095<br />
❼ NavController II 55563-00<br />
❽ 8 m GNSS TNC/TNC RT angle cable 50449<br />
❾ AG25 GNSS antenna 77038-00<br />
❿ NMO to TNC 20ft antenna cable and base 72122<br />
⓫ 900 MHz radio antenna kit 22882-10<br />
⓬ Main NavController II cable 54601<br />
AUTOPILOT AUTOMATED STEERING SYSTEM INSTALLATION INSTRUCTIONS<br />
84
5 – Display <strong>Installation</strong><br />
Preparing the CFX-750 display<br />
Step 1<br />
Locate the CFX-750 display, the RAM mount,<br />
and the RAM mount clamp.<br />
Step 2<br />
Use the provided metric hardware to attach<br />
the RAM mount to the rear of the display.<br />
Step 3<br />
Attach the RAM mount to the rear of the<br />
display.<br />
AUTOPILOT AUTOMATED STEERING SYSTEM INSTALLATION INSTRUCTIONS<br />
85
5 – Display <strong>Installation</strong><br />
Installing the CFX-750 display<br />
C<br />
WARNING – To avoid potentially serious personal injury or illness, and to prevent damage to<br />
equipment, make sure that you read and understand the Safety Information.<br />
Step 1<br />
Decide where you will mount the display in the vehicle cab and then use the provided bolts to attach<br />
the bar mount to the rail.<br />
Attach the free end of the RAM mount to the bar mount and then tighten the clamp on the RAM<br />
mount so that the display is secure.<br />
Step 2<br />
Connect the cable to the B port of the<br />
CFX-750 display.<br />
To connect power to the CFX-750 display, see<br />
Chapter 8, Controller <strong>Installation</strong>.<br />
CFX-750 display: Installing the wiring harness<br />
Step 1<br />
Locate the cable that connects the<br />
CFX-750 display to the NavController II.<br />
Step 2<br />
Connect the cable to the P3 connector on the<br />
NavController II main harness and then route<br />
the cable from the NavController II to the<br />
mounting location on the CFX-750 display.<br />
AUTOPILOT AUTOMATED STEERING SYSTEM INSTALLATION INSTRUCTIONS<br />
86
5 – Display <strong>Installation</strong><br />
Preparing the FmX integrated display<br />
Step 1<br />
Locate the FmX integrated display, the RAM<br />
mount, and the RAM mount clamp.<br />
Step 2<br />
Use the provided metric hardware to attach<br />
the RAM mount to the rear of the display.<br />
Step 3<br />
Attach the RAM mount to the rear of the<br />
display.<br />
AUTOPILOT AUTOMATED STEERING SYSTEM INSTALLATION INSTRUCTIONS<br />
87
5 – Display <strong>Installation</strong><br />
Installing the FmX integrated display<br />
C<br />
WARNING – To avoid potentially serious personal injury or illness, and to prevent damage to<br />
equipment, make sure that you read and understand the Safety Information.<br />
Step 1<br />
Decide where you will mount the display in the vehicle cab and then use the provided bolts to attach<br />
the bar mount to the rail. Attach the free end of the RAM mount to the bar mount and then tighten<br />
the clamp on the RAM mount so that the display is secure.<br />
Step 2<br />
Connect the cable to the C port of the FmX<br />
integrated display.<br />
To connect power to the FmX integrated<br />
display, see Chapter 8, Controller <strong>Installation</strong>.<br />
AUTOPILOT AUTOMATED STEERING SYSTEM INSTALLATION INSTRUCTIONS<br />
88
5 – Display <strong>Installation</strong><br />
FmX integrated display: Installing the wiring harness<br />
Step 1<br />
Locate the cable that connects the FmX<br />
integrated display to the NavController II ❶.<br />
❶<br />
Step 2<br />
Connect the cable to the P3 connector on the<br />
NavController II main harness, and then route<br />
the cable from the NavController II to the<br />
mounting location on the FmX integrated<br />
display.<br />
AUTOPILOT AUTOMATED STEERING SYSTEM INSTALLATION INSTRUCTIONS<br />
89
5 – Display <strong>Installation</strong><br />
CFX-750 display and FmX integrated display:<br />
Connecting accessory options<br />
Note – Unless otherwise stated, “the display” applies to the CFX-750 display or the FmX integrated<br />
display.<br />
AgCam<br />
The AgCam and AgCam cable are accessory items that you can purchase separately from the display.<br />
The CFX-750 display allows up to two video inputs; the FmX integrated display allows up to four.<br />
Step 1<br />
Locate the AgCam and AgCam cable.<br />
Step 2<br />
Mount the AgCam in a secure location and<br />
then route the cable towards the display.<br />
CFX-750 display<br />
Step 3<br />
Connect the AgCam cable to the display<br />
adaptor cable.<br />
FmX display<br />
AUTOPILOT AUTOMATED STEERING SYSTEM INSTALLATION INSTRUCTIONS<br />
90
5 – Display <strong>Installation</strong><br />
Step 4<br />
Connect the display to AgCam adaptor cable<br />
to one of the open 12 pin connectors on the<br />
back of the display.<br />
AUTOPILOT AUTOMATED STEERING SYSTEM INSTALLATION INSTRUCTIONS<br />
91
5 – Display <strong>Installation</strong><br />
CFX-750 and FmX displays: Installing the GNSS<br />
antenna and plate<br />
C<br />
WARNING – To avoid potentially serious personal injury or illness, and to prevent damage to<br />
equipment, make sure that you read and understand the Safety Information.<br />
Note – The V plate antenna bracket is available on the <strong>Autopilot</strong> price list. See Antenna mounting<br />
kits, page 8.<br />
Use one of the following methods:<br />
• Spar mount<br />
• VHB adhesive<br />
Spar mount method<br />
Trimble recommends that you use this<br />
method for RTK and OmniSTAR<br />
operations. For more information, see<br />
Antenna and receiver installation<br />
options, page 63.<br />
Use a 5 / 8 " bolt to attach the AG25<br />
antenna to the spar, as shown.<br />
Measure the length between the bolts<br />
on the roof of the vehicle and order the<br />
appropriate spar:<br />
• Spar 36.5" - 46.5": P/N 53676<br />
• Spar 54" - 64": P/N 66774<br />
VHB adhesive method<br />
Standard 4" x 6" plates are provided in most kits. You can use Very High Bond (VHB) to attach either a<br />
4" x 6" plate or a V plate.<br />
• GLONASS, RTK, OmniSTAR, DGPS applications – To use this method for high accuracy, the surface<br />
must be rigid and free of “oil panning”. For RTK or OmniSTAR HP corrections, the spar method is<br />
recommended. The V plate provides repeatable positioning of the antenna.<br />
• WAAS, EGNOS, OmniSTAR VBS, Beacon applications – Use a 4" x 6" plate for simplified<br />
installation in applications where high accuracy is not critical.<br />
AUTOPILOT AUTOMATED STEERING SYSTEM INSTALLATION INSTRUCTIONS<br />
92
5 – Display <strong>Installation</strong><br />
Step 1<br />
Clean the antenna location on the roof<br />
of the cab with a light solvent to<br />
remove oil and dust.<br />
Step 2<br />
V plate only<br />
Remove the backing from one side of<br />
the VHB strips provided and then apply<br />
the strips to the plate.<br />
Note – The VHB strips are pre-applied to<br />
the 4" x 6" plate.<br />
Step 3<br />
Remove the backing from the other<br />
side of the VHB strips and then apply<br />
the plate to the cab roof. The narrow<br />
end points forward. Ensure that the<br />
VHB strips make even contact with the<br />
surface. Apply pressure and then leave<br />
for approximately 30 minutes to<br />
adhere.<br />
Note – The arrow in this figure points to<br />
the front of the vehicle.<br />
V plate<br />
AUTOPILOT AUTOMATED STEERING SYSTEM INSTALLATION INSTRUCTIONS<br />
93
5 – Display <strong>Installation</strong><br />
Step 4<br />
If the antenna has magnets built in,<br />
omit this step.<br />
4" x 6" plate<br />
Otherwise, attach the large magnet with a 5 / 8 "<br />
stud to the GNSS antenna.<br />
AUTOPILOT AUTOMATED STEERING SYSTEM INSTALLATION INSTRUCTIONS<br />
94
5 – Display <strong>Installation</strong><br />
Step 5<br />
GLONASS, RTK, OmniSTAR, DGPS, applications<br />
For repeatable positioning, place the antenna<br />
against the lip at the narrow end of the V plate.<br />
WAAS, EGNOS, VBS, Beacon applications<br />
Attach the antenna to the center of the 4" x 6"<br />
plate.<br />
Step 6<br />
Both models<br />
Attach the antenna/receiver cable to<br />
the antenna and then route the cable<br />
into the cab through the rubber<br />
grommet at the base of the rear<br />
window. Secure the cable along the<br />
way.<br />
AUTOPILOT AUTOMATED STEERING SYSTEM INSTALLATION INSTRUCTIONS<br />
95
5 – Display <strong>Installation</strong><br />
CFX-750 and FmX displays: Installing the RTK radio<br />
antenna<br />
C<br />
WARNING – To avoid potentially serious personal injury or illness, and to prevent damage to<br />
equipment, make sure that you read and understand the Safety Information.<br />
Step 1<br />
Connect the radio antenna to the magnetic<br />
antenna base<br />
Step 2<br />
Attach the magnetic radio antenna base to<br />
the rear of the V plate on the roof. If the cable<br />
does not reach the V plate, use the 4" x 6"<br />
plate with the VHB provided to relocate the<br />
antenna.<br />
Step 3<br />
Route cable from the vehicle roof into the cab,<br />
and connect the radio cable to the display.<br />
AUTOPILOT AUTOMATED STEERING SYSTEM INSTALLATION INSTRUCTIONS<br />
96
CHAPTER<br />
6<br />
Power Harness <strong>Installation</strong> 6<br />
In this chapter:<br />
• FmX integrated display components<br />
• CFX-750 display components<br />
• FmX and CFX-750 displays: Installing the<br />
power harness<br />
• FmX and CFX-750 displays: Configuring the<br />
power bus options<br />
This chapter describes how to install the power<br />
harness in the vehicle.<br />
Note – Unless otherwise stated, instructions for<br />
“the display” refer to either the FmX integrated<br />
display or the CFX-750 display.<br />
AUTOPILOT AUTOMATED STEERING SYSTEM INSTALLATION INSTRUCTIONS 97
6 – Power Harness <strong>Installation</strong><br />
FmX integrated display components<br />
c<br />
m<br />
k<br />
P3 / GPS<br />
connector<br />
j<br />
g<br />
p<br />
i<br />
o<br />
d<br />
h<br />
n<br />
f<br />
e<br />
C<br />
CAUTION – Connecting the Port Replicator on the FmX to NavController II cable g to the P4 or<br />
P12 connector of the NavController II harness p will result in damage to the display, and will<br />
void the warranty.<br />
Item Description Trimble part number<br />
c FmX integrated display 93100-02<br />
d FmX power cable 66694<br />
e FmX power cable with relay and switch (power bus) 67259<br />
f Basic power cable 67258<br />
g FmX to NavController II cable with port replicator 75741<br />
h 2 pin DTM to 2 pin DT power adaptor 67095<br />
i NavController II 55563-00<br />
j 8 m GPS TNC/TNC RT angle cable 50449<br />
k AG25 GNSS antenna 77038-00<br />
l NMO to TNC 20ft antenna cable and base 62120<br />
m 900 MHz radio antenna kit 22882-10<br />
n External switch cable included with kit Part of P/N 67259<br />
o Switch 67095<br />
AUTOPILOT AUTOMATED STEERING SYSTEM INSTALLATION INSTRUCTIONS<br />
98
6 – Power Harness <strong>Installation</strong><br />
CFX-750 display components<br />
c<br />
m<br />
k<br />
l<br />
j<br />
d<br />
g<br />
i<br />
p<br />
h<br />
f<br />
e<br />
n<br />
o<br />
C<br />
CAUTION – Connecting the Port Replicator on the CFX-750 display to NavController II cable g<br />
to the P4 or P12 connector of the NavController II harness p will result in damage to the<br />
CFX-750 display and will void the warranty.<br />
Item Description Trimble part number<br />
c CFX-750 display<br />
94100-02<br />
Note – RTK password required.<br />
d CFX-750 power cable 77282<br />
e CFX-750 power cable with relay and switch (power bus) 67259<br />
f Basic power cable 67258<br />
AUTOPILOT AUTOMATED STEERING SYSTEM INSTALLATION INSTRUCTIONS<br />
99
6 – Power Harness <strong>Installation</strong><br />
Item Description Trimble part number<br />
g CFX-750 to NavController II cable with port replicator 75741<br />
h 2 pin DTM to 2 pin DT power adaptor 67095<br />
i NavController II 55563-00<br />
j 8 m GPS TNC/TNC RT angle cable 50449<br />
k AG25 GNSS antenna 77038-00<br />
l NMO to TNC 20ft antenna cable and base 62120<br />
m 900 MHz radio antenna kit 22882-10<br />
n External switch cable included with kit Part of P/N 67259<br />
o External switch included with kit Part of P/N 67259<br />
p Main NavController II cable 54601<br />
AUTOPILOT AUTOMATED STEERING SYSTEM INSTALLATION INSTRUCTIONS<br />
100
6 – Power Harness <strong>Installation</strong><br />
FmX and CFX-750 displays: Installing the power<br />
harness<br />
Note – Unless otherwise stated, instructions for “the display” refer to either the FmX integrated<br />
display or the CFX-750 display.<br />
C<br />
WARNING – To avoid potentially serious personal injury or illness, and to prevent damage to<br />
equipment, make sure that you read and understand the Safety Information chapter.<br />
Step 1<br />
Connect the basic power cable to the vehicle<br />
battery and then route the cable into the cab.<br />
C<br />
CAUTION – If the vehicle has a master<br />
electrical disconnect, make sure that<br />
the basic power cable (P/N 67258), is<br />
not directly attached to the battery<br />
terminal that is disconnected by the<br />
master switch - the negative pole in this<br />
example.<br />
Attach this terminal side just past the<br />
main disconnect so that it is as close as<br />
possible to the battery but still gets<br />
disconnected when the master<br />
disconnect is turned off.<br />
Failure to do so can result in damage to<br />
the display.<br />
Cable P/N 67258<br />
to power bus<br />
or display<br />
To tractor<br />
+ve<br />
To tractor<br />
-ve<br />
Master electrical<br />
disconnect<br />
AUTOPILOT AUTOMATED STEERING SYSTEM INSTALLATION INSTRUCTIONS<br />
101
6 – Power Harness <strong>Installation</strong><br />
Step 2<br />
Locate and connect the 4-pin Deutsch DTP<br />
receptacle on the power bus c to the 4-pin<br />
Deutsch DTP plug d on the basic power cable<br />
and then remove the protective cap from the<br />
4-pin Deutsch DTP plug e on the power bus<br />
and connect the plug to the 4-pin Deutsch<br />
DTP receptacle f on the display power<br />
adaptor.<br />
f<br />
e<br />
c<br />
d<br />
Step 3<br />
Route the display power adaptor to the<br />
display mounting location and then connect it<br />
to the display.<br />
FmX display<br />
CFX-750 display<br />
AUTOPILOT AUTOMATED STEERING SYSTEM INSTALLATION INSTRUCTIONS<br />
102
6 – Power Harness <strong>Installation</strong><br />
FmX and CFX-750 displays: Configuring the power bus<br />
options<br />
Note – Unless otherwise stated, instructions for “the display” refer to either the FmX integrated<br />
display or the CFX-750 display.<br />
C<br />
WARNING – To avoid potentially serious personal injury or illness, and to prevent damage to<br />
equipment, make sure that you read and understand the Safety Information chapter.<br />
When you use the power bus cable, use one of the following configuration methods to turn on the<br />
<strong>Autopilot</strong> system:<br />
• Display power button is used to turn on the <strong>Autopilot</strong> system<br />
• External switch is used to turn on the <strong>Autopilot</strong> system<br />
• Ignition is used to turn on the <strong>Autopilot</strong> system<br />
Display power button is used to turn on the <strong>Autopilot</strong> system<br />
Connect the 2 pin connectors labeled R2 and<br />
P2 on the power bus.<br />
External switch is used to turn on the <strong>Autopilot</strong> system<br />
Step 1<br />
Connect the cable labeled R7 switch c<br />
(included with the power bus) to connector<br />
labeled P2 on the power bus d and then<br />
route the cable labeled R7 to a switch<br />
location.<br />
Note – To install the switch provided, drill a ¾"<br />
hole.<br />
d<br />
c<br />
AUTOPILOT AUTOMATED STEERING SYSTEM INSTALLATION INSTRUCTIONS<br />
103
6 – Power Harness <strong>Installation</strong><br />
Step 2<br />
Connect the cable labeled R7 to the switch<br />
pins.<br />
Note – Polarity is not important.<br />
Installing the optional illuminated full or standard Euro switch<br />
Step 1<br />
Find an available knockout location on the<br />
vehicle console.<br />
Note – An alternative location is required for<br />
the switch provided.<br />
Step 2<br />
Route the cable labeled R7 to the switch<br />
location and then connect the cable to the<br />
illuminated switch.<br />
Connect the wire labelled S1 to pin 5 on the<br />
switch and then connect the wire labelled S2<br />
to pin 4 on the switch.<br />
Note – Polarity is important.<br />
AUTOPILOT AUTOMATED STEERING SYSTEM INSTALLATION INSTRUCTIONS<br />
104
6 – Power Harness <strong>Installation</strong><br />
Step 3<br />
Connect a separate wire to pin 3 on the switch<br />
using a spade connector. Route the wire and<br />
then connect it to the vehicle switched power.<br />
Note – This additional wire is required to<br />
allow the switch to illuminate.<br />
Ignition is used to turn on the <strong>Autopilot</strong> system<br />
Note – For more information on how to use the ignition sensing option, see the FmX Integrated<br />
Display User Guide.<br />
Step 1<br />
Connect the 2-pin connectors labeled R2 and<br />
P2 on the power bus.<br />
Step 2<br />
Connect the cable labeled R8 Ignition<br />
(included with the power bus) to connector<br />
P3 Ignition on the power bus.<br />
Step 3<br />
Route the cable to the vehicles ignition.<br />
AUTOPILOT AUTOMATED STEERING SYSTEM INSTALLATION INSTRUCTIONS<br />
105
CHAPTER<br />
7<br />
Remote Engage Switch <strong>Installation</strong> 7<br />
In this chapter:<br />
• Remote engage switch components: Rocker<br />
switch<br />
• Remote engage switch components: Foot<br />
switch<br />
• Preparing the remote engage cable<br />
• Using the remote engage switch<br />
This chapter describes how to install the remote<br />
engage switch.<br />
AUTOPILOT AUTOMATED STEERING SYSTEM INSTALLATION INSTRUCTIONS 106
7 – Remote Engage Switch <strong>Installation</strong><br />
Remote engage switch components: Rocker switch<br />
c<br />
d<br />
Item<br />
c<br />
d<br />
Description<br />
DTM receptacle<br />
Remote engage rocker switch<br />
Note – This is a Full or Standard Euro switch, depending on the kit ordered.<br />
AUTOPILOT AUTOMATED STEERING SYSTEM INSTALLATION INSTRUCTIONS<br />
107
7 – Remote Engage Switch <strong>Installation</strong><br />
Remote engage switch components: Foot switch<br />
d<br />
c<br />
Item<br />
c<br />
d<br />
Description<br />
DTM receptacle<br />
Remote engage foot switch<br />
AUTOPILOT AUTOMATED STEERING SYSTEM INSTALLATION INSTRUCTIONS<br />
108
7 – Remote Engage Switch <strong>Installation</strong><br />
Preparing the remote engage cable<br />
Step 1<br />
Locate the green 12-pin Deutsch<br />
receptacle on the P-5 leg of the main<br />
controller harness. For more<br />
information, see Controller<br />
connections, page 130.<br />
Step 2<br />
Remove the wedge from the connector.<br />
Step 3<br />
Rocker switch only<br />
Remove the plugs from cavity 2 and<br />
cavity 7.<br />
AUTOPILOT AUTOMATED STEERING SYSTEM INSTALLATION INSTRUCTIONS<br />
109
7 – Remote Engage Switch <strong>Installation</strong><br />
Foot Switch Only<br />
Remove the plugs from cavity 2,<br />
cavity 7, and cavity 11.<br />
Step 4<br />
Rocker switch only<br />
Insert the DTM pins into cavity 2 and<br />
cavity 7, according to the labels on the<br />
wires.<br />
Foot switch only<br />
Insert the DTM pins into cavity 2, cavity<br />
7, and cavity 11, according to the labels<br />
on the wires.<br />
AUTOPILOT AUTOMATED STEERING SYSTEM INSTALLATION INSTRUCTIONS<br />
110
7 – Remote Engage Switch <strong>Installation</strong><br />
Step 5<br />
Pull on the wires to seat them in place<br />
and then replace the wedge in the<br />
connector.<br />
Step 6<br />
Replace the receptacle on the P5 plug<br />
of the Nav II harness.<br />
Step 7<br />
Rocker switch only<br />
Run the spade ends of the cable to a<br />
knockout location in the operator<br />
console.<br />
Foot switch only<br />
Run the cable to a clear location on the<br />
floor board. Use double-sided tape to<br />
secure the pedal. Route the cable<br />
under the floor mat.<br />
AUTOPILOT AUTOMATED STEERING SYSTEM INSTALLATION INSTRUCTIONS<br />
111
7 – Remote Engage Switch <strong>Installation</strong><br />
Step 8<br />
Rocker Switch Only<br />
Connect the wires to the switch. Match<br />
the print on the switch body with the<br />
labels on the wires.<br />
Step 9<br />
Rocker Switch Only<br />
Place the switch in the console.<br />
Using the remote engage switch<br />
To engage a system using NavController II do one of the following:<br />
• Firmware versions 5.20 and earlier: Hold down the remote engage switch for longer than 0.5<br />
seconds and less than 4 seconds.<br />
• Firmware 5.21 and later: Hold the switch down for longer than 0.15 seconds and less than 4<br />
seconds.<br />
The system engages when you release the switch.<br />
AUTOPILOT AUTOMATED STEERING SYSTEM INSTALLATION INSTRUCTIONS<br />
112
CHAPTER<br />
8<br />
Controller <strong>Installation</strong> 8<br />
In this chapter:<br />
• Installing the controller<br />
• Installing the controller cables<br />
• Controller connections<br />
This chapter describes how to install the<br />
controller unit.<br />
AUTOPILOT AUTOMATED STEERING SYSTEM INSTALLATION INSTRUCTIONS 113
8 – Controller <strong>Installation</strong><br />
Installing the controller<br />
C<br />
WARNING – To avoid potentially serious personal injury or illness, and to prevent damage to<br />
equipment, make sure that you read and understand the Safety Information chapter.<br />
Back method: When the rear ECU slot is free<br />
Controller orientation is straight up and down, and parallel to the axle:<br />
• Roll: 0<br />
• Pitch: -90<br />
• Yaw: 0<br />
Step 1<br />
At the back of the cab, behind the seat,<br />
remove the screws that hold the plastic<br />
cover on.<br />
Step 2<br />
Remove the plastic cover.<br />
AUTOPILOT AUTOMATED STEERING SYSTEM INSTALLATION INSTRUCTIONS<br />
114
8 – Controller <strong>Installation</strong><br />
Step 3<br />
Unbolt the ECU from its bracket.<br />
Step 4<br />
Unbolt and remove the existing ECU<br />
bracket. Leave the ECU in place.<br />
Step 5<br />
Place the NavController II on the ECU<br />
bracket. Make sure that it is centered<br />
(25 mm from the left and right sides). 38 mm<br />
125 mm<br />
AUTOPILOT AUTOMATED STEERING SYSTEM INSTALLATION INSTRUCTIONS<br />
115
8 – Controller <strong>Installation</strong><br />
Step 6<br />
Use the controller as a template to<br />
mark the positions of the holes.<br />
Step 7<br />
At the marked points, drill holes with a<br />
6 mm diameter.<br />
Step 8<br />
Attach the controller to the mounting<br />
plate. Use the provided #10 x 5/8<br />
screws, four nuts, and four washers.<br />
AUTOPILOT AUTOMATED STEERING SYSTEM INSTALLATION INSTRUCTIONS<br />
116
8 – Controller <strong>Installation</strong><br />
Step 9<br />
Place the controller and mounting plate<br />
in the gap, with the controller<br />
connectors facing upward.<br />
Step 10<br />
Attach the mounting plate to the frame<br />
with the existing bolts.<br />
Step 11<br />
Attach the existing ECU (in front of the<br />
controller), to the top mounting plate.<br />
Use the four existing bolts.<br />
AUTOPILOT AUTOMATED STEERING SYSTEM INSTALLATION INSTRUCTIONS<br />
117
8 – Controller <strong>Installation</strong><br />
Step 12<br />
Attach the main and auxiliary harnesses<br />
using a hex key.<br />
Step 13<br />
Tuck the harnesses behind the plastic<br />
housing and feed it down to the floor.<br />
Step 14<br />
Replace the plastic cover panel and<br />
then reinstall the screws.<br />
AUTOPILOT AUTOMATED STEERING SYSTEM INSTALLATION INSTRUCTIONS<br />
118
8 – Controller <strong>Installation</strong><br />
Seat mounting<br />
Controller orientation is straight up and down, and parallel with the axle:<br />
• Roll: 0<br />
• Pitch: 0<br />
• Yaw: 0<br />
Step 1<br />
Locate the controller seat mounting<br />
bracket and bolts.<br />
Step 2<br />
Remove the rubber plug from the right<br />
rear side of the floor mat. You will route<br />
the controller cables through this hole.<br />
Step 3<br />
If the seat suspension air reservoir is<br />
present on the right of the seat, cut the<br />
cable tie that holds the connector onto<br />
the top of the reservoir and then<br />
disconnect the plug.<br />
If the air reservoir is not installed, skip<br />
to Step 17.<br />
AUTOPILOT AUTOMATED STEERING SYSTEM INSTALLATION INSTRUCTIONS<br />
119
8 – Controller <strong>Installation</strong><br />
Step 4<br />
Release the pressure in the reservoir<br />
using the switch on the left armrest and<br />
disconnect the air hose from the<br />
accumulator.<br />
Step 5<br />
Unbolt the bracket that holds the<br />
accumulator and then take off the<br />
accumulator assembly.<br />
Step 6<br />
Reconnect the plug disconnected in<br />
Step 3.<br />
AUTOPILOT AUTOMATED STEERING SYSTEM INSTALLATION INSTRUCTIONS<br />
120
8 – Controller <strong>Installation</strong><br />
Step 7<br />
Disassemble the air reservoir from its<br />
bracket.<br />
Step 8<br />
Drill through the rivets to remove the<br />
small bracket from the reservoir<br />
bracket.<br />
Step 9<br />
Mark the position of the two mounting<br />
holes 10 mm from the end of each tab<br />
as shown.<br />
10 mm<br />
AUTOPILOT AUTOMATED STEERING SYSTEM INSTALLATION INSTRUCTIONS<br />
121
8 – Controller <strong>Installation</strong><br />
10 mm<br />
Step 10<br />
Drill a 9 mm hole at each of the two<br />
marked locations.<br />
Step 11<br />
Slightly bend the two tabs towards the<br />
back. Follow the white line to obtain<br />
enough room between the air reservoir<br />
and the bracket to mount the M8 nuts.<br />
In this image, the tabs are being bent<br />
away from the camera.<br />
AUTOPILOT AUTOMATED STEERING SYSTEM INSTALLATION INSTRUCTIONS<br />
122
8 – Controller <strong>Installation</strong><br />
Step 12<br />
Drill two holes with a diameter of 9 mm<br />
through the rubber mat at the rear of<br />
the seat as shown.<br />
C<br />
CAUTION – Ensure that you only<br />
drill through the rubber mat. If<br />
you drill through the rear wall,<br />
you can cause damage to the<br />
wires and other devices that are<br />
present behind the wall.<br />
15 mm<br />
30 mm<br />
LEFT HOLE<br />
30 mm<br />
RIGHT HOLE<br />
AUTOPILOT AUTOMATED STEERING SYSTEM INSTALLATION INSTRUCTIONS<br />
123
8 – Controller <strong>Installation</strong><br />
Step 13<br />
Install two flat head M8 x 16 mm<br />
screws in place as shown.<br />
Step 14<br />
Place the air reservoir bracket over the<br />
M8 screws and then secure them with<br />
some M8 nuts.<br />
Step 15<br />
Option 1<br />
Mount the reservoir onto the bracket.<br />
Use the two Serflex belts with the air<br />
connector pointing to the right fender.<br />
Extend the 3 / 8 " air hose using a 3 / 8 "<br />
adaptor (not provided) and 3 / 8 " hose.<br />
Connect it to the air reservoir.<br />
AUTOPILOT AUTOMATED STEERING SYSTEM INSTALLATION INSTRUCTIONS<br />
124
8 – Controller <strong>Installation</strong><br />
Option 2<br />
To avoid extending the 3 / 8 " hose, do the<br />
following:<br />
• Reroute the air hose towards the<br />
back of the seat.<br />
• Mount the reservoir with its base<br />
facing the right fender.<br />
• Adjust the length of the air hose and<br />
then connect it to the air connector.<br />
Step 16<br />
Secure the reservoir with the two<br />
Serflex belts as shown.<br />
Step 17<br />
2011 and newer machines are<br />
equipped with a bracket for a fire<br />
extinguisher. This bracket will be<br />
located above the NavController II.<br />
AUTOPILOT AUTOMATED STEERING SYSTEM INSTALLATION INSTRUCTIONS<br />
125
8 – Controller <strong>Installation</strong><br />
Step 18<br />
To temporarily remove the bracket<br />
from the machine, remove the two<br />
mounting bolts.<br />
Step 19<br />
Remove the two existing seat retaining<br />
screws.<br />
AUTOPILOT AUTOMATED STEERING SYSTEM INSTALLATION INSTRUCTIONS<br />
126
8 – Controller <strong>Installation</strong><br />
Step 20<br />
Install the 27 mm height spacers over<br />
the seat mounting holes.<br />
Step 21<br />
Install the seat bracket over the spacers<br />
and then secure it with the provided<br />
M8 x 50 mm screws.<br />
Step 22<br />
Use the supplied 10-32 screws to fit the<br />
controller bracket to the mounting<br />
plate.<br />
AUTOPILOT AUTOMATED STEERING SYSTEM INSTALLATION INSTRUCTIONS<br />
127
8 – Controller <strong>Installation</strong><br />
Step 23<br />
To attach the bracket to the machine,<br />
first place the supplied spacers under<br />
the mounting plate, then place the<br />
larger spacer above the plate.Place the<br />
original extinguisher plate on top. Use<br />
the supplied bolts to install the<br />
assembly in place.<br />
Step 24<br />
Attach the main and auxiliary harnesses<br />
to the controller and then use an Allen<br />
key to secure them.<br />
Step 25<br />
Route the wiring harnesses through the<br />
hole in the right rubber mat.<br />
AUTOPILOT AUTOMATED STEERING SYSTEM INSTALLATION INSTRUCTIONS<br />
128
8 – Controller <strong>Installation</strong><br />
Installing the controller cables<br />
Step 1<br />
Locate the existing pass-through at the<br />
right corner of the cab and then pass all<br />
the <strong>Autopilot</strong> cables through it.<br />
Step 2<br />
Coil the excess cables and then secure<br />
them with some cable ties behind the<br />
rear panel.<br />
Protect the cables where they are in<br />
contact with any cutting edges at the<br />
pass-through at the back of the cab.<br />
AUTOPILOT AUTOMATED STEERING SYSTEM INSTALLATION INSTRUCTIONS<br />
129
8 – Controller <strong>Installation</strong><br />
Controller connections<br />
P9<br />
P8<br />
P2<br />
P6<br />
P7<br />
1<br />
16<br />
P5<br />
P3<br />
P4<br />
17<br />
15<br />
14<br />
P12<br />
P13<br />
Item Description Item Description<br />
1 NavController II controller P9 Sonalert connector<br />
P2 Power connector P12 Lightbar/spare connector<br />
P3 GPS connector P13 Spare sensors connector<br />
P4 Display connector 14 Status indicator<br />
P5 Vehicle sensors connector 15 Laptop connector<br />
P6 Steering sensor connector 16 Main harness<br />
P7 Manual override connector 17 Auxiliary harness<br />
P8 Hydraulic valve connector<br />
AUTOPILOT AUTOMATED STEERING SYSTEM INSTALLATION INSTRUCTIONS<br />
130
8 – Controller <strong>Installation</strong><br />
Step 1<br />
Connect the power cable connection to<br />
P-2, which is labeled “Power”. P-2 is<br />
located on the main wiring harness.<br />
Note – The power connection supplies<br />
power through the controller to all<br />
connected devices, including GNSS and<br />
displays.<br />
Step 2<br />
Connect the GPS cable connection to<br />
P-3, which is labeled “GPS”. P-3 is<br />
located on the main wiring harness.<br />
Note – If you are using an FmX or<br />
CFX-750 display, attach the main<br />
display cable here, P/N 75741.<br />
Step 3<br />
Connect the steering sensor cable<br />
connection to P-6, which is labeled<br />
“Steering Sensor”. P-6 is located on the<br />
main wiring harness.<br />
Step 4<br />
Connect the manual override cable<br />
connection to P-7, which is labeled<br />
“Manual Override”. P-7 is located on<br />
the main wiring harness.<br />
Note – When you install the remote<br />
engage harness, add the pins to the<br />
existing connector.<br />
AUTOPILOT AUTOMATED STEERING SYSTEM INSTALLATION INSTRUCTIONS<br />
131
8 – Controller <strong>Installation</strong><br />
Step 5<br />
Connect the hydraulic steering valve<br />
cable connection to P-8, which is<br />
labeled “Hydraulic Valve”. P-8 is located<br />
on the main wiring harness.<br />
Step 6<br />
Connect the Sonalert P-9 to the two pin<br />
Delphi connector on the main wiring<br />
harness. Route the cable so the<br />
Sonalert warning device is in a position<br />
that is audible to the operator.<br />
Step 7<br />
Route the LED and laptop lead, which is<br />
located on the auxiliary wiring harness,<br />
to a location that allows the operator to<br />
determine the controller status. See<br />
controller LED status for status<br />
determination. Six flashes per second<br />
indicates a correctly functioning<br />
controller.<br />
Step 8<br />
Use the provided sleeving to secure the<br />
harness cables with tie wraps. Cover<br />
and route the cable bundle to avoid<br />
damage to connectors and strain on<br />
wire connections.<br />
AUTOPILOT AUTOMATED STEERING SYSTEM INSTALLATION INSTRUCTIONS<br />
132
CHAPTER<br />
9<br />
Final Machine Check 9<br />
C<br />
WARNING – To avoid potentially serious personal injury or illness, and to prevent damage to<br />
equipment, make sure that you read and understand the Safety Information chapter.<br />
1. Connect the battery.<br />
2. Start the machine and check for hydraulic leaks. Correct as needed.<br />
3. Update the Trimble display and the <strong>Autopilot</strong> NavController II to the latest firmware from<br />
http://www.agpartners.trimble.com.<br />
You can use FlashLoader 200 software version 3.19 to update the <strong>Autopilot</strong> controller: Download<br />
it from http://agpartners.trimble.com.<br />
4. Load the correct configuration file into the <strong>Autopilot</strong> NavControllerII for the vehicle model being<br />
used.<br />
Download the latest set of configuration files from http://www.agpartners.trimble.com.<br />
You can use <strong>Autopilot</strong> Toolbox II software version 2.92 to load the configuration file into the<br />
<strong>Autopilot</strong> controller. You can download the <strong>Autopilot</strong> Toolbox II software from<br />
http://agpartners.trimble.com.<br />
5. Calibrate the <strong>Autopilot</strong> system using the Trimble display or the <strong>Autopilot</strong> Toolbox II software.<br />
Depending on your machine type, the following items must be calibrated before you can use the<br />
<strong>Autopilot</strong> system:<br />
– NavController II mounting orientation<br />
– Manual override<br />
– Autosense mounting orientation<br />
– Valve deadzone<br />
– <strong>Autopilot</strong> P-gain<br />
– Antenna height/Antenna axle offset, and Roll offset<br />
AUTOPILOT AUTOMATED STEERING SYSTEM INSTALLATION INSTRUCTIONS 133