hp psc 2400 photosmart series all-in-one reference guide
hp psc 2400 photosmart series all-in-one reference guide
hp psc 2400 photosmart series all-in-one reference guide

You also want an ePaper? Increase the reach of your titles
YUMPU automatically turns print PDFs into web optimized ePapers that Google loves.
eference <strong>guide</strong><br />
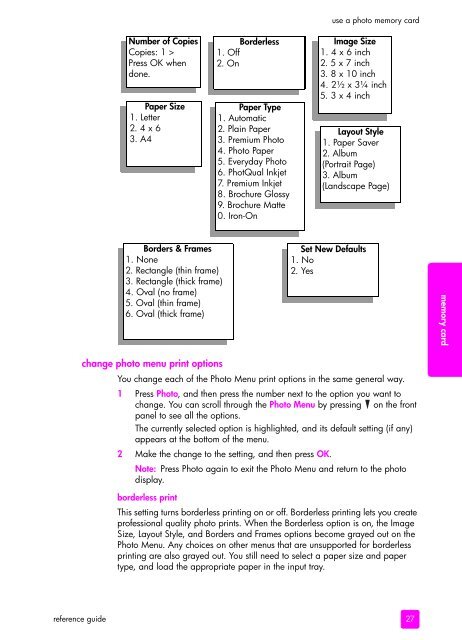
Number of Copies<br />
Copies: 1 ><br />
Press OK when<br />
d<strong>one</strong>.<br />
Paper Size<br />
1. Letter<br />
2. 4 x 6<br />
3. A4<br />
Borders & Frames<br />
1. N<strong>one</strong><br />
2. Rectangle (th<strong>in</strong> frame)<br />
3. Rectangle (thick frame)<br />
4. Oval (no frame)<br />
5. Oval (th<strong>in</strong> frame)<br />
6. Oval (thick frame)<br />
change photo menu pr<strong>in</strong>t options<br />
Borderless<br />
1. Off<br />
2. On<br />
Paper Type<br />
1. Automatic<br />
2. Pla<strong>in</strong> Paper<br />
3. Premium Photo<br />
4. Photo Paper<br />
5. Everyday Photo<br />
6. PhotQual Inkjet<br />
7. Premium Inkjet<br />
8. Brochure Glossy<br />
9. Brochure Matte<br />
0. Iron-On<br />
use a photo memory card<br />
Image Size<br />
1. 4 x 6 <strong>in</strong>ch<br />
2. 5 x 7 <strong>in</strong>ch<br />
3. 8 x 10 <strong>in</strong>ch<br />
4. 2½ x 3¼ <strong>in</strong>ch<br />
5. 3 x 4 <strong>in</strong>ch<br />
Layout Style<br />
1. Paper Saver<br />
2. Album<br />
(Portrait Page)<br />
3. Album<br />
(Landscape Page)<br />
Set New Defaults<br />
1. No<br />
2. Yes<br />
You change each of the Photo Menu pr<strong>in</strong>t options <strong>in</strong> the same general way.<br />
1 Press Photo, and then press the number next to the option you want to<br />
change. You can scroll through the Photo Menu by press<strong>in</strong>g on the front<br />
panel to see <strong>all</strong> the options.<br />
The currently selected option is highlighted, and its default sett<strong>in</strong>g (if any)<br />
appears at the bottom of the menu.<br />
2 Make the change to the sett<strong>in</strong>g, and then press OK.<br />
Note: Press Photo aga<strong>in</strong> to exit the Photo Menu and return to the photo<br />
display.<br />
borderless pr<strong>in</strong>t<br />
This sett<strong>in</strong>g turns borderless pr<strong>in</strong>t<strong>in</strong>g on or off. Borderless pr<strong>in</strong>t<strong>in</strong>g lets you create<br />
professional quality photo pr<strong>in</strong>ts. When the Borderless option is on, the Image<br />
Size, Layout Style, and Borders and Frames options become grayed out on the<br />
Photo Menu. Any choices on other menus that are unsupported for borderless<br />
pr<strong>in</strong>t<strong>in</strong>g are also grayed out. You still need to select a paper size and paper<br />
type, and load the appropriate paper <strong>in</strong> the <strong>in</strong>put tray.<br />
27<br />
memory card