RO Quick Change Manual PB4RO-75 - Pentair Residential Filtration
RO Quick Change Manual PB4RO-75 - Pentair Residential Filtration
RO Quick Change Manual PB4RO-75 - Pentair Residential Filtration

Create successful ePaper yourself
Turn your PDF publications into a flip-book with our unique Google optimized e-Paper software.
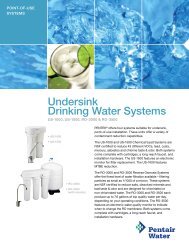
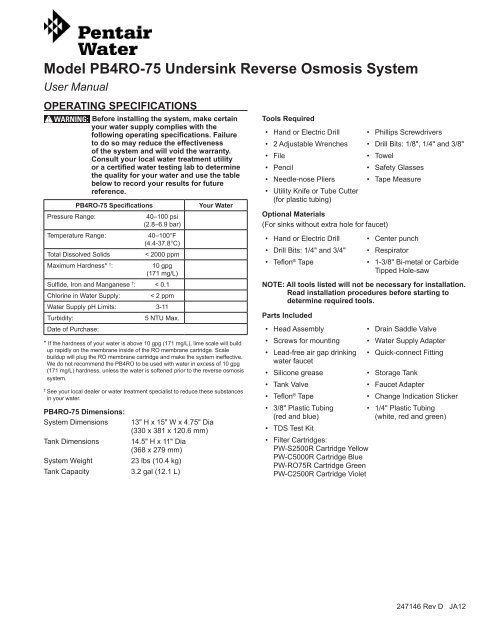
Model PB4<strong>RO</strong>-<strong>75</strong> Undersink Reverse Osmosis System<br />
User <strong>Manual</strong><br />
OPERATING SPECIFICATIONS<br />
WARNING: Before installing the system, make certain<br />
your water supply complies with the<br />
following operating specifications. Failure<br />
to do so may reduce the effectiveness<br />
of the system and will void the warranty.<br />
Consult your local water treatment utility<br />
or a certified water testing lab to determine<br />
the quality for your water and use the table<br />
below to record your results for future<br />
reference.<br />
Pressure Range:<br />
PB4<strong>RO</strong>-<strong>75</strong> Specifications<br />
Temperature Range:<br />
Total Dissolved Solids<br />
Maximum Hardness* † :<br />
40–100 psi<br />
(2.8–6.9 bar)<br />
40–100°F<br />
(4.4-37.8°C)<br />
< 2000 ppm<br />
10 gpg<br />
(171 mg/L)<br />
Sulfide, Iron and Manganese † : < 0.1<br />
Chlorine in Water Supply:<br />
< 2 ppm<br />
Water Supply pH Limits: 3-11<br />
Turbidity:<br />
Date of Purchase:<br />
5 NTU Max.<br />
Your Water<br />
* If the hardness of your water is above 10 gpg (171 mg/L), lime scale will build<br />
up rapidly on the membrane inside of the <strong>RO</strong> membrane cartridge. Scale<br />
buildup will plug the <strong>RO</strong> membrane cartridge and make the system ineffective.<br />
We do not recommend the PB4<strong>RO</strong> to be used with water in excess of 10 gpg<br />
(171 mg/L) hardness, unless the water is softened prior to the reverse osmosis<br />
system.<br />
†<br />
See your local dealer or water treatment specialist to reduce these substances<br />
in your water.<br />
PB4<strong>RO</strong>-<strong>75</strong> Dimensions:<br />
System Dimensions<br />
Tank Dimensions<br />
System Weight<br />
13" H x 15" W x 4.<strong>75</strong>" Dia<br />
(330 x 381 x 120.6 mm)<br />
14.5" H x 11" Dia<br />
(368 x 279 mm)<br />
23 lbs (10.4 kg)<br />
Tank Capacity 3.2 gal (12.1 L)<br />
Tools Required<br />
• Hand or Electric Drill<br />
• Phillips Screwdrivers<br />
• 2 Adjustable Wrenches • Drill Bits: 1/8", 1/4" and 3/8"<br />
• File<br />
• Pencil<br />
• Needle-nose Pliers<br />
• Utility Knife or Tube Cutter<br />
(for plastic tubing)<br />
• Towel<br />
Optional Materials<br />
(For sinks without extra hole for faucet)<br />
• Hand or Electric Drill<br />
• Drill Bits: 1/4" and 3/4"<br />
• Teflon ® Tape<br />
• Safety Glasses<br />
• Tape Measure<br />
• Center punch<br />
• Respirator<br />
• 1-3/8" Bi-metal or Carbide<br />
Tipped Hole-saw<br />
NOTE: All tools listed will not be necessary for installation.<br />
Read installation procedures before starting to<br />
determine required tools.<br />
Parts Included<br />
• Head Assembly<br />
• Screws for mounting<br />
• Lead-free air gap drinking<br />
water faucet<br />
• Silicone grease<br />
• Tank Valve<br />
• Teflon ® Tape<br />
• 3/8" Plastic Tubing<br />
(red and blue)<br />
• TDS Test Kit<br />
• Filter Cartridges:<br />
PW-S2500R Cartridge Yellow<br />
PW-C5000R Cartridge Blue<br />
PW-<strong>RO</strong><strong>75</strong>R Cartridge Green<br />
PW-C2500R Cartridge Violet<br />
• Drain Saddle Valve<br />
• Water Supply Adapter<br />
• <strong>Quick</strong>-connect Fitting<br />
• Storage Tank<br />
• Faucet Adapter<br />
• <strong>Change</strong> Indication Sticker<br />
• 1/4" Plastic Tubing<br />
(white, red and green)<br />
<br />
247146 Rev D JA12
GENERAL PRECAUTIONS<br />
WARNING: Do not use with water that is<br />
microbiologically unsafe or of unknown<br />
quality without adequate disinfection before<br />
or after the system. Systems certified for<br />
cyst reduction may be used on disinfected<br />
waters that may contain filterable cysts.<br />
WARNING: The PB4<strong>RO</strong> contains a replaceable <strong>RO</strong><br />
membrane cartridge that is critical to the<br />
efficiency of the system. Replacement of the<br />
<strong>RO</strong> membrane cartridge should be with one<br />
of identical specifications, as defined by the<br />
manufacturer, to assure the same efficiency<br />
and contaminant reduction performance.<br />
WARNING: The PB4<strong>RO</strong> contains a replaceable <strong>RO</strong><br />
membrane cartridge, critical for the effective<br />
reduction of total dissolved solids. Product<br />
water should be tested periodically to verify<br />
that the system is working properly.<br />
WARNING: The PB4<strong>RO</strong> is acceptable for treatment<br />
of influent concentrations of no more<br />
than 27 mg/L nitrate and 3 mg/L nitrite in<br />
combination measured as N and is certified<br />
for nitrate/nitrite reduction only for water<br />
supplies with a pressure of 40 psig (280 kPa)<br />
or greater.<br />
WARNING: The PB4<strong>RO</strong> shall only be used for arsenic<br />
reduction on chlorinated water supplies<br />
containing detectable residual free chlorine<br />
at the system inlet. Water systems using an<br />
in-line chlorinator should provide a oneminute<br />
chlorine contact time before the unit.<br />
WARNING: The PB4<strong>RO</strong> will not protect against diseasecausing<br />
bacteria or remove naturallyoccurring<br />
harmless bacteria.<br />
CAUTION The PB4<strong>RO</strong> must be protected against freezing<br />
which can cause the filter housing to crack,<br />
resulting in water leakage.<br />
CAUTION Turn off water supply to head without cartridge if<br />
it must be left unattended for an extended period<br />
of time.<br />
CAUTION Do not use electrical heating tape on this unit.<br />
NOTE: Substances listed as reduced are not necessarily<br />
in your water. System must be maintained<br />
according to manufacturer's instructions, including<br />
replacement of filter cartridges.<br />
NOTE: Your water must be within required limits for<br />
satisfactory operation. If not, the <strong>RO</strong> membrane<br />
cartridge’s life may be shortened and your warranty<br />
will be voided (see Operating Specifications).<br />
NOTE: Install on cold water line only.<br />
NOTE: Do not install where system will be exposed to<br />
direct sunlight.<br />
NOTE: Make certain that installation complies with all state<br />
and local laws and regulations.<br />
NOTE: The filter cartridges and <strong>RO</strong> membrane cartridge<br />
included with the system have limited service lives.<br />
<strong>Change</strong>s in taste, odor, and color of the filtered<br />
water indicate that the cartridges and/or membrane<br />
should be replaced.<br />
NOTE: During extended periods of non-use (such as<br />
during a vacation), remove the membrane cartridge<br />
and the filter cartridges from the unit and place<br />
them in a sealed plastic bag. Store the cartridges<br />
in the refrigerator for future use. When re-starting<br />
the unit, replace all cartridges and flush per<br />
instructions.<br />
NOTE: If the PB4<strong>RO</strong> stands for more than 2 to 3 days<br />
without being used, the storage tank should be<br />
emptied.<br />
NOTE: Use only Teflon ® tape without adhesive backing<br />
to seal joints. Do not use pipe compound (“pipe<br />
dope”), sticks, or similar compounds with this<br />
unit; they contain petroleum derivatives which can<br />
cause crazing and cracking of the plastic in the<br />
filter housing.<br />
NOTE: Use only soap and water to clean components.<br />
NOTE: Do not use aerosol sprays (bug spray, cleaning<br />
fluids, etc.) near the PB4<strong>RO</strong>. They contain organic<br />
solvents which will cause crazing and cracking of<br />
the plastic in the filter housing.<br />
NOTE: After prolonged periods of non-use, such as a<br />
vacation, it is recommended that the system be<br />
flushed thoroughly. Let water run for 2 to 3 minutes<br />
before using.<br />
NOTE: Do not use a torch near the unit.<br />
HOW REVERSE OSMOSIS (<strong>RO</strong>) WORKS<br />
The PB4<strong>RO</strong> uses a semi-permeable membrane to reduce<br />
dissolved salts, improving the taste and odor of your water. The<br />
<strong>RO</strong> membrane cartridge contains multiple layers of micron-thin<br />
film wound around a hollow center core. Water molecules can<br />
pass through the cartridge, while dissolved salts are rejected.<br />
Your household water supply is pre-filtered to reduce dirt and<br />
chlorine that may foul the membrane. The <strong>RO</strong> membrane<br />
cartridge separates this pre-filtered water into P<strong>RO</strong>DUCT<br />
WATER and REJECT WATER. Your household water pressure<br />
forces water through the membrane within the <strong>RO</strong> membrane<br />
cartridge, and into the storage tank. This is product water.<br />
Dissolved salts cannot pass through the membrane and are<br />
sent to the drain as reject water. When you open the faucet,<br />
product water (permeate) is drawn from the storage tank<br />
through a post-polishing filter. The post-polishing filter takes out<br />
any remaining taste or odor in the water and provides you and<br />
your family with cleaner, great-tasting water.<br />
The PB4<strong>RO</strong> also features an auto shut-off valve, which shuts<br />
off the system once the pressure in the storage tank reaches<br />
2/3 of the incoming water pressure (your household water<br />
pressure). When you open the faucet to draw water from<br />
the storage tank, the pressure inside the tank drops and<br />
the auto shut-off valve opens. The system then begins to<br />
operate, replenishing the water you took from the storage tank.<br />
Depending on the system's efficiency, for each gallon of water<br />
produced, up to 7 gallons are discharged as reject water. The<br />
storage tank can hold up to 3.2 gallons (12.1 L) of water at a<br />
time, more than enough for the average family’s drinking and<br />
cooking needs.<br />
NOTE: When used under operating conditions specified<br />
on page 1 of this manual, the <strong>RO</strong> membrane<br />
cartridge of the PB4<strong>RO</strong> should last 12–24 months.<br />
The precise life span of the PB4<strong>RO</strong>'s <strong>RO</strong> membrane<br />
cartridge will depend on the quality of the water<br />
entering the system, and the frequency with which<br />
you use it. Frequent use prevents the dissolved<br />
salts from building up on the membrane as scale.<br />
The more water the system is required to produce,<br />
the longer the membrane will last. You may wish<br />
to find a variety of uses for your PB4<strong>RO</strong> system in<br />
order to prolong the life of the membrane.<br />
2 • JA12 Model PB4<strong>RO</strong>-<strong>75</strong> Undersink Reverse Osmosis System
INSTALLATION<br />
NOTE: Please read all instructions, specifications, and<br />
precautions before installing and using your<br />
PB4<strong>RO</strong> system.<br />
NOTE: The PB4<strong>RO</strong> may be installed under a sink or in the<br />
basement.<br />
NOTE: The PB4<strong>RO</strong> is installed vertically.<br />
NOTE: Numbered diagrams correspond with numbered<br />
steps.<br />
NOTE: For standard installation on 1/2" 14 NPS threads<br />
(most common thread on kitchen faucets) cold<br />
water line.<br />
1. Installing the Water Supply Adapter<br />
The supply adapter fits 1/2" 14 NPS supply threads. If local<br />
codes permit, it may be used to connect the filter system<br />
to the cold water supply line. If local codes do not permit<br />
the use of the supply adapter, alternate connectors can be<br />
obtained from your local retailer.<br />
A. Turn off cold water supply line. If cold water line does<br />
not have a shut-off valve under the sink, one should be<br />
installed.<br />
B. Turn on the cold water faucet and allow all water to<br />
drain from line.<br />
C. Disconnect cold water line from 1/2" 14 NPS threaded<br />
stub on bottom of main faucet.<br />
D. Screw the water supply adapter to the threaded faucet<br />
stub as shown.<br />
E. Using the nut that previously connected the cold water<br />
line to the faucet, screw the cold water line to the male<br />
supply adapter threads.<br />
C<br />
E<br />
B<br />
2. Selecting the Faucet Location<br />
NOTE: The drinking water faucet should be positioned<br />
with function, convenience, and appearance in<br />
mind. An adequate flat area is required to allow<br />
faucet base to rest securely. The faucet fits through<br />
a 1-3/8" hole. Most sinks have pre-drilled 1-3/8" or<br />
1-1⁄2" diameter holes that may be used for faucet<br />
installation. If these pre-drilled holes cannot be<br />
used or are in an inconvenient location, it will<br />
be necessary to drill a 1-3/8" hole in the sink to<br />
accommodate the faucet.<br />
WARNING: This procedure may generate dust which<br />
can cause severe irritation if inhaled or come<br />
in contact with the eyes. The use of safety<br />
glasses and respirator for this procedure is<br />
recommended.<br />
WARNING: Do not attempt to drill through an allporcelain<br />
sink. If you have an all-porcelain<br />
sink, mount the faucet in pre-drilled sprayer<br />
hole or drill through countertop next to sink.<br />
WARNING: When drilling through a countertop, make<br />
sure the area below the drilled area is free<br />
of wiring and piping. Make certain that<br />
you have ample room to make the proper<br />
connections to the bottom of the faucet.<br />
WARNING: Do not drill through a countertop that is<br />
more than 1" thick.<br />
WARNING: Do not attempt to drill through a tiled,<br />
marble, granite or similar countertop.<br />
Consult a plumber or the countertop<br />
manufacturer for advice or assistance.<br />
A. Line bottom of sink with newspaper to prevent metal<br />
shavings, parts, or tools from falling down drain.<br />
B. Place masking tape over the area to be drilled to help<br />
prevent scratches if drill bit slips.<br />
C. Mark hole with center punch. Use a 1/4" drill bit for a<br />
pilot hole.<br />
D. Using a 1-3/8" hole saw, drill a hole completely through<br />
the sink. Smooth the rough edges with a file.<br />
F<br />
D<br />
A<br />
Figure 1<br />
D<br />
C<br />
C<br />
1<br />
⁄4”<br />
B<br />
1 1 ⁄4”<br />
D<br />
Figure 2<br />
A<br />
Model PB4<strong>RO</strong>-<strong>75</strong> Undersink Reverse Osmosis System JA12 • 3
INSTALLATION continued<br />
3. Mounting the Faucet<br />
A. Pre-assemble the base. The rubber washer should be<br />
in place below the base. The two toggle bolts should be<br />
inserted through the base and the rubber washer. The<br />
bolts are screwed into the spring-loaded toggle.<br />
B. Place the base assembly over the hole in the sink. The<br />
two toggles should pass through the hole far enough to<br />
spring fully open. If they are not open, unscrew the bolt<br />
until the toggle moves down to clear the sink.<br />
C. Look down through the base for this step. Before<br />
tightening the bolts, determine the correct rotation of the<br />
base. The final position of the handle will be 45 degrees<br />
off from the bolt heads. Use Figure 5 to help determine<br />
the best position for your installation.<br />
Through the hole in the base, hold the toggle in position<br />
while tightening the bolt. The spring loaded toggle<br />
will contact the bottom of the counter top and hold in<br />
position. Do not fully tighten. Repeat for second toggle<br />
bolt.<br />
Check the final position of the base and toggle bolts.<br />
Tighten the two bolts evenly. DO NOT OVERTIGHTEN.<br />
Tighten only far enough to prevent the base from<br />
rotating when the faucet is rotated in place.<br />
D. Attach large diameter 3/8" (red) drain tube to the larger<br />
barb fitting at the faucet bottom. This tube should be<br />
long enough to reach the drain clamp in Step 7.<br />
E. Locate the 1/4" red brine tube from the right side of the<br />
system head assembly. Route the tube through the<br />
faucet base and connect to small barb on the faucet.<br />
Make certain that the tube is not kinked or stressed<br />
once the head assembly is mounted.<br />
F. Apply 3-5 wraps of Teflon tape to faucet stem. Screw<br />
quick connector onto end of threads.<br />
G. Wet end of 3/8" blue tube. Push into bottom of<br />
connector. Tug gently to be sure connection is<br />
complete. This tube should be long enough to reach the<br />
top right side of the <strong>RO</strong> Assembly.<br />
H. Check that the O-ring is in place on the faucet. Feed<br />
the remaining 3/8" tubes through the base. Hold the<br />
faucet in the final position and rotate backwards (to the<br />
left) while pushing down. The faucet will drop into the<br />
base. Push down on the faucet and rotate forward (to<br />
the right) to lock it into final position. The O-ring will be<br />
seated and the faucet held securely in position.<br />
I. Insert the spout into the top opening. Hold in position<br />
and screw the collar onto the base.<br />
NOTE: If the faucet handle is not in the correct<br />
position, remove the faucet, loosen the toggle<br />
bolts and reposition the base. Tighten the<br />
toggle bolts. Then reinstall the faucet.<br />
A<br />
Base<br />
Black Rubber<br />
Washer<br />
B<br />
Base<br />
Will Spring Open<br />
C<br />
Notch For Faucet<br />
O-ring Seat<br />
Figure 4<br />
Handle Faces This Direction<br />
D<br />
45°<br />
E<br />
Figure 5<br />
Figure 6<br />
G<br />
Black Rubber<br />
Washer<br />
Notch For Faucet<br />
Blades Must Be Held<br />
When Tightening<br />
F<br />
O-ring<br />
Folds Upward<br />
Figure 3<br />
4 • JA12 Model PB4<strong>RO</strong>-<strong>75</strong> Undersink Reverse Osmosis System
INSTALLATION continued<br />
4. Mounting the System<br />
CAUTION The filter head assembly should be mounted on<br />
a stud or firm surface. The mounting bracket will<br />
support the weight of the cartridges and help<br />
prevent strain on the water lines.<br />
A. Select location under sink or in basement where unit<br />
is to be mounted. The head assembly is mounted in a<br />
vertical position.<br />
B. When mounting the PB4<strong>RO</strong>-<strong>75</strong> two screws are supplied<br />
to mount the head. Measure up from the floor of the<br />
cabinet 14-1/2". This will provide clearance to change<br />
the cartridges. The two screws will be 14" apart and<br />
level. Screw the two screws into the wall. Leave a<br />
gap between the screw head and the wall of 1/8". The<br />
backside of the system head has two slots that will fit<br />
over the screw heads and slide down to lock.<br />
14 Inches<br />
Between Holes<br />
B<br />
12 Inches<br />
From Mounting<br />
Hole to Bottom<br />
of Cartridge<br />
2-1/2 Inches Clearance Below Cartridges<br />
Figure 7<br />
Model PB4<strong>RO</strong>-<strong>75</strong> Undersink Reverse Osmosis System JA12 • 5
INSTALLATION continued<br />
5. Connecting the Faucet<br />
CAUTION Water supply to the tee should have a separate<br />
shut-off valve. If it does not, a separate shut-off<br />
should be installed.<br />
A. Locate the 3/8" blue tubing from the faucet and place a<br />
mark 5/8" from the end of the tubing. Moisten the end of<br />
the tubing with water and insert into the quick-connect<br />
fitting on the head assembly until the mark is flush with<br />
the quick-connect fitting.<br />
B. Gently pull back on the tubing to ensure it is connected<br />
properly. If the tubing comes out of fitting, cut a small<br />
section off of the tubing and reconnect.<br />
NOTE: Tubing may be quickly and easily removed from<br />
the fitting if necessary. First, turn off the water<br />
supply to the filter. Open faucet, then press in<br />
the collet around the fitting while pulling the<br />
tubing with your other hand.<br />
Step 8<br />
A<br />
3/8" Blue<br />
Step 5<br />
3/8" Red<br />
Step 9<br />
1/4" Red<br />
1/4" White<br />
Step 6<br />
PW-S2500R<br />
Yellow<br />
PW-C5000R<br />
Blue<br />
PW-C2500R<br />
Violet<br />
Cover Not Shown<br />
PW-<strong>RO</strong><strong>75</strong>R<br />
Green<br />
1/4" Green<br />
Step 11<br />
Figure 8<br />
6 • JA12 Model PB4<strong>RO</strong>-<strong>75</strong> Undersink Reverse Osmosis System
INSTALLATION continued<br />
6. Connecting the Water Supply Adapter<br />
A. Determine the length of 1/4" white plastic tubing needed<br />
to connect the inlet (white collet) on the left side of the<br />
filter with the water supply adapter. Be sure to allow<br />
enough tubing to prevent kinking and cut the tubing<br />
squarely. Place a mark 5/8" from the end of the tubing.<br />
B. Wet tubing with water and insert into water supply<br />
adapter 5/8" until mark is flush with fitting. Repeat<br />
inserting other end of tubing into inlet of the head<br />
assembly.<br />
D<br />
E<br />
7. Installing the Drain Clamp<br />
NOTE: If you have a single-basin sink with a disposal<br />
unit, call Technical support at 1-800-279-9404 for<br />
options.<br />
NOTE: Before installing the drain clamp, check the<br />
drainpipes under the sink for corrosion. Corroded<br />
pipes should be replaced before continuing with<br />
installation.<br />
A. Attach the drain clamp to a vertical section of the<br />
drainpipe, about 6" above the trap. Make sure the<br />
opening on the drain clamp is facing towards the<br />
drinking water faucet.<br />
B. Using the fitting hole of the drain clamp as a guide, drill<br />
a 1/4" hole through one side of the drainpipe.<br />
C. Remove the drain clamp from the drainpipe and enlarge<br />
the hole with a 3/8" drill bit. Use a file to remove rough<br />
edges from the drilled hole.<br />
D. Make sure the black rubber gasket is adhered to the<br />
inside of the drain clamp and place the drain clamp<br />
assembly over the drilled hole. Look through the hole<br />
and position the clamp so that the center of the clamp<br />
hole is slightly higher (about 1/16") than the center<br />
of the drilled hole, see Figure 11. Tighten the clamp<br />
securely.<br />
E. Screw the plastic compression nut onto the drain clamp<br />
until hand-tight.<br />
Figure 11<br />
8. Connecting the Faucet to the Drain<br />
NOTE: This is a gravity drain line. Any loops, kinks or<br />
sharp bends must be eliminated before proceeding.<br />
Failure to create a straight line to the drain may<br />
result in reject water leaking through the air gap<br />
in the faucet onto the counter top and below the<br />
faucet.<br />
A. Align the 3/8" red tubing from the faucet with the<br />
compression nut on the drain clamp. Create as straight<br />
a path as possible with the tubing. Cut the tubing<br />
squarely below the nut and remove the internal and<br />
external burrs.<br />
B. Loosen the compression nut two complete turns. Insert<br />
the tubing into the nut until it stops. Tighten with fingers,<br />
then tighten 1 to 2 turns with a wrench.<br />
A<br />
B<br />
A<br />
Figure 12<br />
6"<br />
Figure 9<br />
B<br />
C<br />
Figure 10<br />
Model PB4<strong>RO</strong>-<strong>75</strong> Undersink Reverse Osmosis System JA12 • 7
CAPACITY:<br />
Replace every 12 months<br />
TEMPERATURE RANGE:<br />
40-100°F (4.4-37.8°C)<br />
PRESSURE RANGE:<br />
30-125°F (2.4-8.6 Bar)<br />
For use with <strong>Pentair</strong> Water models:<br />
PB4<strong>RO</strong>-<strong>75</strong>, PP4<strong>RO</strong>-<strong>75</strong> and PB5<strong>RO</strong>-<strong>75</strong><br />
INSTALLATION continued<br />
9. Installing the Cartridges<br />
The cartridges are identified by the color of the label and<br />
the model number.<br />
Cartridge #1 = PW-S2500R, Yellow<br />
Cartridge #2 = PW-C5000R, Blue<br />
Cartridge #3 = PW-<strong>RO</strong><strong>75</strong>R, Green<br />
Cartridge #4 = PW-C2500R, Violet<br />
Install the cartridges in order. If the cartridges are installed<br />
out of order the system will not filter correctly.<br />
A. Slide the cartridge into the head until it stops.<br />
B. Twist the cartridge 1/4 turn clockwise until it snaps into<br />
place. Gently pull out on the cartridge to ensure the<br />
cartridge is locked into place.<br />
PW-S2500R<br />
<strong>Quick</strong> <strong>Change</strong><br />
Sediment Cartridge<br />
PW-C5000R<br />
<strong>Quick</strong> <strong>Change</strong><br />
EP Cartridge<br />
©2010 <strong>Pentair</strong> <strong>Residential</strong> <strong>Filtration</strong>, LLC<br />
Milwaukee, WI, USA<br />
Assembled in China SH247144 Rev A MR10<br />
Warning: Do not use with water that is<br />
microbiologically unsafe or of unknown<br />
quality without adequate disinfection<br />
before or after the systems. Systems<br />
certified for cyst reduction may be used<br />
on disinfected waters that may contain<br />
filterable cysts.<br />
PW-C2500R<br />
Figure 13<br />
Milwaukee, WI, USA<br />
Assembled in China SH247143 Rev A MR10<br />
on disinfected waters that may contain<br />
filterable cysts.<br />
3<br />
1<br />
2<br />
PW-C2500R<br />
10. Connecting the Storage Tank to the System<br />
CAUTION When tank is full, it weighs approximately 35<br />
pounds. Provide ample support under the tank.<br />
A. Apply 3-5 wraps of Teflon tape to the tank threads.<br />
B. Thread the tank valve onto the top of the tank opening<br />
by turning it clockwise until snug.<br />
C. Locate the green tubing and a mark 3/4" from the end.<br />
Moisten one end of the green tubing with water and<br />
insert with a twisting motion into the free port of the tank<br />
valve until the 3/4" mark is flush with the quick-connect<br />
fitting.<br />
NOTE: Do not cut green tube. This line should be left at<br />
the pre-cut length for future service.<br />
NOTE: The pressurized storage tank has capacity of<br />
3.2 gallons. The tank's air pressure is factory<br />
set at 5 to 7 psi when tank is empty.<br />
11. Putting the System Into Operation<br />
CAUTION Make certain head assembly is firmly attached<br />
to wall to prevent it from falling and possibly<br />
becoming damaged.<br />
NOTE: Use caution not to bend or pinch the tubing behind<br />
the system while attaching to mounting screws.<br />
NOTE: The post-polishing filter may contain fine black<br />
carbon particles. These fines are harmless, but<br />
may make the water appear gray in color. The<br />
carbon fines are flushed from the system with the<br />
first tank full of water.<br />
NOTE: The PB4<strong>RO</strong> system does not produce a high<br />
volume of water on demand as an ordinary filter<br />
does. Water is produced at a slow, drop-by-drop<br />
rate. The system requires about 3 hours to fill the<br />
storage tank. As water is taken from the tank, the<br />
system automatically starts the cycle of replacing<br />
the water and then stops water production when<br />
the tank is full.<br />
A. Make sure cold water faucet is “off” (Figure 14).<br />
B. Make sure tank valve is in the open position.<br />
C. Slowly turn on cold water supply.<br />
D. Open the faucet to turn on flow. Let the faucet run/drip<br />
for 12 hours, then close it.<br />
E. Allow 3 hours for the tank to fill. Continue to periodically<br />
check the installation for leaks. After the storage tank<br />
is filled, open the faucet to flush the post-filter cartridge<br />
(on the right side of the filter housing). Allow 4 to 5<br />
minutes for all of the water to drain from the tank. Close<br />
faucet and allow tank to fill.<br />
CAUTION Visually check the entire system for leaks. If a leak is<br />
present, see T<strong>RO</strong>UBLESHOOTING.<br />
F. Repeat Step E four times.<br />
NOTE: Initially, the water may appear cloudy. This is a<br />
result of air trapped in the post-filter cartridge.<br />
It is not harmful and will disappear in a matter<br />
of minutes. It may take up to a week after<br />
installing a new post-filter cartridge for the<br />
trapped air to dissipate.<br />
The system is ready for operation. You can now enjoy quality<br />
water from the PB4<strong>RO</strong>-<strong>75</strong>.<br />
Closed<br />
Tank Valve<br />
A<br />
B<br />
Open<br />
Tank Valve<br />
Figure 14<br />
8 • JA12 Model PB4<strong>RO</strong>-<strong>75</strong> Undersink Reverse Osmosis System
OPTIONAL INSTALLATION<br />
CONNECTING THE PB4<strong>RO</strong>-<strong>75</strong> TO<br />
REFRIGERATOR ICEMAKER/WATER<br />
DISPENSER<br />
CAUTION If you are connecting the PB4<strong>RO</strong> to your<br />
refrigerator/icemaker with initial system<br />
installation, wait to turn on the icemaker until<br />
the Post- Filter Cartridge (on the right side of the<br />
filter housing) has been flushed according to<br />
Step 11.<br />
CAUTION Use plastic tubing and fittings. Do not use<br />
copper tubing or brass fittings.<br />
NOTE: For optimum performance, it is recommended<br />
that the distance between the PB4<strong>RO</strong> and the<br />
refrigerator icemaker/water dispenser be no greater<br />
than 10 feet (3 m). At distances greater than 10 feet,<br />
the water pressure from the system may not be<br />
adequate to deliver water to the refrigerator.<br />
Materials Required<br />
(available from your local hardware store)<br />
• 3/8" x 3/8" x 3/8" (9.5 x 9.5 x 9.5 mm) compression or<br />
quick-connect tee.<br />
• 3/8" (9.5 mm) polyethylene tubing (maximum length of<br />
10 feet [3 m] recommended)<br />
• Shut-off valve<br />
A. Turn off icemaker and refrigerator water supply. Consult<br />
manufacturer’s guidelines.<br />
B. Close tank valve (on top of storage tank).<br />
C. Turn off water to the system at the cold water supply.<br />
D. Open drinking water faucet to relieve pressure.<br />
E. Locate blue tubing leading to your drinking water faucet.<br />
Cut and insert the 3/8" x 3/8" x 3/8" (9.5 x 9.5 x 9.5 mm)<br />
compression or quick-connect tee into the blue tubing<br />
(Figure 15). Consult manufacturer’s guidelines before<br />
installing the tee connection.<br />
NOTE: When cutting the blue tubing, you may<br />
experience some water leakage.<br />
F. Using a length of 3/8" polyethylene tubing, connect<br />
the icemaker/dispenser line with the free port on the<br />
compression tee.<br />
G. The shut-off valve should be installed as close to this<br />
port of the tee as possible. Shut-off valve should be<br />
installed in the OFF position. Consult manufacturer’s<br />
guidelines before installing the shut-off valve.<br />
H. Completely open cold water supply (until it comes to a<br />
stop).<br />
I. Open tank valve.<br />
J. Turn off the drinking water faucet.<br />
K. Open shut-off valve at the tee connection.<br />
L. Turn on ice maker. Consult manufacturer’s instructions.<br />
M. Check for leaks and tighten connections if necessary.<br />
Tubing to drinking<br />
water faucet<br />
Figure 15<br />
Tubing from<br />
system outlet<br />
Tubing to<br />
refrigerator<br />
Model PB4<strong>RO</strong>-<strong>75</strong> Undersink Reverse Osmosis System JA12 • 9
TESTING YOUR REVERSE OSMOSIS<br />
SYSTEM<br />
Total Dissolved Solids (TDS) Test<br />
NOTE: Under NSF/ANSI Standard 58, it is highly<br />
recommended that you (the consumer) have your<br />
water tested at least every 6 months to verify that<br />
your system is performing satisfactorily.<br />
Sampling Instructions:<br />
Sampling instructions are included with the Total Dissolved<br />
Solids (TDS) Test Kit. If the TDS Test Kit is missing from your<br />
unit, please call Customer Support at 1-888-837-0028 for a<br />
replacement.<br />
Figure 16<br />
Total Dissolved<br />
Solids Test Kit<br />
WHEN TO CHANGE THE CARTRIDGES<br />
The life of the cartridge depends on the water volume used and<br />
the substances in the water. Normally, cartridges should be<br />
changed at intervals of 6 months. Replace the cartridge sooner<br />
if the water pressure at the faucet begins to drop noticeably or<br />
if you notice changes in the taste, color, or flow of the filtered<br />
water.<br />
CHANGING THE CARTRIDGES<br />
Materials Needed<br />
• Replacement Cartridges (color coded):<br />
PW-S2500R Cartridge Yellow<br />
PW-C5000R Cartridge Blue<br />
PW-<strong>RO</strong><strong>75</strong>R Cartridge Green<br />
PW-C2500R Cartridge Violet<br />
The pre-filter and post-filter cartridges need to be changed<br />
when the water pressure at the faucet begins to drop<br />
noticeably, or if there are changes in taste, color or flow of the<br />
filtered water. All cartridges should be changed at the same<br />
time. The cartridges are color coded to indicate which location<br />
they are installed into.<br />
1. Changing the Cartridges<br />
NOTE: Only the replacement cartridges listed can be used<br />
with this system. Failure to use recommended<br />
replacement cartridges will void your warranty.<br />
A. Place a small pan or towel under the PB4<strong>RO</strong> to catch<br />
any water that may drip.<br />
B. Twist the pre-filter cartridge (on the left side of the filter<br />
housing) counter-clockwise for a 1/4 of a turn, and pull<br />
the cartridge out of the system. If the system has any<br />
significant leaks, see Troubleshooting.<br />
C. Push the new cartridge into the head until it can go no<br />
further.<br />
D. Twist the cartridge 1/4 turn clockwise until it snaps into<br />
place.<br />
E. Gently pull the cartridge straight out to ensure the<br />
cartridge is locked into place.<br />
F. Repeat for all other cartridges.<br />
G. Turn on water and check for leaks. If leaks are found,<br />
see Troubleshooting.<br />
NOTE: The post filter cartridge may contain carbon<br />
fines (very fine black powder). This will be<br />
released during your initial flushing.<br />
H. Flush water through filter for 5 minutes to remove<br />
carbon fines. Check for leaks again before leaving<br />
installation. Allow the tank to fill.<br />
2. Flushing the <strong>RO</strong> membrane<br />
NOTE: The PB4<strong>RO</strong> system does not produce a high<br />
volume of water on demand as an ordinary filter<br />
does. Water is produced at a slow, drop-by-drop<br />
rate. The system requires about 3 hours to fill the<br />
storage tank. As water is taken from the tank, the<br />
system automatically starts the cycle of replacing<br />
the water and then stops water production when<br />
the tank is full.<br />
A. Make sure cold water faucet is “off” (Figure 14).<br />
B. Make sure tank valve is in the open position.<br />
C. Slowly turn on cold water supply.<br />
D. Open the faucet to turn on flow. Let the faucet run/drip<br />
for 12 hours, then close it.<br />
E. Allow 3 hours for the tank to fill. Continue to periodically<br />
check the installation for leaks. After the storage tank<br />
is filled, open the faucet to flush the post-filter cartridge<br />
(on the right side of the filter housing). Allow 4 to 5<br />
minutes for all of the water to drain from the tank. Close<br />
faucet and allow tank to fill.<br />
CAUTION Visually check the entire system for leaks. If a leak is<br />
present, see T<strong>RO</strong>UBLESHOOTING.<br />
F. Repeat Step E four times.<br />
10 • JA12 Model PB4<strong>RO</strong>-<strong>75</strong> Undersink Reverse Osmosis System
T<strong>RO</strong>UBLESHOOTING<br />
Leaks on Supply Adapter Connection<br />
1. Turn off water supply valve and turn on drinking water<br />
faucet to release pressure in system.<br />
2. Loosen leaking threaded fitting on supply adapter or pull<br />
out leaking tubing by pressing collar surrounding tubing<br />
while pulling the tubing with your other hand.<br />
3. Inspect to see if plastic tubing is scratched and supply<br />
adapter was properly attached.<br />
4. If tubing is scratched, cut off 1/2" to 5/8" and reinstall.<br />
Leaks on Faucet/Tubing Connection<br />
1. Turn off water supply valve and turn on drinking water<br />
faucet to release pressure.<br />
2. Unscrew tubing nut at bottom of faucet. Inspect the tubing.<br />
The insert, plastic ring and tubing should not be damaged.<br />
3. Check if insert is in place and tubing is cut squarely and<br />
not scratched, cut tubing if necessary to get square smooth<br />
end.<br />
4. If the tubing is smooth and square, reconnect tubing by<br />
inserting into faucet and tightening nut. The plastic ring<br />
should be held tight to the faucet system when the nut is<br />
tight.<br />
5. Turn on water supply valve, then close faucet and check for<br />
leaks.<br />
NOTE: If leaks persist, or if there are other leaks on<br />
system, turn off water supply and call Technical<br />
Support 1-800-279-9404.<br />
Leaks Between Cartridge and Filter Housing<br />
1. Turn off cold water supply to system at saddle valve. Close<br />
tank valve. Open drinking water faucet to relieve water<br />
pressure.<br />
2. Remove the cartridge, inspecting it for damage. Inspect<br />
O-rings to make sure they are seated and clean.<br />
3. Insert and twist the cartridge back into the filter housing.<br />
4. Turn on water supply at saddle valve. Open tank valve.<br />
Close drinking water faucet after water begins to flow. If<br />
leaks persist, call Technical Support.<br />
Leak Between Tank Valve and Storage Tank<br />
1. Turn off water supply to system at the saddle valve. Open<br />
faucet to drain storage tank. Let faucet run for 3–5 minutes<br />
until it drips.<br />
2. Remove green tubing from tank valve by pressing the collar<br />
around the fitting while pulling the tubing with your other<br />
hand.<br />
3. Unscrew the tank valve from the storage tank.<br />
4. Place three wraps of Teflon ® tape on the threads of the<br />
storage tank.<br />
5. Thread the tank valve onto the top of the tank opening by<br />
turning it clockwise until snug.<br />
6. Cut off 1" of tubing. Tubing should be cut squarely. Internal<br />
and external burrs should be removed. Place a mark on<br />
tubing 3/4" from end of tubing.<br />
7. Wet the tubing and insert until the mark is flush with the<br />
quick-connect fitting.<br />
8. Turn water supply on at the saddle valve and close drinking<br />
water faucet.<br />
9. Allow system to pressurize for several hours and check for<br />
leaks.<br />
10. Check for leaks after tank is fully pressurized (1–3 hours). If<br />
leak persists, call Technical Support .<br />
Leaks at <strong>Quick</strong>-Connect Fittings<br />
CAUTION The 1/4" red tubing connected to the top of the<br />
fourth cartridge has a flow restrictor installed.<br />
The system will not operate correctly if the<br />
restrictor is removed.<br />
1. Close tank valve, close saddle valve, and open drinking<br />
water faucet.<br />
2. Press collar around the quick-connect fitting while pulling<br />
the tubing with your other hand.<br />
3. Cut off 1" of tubing. Tubing should be cut squarely. Internal<br />
and external burs should be removed. Place a mark on<br />
tubing 5/8" from end on 1/4" tubing or 3/4" from end on 3/8"<br />
tubing.<br />
4. Wet the end and insert tubing until the mark is flush with the<br />
quick-connect fitting.<br />
5. Open the saddle valve until it comes to a stop. Open the<br />
tank valve and close drinking water faucet. If leaks persist,<br />
call Technical Support.<br />
Leaks from Faucet<br />
1. Check to make sure white tubing leading from the drinking<br />
water faucet to the drain is as straight as possible (it is<br />
usually necessary to cut this line during installation). Any<br />
kinks or sags in this drain line will impede the flow of water<br />
to the drain.<br />
2. Check to make sure the drain clamp and the drain hole are<br />
properly aligned, refer to Figure 7 on page 7).<br />
1. Check to make sure there is no foreign matter clogging the<br />
drain line or at the drain clamp hole. If leaks persist, call<br />
Technical Support.<br />
No Flow or Slow Flow from the Brine (Reject) Line (Less<br />
than 6 fl. oz. or 180 milliliters per minute)<br />
NOTE: Before checking brine (or reject) flow, make sure<br />
the unit is producing water by turning the valve on<br />
the storage tank off and opening the drinking water<br />
faucet. Water should drip from faucet.<br />
1. Replace the pre-filter cartridge according to the Changing<br />
the pre-filter cartridge instructions on page 10 and recheck<br />
the brine (or reject) flow rate.<br />
2. If the pre-filter cartridge is not at fault, the brine (or reject)<br />
flow controller could be clogged. Call Technical Support.<br />
High TDS in Product Water<br />
1. If high TDS (Total Dissolved Solids) is detected in the<br />
product water, the <strong>RO</strong> Cartridge may need to be replaced<br />
or the reject flow control tubing may be clogged. If this is a<br />
new installation, call Technical Support.<br />
2. Otherwise, draw 1 gallon of water from the unit. After<br />
10 minutes, then run water from the faucet and test the<br />
water again.<br />
3. Determine when you last changed the <strong>RO</strong> Filter Cartridge<br />
and call Technical Support.<br />
Model PB4<strong>RO</strong>-<strong>75</strong> Undersink Reverse Osmosis System JA12 • 11
T<strong>RO</strong>UBLESHOOTING continued<br />
Limited Flow at Drinking Water Faucet<br />
1. Turn off water supply to system at saddle valve.<br />
2. Open the faucet to turn on flow.<br />
3. Unscrew the blue cap at the base of the storage tank to<br />
expose air valve. Use a small air compressor or bicycle<br />
pump to add air to the storage tank. This will force the<br />
water out of the storage tank through the faucet. Continue<br />
to add air until no more water comes out of the faucet.<br />
4. Turn off the drinking water faucet.<br />
5. Using an air pressure gauge, adjust the pressure in the<br />
storage tank to 5–7 psi.<br />
6. Replace the blue cap.<br />
7. Open the saddle valve until it comes to a stop. Let the<br />
system run 1–3 hours to fill the tank. A full tank weighs<br />
approximately 33 pounds. If performance has not improved,<br />
call Technical Support.<br />
Sudden Return of Taste and Odor<br />
If shortly after complete servicing, noticeable taste and odors<br />
return, contact Technical Support.<br />
If you are experiencing a problem not listed in this manual,<br />
shut off the water supply at the saddle valve and close the tank<br />
valve. Call Technical Support.<br />
12 • JA12 Model PB4<strong>RO</strong>-<strong>75</strong> Undersink Reverse Osmosis System
IT’S TIME TO CHANGE YOUR<br />
Place this half of IT’S the TIME label on TO your CHANGE YOUR<br />
calendar, date book or refrigerator.<br />
Bend and Peel Here<br />
Place this half of the label on your<br />
calendar, date book or refrigerator.<br />
Bend and Peel Here<br />
month day year<br />
Place this half on your filter housing.<br />
For more info: 1-800-279-9404<br />
SH247117 JA10<br />
month day year<br />
Place this half on your filter housing.<br />
For more info: 1-800-279-9404<br />
SH247117 JA10<br />
WARNING: Do not use with water that is<br />
microbiologically unsafe or of unknown<br />
quality without adequate disinfection before<br />
or after the system. Systems certified for<br />
cyst reduction may be used on disinfected<br />
waters that may contain filterable cysts.<br />
NOTE: Substances that may be reduced are not<br />
necessarily in your water. Filter must be maintained<br />
according to manufacturer’s instructions, including<br />
replacement of filter cartridges.<br />
MAINTENANCE<br />
Contact your water treatment professional for replacement<br />
cartridge pricing.<br />
SUGGESTED LIST PRICE<br />
REPLACEMENT CARTRIDGES<br />
555612-96 PWS2500R: $8.94<br />
555586-96 PW-C5000R: $18.54<br />
555613-96 PW-<strong>RO</strong><strong>75</strong>R: $44.00<br />
555585-96 PW-C2500R: $12.16<br />
REPLACEMENT PARTS<br />
For replacement parts contact your local retailer or call<br />
Customer Service at 1-800-279-9404.<br />
Item<br />
#<br />
Part Number Description QTY<br />
1 244877 Storage Tank 3.2 Gal 1<br />
2 555612-96 Cartridge, Sediment PW-S2500R,<br />
Yellow<br />
3 555586-96 Cartridge, Carbon Block PW-C5000R,<br />
Blue<br />
4 555676-96 Cartridge, <strong>RO</strong> Element, <strong>75</strong> GPD<br />
PW-<strong>RO</strong><strong>75</strong>R, Green<br />
5 555585-96 Cartridge, GAC PW-C2500R, Violet 1<br />
6 244876 Kit, Faucet 1<br />
244857 Faucet, Air Gap - Paragon<br />
(includes Toggles)<br />
244783 Valve, <strong>RO</strong> Tank 1/4" NPT x 1/4" QC 1<br />
247117 Label, Water <strong>Change</strong> Reminder 2<br />
1-459-00 Mounting Screw 2<br />
143495 Lubricant, Silicone Packet 1<br />
244796 Drain Clamp, 3/8" QC 1<br />
244797 Inlet Adaptor, 1/2" FIPS x 1/2" MIPS x<br />
1/4" QC<br />
244880 Faucet Adaptor, 1/4" NPT x 3/8" QC 1<br />
150646 TDS Test Kit 1<br />
7 244849 Tube, 3/8" OD Red - Faucet Drain 1<br />
8 244848 Tube, 3/8" OD Blue - Permeate 1<br />
9 244794 Tube, 1/4" OD White PE 1<br />
10 244850 Tube, 1/4" OD Green 1<br />
11 2448<strong>75</strong> Tube, 1/4" OD Red 1<br />
12 357484 Head Assembly Includes Bracket,<br />
Screws, Manifold Assembly and<br />
Plastic Tee<br />
247146 <strong>Manual</strong>, PB4<strong>RO</strong> (Not Shown) 1<br />
1<br />
1<br />
1<br />
1<br />
1<br />
1<br />
1<br />
12<br />
6<br />
<strong>Change</strong> your water filter<br />
cartridge on:<br />
<strong>Change</strong> your water filter<br />
cartridge on:<br />
SILICONE LUBRICANT<br />
2<br />
3<br />
4<br />
5<br />
7<br />
8<br />
9<br />
10 11<br />
Model PB4<strong>RO</strong>-<strong>75</strong> Undersink Reverse Osmosis System JA12 • 13
Arsenic Fact Sheet<br />
Arsenic (abbreviated As) is found naturally in some well<br />
water. Arsenic in water has no color, taste or odor. It must<br />
be measured by a lab test. Public water utilities must have<br />
their water tested for arsenic. You can get the results from<br />
your water utility. If you have your own well, you can have<br />
the water tested. The local health department or state<br />
environmental health agency can provide a list of certified<br />
labs. The cost is typically $15 to $30. Information about<br />
arsenic in water can be found on the Internet at the US<br />
Environmental Protection Agency web site: www.epa.gov/<br />
safewater/arsenic.html.<br />
There are two forms of arsenic: pentavalent arsenic [also<br />
called As(V), As(+5), and arsenate] and trivalent arsenic<br />
[also called As(III), As(+3) and arsenite]. In well water,<br />
arsenic may be pentavalent, trivalent, or a combination<br />
of both. Special sampling procedures are needed for a<br />
lab to determine what type and how much of each type of<br />
arsenic is in the water. Check with the labs in your area to<br />
see if they can provide this type of service.<br />
Reverse osmosis (<strong>RO</strong>) water treatment systems do not<br />
remove trivalent arsenic from water very well. <strong>RO</strong> systems<br />
are very effective at removing pentavalent arsenic. A free<br />
chlorine residual will rapidly convert trivalent arsenic to<br />
pentavalent arsenic. Other water treatment chemicals<br />
such as ozone and potassium permanganate will also<br />
change trivalent arsenic to pentavalent arsenic. A<br />
combined chlorine residual (also called chloramine) may<br />
not convert all the trivalent arsenic. If you get your water<br />
from a public water utility, contact the utility to find out if<br />
free chlorine or combined chlorine is used in the water<br />
system.<br />
The PB4<strong>RO</strong>-<strong>75</strong> system is designed to remove pentavalent<br />
arsenic. It will not convert trivalent arsenic to pentavalent<br />
arsenic. The system was tested in a lab. Under those<br />
conditions, the system reduced 0.30 mg/L (ppm)<br />
pentavalent arsenic to 0.010 mg/L (ppm) (the USEPA<br />
standard for drinking water) or less. The performance of<br />
the system may be different at your installation. Have the<br />
treated water tested for arsenic to check if the system is<br />
working properly.<br />
The <strong>RO</strong> component of the PB4<strong>RO</strong>-<strong>75</strong> system must be<br />
replaced every 12-24 months to ensure the system will<br />
continue to remove pentavalent arsenic. The component<br />
identification and locations where you can purchase the<br />
component are listed in the installation/operation manual.<br />
14 • JA12 Model PB4<strong>RO</strong>-<strong>75</strong> Undersink Reverse Osmosis System
Performance Data<br />
Important Notice: Read this performance data and compare<br />
the capabilities of this system with your actual water treatment<br />
needs. It is recommended that before installing a water<br />
treatment system, you have your water supply tested to<br />
determine your actual water treatment needs.<br />
This system has been tested according to NSF/ANSI 58 for the<br />
reduction of the substances listed below. The concentration<br />
for the indicated substances in water entering the system<br />
was reduced to a concentration less than or equal to the<br />
permissible limit for water leaving the system, as specified in<br />
NSF/ANSI 58.<br />
NOTE: Substances that may be reduced are not<br />
necessarily in your water. Filter must be maintained<br />
according to manufacturer’s instructions, including<br />
replacement of filter cartridges.<br />
The tested efficiency rating for this system is 15.80%.<br />
Efficiency rating means the percentage of the influent water<br />
to the system that is available to the user as reverse osmosis<br />
treated water under operating conditions that approximate<br />
typical daily usage. The tested recovery rating is 27.40%.<br />
Recovery rating means the percentage of the influent water<br />
to the membrane portion of the system that is available to the<br />
user as reverse osmosis treated water when the system is<br />
operated without a storage tank or when the storage tank is<br />
bypassed.<br />
PB4<strong>RO</strong>-<strong>75</strong><br />
Influent Challenge<br />
Concentration<br />
Maximum<br />
Permissible<br />
Product Water<br />
Concentration<br />
Reduction<br />
Requirements<br />
Average<br />
Reduction<br />
Substance<br />
Standard 58<br />
Arsenic V 0.050 mg/L ± 10% 0.010 mg/L 97.6%<br />
Barium 10.0 mg/L ± 10% 2.0 mg/L 96.7%<br />
Cadmium 0.03 mg/L ± 10% 0.005 mg/L 98.2%<br />
Chromium III 0.3 mg/L ± 10% 0.1 mg/L 97.6%<br />
Chromium VI 0.3 mg/L ± 10% 0.1 mg/L 97.0%<br />
Copper 3.0 mg/L ± 10% 1.3 mg/L 98.8%<br />
Cysts Minimum 50,000/mL 99.95% 99.99%<br />
Fluoride 8.0 mg/L ± 10% 1.5 mg/L 96.2%<br />
Lead 0.15 mg/L ± 10% 0.010 mg/L 99.0%<br />
Radium<br />
226/228<br />
27pCi/L ± 10% 5pCi/L 80%<br />
Selenium 0.10 mg/L ± 10% 0.05 mg/L 98.0%<br />
Total Dissolved<br />
Solids<br />
<strong>75</strong>0 mg/L ± 40 mg/L 187 mg/L 94.9%<br />
Turbidity 11 mg/L ± 1 NTU 0.5 NTU 99.1%<br />
Standard 42<br />
Chlorine 2 mg/L >=50% 93.0%<br />
Production Rate: 24.83 gpd<br />
The PB4<strong>RO</strong>-<strong>75</strong> is Tested and Certified by NSF International<br />
against NSF/ANSI Standard 42 and 58 for the reduction of<br />
substances listed in the table above.<br />
Testing was performed under standard laboratory conditions,<br />
actual performance may vary.<br />
State of California<br />
Department of Public Health<br />
Water Treatment Device<br />
Certificate Number<br />
11- 2097<br />
Date Issued: October 24, 2011<br />
Trademark/Model Designation<br />
Replacement Elements<br />
<strong>Pentair</strong> Water PB4<strong>RO</strong>-<strong>75</strong> PW-<strong>RO</strong><strong>75</strong>R (<strong>RO</strong> Membrane)<br />
PW-S2500R (Pre Filters)<br />
PW-C5000R (Pre Filters)<br />
PW-C2500R (Post Filter)<br />
Manufacturer: <strong>Pentair</strong> <strong>Residential</strong> <strong>Filtration</strong>, LLC<br />
The water treatment device(s) listed on this certificate have met the testing requirements pursuant to Section<br />
116830 of the Health and Safety Code for the following health related contaminants:<br />
Microbiological Contaminants and Turbidity<br />
Cysts<br />
Turbidity<br />
Organic Contaminants<br />
None<br />
Inorganic/Radiological Contaminants<br />
Arsenic (pentavalent) 1<br />
Barium<br />
Cadmium<br />
Chromium (hexalent)<br />
Chromium (trivalent)<br />
Copper<br />
Fluoride<br />
Lead<br />
Radium 226/228<br />
Selenium<br />
Rated Service Capacity: 1250 gal service cycle<br />
Rated Service Flow: 24.8 gpd<br />
Conditions of Certification:<br />
Do not use where water is microbiologically unsafe or with water of unknown quality, except that systems certified<br />
for cyst reduction may be used on disinfected waters that may contain filterable cysts.<br />
1<br />
Claims for arsenic reduction shall only be made on water supplies maintaining detectable residual free chlorine at the<br />
reverse osmosis (<strong>RO</strong>) system inlet. Water systems using an in-line chlorinator should provide a minimum of 1 minute<br />
chlorine contact time before the <strong>RO</strong> system.<br />
Model PB4<strong>RO</strong>-<strong>75</strong> Undersink Reverse Osmosis System JA12 • 15
<strong>Pentair</strong> <strong>Residential</strong> <strong>Filtration</strong>, LLC LIMITED WARRANTY<br />
<strong>Pentair</strong> <strong>Residential</strong> <strong>Filtration</strong>, LLC warrants to the original owner (under normal use): Reverse Osmosis System to be free from defects in material and/or<br />
workmanship one (1) year from the date of purchase. Any replacement products furnished will be free from defects in material and/or workmanship for the<br />
remainder of the original warranty period. This warranty does not cover: (1) pre and post filter cartridges, or reverse osmosis membrane (2) defects not reported<br />
within the above time period, (3) items manufactured by other companies, (4) problems arising from failure to comply with <strong>Pentair</strong> <strong>Residential</strong> <strong>Filtration</strong>, LLC<br />
instructions, (5) problems and/or damage arising from acts of nature, abuse, misuse, negligence or accident by any party other than <strong>Pentair</strong> <strong>Residential</strong> <strong>Filtration</strong>,<br />
LLC, (6) problems and/or damage resulting in whole or in part from alteration, modification, repair or attempted alteration, modification or repair by any party other<br />
than <strong>Pentair</strong> <strong>Residential</strong> <strong>Filtration</strong>, LLC, (7) noncompliance with applicable codes/ordinances.<br />
If a defect in workmanship and/or material in a product or part covered by the warranty should arise, <strong>Pentair</strong> <strong>Residential</strong> <strong>Filtration</strong>, LLC, at its sole discretion, will<br />
repair or replace the defective product or part (<strong>Pentair</strong> <strong>Residential</strong> <strong>Filtration</strong>, LLC may consider, in good faith, the customer’s preference).<br />
All claimed defective product must: (1) be authorized for return by <strong>Pentair</strong> <strong>Residential</strong> <strong>Filtration</strong>, LLC with an RGA number (2) include proof of the purchase date of<br />
the product or part (3) returned to <strong>Pentair</strong> <strong>Residential</strong> <strong>Filtration</strong>, LLC prior to the expiration of the warranty date, at the customer’s expense, shipment pre-paid, (4) be<br />
accompanied by a letter detailing the Model Number, Serial Number (if any), and a brief description of the problem.<br />
TO THE MAXIMUM EXTENT PERMITTED BY APPLICABLE LAW, PENTAIR RESIDENTIAL FILTRATION, LLC DISCLAIMS ALL OTHER WARRANTIES, WHETHER<br />
EXPRESS OR IMPLIED, INCLUDING, BUT NOT LIMITED TO, THE IMPLIED WARRANTY OF MERCHANTABILITY AND FITNESS FOR A PARTICULAR PURPOSE, WITH<br />
REGARD TO THE P<strong>RO</strong>DUCTS, PARTS AND ANY ACCOMPANYING WRITTEN MATERIALS.<br />
To the maximum extent permitted by applicable law, <strong>Pentair</strong> <strong>Residential</strong> <strong>Filtration</strong>, LLC shall not be liable for any damages whatsoever (including, but not limited<br />
to, loss of time, inconvenience, expenses, labor or material charges incurred in connection with the removal or replacement of the system, special, incidental,<br />
consequential, or indirect damages for personal injury, loss of business profits, business interruption, loss of business information, or any other pecuniary loss)<br />
arising out of the use of or inability to use the defective products or parts, even if <strong>Pentair</strong> <strong>Residential</strong> <strong>Filtration</strong>, LLC has been advised of the possibility of such<br />
damages.<br />
<strong>Pentair</strong> <strong>Residential</strong> <strong>Filtration</strong>, LLC'S maximum liability under any provision of this Limited Warranty shall be limited to the amount actually paid for the system.<br />
NOTE: Because some states do not allow the exclusion or limitation of incidental or consequential damages, the above limitations or exclusions may not apply.<br />
THIS WARRANTY GRANTS SPECIFIC LEGAL RIGHTS, AND OTHER RIGHTS MAY APPLY. SUCH RIGHTS VARY F<strong>RO</strong>M STATE TO STATE.<br />
Buyer Seller Date<br />
5730 North Glen Park Road, Milwaukee, WI 53209<br />
Technical Support: 800.279.9404<br />
www.pentairaqua.com/pro<br />
©2012 <strong>Pentair</strong> <strong>Residential</strong> <strong>Filtration</strong>, LLC 247146 Rev D JA12