MANAGING ELECTRONIC SUBMISSIONS IN COLOR iQC
MANAGING ELECTRONIC SUBMISSIONS IN COLOR iQC
MANAGING ELECTRONIC SUBMISSIONS IN COLOR iQC

You also want an ePaper? Increase the reach of your titles
YUMPU automatically turns print PDFs into web optimized ePapers that Google loves.
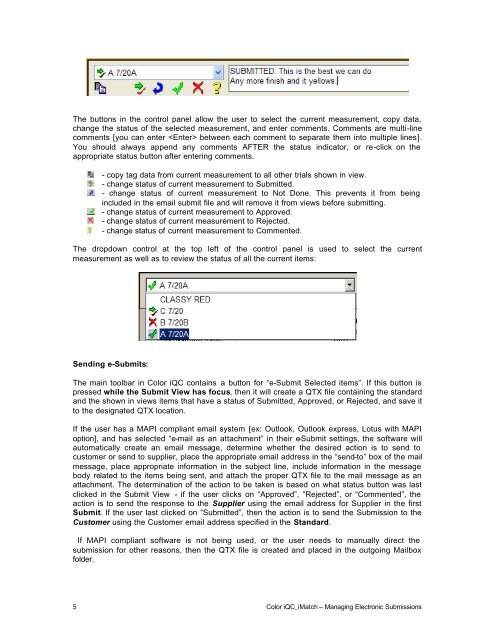
The buttons in the control panel allow the user to select the current measurement, copy data,<br />
change the status of the selected measurement, and enter comments. Comments are multi-line<br />
comments [you can enter between each comment to separate them into multiple lines].<br />
You should always append any comments AFTER the status indicator, or re-click on the<br />
appropriate status button after entering comments.<br />
- copy tag data from current measurement to all other trials shown in view.<br />
- change status of current measurement to Submitted.<br />
- change status of current measurement to Not Done. This prevents it from being<br />
included in the email submit file and will remove it from views before submitting.<br />
- change status of current measurement to Approved.<br />
- change status of current measurement to Rejected.<br />
- change status of current measurement to Commented.<br />
The dropdown control at the top left of the control panel is used to select the current<br />
measurement as well as to review the status of all the current items:<br />
Sending e-Submits:<br />
The main toolbar in Color <strong>iQC</strong> contains a button for “e-Submit Selected items”. If this button is<br />
pressed while the Submit View has focus, then it will create a QTX file containing the standard<br />
and the shown in views items that have a status of Submitted, Approved, or Rejected, and save it<br />
to the designated QTX location.<br />
If the user has a MAPI compliant email system [ex: Outlook, Outlook express, Lotus with MAPI<br />
option], and has selected “e-mail as an attachment” in their e-Submit settings, the software will<br />
automatically create an email message, determine whether the desired action is to send to<br />
customer or send to supplier, place the appropriate email address in the “send-to” box of the mail<br />
message, place appropriate information in the subject line, include information in the message<br />
body related to the items being sent, and attach the proper QTX file to the mail message as an<br />
attachment. The determination of the action to be taken is based on what status button was last<br />
clicked in the Submit View - if the user clicks on “Approved”, “Rejected”, or “Commented”, the<br />
action is to send the response to the Supplier using the email address for Supplier in the first<br />
Submit. If the user last clicked on “Submitted”, then the action is to send the Submission to the<br />
Customer using the Customer email address specified in the Standard.<br />
If MAPI compliant software is not being used, or the user needs to manually direct the<br />
submission for other reasons, then the QTX file is created and placed in the outgoing Mailbox<br />
folder.<br />
5 Color <strong>iQC</strong>_iMatch – Managing Electronic Submissions