Xenogen IVIS-200 user manual
Xenogen IVIS-200 user manual
Xenogen IVIS-200 user manual

Create successful ePaper yourself
Turn your PDF publications into a flip-book with our unique Google optimized e-Paper software.
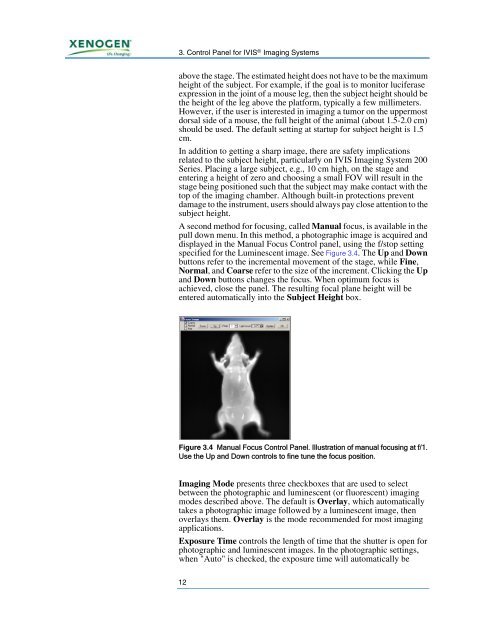
3. Control Panel for <strong>IVIS</strong> ® Imaging Systemsabove the stage. The estimated height does not have to be the maximumheight of the subject. For example, if the goal is to monitor luciferaseexpression in the joint of a mouse leg, then the subject height should bethe height of the leg above the platform, typically a few millimeters.However, if the <strong>user</strong> is interested in imaging a tumor on the uppermostdorsal side of a mouse, the full height of the animal (about 1.5-2.0 cm)should be used. The default setting at startup for subject height is 1.5cm.In addition to getting a sharp image, there are safety implicationsrelated to the subject height, particularly on <strong>IVIS</strong> Imaging System <strong>200</strong>Series. Placing a large subject, e.g., 10 cm high, on the stage andentering a height of zero and choosing a small FOV will result in thestage being positioned such that the subject may make contact with thetop of the imaging chamber. Although built-in protections preventdamage to the instrument, <strong>user</strong>s should always pay close attention to thesubject height.A second method for focusing, called Manual focus, is available in thepull down menu. In this method, a photographic image is acquired anddisplayed in the Manual Focus Control panel, using the f/stop settingspecified for the Luminescent image. See Figure 3.4. The Up and Downbuttons refer to the incremental movement of the stage, while Fine,Normal, and Coarse refer to the size of the increment. Clicking the Upand Down buttons changes the focus. When optimum focus isachieved, close the panel. The resulting focal plane height will beentered automatically into the Subject Height box.Figure 3.4 Manual Focus Control Panel. Illustration of <strong>manual</strong> focusing at f/1.Use the Up and Down controls to fine tune the focus position.Imaging Mode presents three checkboxes that are used to selectbetween the photographic and luminescent (or fluorescent) imagingmodes described above. The default is Overlay, which automaticallytakes a photographic image followed by a luminescent image, thenoverlays them. Overlay is the mode recommended for most imagingapplications.Exposure Time controls the length of time that the shutter is open forphotographic and luminescent images. In the photographic settings,when "Auto" is checked, the exposure time will automatically be12