CongratulationsQuick ReferenceThe <strong>Bel</strong> Pro<strong>200</strong> is the most advanced radar,laser and safety detector ever designed by<strong>Bel</strong>tronics.The <strong>Bel</strong> Pro<strong>200</strong> includes full X, K,SuperWide Ka, and Safety Warning Systemradar capability, front and rear laserdetection, varactor-tuned (VTO) microwavereceiver, digital signal processing (DSP)for superior range and reduced falsealarms, our patented Mute and AutoMute,audible and visual band alerts, and all theperformance you’d expect from <strong>Bel</strong>tronics.In addition, the <strong>Bel</strong> Pro<strong>200</strong> introducesthe following revolutionary features:• Varactor-tuned receiver provideslong-range protection against allradar threats• New easy-to-use Programming letsyou customize up to 6 features• New AutoScan mode intelligentlyreduces unwanted false alarms, plusHighway and City settings• Ultra-bright text-display provideseasy to read information from anyangle• Detects and decodes Safety WarningSystem messagesRegisteronline:@www.beltronics.comIf you’ve used a radar detector before,a review of the Quick Reference Guide onpages 4 and 5, and the Programminginformation on pages 12 and 13 will brieflyexplain the new features.If this is your first detector, please readthe manual in detail to get the most out ofyour Pro<strong>200</strong>’s outstanding performanceand innovative features.Please drive safely.There are 6 user-selectable options so you cancustomize your Pro<strong>200</strong> for your own preferences.The buttons labeled CITY and BRT are also used toenter the Program Mode, REVIEW your currentprogram settings, and to CHANGE any settings asdesired. The words PGM, RVW and CHG are located onthe top of the detector, and are highlighted in graphics.How to use Programming1 To enter Program Mode, press and hold bothCITY and BRT buttons down for 2 seconds. Theunit will beep twice, and will display the wordProgram.2 Then press the RVW button to review thecurrent settings. You can either tap the button tochange from item to item, or hold the button to scrollthrough the items.3 Press the CHG button to change any setting.You can either tap the button to change from setting tosetting, or hold the button to scroll through all theoptions.4 To leave Program Mode, simply wait 8 secondswithout pressing any button. The unit will displayComplete, beep, and return to normal operation.An exampleHere is how you would turn the Pro<strong>200</strong>’s AutoMutefeature off.1 Enter the Program Mode by holding both the CITYand BRT buttons down for 2 seconds. The Pro<strong>200</strong>will beep twice and display Program.2 Then hold the RVW button down. Pro<strong>200</strong> willscroll through the categories, starting with Display(Pilot), then Voice (Voice), then Power-Onsequence (PwrOn), and then AutoMute (aMute).3 Release the RVW button when the Pro<strong>200</strong> showsthe AutoMute item. Since the factory setting is forAutoMute to be on, the Pro<strong>200</strong> will display aMute ON.If you accidentally don’t release the Reviewbutton in time, and the Pro<strong>200</strong> goes to the nextcategory, hold the RVW button down again, andafter the Pro<strong>200</strong> scrolls through all categories, itwill begin again at the top of the list.4 Press the CHG button to change from aMute ON toaMute OFF.5 To complete the Programming, simply wait 8seconds without pressing any button. The Pro<strong>200</strong>will display Complete, beep 4 times, and return tonormal operation.FCC Note:Modifications not expressly approvedby the manufacturer could void theuser’s FCC granted authority to operatethe equipment.Factory Default SettingsTo reset your Pro<strong>200</strong> to its original factory settings,press and hold the “CITY” and “BRT” buttonswhile turning the power on. The Pro<strong>200</strong>’s displaywill provide a Reset message, accompanied by anaudible alert, acknowledging the reset.1 Programming Details
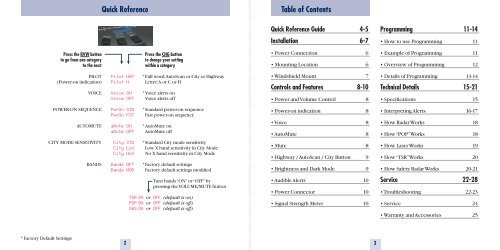
Quick ReferenceTable of ContentsQuick Reference Guide 4-5Programming 11-14Installation 6-7• How to use Programming 11Press the RVW buttonto go from one categoryto the nextPress the CHG buttonto change your settingwithin a category• Power Connection 6• Mounting Location 6• Example of Programming 11• Overview of Programming 12PILOT(Power-on indication)VOICEPilot HWYPilot HVoice ONVoice OFF* Full word: AutoScan or City or HighwayLetter: A or C or H* Voice alerts onVoice alerts off• Windshield Mount 7Controls and Features 8-10• Power and Volume Control 8• Details of Programming 13-14Technical Details 15-21• Specifications 15POWER-ON SEQUENCEAUTOMUTEPwrOn STDPwrOn FSTaMute ONaMute OFF* Standard power-on sequenceFast power-on sequence* AutoMute onAutoMute off• Power-on indication 8• Voice 8• AutoMute 8• Interpreting Alerts 16-17• How <strong>Radar</strong> Works 18• How “POP” Works 18CITY MODE SENSITIVITYBANDSCity STDCity LoXCity NoXBands DFTBands MOD* Standard City mode sensitivityLow X band sensitivity in City ModeNo X band sensitivity in City Mode* Factory default settingsFactory default settings modified• Mute 8• Highway / AutoScan / City Button 9• Brightness and Dark Mode 9• How Laser Works 19• How “TSR” Works 20• How Safety <strong>Radar</strong> Works 20-21Turn bands “ON” or “OFF” bypressing the VOLUME/MUTE buttonTSR ON or OFF (default is on)POP ON or OFF (default is off)SWS ON or OFF (default is off)• Audible Alerts 10• Power Connector 10• Signal Strength Meter 10Service 22-28• Troubleshooting 22-23• Service 24• Warranty and Accessories 25* Factory Default Settings23