Bel PRO 200 - Best Radar Detector
Bel PRO 200 - Best Radar Detector
Bel PRO 200 - Best Radar Detector

You also want an ePaper? Increase the reach of your titles
YUMPU automatically turns print PDFs into web optimized ePapers that Google loves.
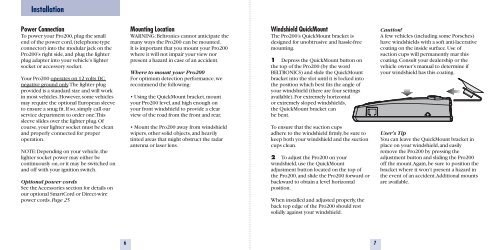
InstallationPower ConnectionTo power your Pro<strong>200</strong>, plug the smallend of the power cord, (telephone-typeconnector) into the modular jack on thePro<strong>200</strong>’s right side, and plug the lighterplug adapter into your vehicle’s lightersocket or accessory socket.Your Pro<strong>200</strong> operates on 12 volts DCnegative ground only. The lighter plugprovided is a standard size and will workin most vehicles. However, some vehiclesmay require the optional European sleeveto ensure a snug fit. If so, simply call ourservice department to order one. Thissleeve slides over the lighter plug. Ofcourse, your lighter socket must be cleanand properly connected for properoperation.NOTE: Depending on your vehicle, thelighter socket power may either becontinuously on, or it may be switched onand off with your ignition switch.Optional power cordsSee the Accessories section for details onour optional SmartCord or Direct-wirepower cords. Page 25Mounting LocationWARNING: <strong>Bel</strong>tronics cannot anticipate themany ways the Pro<strong>200</strong> can be mounted.It is important that you mount your Pro<strong>200</strong>where it will not impair your view norpresent a hazard in case of an accident.Where to mount your Pro<strong>200</strong>For optimum detection performance, werecommend the following:• Using the QuickMount bracket, mountyour Pro<strong>200</strong> level, and high enough onyour front windshield to provide a clearview of the road from the front and rear.• Mount the Pro<strong>200</strong> away from windshieldwipers, other solid objects, and heavilytinted areas that might obstruct the radarantenna or laser lens.Windshield QuickMountThe Pro<strong>200</strong>’s QuickMount bracket isdesigned for unobtrusive and hassle-freemounting.1 Depress the QuickMount button onthe top of the Pro<strong>200</strong> (by the wordBELTRONICS) and slide the QuickMountbracket into the slot until it is locked intothe position which best fits the angle ofyour windshield (there are four settingsavailable). For extremely horizontalor extremely sloped windshields,the QuickMount bracket canbe bent.To ensure that the suction cupsadhere to the windshield firmly, be sure tokeep both your windshield and the suctioncups clean.2 To adjust the Pro<strong>200</strong> on yourwindshield, use the QuickMountadjustment button located on the top ofthe Pro<strong>200</strong>, and slide the Pro<strong>200</strong> forward orbackward to obtain a level horizontalposition.When installed and adjusted properly, theback top edge of the Pro<strong>200</strong> should restsolidly against your windshield.Caution!A few vehicles (including some Porsches)have windshields with a soft anti-lacerativecoating on the inside surface. Use ofsuction cups will permanently mar thiscoating. Consult your dealership or thevehicle owner’s manual to determine ifyour windshield has this coating.User’s TipYou can leave the QuickMount bracket inplace on your windshield, and easilyremove the Pro<strong>200</strong> by pressing theadjustment button and sliding the Pro<strong>200</strong>off the mount. Again, be sure to position thebracket where it won’t present a hazard inthe event of an accident. Additional mountsare available.67