Tornier Fracture Surgical Technique
Tornier Fracture Surgical Technique
Tornier Fracture Surgical Technique

Create successful ePaper yourself
Turn your PDF publications into a flip-book with our unique Google optimized e-Paper software.
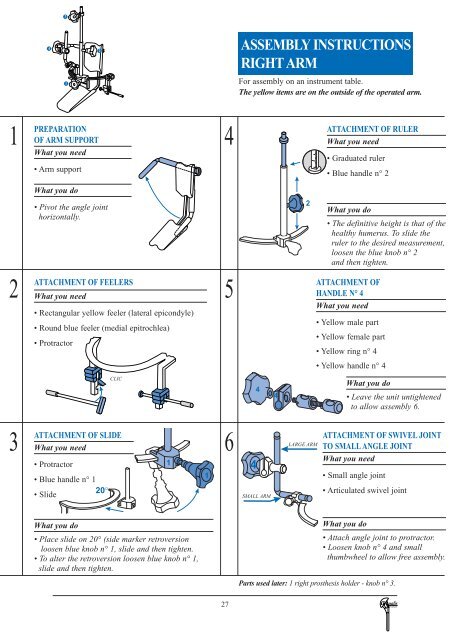
342ASSEMBLY INSTRUCTIONSRIGHT ARM1For assembly on an instrument table.The yellow items are on the outside of the operated arm.1PREPARATION4OF ARM SUPPORTWhat you need• Arm supportWhat you do• Pivot the angle jointhorizontally.2ATTACHMENT OF FEELERS5What you need• Rectangular yellow feeler (lateral epicondyle)• Round blue feeler (medial epitrochlea)• Protractor2ATTACHMENT OF RULERWhat you need• Graduated ruler• Blue handle n° 2What you do• The definitive height is that of thehealthy humerus. To slide theruler to the desired measurement,loosen the blue knob n° 2and then tighten.ATTACHMENT OFHANDLE N° 4What you need• Yellow male part• Yellow female part• Yellow ring n° 4• Yellow handle n° 4CLIC44What you do• Leave the unit untightenedto allow assembly 6.3ATTACHMENT OF SLIDE6What you need• Protractor1• Blue handle n° 11• Slide20°4SMALL ARMLARGE ARMATTACHMENT OF SWIVEL JOINTTO SMALL ANGLE JOINTWhat you need• Small angle joint• Articulated swivel jointWhat you do• Place slide on 20° (side marker retroversionloosen blue knob n° 1, slide and then tighten.• To alter the retroversion loosen blue knob n° 1,slide and then tighten.What you do• Attach angle joint to protractor.• Loosen knob n° 4 and smallthumbwheel to allow free assembly.Parts used later: 1 right prosthesis holder - knob n° 3.27