PA53 & PA58 - Operator Manual - McConnel
PA53 & PA58 - Operator Manual - McConnel
PA53 & PA58 - Operator Manual - McConnel

Create successful ePaper yourself
Turn your PDF publications into a flip-book with our unique Google optimized e-Paper software.
Publication 491November 2005Part No. 41570.91Revision: 07.11.12<strong>PA53</strong> & <strong>PA58</strong>HEDGECUTTER / MOWER<strong>Operator</strong> <strong>Manual</strong>
IMPORTANTVERIFICATION OF WARRANTY REGISTRATIONDEALER WARRANTY INFORMATION & REGISTRATION VERIFICATIONIt is imperative that the selling dealer registers this machine with <strong>McConnel</strong> Limited beforedelivery to the end user – failure to do so may affect the validity of the machine warranty.To register machines go to the <strong>McConnel</strong> Limited web site at www.mcconnel.com, logonto ‘Dealer Inside’ and select the ‘Machine Registration button’ which can be found inthe Service Section of the site. Confirm to the customer that the machine has beenregistered in the section below.Should you experience any problems registering a machine in this manner please contactthe <strong>McConnel</strong> Service Department on 01584 875848.Registration VerificationDealer Name: ……………………..…………………………………………………………….Dealer Address: …….………………………………………………………………………….Customer Name: ……………………..…………………………………………………………Date of Warranty Registration: ……/……/...…… Dealer Signature: ………………..……NOTE TO CUSTOMER / OWNERPlease ensure that the above section above has been completed and signed by the sellingdealer to verify that your machine has been registered with <strong>McConnel</strong> Limited.IMPORTANT: During the initial ‘bedding in’ period of a new machine it is the customer’s responsibilityto regularly inspect all nuts, bolts and hose connections for tightness and re-tighten if required. Newhydraulic connections occasionally weep small amounts of oil as the seals and joints settle in – wherethis occurs it can be cured by re-tightening the connection – refer to torque settings chart below. Thetasks stated above should be performed on an hourly basis during the first day of work and at leastdaily thereafter as part of the machines general maintenance procedure.CAUTION: DO NOT OVER TORQUE HYDRAULIC FITTINGS AND HOSESTORQUE SETTINGS FOR HYDRAULIC FITTINGSHYDRAULIC HOSE ENDSPORT ADAPTORS WITH BONDED SEALSBSP Setting Metric BSP Setting Metric1/4” 18 Nm 19 mm 1/4” 34 Nm 19 mm3/8” 31 Nm 22 mm 3/8” 47 Nm 22 mm1/2” 49 Nm 27 mm 1/2” 102 Nm 27 mm5/8” 60 Nm 30 mm 5/8” 122 Nm 30 mm3/4” 80 Nm 32 mm 3/4” 149 Nm 32 mm1” 125 Nm 41 mm 1” 203 Nm 41 mm1.1/4” 190 Nm 50 mm 1.1/4” 305 Nm 50 mm1.1/2” 250 Nm 55 mm 1.1/2” 305 Nm 55 mm2” 420 Nm 70 mm 2” 400 Nm 70 mm
WARRANTY POLICYWARRANTY REGISTRATIONAll machines must be registered, by the selling dealer with <strong>McConnel</strong> Ltd, before delivery to the enduser. On receipt of the goods it is the buyer’s re sponsibility to check that the Verification of WarrantyRegistration in the <strong>Operator</strong>’s <strong>Manual</strong> has been completed by the selling dealer.1. LIMITED WARRANTIES1.01. All machines supplied by <strong>McConnel</strong> Limited are warranted to be free from defects in materialand workmanship from the date of sal e to the original purchaser for a period of 1 2 months,unless a different period is specified.1.02. All spare parts supplied by <strong>McConnel</strong> Limited are warranted to be free from defects in materialand workmanship from the date of sale to the original purchaser for a period of 6 months.1.03. The manufacturer will replace or rep air for the p urchaser any part or pa rts found, uponexamination at its factory, to be defective under normal use a nd service due to defects inmaterial or workmanship. Returned parts must be complete and unexamined.1.04. This warranty does not apply to any part of the goods, which has been subjected to improper orabnormal use, negligence, alteration, modification, fitment of non-genuine parts, accid entdamage, or damage resulting from contact with overhead power lines, dam age caused byforeign objects (e.g. stones, iron, ma terial other than vegetati on), failure due to lack ofmaintenance, use of incorrect oil or lubricants, contamination of the oil, or which has served itsnormal life. This warranty does not ap ply to any expendable items such as blades, flails, flapkits, skids, soil engaging parts, shields, guards, wear pads or pneumatic tyres.1.05. Temporary repairs an d consequential loss - i.e. oil, do wntime and associated parts arespecifically excluded from the warranty.1.06. Warranty on hoses is limit ed to 12 months and does not include hoses w hich have suffere dexternal damage. Only complete hoses may be returned under warranty, any which have beencut or repaired will be rejected.1.07. Machines must be repaired immediately a problem arises. Continued use of the machine after aproblem has occurred can result in furt her component failures, for which <strong>McConnel</strong> Ltd ca nnotbe held liable, and may have safety implications.1.08. Except as provided herein, no employee, agent, dealer or other person is authorised to give anywarranties of any nature on behalf of <strong>McConnel</strong> Ltd.1.09. For machine warranty periods in excess of 12 months the follo wing additional exclusions shallapply:1) Hoses, external seals, exposed pipes and hydraulic tank breathers.2) Filters.3) Rubber mountings.4) External electric wiring.1.10. All service work, particularly filter c hanges, must be carried out in accordance with themanufacturer’s service schedule. Failure to comply will invalidate the warranty. In the event of aclaim, proof of the service work being carried out may be required.NB Warranty cover will be invalid if any non-genuine parts have been fitted or used. Use ofnon-genuine parts may seriously affect the machine’s performance and safety. <strong>McConnel</strong> Ltdcannot be held responsible for any failures or safety implications that arise due to the use ofnon-genuine parts.
2. REMEDIES AND PROCEDURES2.01. The warranty is not effective unless the Selling Dealer registers the machine, via the <strong>McConnel</strong>web site and confirms the registration to the purchaser by completing the confirmation form inthe operator’s manual.2.02. Any fault must be reported to an authorised <strong>McConnel</strong> dealer as soon as it o ccurs. Continueduse of a m achine, after a f ault has occurred, can result in further component failure for which<strong>McConnel</strong> Ltd cannot be held liable.2.03. Repairs should be undertaken within two days of the failure. Claims submitted for re pairsundertaken more than 2 weeks after a failure ha s occurred, or 2 days after the pa rts weresupplied will be rejected, unless the delay has been authorised by <strong>McConnel</strong> Ltd.2.04. All claims must be submitted, by an aut horised <strong>McConnel</strong> Service Dealer, within 30 days of thedate of repair.2.05. Following examination of the claim an d parts the manufacture will pay, at their discretio n, forany valid claim the cost of any parts and an appropriate labour allowance if applicable.2.06. The submission of a claim is not a guarantee of payment.2.07. Any decision reached by <strong>McConnel</strong> Ltd. is final.3. LIMITATION OF LIABILITY3.01. The manufacturer disclaims any express (exc ept as set forth herein) an d implied warrantieswith respect to the goods including, but not limited to, merchantability and fitness for a particularpurpose.3.02. The manufacturer makes no warranty as to the design, capability, capacity or suitability for useof the goods.3.03. Except as provi ded herein, the m anufacturer shall have no liability or responsibility to thepurchaser or any other person or entity with respect to any liability, loss, or damage caused o ralleged to be caused directly or indirectly by the goods including, but not limited to, any indirect,special, consequential, or incidental damages resulting from the use or operation of the goodsor any breach of this warranty. Notwithstanding the above limitations and warranties, themanufacturer’s liability hereund er for d amages incurred by the purchase r or others shall notexceed the price of the goods.3.04. No action arising out of any claimed breach of this warranty or transactions under this warrantymay be brought more than one (1) year after the cause of the action has occurred.4. MISCELLANEOUS4.01. The manufacturer may waive compliance with any of the terms of this limited warranty, but nowaiver of any terms shall be deemed to be a waiver of any other term.4.02. If any provision of this limited warranty shall violate any applic able law and is held to beunenforceable, then the invalidity of such provision shall not invalidate any other provisionsherein.4.03. Applicable law may provide rights an d benefits to the purchaser in addition to those providedherein.
DECLARATION OF CONFORMITYConforming to EU Machinery Directive 2006/42/ECWe,McCONNEL LIMITED, Temeside Works, Ludlow, Shropshire SY8 1JL, UKHereby declare that:The Product; Tractor Mounted Hedgecutter / Grass MowerProduct Code; <strong>PA53</strong>, P58ASerial No. & Date ………………………………… Type …………………………Manufactured in; United KingdomComplies with the required provisions of the Machinery Directive 2006/42/ECThe machinery directive is supported by the following harmonized standards; BS EN ISO 14121-1 (2007) Safety of machinery - Risk assessment, Part 1:Principles Part 2: practical guide and examples of methods. BS EN ISO 12100-1 (2010) Safety of mach inery - Part 1: Basic terminology andmethodology Part 2: Technical principles. BS EN 349(1993)+ A1 (2008) Safety of machinery - Minimum distances to avoid theentrapment with human body parts. BS EN 953 (1998) Safety of machinery - Guards General requirements for thedesign and construction of fixed and movable guards. BS EN 982(1996)+ A1 (2008) Safety requirements for fluid power systems and theircomponents. HydraulicsMcCONNEL LIMITED operates an IS O 9001:2008 quality management system,certificate number: FM25970.This system is continually assessed by the;British Standards Institution (BSI), Beech House, Milton Keynes, MK14 6ES, UKBSI is accredited by UK Accreditation Service, accreditation number: UKAS 003.The EC declaration only applies if the machine stated above is used inaccordance with the operating instructions.Signed …………………................ Responsible PersonCHRISTIAN DAVIES on behalf of McCONNEL LIMITEDStatus: General Manager Date: May 2011
POWER ARM INSPECTION AND MAINTENANCEA daily equipment inspection of the trac tor and mower should be conduct ed before theequipment is used. You may use the ins pection sheets to assist with these dailyinspections. Any damaged or missing guar ds should be repaired or replaced befor eoperating the mower. Failure t o repair the damaged shield c an result in objects beingthrown from the mower and possibly hitting the operator or bystander.Inspect the Mower for Safe Operating ConditionMake sure the driveline guards and shielding are in place and in good repair.Inspect the flexible thrown object shieldi ng to assure that they are in plac e on thefront and rear of the mower head and in good repair. Rep air or replace anydamaged or missing thrown object shields.Ensure the mower cutting height is se t high enough to reduce the possibility of themower blades contacting the ground. Actual height will be dependent on the groundconditions. Increase the height when working in rough or undulating conditions. Inspect for broken, chipped, bent, missi ng, or severely worn blades. Replacedamaged blades before operating the mower. Ensure the blade retaining bolts andfasteners are secure and tight. Ensure all head bolts and nuts are tight. Lubricate the driveline universal joints and telescoping members daily. Grease the rotor and roller bearings and inspect their condition. Inspect for any oil leaks or damaged hoses Inspect for worn or damaged decals and s afety instructions. Replace unreadable,damaged or missing safety decals. Follow the operator’s manual(s) inspec tion and maintenanc e instructions forlubricating parts, and keeping thrown obj ect shielding, driveline guards, rotatingparts shields, mower blades and decals in good repair.Inspect the Tractor for Safe Operating Condition: Inspect the controls, lights, SMVs (Slo w Moving Vehicle sign), seat bel ts, andROPS to assure that they are in place and in good working order. Be sure the tires, wheels, lug bolts/nuts are in good condition. Make sure the tractor brakes and steering are in proper operating condition. Follow the operator’s manual(s) ins pection and m aintenance procedures forkeeping the tractor in good and safe condition before operating.The inspection sheet on the foll owing page should be kept in this book a s a record. Asecond sheet is included for you to cut out and photocopy or the inspection sheets can bedownloaded from our website at;http://www.mcconnel.com/support/aftersales/default.aspx?nav=After Sales
POWER ARM PRE-OPERATION InspectionPower Arm ID ________________ Date: _______________ Shift: _______________WARNINGBefore conducting the inspection, make sure the tractor engine is off, the key removed, allrotation has stopped and the tractor is in park with the parking brake engaged. Make surethe mower head is resting on the ground or is securely blocked up and supported and allhydraulic pressure has been relieved.ItemThe <strong>Operator</strong>’s <strong>Manual</strong> is in the Canister on the mowerAll Warning Decals are in place, clean and legibleAll Lights are clean and workingThe Mounting frame bolts are in place and tightThe Arm pivot pins are tight and correctly securedThere are no cracks in the armsThe Hyd. Cylinder pins are tight and correctly securedThe Hyd Cylinder hose connections are tightThe Hyd. Pump hose connections are tightThe Hyd. Valve hose connections are tightThe Hyd. Valve controls function properlyThere are no damaged hosesThe Oil level is to the green mark on the tank sight glassThere is no evidence of Hydraulic oil leaksFlails are not missing, chipped, broken or excessively wornThe Flail bolts are tightThe Front & Rear Flaps are fitted and in good conditionThe Front hood is in place and in good conditionThe Wire Trap is in good conditionThe Skid shoes are in good condition & tightThere are no cracks or holes in flail casingThe Hyd. motor mounting bolts are tightAll Flail Head Nuts and Bolts are tightThe Rotor Bearings are in good condition and greasedThe Roller bearings are in good condition and greasedThe drive line Shaft guard is in good conditionThe drive line shaft guard is correctly securedControls are securely mounted in the cabWith engine running check arm operationHave a spare pack of flails, bushes, bolts and nutsCondition atstart of shiftSpecific Comments if not O.K.<strong>Operator</strong>s Signature: ___________________________________________DO NOT OPERATE an UNSAFE TRACTOR or MOWER
TRACTOR PRE-OPERATION InspectionPower Arm ID ________________ Date: _______________ Shift: _______________WARNING Before conducting the inspection, make sure the tractor engine is off, the key is removedall rotation has stopped and the tractor is in park with the parking brake engaged. Anyimplement attached to the tractor is firmly on the ground.ItemThe flashing lights function properly.All lights are clean and working correctlyAll cab windows are clean and wipers working correctlyThe SMV sign, where required, is clean and visible.The tyres are in good condition with correct pressure.The wheel nuts are tight.The tractor brakes are in good condition.The steering linkage is in good condition.There are no visible oil leaks.The hydraulic controls function properly.The ROPS or ROPS cab is in good condition.The seatbelt is in place and in good condition.The 3-point hitch is in good condition.The drawbar/pick up hook is secure & in good conditionThe PTO master shield is in place.The engine oil level is full.The brake fluid level is full.The power steering fluid level is full.The fuel level is adequate.The engine coolant fluid level is full.The radiator & oil cooler are free of debris.The air filter is in good conditionCondition atstart of shiftSpecific Comments if not O.K.<strong>Operator</strong>s Signature: ___________________________________________DO NOT OPERATE an UNSAFE TRACTOR or MOWER
For best performance …USE ONLY GENUINE McCONNEL SERVICE PARTSTo be assured of the latest design improvements purchase your‘Genuine Replacements’ from the ‘Original Equipment Manufacturer’McCONNEL LIMITEDThrough your local Dealer or StockistAlways quote:• Machine Type• Serial Number• Part NumberDesign improvements may alter some of the parts listed in this manual – thelatest part will always be supplied when it is interchangeable with an earlier one.
LIST OF CONTENTSPage No.General Information 1Features and Specifications 2Safety Information 3Tractor Requirements 7Vehicle/Tractor Preparation 8Closed Centre Conversion Kit for SI Models 9Initial Attachment to Tractor 10PTO Driveshaft Installation 17Flailhead Attachment 18Hydraulic Oil 19Fitting <strong>Operator</strong> Control Unit 20Running Up Procedure 21Pre-Work Preparation & Precautions 22Emergency Stopping 23Removal from Tractor 24Storage 25<strong>Operator</strong> Guard 26Cable Controls 27Cable Rotor Control 30Electric Switchbox Controls 31Electric Monolever Controls 35XTC Proportional Switchbox Controls 39V4 Proportional Controls 43Rotor Control – SI Machines 56Slew & Lift Locks 57Breakaway & Auto Reset 58Powered Slew 59Flailhead Wire Trap & Wire Removal 60Moving into the Transport Position 61Transport Position 62Moving from Transport to Work Position 63Rotor Operating Speed 64Hazards & Dangers 65Overhead Power Lines 66Hedge Cutting Procedure 68Lift Float Kit (Option) 69Angle Float Kit 70Cam Valve Adjustment 71Maintenance & Lubrication 72Hydraulic System 74Hydraulic Hoses 75Control Cables 76PTO Shaft Maintenance 77Front Lighting Kits Installation 78
For Safety and Performance …ALWAYS READ THIS BOOK FIRSTMcCONNEL LIMITEDTemeside WorksLudlowShropshireEnglandTelephone: 01584 873131www.mcconnel.comNOISE STATEMENTThe equivalent daily personal noise exposure from this machine measured at the operators’ ear iswithin the range 78 – 85 dB, these figures apply to a normal distribution of use where the noisefluctuates between zero and maximum. The figures assume that the machine is fitted to a tractor witha ‘quiet’ cab with the windows closed in a generally open environment. We recommend that thewindows are kept closed. With the cab rear window open the equivalent daily personal noiseexposure will increase to a figure within the range 82 – 88 dB. At equivalent daily noise exposurelevels of between 85 – 90 dB ear protection is recommended – it should be used if any window is leftopen.
GENERAL INFORMATIONAlways read this manual before fitting or operating the machine – whenever any doubtexists contact your dealer or the <strong>McConnel</strong> Service Department for advice and assistance.Use only <strong>McConnel</strong> Genuine Service Parts on <strong>McConnel</strong> Equipment and MachinesDEFINITIONS – The following definitions apply throughout this manual:WARNINGAn operating procedure, technique etc., which –can result in personal injury or loss of life if not observed carefully.CAUTIONAn operating procedure, technique etc., which –can result in damage to either machine or equipment if not observed carefully.NOTEAn operating procedure, technique etc., which –is considered essential to emphasis.LEFT AND RIGHT HANDThis term is applicable to the machine when attached to the tractor and is viewedfrom the rear – this also applies to tractor references.MACHINE & DEALER INFORMATIONRecord the Serial Number of your machine on this page and always quote this numberwhen ordering parts. Whenever information concerning the machine is requestedremember also to state the make and model of tractor to which the machine is fitted.Machine Serial Number:Machine Model details:Dealer Name:Dealer Address:Dealer Telephone No:Dealer Email Address:Installation Date:1
FEATURES & SPECIFICATIONS<strong>PA53</strong> & <strong>PA58</strong> (all models)‘Quick Fit’ Three Point Linkage Mounted.Right or Left Hand Cutting.Cast Iron Gearbox.<strong>Operator</strong> Guard.Hydraulic Breakaway.95° powered slew.200 Litre Hydraulic Reservoir.Choice of Flailhead.Under Frame ‘Pick Up’ Points<strong>PA53</strong> & <strong>PA58</strong> SI ModelsSemi Independent Hydraulics - tractor power for arm movement, PTO pump for rotor.Rotor engagement by tractors PTO lever.60HP Hydraulic System.Cable Controls.Head Angle Float.<strong>PA53</strong> & <strong>PA58</strong> TI ModelsTotally Independent Hydraulics powered by tandem PTO pump.Independent Reversible Rotor on/off valve.60HP Hydraulic System.Cable Controls.Head Angle Float.<strong>PA53</strong> E & <strong>PA58</strong> E ModelsTotally Independent Hydraulics powered by tandem PTO pump.Independent Reversible Rotor on/off valve.60HP Hydraulic System.Solenoid Operated Controls.Choice of Electric Switchbox, Mono-Lever or Proportional Controls.Head Angle Float.OPTIONAL EXTRASAxle Bracket Mounting.Easy Drive System (EDS).Lift Float Kit.Lighting Kit.2
SAFETY SECTIONThis machine has the potential to be extremely dangerous - in the wrong hands it can killor maim; It is therefore imperative that both owner and operator of the machine reads andunderstands the following section to ensure they are fully aware of the dangers that do, ormay exist, and their responsibilities surrounding the use and operation of the machine.The operator of this machine is responsible not only for their own safety but equally for thesafety of others who may come into the close proximity of the machine, as the owner youare responsible for both.When the machine is not in use the cutting head should be lowered to rest on the ground.In the event of any fault being detected with the machine’s operation it must be stoppedimmediately and not used again until the fault has been corrected by a qualified technician.POTENTIAL SIGNIFICANT DANGERS ASSOCIATED WITH THE USE OF THIS MACHINE:▲ Being hit by debris thrown by rotating components.▲ Being hit by machine parts ejected through damage during use.▲ Being caught on a rotating power take-off (PTO) shaft.▲ Being caught in other moving parts i.e.: belts, pulleys and cutting heads.▲ Electrocution from Overhead Power Lines (by contact with or ‘flashover’ from).▲ Being hit by cutting heads or machine arms as they move.▲ Becoming trapped between tractor and machine when hitching or unhitching.▲ Tractor overbalancing when machine arm is extended.▲ Injection of high-pressure oil from hydraulic hoses or couplings.▲ Machine overbalancing when freestanding (out of use).▲ Road traffic accidents due to collision or debris on the road.3
BEFORE USING THIS MACHINE YOU MUST:▲ Ensure you read all sections of the operator handbook.▲ Ensure the operator is, or has been, properly trained to use the machine.▲ Ensure the operator has been issued with and reads the operator handbook.▲ Ensure the operator understands and follows the instructions in operator handbook.▲ Ensure the tractor front, rear and sides ar e fitted with metal mesh or polycarbonateguards of suitable siz e and st rength to protect the operator against thrown debris orparts.▲ Ensure tractor guards are fitted correctmaintained.ly, are undam aged and kept properly▲ Ensure that all m achine guards are in position, are undam aged, and are keptmaintained in accordance with the manufacturer’s recommendations.▲ Ensure flails and their fixings ar e of a type recommended by t he manufacturer, aresecurely attached and that none are missing or damaged.▲ Ensure hydraulic pipes are carefully and corre ctly routed to avoid da mage by chaffing,stretching or pinching and that they are held in place with the correct fittings.▲ Always follow the manufacturer’ s instructions for attachm ent and remov al of themachine from the tractor.▲ Check that the machine fittings and couplings are in good condition.▲ Ensure the tractor meets the minimum weight recommendations of the machine’ smanufacturer and that ballast is used as necessary.▲ Always inspect the work area thoroughly before starting to note obstacles and rem ovewire, bottles, cans and other debris.▲ Use clear suitably s ized warning signs to al ert others to the nature of the m achineworking within that ar ea. Signs should be placed at both ends of the work site. (It i srecommended that signs used are of a s ize and type specified by the Departm ent ofTransport and positioned in acc ordance with their, and the Local Highways Authority,guidelines).▲ Ensure the operator is protected from noise. Ear defenders should be worn and tractorcab doors and windows must be kept closed. Machine cont rols should be routedthrough proprietary openings in the cab to enable all windows to be shut fully.▲ Always work at a safe speed taking account of the conditions i. e.: terrain, highwayproximity and obstacles around and above the m achine. Extra special attention shouldbe applied to Overhead Power Lines. Som e of our machines are capable of reach inexcess of 8 m etres (26 feet) this m eans they have the potential to well exceed, bypossibly 3 metres (9’ 9”), the lowest lega l minimum height of 5. 2 metres from theground for 11,000 and 33,000 volt power lines. It cannot be stressed enough thedangers that surround this capability, it is therefore vital that the operator is fully awareof the max imum height and reac h of the machine, and that they are fully conversantwith all as pects regarding the safe minimum distances that apply when working withmachines in close proximity to Power Lines. (Further information on this subject can beobtained from the Health & Safety Executive or your Local Power Company).4
▲ Always disengage the machine, kill the tractor engine, remove and pocket the keybefore dismounting for any reason.▲ Always clear up all debris left at the work area, it may cause hazard to others.▲ Always ensure when you rem ove your machine from the tracto r that it is left in a safeand stable position using the stands and props provided and secured if necessary.WHEN NOT TO USE THIS MACHINE:▲ Never attempt to use this machine if you have not been trained to do so.▲ Never use a machine until you have read and understood the operator handbook, arefamiliar with it, and practiced the controls.▲ Never use a machine that is poorly maintained.▲ Never use a machine if guards are missing or damaged.▲ Never use a machine on which the hydraulic system shows signs of wear or damage.▲ Never fit, or use, a machine on a tractominimum specification level.r that does not meet the manufacturer’s▲ Never use a machine fitted to a tractor t hat does not have s uitable front, rear andside(s) cab guarding made of metal mesh or polycarbonate.▲ Never use the m achine if the tractor cab guarding is dam aged, deteriorating or badlyfitted.▲ Never turn a m achine cutting head to an angltowards the cab.e that causes debris to be ejected▲ Never start or continue to work a m achine if people ar e nearby or approaching - Stopand wait until they ar e at a safe distance before continuing. WARNING: Some cuttingheads may continue to ‘freewheel’ for up to 40 seconds after being stopped.▲ Never attempt to use a machine on materials in excess of its capability.▲ Never use a machine to perform a task it has not been designed to do.▲ Never operate the tractor or m achine controls from any position other than from thedriving seat, especially whilst hitching or unhitching the machine.▲ Never carry out m aintenance of a machine or a tractor whilst the engine is r unning –the engine should be switched off, the key removed and pocketed.▲ Never leave a machine unattended in a raised pos ition – it should be lowered to theground in a safe position on a level firm site.▲ Never leave a tractor with the key in or the engine running.▲ Never carry out m aintenance on any part or component of a machi ne that is raisedunless that part or component has been properly substantially braced or supported.▲ Never attempt to detect a hydraulic leak with your hand – use a piece of cardboard.▲ Never allow children near to, or play on, a tractor or machine under any circumstances.5
ADDITIONAL SAFETY ADVICETraining<strong>Operator</strong>s need to be competent and fully capable of operating this machine in a safe andefficient way prior to attempting to use it in any public place. We advise therefore that theprospective operator make use of relevant training courses available such as those run bythe Agricultural Training Board, Agricultural Colleges, Dealers and <strong>McConnel</strong>.Working in Public PlacesWhen working in public places such as roadsides, consideration should be paid to othersin the vicinity. Stop the machine immediately when pedestrians, cyclists and horse ridersetc. pass. Restart only when they are at a distance that causes no risk to their safety.Warning SignsIt is advisable that any working area be covered by suitable warning signs and statutory inpublic places. Signs should be highly visible and well placed in order to give clearadvanced warning of the hazard. Contact the Department of Transport or your LocalHighways Authority to obtain detailed information on this subject. The latter should becontacted prior to working on the public highway advising them of the time and location ofthe intended work asking what is required by way of signs and procedure. – ‘Nonauthorisedplacement of road signs may create offences under the Highways Act’.Suggested Warning Signs Required‘Road works ahead’ warning sign with a supplementary ‘Hedge cutting’ plate. ‘For 1mile’ or appropriate shorter distance may be added to the plate.‘Road narrows’ warning signs with supplementary ‘Single file traffic’ plate.White on blue ‘Keep right’ (*) arrow sign on rear of machine.* Note – this applies to UK Market machines where traffic passes to the right of a machine working inthe same direction as the traffic flow. The direction, use and colour of the arrow sign will depend onthe country of use and the Local Highway Authorities regulations in the locality.Use of Warning Signs▲ On two-way roads one set of signs is needed facing traffic in each direction.▲ Work should be within 1 mile of the signs.▲ Work only when visibility is good and at times of low risk e.g.: NOT during ‘rush-hour’.▲ Vehicles should have an amber-flashing beacon.▲ Ideally, vehicles should be conspicuously coloured.▲ Debris should be removed from the road and path as soon as practicable, and atregular intervals, wearing high visibilit y clothing and before rem oving the hazar dwarning signs.▲ Collect all road signs promptly when the job is completed.Although the information stated her e covers a wide range of safety subjects it is impossible t opredict every eventuality that can occur under differing circumstances whilst o perating thismachine. No advice given here can replace ‘good common sense’ and ‘ total awareness’ at alltimes, but will go a long way towards the safe use of your <strong>McConnel</strong> machine.6
FITTING - Tractor requirementsMINIMUM TRACTOR WEIGHTS - including ballast weight if necessary:All models – 3250 kg.MINIMUM HP REQUIREMENTS:All models – 60 HPLINKAGE:Category 2PTO SHAFT:Tractor must be equipped with a live drive P.T.O. to enable forward motion to be stoppedwhile the flailhead continues to operate.LINKAGE ISOLATION:A linkage isolation facility is necessary for ‘SI’ models only.CHECK CHAINS/STABILIZERS:Check chains or stabilizers must be fitted and tightened.TRACTOR RELIEF VALVE:For ‘SI’ models only tractor relief valve must be set above 2750 psi (190 bar).TRACTOR HYDRAULIC FLOW RATE:Hydraulic flow rates are not crucial for ‘SI’ models.FRONT MOUNTED MODELSBefore fitting a front mounted machine to your tractor you should seek advice from thetractor manufacturer or dealer regarding its suitability and additionally any necessarylinkage, ballast or weight requirements that may be needed.7
VEHICLE/TRACTOR PREPARATIONWe recommend vehicles are fitted with cabsusing safety glass windows and protectiveguarding when used with our machines.Fit <strong>Operator</strong> Guard (part no. 7 3 13 324)using the hooks provided. Shape mesh tocover all vulnerable areas.Remember the driver must be lookingthrough mesh and/or polycarbonate glazingwhen viewing the flail head in any workingposition - unless the vehicle/ cab manufacturer can demonstrate that the penetrationresistance is equivalent to, or higher than, that provided by mesh/polycarbonate glazing. If thetractor has a roll bar only, a frame must be made to carry both mesh and polycarbonateglazing. The operator should also use personal protective equipment to reduce the risk ofserious injury such as; eye protection (mesh visor to EN1731 or safety glasses to EN166),hearing protection to EN352, safety helmet to EN297, gloves, filter mask and high visibilityclothing.Vehicle Ballast: It is imperative when attaching ‘third-party’ equipment to a tractor that themaximum possible stability of the machine and tractor combination is achieved – this can beaccomplished by the utilisation of ‘ballast’ in order to counter-balance the additional equipmentadded.Front weights may be required to place 15% of total outfit weight on the front axle for stabletransport on the road and to reduce ‘crabbing’ due to the drag of the cutting unit when workingon the ground.Rear weights may be required to maintain a reasonable amount of rear axle load on theopposite wheel from the arms when in work; for normal off-ground work i.e. hedge cutting thisshould be 20% of rear axle weight or more for adequate control, and for ground work i.e. vergemowing with experienced operators, this can be reduced to 10%.All factors must be addressed in order to match the type and nature of the equipment added tothe circumstances under which it will be used – in the instance of Power Arm Hedgecutters itmust be remembered that the machines centre of gravity during work will be constantly movingand will differ from that during transport mode, therefore balance becomes critical.Factors that effect stability:● Centre of gravity of the tractor/machine combination.● Geometric conditions, e.g. position of the cutting head and ballast.● Weight, track width and wheelbase of the tractor.● Acceleration, braking, turning and the relative position of the cutting head during theseoperations.● Ground conditions, e.g. slope, grip, load capability of the soil/surface.● Rigidity of implement mounting.Suggestions to increase stability:●●●●Increasing rear wheel track; a tractor with a wider wheel track is more stable.Ballasting the wheel; it is preferable to use external weights but liquid can be added toaround 75% of the tyre volume – water with anti-freeze or the heavier Calcium Chloridealternative can be used.Addition of weights – care should be taken in selecting the location of the weights toensure they are added to a position that offers the greatest advantage.Front axle locking; a ram can be used to ‘lock’ the front axle in work only – locking the axlemoves the ‘balance line’ and can be used to transfer weight to the front axle from the rear(check with tractor manufacturer).The advice above is offered as a guide for stability only and is not a guide to tractor strength - it istherefore recommended that you consult your tractor manufacturer or local dealer to obtain specificadvise on this subject, additionally advice should be sought from a tyre specialist with regard to tyrepressures and ratings suitable for the type and nature of the machine you intend to fit.8
CLOSED CENTRE CONVERSION KIT (8130059) – SI models onlyA control valve conversion kit consists of a relief valve blanking plug which should beinstalled in place of the existing relief valve and a pressure gallery blanking adaptor whichis installed in place of the standard adaptor at the valve outlet end next to the lift loop hoseconnection. - Take care when extracting the relief valve not to damage the copper ‘sealing’washer, as it is re-used.9
INITIAL ATTACHMENT TO TRACTORThe machine will be delivered in a partially dismantled condition, secured with transportstrap and banding.Choose a firm level site.Remove the transport strap, banding straps andloose items.Fill tank with oil from the chart or equivalent(see page 19). Raise the machine using overhead liftingequipment with a minimum capacity of1500kg SWL.LEAVE IN POSITION AT THIS STAGE.Lower the legs and pin in position selectingthe holes that position the machines gearboxstub shaft approx. 75 mm below the tractorsP.T.O. shaft. Note: Leg pin position used.Unbolt stabiliser from machine and removethe stabiliser nose quadrant pin.Top Link BufferThe machine utilizes a buffered rocker systemat the main frame to top link attachment point,this is primarily to reduce ‘shock loading’ totractor and machine mounting components. Therubber buffers should be tightened to acompressed height of 15-18mm each.Never use or transport the machine without thebuffers in place and correctly tensioned -replace immediately if they are either damagedor missing.10
TRACTOR ATTACHMENT – Linkage Mounted MachinesWith the machine positioned on a firmlevel site and securely supported,manoeuvre the tractor squarely up to themachine.Set the tractor’s draft links to a height levelwith the machines lower link brackets andcarefully reverse the tractor to a point thatallows attachment of the lower links.NOTE: The hole selected on the lower linkbracket should be t he rear most thatpermits the m achine to be mountedwithout fouling the tractor.Ensure the same hole position is selectedboth sides of the machine.Insert lower linkage pins and spacers andsecure in position with lynch pins.ANY LIFTING EQUIPMENT USED TOPOSITION THE MACHINE MAY NOW BEREMOVED11
Fit the stabilizer into position with its arms alignedin the connection channels of the main frame andattach the stabilizer nose to the tractors top link –select the highest possible position availableavoiding any load sensing properties.NOTE: The bolt on nose of the stabiliser isreversible in order to accommodate variations oftractor linkage designs.<strong>McConnel</strong> offer various versions of stabilizer nosesfor differing types and makes of tractors – contactyour local dealer or <strong>McConnel</strong> Parts Departmentfor further information.Secure the stabilizer in position with the fixingssupplied – the arms of the stabilizer should beattached to the main frame selecting the hole thatis farthest away from the back of the tractor.Place the machines top link into position betweenthe stabilizer and the machine main frame.12
Attach the machines top link to both the stabilizerand the main frame using the linkage pins suppliedand secure in position with lynch pins.Raise the machine on the tractors linkage to aheight where the tractors PTO and the stub axle ofthe machines gearbox are approximately in linewith each other.Note: As lift occurs be aware the machine may tiltslightly.WARNINGThe quadrant lever or machine controls must onlybe operated from the tractor seat. Ensure no oneis standing on, between, or near the linkage armsor bars during this procedure.Adjust the top link to bring the machine frame intothe vertical position.13
Remove leg pins and raise the stand legs to theirstowage position – replace leg pins and secure inplace with ‘R’ clips.Adjust check chains to prevent sidewaysmovement of the tractor’s linkage.Measure the PTO shaft and cut to the dimensionshown below. The finished length of the shaftshould be 75mm (3”) less than the measureddistance ‘A’ between tractor shaft and gearboxstub shaft to allow for fitting.NOTE: For subsequent use with different tractorsmeasure again - there m ust be a min imum shaftoverlap of 150mm (6”).14
When the PTO shaft is in position attach torquechains to convenient locations to prevent rotationof the shaft guarding.Fit the machine control unit in the tractor cab in aconvenient location that allows for safe and easyoperation of all the controls and functions – referto page 20 for details.On semi independent machines only;Connect up the supply and return hoses.Supply – from tractors auxiliary service.Return – to tractors transmission casing(Refer to the Tractor Handbook).Note: On semi independent machines only selecttractors external services.VFR Lock Tap - Pre-Operational CheckVFR machines produced after late 2012are fitted with a security lock tap located onthe control valve’s reach gland port; this isto prevent the risk of arm movement duringshipping of the machine.Ensure this lock tap is opened beforeattempting to operate the machine; the tapshould then be left in its open position fromthat point onwards and only closed for anyfuture shipping and as an added safetyprecaution when storing the machinedetached from the tractor.15
Ensure the Lift Ram tap and Slew Ram taps are open.Request assistance.Operate ‘lift up’ on machine controls sufficient only for the end of the dipper arm to clearthe ground.Pivot out the dipper arm until the tension link can be connected. Operate the controls to ‘slew’ the arms towards the rear only until the frame ishorizontal. Carefully operate the machine through its full range of movements whilst checking thathoses are not strained, pinched, chaffed or kinked, and that all machine movementsare functioning correctly. On initial installation, the machine is now ready for attachment of the flailhead (seepage 18 for fitting details). Fold the machine into the transport position (refer to page 62 for details). The machineis now ready to proceed to the work site.16
PTO DRIVESHAFT INSTALLATIONThe PTO driveshaft attaches between the tractor and the machine gearbox to transfer thepower required to the run and operate the machine – it is important to achieve the correctshaft length to avoid risk of it ‘bottoming out’ when raising or lowering the machine.The procedure for measuring andcutting the shaft is as follows:Measuring the PTO ShaftWith the machine attached to thetractor in the working position measurethe horizontal distance ‘A’ from thetractor’s PTO to the input shaft on themachines gearbox and subtract 75mm(3”) – this figure is the required shaftlength.Place the fully closed PTO shaft onthe ground and measure its overalllength, if the shaft is shorter than therequired length you can use it withoutthe need to shorten - providing itallows for a m inimum 150mm (6”)overlap when fitted.If the shaft is longer subtract therequired shaft length plus an additional75mm (3”) - the resulting figure is theexcess length that will need to beremoved from each half of the shaft.Cutting the PTO ShaftSeparate the two halves and using themeasurement obtained above shortenboth the plastic guarding and the innersteel profile tubes of each shaft by thissame amount. De-burr the cut tubeswith a file to remove rough or sharpedges and thoroughly clean to removeswarf before greasing, assembling andfitting the shaft.NOTE: For subsequent use with different tractors the shaft should be measured again tocheck suitability – there must be a minimum shaft overlap of 150mm (6”).MaintenanceTo increase the working life of the PTO shaft it should be periodically checked, cleanedand lubricated – refer to the PTO maintenance section for further details on this subject.17
FLAILHEAD ATTACHMENTFor ease of attachment and safety this procedure is best performed on a firm level site.With the tractor parked alongside the flailhead operate the controls of the machine toposition the pivot bracket of the machines head angling mechanism directly behindflailhead with the base of the hose tray (or junction bracket) parallel to the ground.Manoeuvre the flailhead backwards on its roller until the heads attachment bracket isadjacent to the machines pivot bracket. Fit the 4 attachment bolts through the bracketsfrom the arm side - if the holes are mis-aligned carefu lly operate the angling ram until theholes correspond.WARNING: Ensure all persons remain at a safe distance whilst operating the angling function as thegeometry of the head angling mechanism produces several pinch risk areas.With the attachment bolts correctly located through the brackets fit the self-locking nutsand tighten alternately until the brackets are drawn flush before finally tightening them to atorque setting of 203Nm (150ft.lbs).Flailhead Hose AttachmentWith the flailhead attached to themachine the hydraulic hoses cannow be connected – refer todiagrams opposite. Upper port ‘A’on the motor connects to junctionbracket point ‘A’ on the arm andlower port ‘B’ on the motorconnects to junction bracket point‘B’ on the arm.Note: If a hose tray is already fitted tothe arm it will need to be removed toallow the hoses to be connected to thejunction bracket – ensure the hose trayis replaced once the hoses have beenconnected.18
HYDRAULIC OILHydraulic Oil ReservoirFill the tan k with oil s elected from the chartbelow or a good quality equivalent to a pointwhere the level is be tween the minimum andmaximum marks on the tank gauge. Whenthe machine is initially run the le vel will dropas the oil is drawn int o the circuit - top backup as required to the correct l evel on thegauge.Always use clean receptacles when handlingand transferring oil to avoid moisture or dirtcontamination that can damage component sand/or reduce machine performance.NOTE: Refer to the maintenance section for further information on the subject of hydraulic oil andsystem filtration.Reservoir CapacityThe oil tank capacity of the machine is approximately 200 Litres.Recommended Hydraulic OilsFor initial filling of the oil reservoir, peri odic oil changes and replen ishment purposes thefollowing hydraulic oils, or a good quality equivalent are recommended:NOTE: Only use oils that are ISO 18/16/13, NAS7, or cleaner.Manufacturer Cold or Temperate Climate Hot ClimateBP Bartran 46Energol HLP-HM 46Bartran 68Energol HLP-HM 68CASTROL Hyspin AWH-M 46 Hyspin AWH-M 68COMMA Hydraulic Oil LIC 15 Hydraulic Oil LIC 20ELF Hydrelf HV 46Hydrelf HV 68Hydrelf XV 46ESSO Univis N 46 Univis N 68FUCHS(UK/Non UK markets*)Renolin 46Renolin HVZ 46Renolin CL46/B15*Renolin AF46/ZAF46B*Renolin 68Renolin HVZ 68Renolin CL68/B20*Renolin AF68/ZAF68B*GREENWAY Excelpower HY 68 Excelpower HY 68MILLERS Millmax 46Millmax HV 46Millmax 68Millmax HV 68MORRIS Liquimatic 5Liquimatic HV 46Triad 46Liquimatic 6Liquimatic HV 68Triad 68SHELL Tellus 46Tellus T46Tellus 68Tellus T68TEXACO Rando HD 46Rando HDZ 46Rando HD 68Rando HDZ 68TOTAL Equivis ZS 46 Equivis ZS 6819
FITTING OPERATOR CONTROL UNITSFitment of the operator controls in the tractor cab will vary depending on the particularmodel or specification of machine – the information below lists the differing methods offitment for the various types of controls available.NOTE: Electric control units work within the range of 12v-16v DC and will require aminimum power supply of 12v DC.Cable ControlsCable control units are provided with, and attached to, a mounting bracket – the bracketshould be securely fixed to the internal mud wing or cab cladding in a suitable convenientlocation that offers ease of use without interfering with normal tractor operation.In deciding the final position of the control unit bear in mind the location of the cable run –make sure the minimum acceptable cable bend radii of 8” (200mm) is not exceeded.Ensure during fitting that no structural member of the tractor cab or roll bar is drilled ordamaged.The cable rotor control valve lever on cable controlled machines will be assembled as acomponent part of the main bank of controls and therefore shares the same mountingbracket.On electric machines with cable operated rotor control valve the lever will be supplied as a‘standalone’ unit with its own individual mounting bracket – this should be fitted in thesame manner as above adopting the same precautions pertaining to attachment and cableruns.Electric ControlsDepending on the particular type of control, electric units are supplied either with amounting bracket or a mounting pillar which should be bolted to the internal mud wing orcab cladding in a suitable convenient location that offers ease of use without interferingwith normal tractor operation. Mounting pillars can be bent or twisted to achieve acomfortable working position. Ensure during fitting that no structural member of the tractorcab or roll bar is drilled or damaged.The power supply cable should be connected directly to the tractors battery - do not usecigarette lighter type connections as these prove to be sporadic and unreliable for controlapplications. Control units are 12 volt DC operated; the brown lead is positive (+) and theblue lead is negative (-).Proportional Armrest ControlsV3 proportional armrests are supplied with a mounting bracket and bar, the bracket mustbe securely fixed to the internal mud wing, cab cladding or other suitable convenientlocation that offers ease of use without interfering with normal tractor operation. Once thebracket has been fitted in the cab the mounting bar and armrest control unit can beattached to it using the fixings supplied. Ensure during fitting that no structural member ofthe tractor cab or roll bar is drilled or damaged.V4 & Revolution proportional controls comprise of 2 units; the main control box or controlscreen respectively and the armrest control unit. The control box / screen is supplied witha mounting bracket and suction cup assembly that allows the units to be mounted on thewindow of the tractor cab – ensure the surface used is clean and dry and that the unit ismounted in a position where it does not obstruct operator vision. The armrest control isdesigned to slide over the armrest of the tractor seat and is held in place with the fixingstraps provided.The power supply cable should be connected directly to the tractors battery - do not usecigarette lighter type connections as these prove to be sporadic and unreliable for controlapplications. Control units are 12 volt DC operated; the red lead is positive (+) and theblack lead is negative (-).20
RUNNING UP PROCEDURETI MODELS ONLYCAUTION! Before initial use of a new machine, all lubrication points must begreased and the gearbox and oil tank levels checked and where required toppedup before attempting to use the machine. See maintenance section for details.Ensure that the rotor control valve is in "STOP" position, start tractor, engage P.T.O. allowthe oil to circulate through the return line filter for about 5 minutes without operation of thearmhead control lever.Operate the armhead levers through their complete range ensuring that all movements arefunctioning correctly.Place the flail head at a safe attitude and move the rotor control to "START" position. Afterinitial fluctuation the rotor should settle to a steady speed. Increase P.T.O. speed toapproximately 360 rpm. and run for a further five minutes before disengaging and stoppingtractor.Check the hose runs and observe that they are free from any pinching, chaffing, strainingor kinks. Re-check the oil level in the tank-and top up as necessary.SI MODELS ONLYEnsure P.T.O. lever is in neutral position, and isolate tractor hydraulic linkage. Start tractorand select external service supply. Allow the tractor to run for several minutes beforeattempting to operate any of the machine control levers.On operating move the levers through their complete range ensuring that all movementsare functioning correctly.Check the tractor rear axle oil level and top up if necessary.Place the flail head at a safe attitude and bring tractor engine revolutions to 1000 rpm.Engage P.T.O. and allow the rotor to run for several minutes. Do not leave the tractor cabor allow anyone to approach the flail head at this time.CAUTION!Do not allow the pump to continue working if the rotor does not turn.Overheating and serious damage to the pump can be caused in a very short time.After running up the machine increase P.T.O. speed to approximately 360 rpm. and run fora further five minutes to allow the oil to circulate through the return line filter beforedisengaging the P.T.O. and stopping tractor.Check the hose runs and observe that they are free from any pinching, chafing, strainingor kinks. Re-check the oil level in the tank and top up as necessary.21
PRE-WORK PREPARATION & PRECAUTIONSIMPORTANT: Always read the book first before attempting to operate the machine –practise operating the machine, without the rotor running, in a safe open space until youare fully familiar with all controls and functions of the machine. Only begin using themachine for work when you are confident that you have mastered the controls andoperation sufficient for safe use of the machine.CAUTION: Care must always be taken when working with the flailhead close in to avoid contact withthe tractor.Pre-work Machine ChecksPrior to use of the machine always check all bolts are tight and that the torque figures arecorrect for the specific locations indicated below:52 NmMotor BoltsRoller End Capscrews203 NmRotor BoltsFlail BoltsRoller Bracket BoltsGeneral Work PrecautionsInspect the work area prior to operation, remove any hazardous materials and note anyimmovable objects - it may also be a wise precaution to mark these hazards with a visiblemarker than can be easily seen from the operating position in the tractor.If the type of work being undertaken makes this important precaution impractical, alwaysmaintain a high degree of alertness and restrict the tractors forward motion to a speed thatallows sufficient time to stop the tractor or avoid the hazard before contact is made.General Working PracticeIt is the operator’s responsibility to develop safe working procedures;Always:▲ Be aware of potential hazards in the vicinity of the work area.▲ Ensure all guards are fitted correctly and in good condition.▲ Disengage PTO before stopping the engine.▲ Wait until the flail has stopped running before leaving the tractor seat.▲ Disengage the PTO, stop the engine, remove and pocket the key before making anyadjustments to the machine.▲ Check frequently that all nuts and bolts are tight.▲ Keep bystanders at a safe distance.22
IMPORTANTOn the first day of use with a newflailhead, nuts should be checkedfor tightness every hour andretightened if required. Thereafterthey should be checked on adaily basis prior to use of themachine. Torque nuts to thesettings stated on previous page.EMERGENCY STOPPINGIn all emergency situations machine operation and functions must be stopped immediately;Stop PTO operation using the tractor controls then immediately kill electrical power to themachine using the Off (Emergency Stop) switch on the machine’s control unit.WARNING: Auto-Reset MachinesWhen the Auto-Reset feature is active the machines arm set is capable ofunintentional movement even when the PTO is switched off and stationary.Always ensure that electrical power to the machine is switched off using theOff (Emergency Stop) switch on the machine’s control unit in emergencysituations and/or when the machine is not being operated.WARNING: Cable Operated MachinesIn certain conditions, and/or if the Auto-Reset feature is active, the arm setson cable operated machines possess the potential to move unintentionally,even when the PTO is switched off and stationary, if the levers were to beaccidentally operated. Care must be adopted to avoid any movement of thelevers when the machine is not being operated. Ensure arm sets are loweredfully to the ground when the machine is parked up or not in use.23
REMOVAL FROM TRACTORDANGER!READ CAREFULLY BEFORE COMMENCING TO REMOVE MACHINE FROM THE TRACTOR.THE ORDER OF THE FOLLOWING STEPS MUST BE FOLLOWED EXACTLYDISCONNECTING THE TOP LINK MUST BE THE LAST OPERATION PRIOR TODRIVING THE TRACTOR AWAY FROM THE MACHINE.WARNINGDo not operate quadrant lever or machine controls through the rear cab window whilststanding on or amongst linkage components. Always seek assistance.Select a firm level site for parking the machine.Replace parking legs in their sockets and secure in their lowest position.Raise the machine on the tractor linkage until the weight is taken off the stabiliser.Remove the lower stabilizer pins.Unscrew the lift ram tap.Lower the machine to be ground.Extend the arms and place the flail head on the ground at half reach.Disengage tractor P.T.O. and remove.Disconnect stabiliser bars or loosen check chains as applicable. Unbolt the control unit from the mounting pillar, remove from tractor cab and stow thelevers or switchbox clear of the ground.On Si models only disconnect the supply and return hoses and stow with hose endsclear of the ground. Disconnect the stabiliser from the tractors top hitch position. Allow the stabiliser to slidealong the rail until it contacts the eccentric stops.Remove draft link pins and drive tractor away from machine.24
STORAGEIf machine is to be left standi ng for an extended per iod of time, lightly coat the exposedportions of the ram rods with grease. Subsequently this grease should be wiped off beforethe rams are next moved.If the machine has to be stored out side tie a piec e of tarpaulin or canvas over the controlassembly, do not use a plastic fertilizer bag which could lead to rapid corrosion.SUBSEQUENT ATTACHMENT TO IDENTICAL TRACTORRefer to and follow steps on ‘initial attachment to tractor’ (page 13)Connect Stabiliser into tractors top hitch position used previously.Raise the machine on the tractor linkage until the Stabiliser contacts the eccentricstops.Fit Stabilizer lower pins.Mount controls in the tractor cab.Fit PTO Shaft and attach torque chain to a convenient point to prevent the shaft guardrotating.Place arms in work position at half reach and adjust lift arm leveling box to bring framehorizontal.Tighten Check Chains if fitted.Stow parking legs. Fold machine into transport position (see page 36).Proceed to the work site.SUBSEQUENT ATTACHMENT TO DIFFERENT TRACTORRemove Stabiliser and Top Link from machine and separate.Refer to and follow steps ‘initial attachment to tractor’ (page 13)25
OPERATIONOPERATOR GUARDPREPARATIONREAD THE BOOK FIRSTPractice operating the machine in an open space without the rotor running until you arefully familiar with the controls and operation of the machine.CAUTION!Care must be taken when working with the flail head close in as it can come intocontact with the tractor.TRACTOR CONTROLSFor Si models only the tractor linkage will need to be isolated.26
CABLE CONTROLSCable controlled machines are supplied with a control unit of the type shown below – theparticular version will be dependent on the specification and features of the machine.Versions differ primarily in the number of armhead control levers assembled within thecontrol bank – some versions will have the rotor control lever assembled alongside thearmhead control levers as shown below left and others will be supplied with the rotorcontrol lever as a ‘standalone’ unit with its own individual mounting bracket.The armhead control levers all move in a forwards and backwards direction eachcontrolling a specific arm function with the exception of the auto reset lever which operatesonly in the backward direction (from central ‘off’ position to the backwards ‘on’ position).Where applicable, if a machine is fitted with the optional lift float feature, operation of thelift float will be via an additional electrical switch which will need to be installed in aconvenient location in the tractor cab.Basic Cable Control UnitCable Control Unit with Auto ResetLOCATION & FUNCTION OF CONTROLS1. Arm Lift Control2. Arm Reach Control3. Head Angle Control / Angle Float Selection4. Arm Slew Control5. Rotor Control6. Auto Reset (where applicable)7. Midcut/VFR (where applicable)Cable Control Unit with Auto Reset & MidcutNOTE: The illustrations on the following pages show the method of operating all possible functions –depending on individual specifications some features may not be present on your particular machineand therefore will not be applicable.27
ARM OPERATIONAutoReset28
Rotor ControlRefer to specific cable rotor control sectionfor additional information on rotor operationMidcut/VFR ModelsFLOAT OPERATION (Angle Float standard/ Lift Float optional)HEAD ANGLE FLOAT -Push angle lever fullyforward into the detentposition.A) Angle Float OFF B) Angle Float ONLift Float (where applicable)A) Lift Float OFF B) Lift Float ON29
CABLE ROTOR CONTROLOn cable rotor control machines the rotor is operated by the lever shown below – from theupright ‘off’ position pushing the lever forward switches the rotor on for downhill cutting andpulling the lever backwards switches the rotor on for uphill cutting. The small pivot lockinglever mounted on the side of the control assembly rotates through 180° to lock the rotor ina specific cutting direction – this is a safety feature to avoid changes of rotor directionwithout first stopping the rotor. To change the direction of cut the rotor lever must beplaced in the upright ‘off’ position; when the rotor has stopped rotating completely the pivotlocking lever can be turned to the opposing position allowing the control lever to beoperated for opposite cutting direction.On some cable operated machines the rotor control lever will be assembled as part of themain bank of controls, whereas on others and all electric models it will be supplied as a‘standalone’ unit with its own mounting bracket.UPHILL CUTTINGLockDOWNHILL CUTTINGLockCAUTION: Ensure the rotor has stopped turning completely before attempting to changedirection - When switched off a rotor can continue to ‘freewheel’ under its own momentumfor up to 40 seconds before stopping.30
ELECTRIC SWITCHBOX CONTROLSMachines with Electric Switchbox Controls will be supplied with one of the control unitsshown below, the particular version will be dependent on the specification of the machine;machines fitted with cable rotor control will use the unit shown left whilst machines withelectric rotor control will use the unit shown right – the only differences between the unitsis that the latter has 2 addition switches fitted for operation of the electric rotor control.Cable Rotor Control Version▼Electric Rotor Control Version▼LOCATION & FUNCTION OF CONTROLS1. Arm Lift Control2. Arm Reach Control3. Flailhead Angle Control4. Arm Slew Control5. Tele/Midcut/VFR Control (Applicable models only)A. Power On/OffB. Auto ResetC. Head Float - Angle/Lift (Option)D. Rotor On/Off (Electric RCV models)E. Rotor Direction (Electric RCV models)Powering the ControlsActivation of power to the control unit is by operation of switch ‘A’ as shown below:Press the switch down for Power ON (LED light on)Press the switch up for Power OFF (LED light off)PowerON31PowerOFF
ARM OPERATIONAutoResetTele or Midcut/VFR Models only32
HEAD FLOAT OPERATION (Angle Float standard / Lift Float optional)Angle Float OFFLift Float OFFAngle Float OFFLift Float ONAngle Float ONLift Float ONROTOR OPERATION – Electric Rotor Control Models onlyNOTE: The following section relates to machines with Electric Rotor Control only – for Cable RotorControl models refer to the cable rotor control section.Selection of Rotor Cutting DirectionUphill CuttingDownhill Cutting33
Switching the Rotor OnFor safety reasons, to prevent accidental starting of the rotor, the ‘Rotor On’ switch cannotbe activated in a single operation or without first selecting the direction of cut – theprocedure for starting the rotor is as follows:Select the required cutting direction - the Rotor On/Off Switch (D) must then be switchedupwards and held in position for a minimum of 8 seconds before switching it into the fullydown ‘on’ position where it will remain until it is switched off. When the switch is moved tothe down position the red LED light below the switch will be lit to signify the rotor is on – ifthe LED does not light the switch was not held in its up position for long enough and therotor will not have started, repeat the process again holding the switch upwards for alonger period.Rotor StartSwitching the Rotor OffStopping the rotor is performed by switching either the Rotor Power Switch (D) or theRotor Direction Switch (E) to the central (off) position – the red LED light will go out tosignify the rotor has been switched off.Rotor StopCAUTION: When the rotor is switched off it will continue to ‘freewheel’ under its ownmomentum for up to 40 seconds before finally coming to a standstill – do not leave thetractor cab or attempt to approach the flailhead until the rotor has stopped turningcompletely.Alternative Rotor Stop34
ELECTRIC MONOLEVER CONTROLSMachines with Electric Monolever Controls will be supplied with one of the control unitsshown below, the particular version will be dependent on the specification of the machine;machines fitted with cable rotor control will use the unit shown left whilst machines withelectric rotor control will use the unit shown right – the only differences between the unitsis that the latter has 2 addition switches fitted for operation of the electric rotor control.Cable Rotor Control Version▼Electric Rotor Control Version▼LOCATION & FUNCTION OF CONTROLS6. Arm Lift Control7. Arm Reach Control8. Flailhead Angle Control9. Arm Slew Control10. Tele/Midcut/VFR Control (Applicable models only)A. Power On/Off (Emergency Stop)B. Auto ResetC. Head Float - Angle/Lift (Option)D. Rotor On/Off (Electric RCV models)E. Rotor Direction (Electric RCV models)Powering the ControlsActivation of power to the control unit is by operation of switch ‘A’ as shown below:Rotate the switch clockwise to Power ON (LED light on)Press the switch to Power OFF or Emergency Stop (LED light off)PowerONPowerOFF35
ARM OPERATIONAutoResetTele or Midcut/VFR Models only36
HEAD FLOAT OPERATION (Angle Float standard / Lift Float optional)Angle Float OFFLift Float OFFAngle Float OFFLift Float ONAngle Float ONLift Float ONROTOR OPERATION – Electric Rotor Control Models onlyNOTE: The following section relates to machines with Electric Rotor Control only – for Cable RotorControl models refer to the cable rotor control section.Selection of Rotor Cutting DirectionUphill CuttingDownhill Cutting37
Switching the Rotor OnFor safety reasons, to prevent accidental starting of the rotor, the ‘Rotor On’ switch cannotbe activated in a single operation or without first selecting the direction of cut – theprocedure for starting the rotor is as follows:Select the required cutting direction - the Rotor On/Off Switch (D) must then be switchedupwards and held in position for a minimum of 8 seconds before switching it into the fullydown ‘on’ position where it will remain until it is switched off. When the switch is moved tothe down position the red LED light above the switch will be lit to signify the rotor is on – ifthe LED does not light the switch was not held in its up position for long enough and therotor will not have started, repeat the process again holding the switch upwards for alonger period.Rotor StartSwitching the Rotor OffStopping the rotor is performed by switching either the Rotor Power Switch (D) or theRotor Direction Switch (E) to the central (off) position – the red LED light will go out tosignify the rotor has been switched off.Rotor StopCAUTION: When the rotor is switched off it will continue to ‘freewheel’ under its ownmomentum for up to 40 seconds before finally coming to a standstill – do not leave thetractor cab or attempt to approach the flailhead until the rotor has stopped turningcompletely.Alternative Rotor Stop38
XTC (Mk2) PROPORTIONAL SWITCHBOX CONTROLS (5 Service Models)Machines with XTC Mk2 Proportional Controls (5 service models) will be supplied with thecontrol unit shown below. The units for both electric and cable controlled rotor machinesare identical except that for cable versions the rotor control switches B, C & D (shownbelow) will not provide a function as rotor operation will be controlled by a separate cablelever unit (refer to specific cable rotor control page for operation details of that unit).LOCATION & FUNCTION OF CONTROLS11. Arm Lift Control12. Arm Reach Control13. Head Angle Control14. Arm Slew Control (Default Mode)15. Tele*/Midcut*/VFR* Control (Default Mode)* Applies to the specific model onlyF. Power On/Off (LED ‘a’ indicates status)G. Rotor Start (Uphill Cutting Direction)H. Rotor Start (Downhill Cutting Direction)I. Rotor StopJ. Auto ResetK. Head Angle Float On/OffL. Lift Float On/Off (Option)Note: 2 sets of control buttons are installed on each side of the unit for operation of Angle Float &Lift Float, both sets of buttons and their LED’s are linked and therefore perform exactly the samefunction; they are installed to allow for operator preference.LED LightsAn LED light adjacent to each control button reports the status of that particular function –when the function is selected the LED light will illuminate to confirm the function is active;the light will switch off on de-selection of that function.Powering the ControlsActivation of power to the control unit is by operation of the red button switch ‘A’ as shownbelow:Rotate clockwise for Power ON (LED light on)Press for Power OFF / Emergency Stop (LED light off)39
ARM OPERATIONTele or Midcut/VFR Models only40
HEAD FLOAT OPERATIONAngle Float (Standard Feature)Lift Float (Optional Feature)ROTOR OPERATION – Electric Rotor Control Models onlyNOTE: The following section relates to machines with electric rotor control only – for cable rotorcontrol models refer to the specific cable rotor control section.Rotor Start (Selection of Rotor Cutting Direction)Select rotor start for required direction (LED will light to indicate the active direction).Uphill CuttingDownhill Cutting41
Switching Rotor DirectionWith the rotor running, changing the rotor cutting direction can only be achieved after firstoperating ‘rotor stop’, when stop has been selected the specific direction button can thenbe operated to command the rotor to switch to the desired direction. NOTE: This functionhas a built in time delay of approximately 8 seconds - this is a machine protection featurethat allows the rotor sufficient time to de-accelerate before restarting in the oppositedirection. The LED light of the active cutting direction will flash on and off during theslowing down period, when the direction has changed the LED for the new direction will beilluminated.Switching the Rotor OffStopping the rotor is performed by operation of the rotor stop button as illustrated below.When rotor off has been selected the LED light above the button of the active cuttingdirection will flash on and off for approximately 8 seconds to signify that the rotor has beenswitched off, after this 8 second period the light will go off completely. NOTE: The rotor willcontinue to rotate under its own power until it finally comes to a standstill.CAUTION: When the rotor is switched off it will continue to ‘freewheel’ under its ownmomentum for up to 40 seconds before finally coming to a standstill – do not leave thetractor cab or attempt to approach the flailhead until the rotor has stopped turningcompletely.42
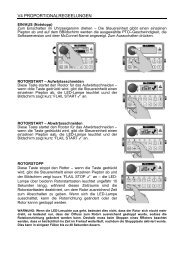
V4 PROPORTIONAL CONTROLSPOWER ON / OFF (Emergency Stop)Rotate Clockwise to Power On – control unit will emit a single beep and screen will displaythe selected PTO speed, software version and the <strong>McConnel</strong> name. Press to Power Off.ROTOR START – Uphill CuttingThis button starts the rotor for ‘uphill’ cutting – whenthe button is pressed the control unit will emit asingle beep, the LED light will illuminate and thescreen will momentarily display ‘FLAIL START ’.ROTOR START – Downhill CuttingThis button starts the rotor for ‘downhill’ cutting –when the button is pressed the control unit will emit asingle beep, the LED light will illuminate and thescreen will momentarily display ‘FLAIL START ’.ROTOR STOPThis button stops the rotor – when the button ispressed the control unit will emit a single beep andthe screen will momentarily display ‘FLAIL STOP ’– the LED lights above both rotor start buttons will beilluminated for approximately 10 seconds, during thisperiod the rotor start buttons will be disabled to allowsufficient time for the rotor to power down. When theLED lights go out the rotor direction can be changedor the rotor allowed to stop.WARNING: The LED lights going out do notindicate that the rotor has stopped rotating, itsignifies only that the oil flow to the rotor has ceased sufficient for the direction of rotationto be changed - therefore when stopping a rotor it must be noted that it will continue tofreewheel for a considerable length of time after the stop button has been activated, insome case this can be up to 40 seconds.43
HEAD ANGLE FLOATThere are 2 methods available for selection and de-selection of this function; activation viathe control unit - refer to #1 below, or activation via the joystick controls - refer to #2 below.1. Pressing the Head Angle Float button – when activated the control unit will emit asingle beep, the LED light will illuminate and the screen will momentarily display‘ANGLE FLOAT ’ pressing the button again will deselect the function – the controlunit will emit a single beep, the LED light will go out and the screen will momentarilydisplay ‘ANGLE FLOAT X’.2. Press and hold in the lower frontal button(B1) on the joystick control and roll the lefthand thumbwheel (T1) forwards – thecontrol unit will emit a single beep, theLED light will illuminate and the screen willmomentarily display ‘ANGLE FLOAT ’.To deselect press and hold in the lowerfrontal button (B1) on the joystick controland roll the left hand thumbwheel (T1)backwards – the control unit will emit asingle beep, the LED light will go out andthe screen will momentarily display‘ANGLE FLOAT X’.NOTE: When selecting or deselecting thefunction, the thumbwheel (T1) should beallowed to return to its centre position beforereleasing the lower frontal button (B1).NOTE: By default operation of thumbwheels T1 and T2 in conjunction with button B1 activatesHead Angle Float and EDS/Lift Float respectively. These controls can, if required, be swappedover so that the thumbwheels operate the opposing functions – this procedure is performed byaccessing the settings menu on the control unit via the screen and menu buttons.44
EDS FUNCTION (EDS Models) / LIFT FLOAT (Non EDS Models)There are 2 methods available for selection and de-selection of this function; activation viathe control unit - refer to #1 below, or activation via the joystick controls - refer to #2 below.1. Pressing the EDS / Lift Float button will activate the relevant function – when activatedthe control unit will emit a single beep, the LED light will illuminate and the screen willmomentarily display ‘LIFT FLOAT’. Pressing the button again will deselect thefunction – the control unit will emit a single beep, the LED light will go out and thescreen will momentarily display ‘LIFT FLOAT X’.Press and hold in the lower frontalbutton (B1) on the joystick controland roll the right hand thumbwheel(T2) forwards – the control unit willemit a single beep, the LED light willilluminate and the screen willmomentarily display ‘LIFT FLOAT’. To deselect press and hold inthe lower frontal button (B1) on thejoystick control and roll the righthand thumbwheel (T2) backwards –the control unit will emit a singlebeep, the LED light will go out andthe screen will momentarily display‘LIFT FLOAT X’.NOTE: When selecting or deselectingthe function, the thumbwheel (T2)should be allowed to return to its centreposition before releasing the lowerfrontal button (B1).All models with v4.08 software onwards: With the function engaged subsequentoperation of button B1 on the joystick or the [] button on the control unit will alternatelydisable and enable all active floats.EDS models with pre v4.08 software: With the function engaged and the rotor runningEDS settings (SOFT – MED – HARD) will automatically be displayed on the control unitscreen and can be scrolled through using button B1 on the joystick or the tick [] button onthe control unit, if the rotor is not running the EDS settings can manually be viewed on thescreen by pressing either [◄] [►] buttons on the control unit and scrolling to the EDS workscreen.45
AUXILIARY FUNCTION CONTROLThere are 3 possible types of auxiliary service control as described in A, B & C below – theparticular type used will be dependant on the build specification of the machine. Controloperation of the function for all types remains the same (see below).A) Diverter Valve System Utilising an Existing Service (Physical Diverter Valve)The control selects either of the two diverter valves for the operation of additionalequipment that may be fitted to the machine such as: Directional Ram, Orbiter Head Kit,Hydraulic Roller etc.B) 6/7 Service Manifold Systems (Electronic Diverter Valve)Only available on stackable manifold systems either as a factory fitted option or as anaftermarket kit, in the case of the latter ‘D1 and/or D2 PROP’ will need to be changed from‘N’ to ‘Y’ within ‘options’ of the setup menu on initial installation of the kit.C) Integrated Debris BlowerOperated by D1 on machines with standard arm or D2 on machines with Tele, Midcut orVFR arms.There are 2 methods of control available for selection and de-selection of the functions;activation via the control unit - refer to #1 below, or activation via the joystick controls -refer to #2 below.1. Pressing the button momentarily will select Diverter Valve #1 – when activated thecontrol unit will emit a single beep, the LED light will illuminate and the screen willmomentarily display ‘DIVERTER VALVE 1 ’. Pressing the button again momentarilywill deactivate diverter #1, the screen will display ‘DIVERTER VALVE 1 X’Holding the button in for 2 seconds will select Diverter Valve #2 – when selected itremains active until it is subsequently deselected by holding the button in again for 2seconds.2. Pressing the upper frontal button (B2) onthe joystick momentarily will select DiverterValve #1 – when activated the control unitwill emit a single beep, the LED light willilluminate and the screen will momentarilydisplay ‘DIVERTER VALVE 1 ’. Pressingthe button again momentarily willdeactivate diverter #1, the screen willdisplay ‘DIVERTER VALVE 1 X’Holding button (B2) in for 2 seconds willselect Diverter Valve #2 – when selected itremains active until it is subsequentlydeselected by holding the button in againfor 2 seconds.46
SLEW – TELE / MIDCUT / VFR SWAPIMPORTANT NOTE RELATING TO THE OPERATION OF PA180 MACHINES ONLY:Where these controls are fitted to PA180 models it must be noted that the default functionof the right hand thumbwheel is Forward Extension operation and NOT Slew operation asstated below – therefore for PA180 Models only please read all text references to Slewoperation on this page as Forward Extension operation.This function swaps over the controls used to operate Slew and Tele/Midcut/VFR. Bydefault, Slew operation is performed with the right hand thumbwheel (T2) andTele/Midcut/VFR operation with the [◄] [►] buttons on the control unit - in the swappedmode these will be the opposite way around and the LED on the control unit will be lit toindicate that the swapped mode is selected.Swapping these controls is performed via the control unit - refer to #1 below. On machinesinstalled with pre v4.08 software the same function could also be performed via thejoystick controls – for these models only refer also to #2 below.1. Press the swap button once to select swap mode – when activated the control unit willemit a single beep, the LED light will illuminate and the screen will momentarily display‘SLEW/TELE SWAP ’. Pressing the button again will deselect the function – thecontrol unit will emit a single beep, the LED light will go out and the screen willmomentarily display ‘SLEW/TELE SWAP X’.Models with pre v4.08 software only2. Press the joysticks lower frontal button (B1)once to select swap mode – when activatedthe control unit will emit a single beep, theLED light will illuminate and the screen willmomentarily display ‘SLEW/TELE SWAP’.De-selection is with subsequent use of thesame button - the control unit will emit asingle beep, the LED light will go out andthe screen will momentarily display‘SLEW/TELE SWAP X’.47
AUTO RESETThis button is for the selection and de-selection of the Auto Reset function – pressing thebutton once will activate Auto Reset, the control unit will emit a single beep, the LED lightwill illuminate and the screen will momentarily display ‘AUTO RESET ’. Pressing thebutton again will deselect the function – the control unit will emit a single beep, the LEDlight will go out and the screen will momentarily display ‘AUTO RESET X’.48
V4 JOYSTICK CONTROLS - Buttons & Thumbwheels OperationNOTE: By default operation of thumbwheels T1 and T2in conjunction with button B1 activates Head AngleFloat and EDS/Lift Float respectively. These controlscan, if required, be swapped over so that thethumbwheels operate the opposing functions – thisprocedure is performed by accessing the settingsmenu on the control unit via the screen and menubuttons.LH/RH Swap Shortcut; Press and hold & X on Control Unit for 3 seconds (unit will ‘bleep’ to confirm).FLOAT SELECTION & DE-SELECTIONOperate thumbwheels to their furthest points (+ or -) to select or deselect float functions.ANGLE & SLEW OPERATIONRotate thumbwheels in required direction.DIVERTER VALVE SELECTIONDiverter selection is via button B249
ARMHEAD OPERATION – JOYSTICK CONTROLS50
TELE / MIDCUT / VFR OPERATION – JOYSTICK CONTROLS (Diverted Mode)51
V4 CONTROL UNIT – Screen Access & Menu ButtonsPower on/off switch (E/Stop)Speaker (audible confirmation)Control unit emits an audible confirmation ‘beep’ when the buttons are pressed.Command Button []Command Button [X]Navigate Forward Button [>] Navigate Back Button [
V4 CONTROL UNIT – LED Screen Display & FunctionsIMPORTANT: Under no circumstances should a V4 Control Unit be connected to a V3 ACB (AuxiliaryControl Box). Dedicated V3.5 & V4 Upgrade Kits are available from <strong>McConnel</strong> Limited – contact yourlocal dealer or <strong>McConnel</strong> direct for available options and specific advice on this subject.Rotate the ON/OFF switch on the control unit clockwise to power up controls - unit will emita single beep and the LED screen will light up. Note: 12 Volts at the battery is required forthe unit to function correctly.1. Screen will initially display the ‘<strong>McConnel</strong>’ name alongwith the selected PTO speed and the software versionsinstalled on the Armrest and the Control Boxrespectively.2. Pressing the scroll forward [►] button once will displaythe rotor running times screen. ‘TOT’ displays theoverall total running time of the rotor which is acumulative total and cannot be reset. ‘JOB’ is a ‘trip’total for the current rotor running time and can be resetto zero by pressing and holding the [X] button for 3seconds.3. Pressing either of the ‘Rotor On’ buttons will activatethe ‘egg timer’ icon and display the rotor on image.4. Pressing the EDS Lift float button will turn on the EDS(EDS Lift Float machines only). Then SOFT, MED orHARD will be added to the running screen.5. Pressing the tick [] button when EDS is turned on willscroll through the EDS work settings of SOFT, MED orHARD. This may also be operated via button B1 on thejoystick.6. Pressing scroll forward [►] button will now display theactual Tractor PTO running speed.7. Scrolling forward [►] again displays the Power Monitorscreen.Scrolling backwards [◄] will display the screens in theopposite order.53
POWER MONITORWhen displayed the power screen will indicate to the operator the level of power beingdemanded by the cutting head – an ascending graphic indicates the power demand statusfrom minimum on the left of the screen to maximum on the right.Power Status – Low DemandPower Status – High DemandWhen the power demand approaches the maximum limit an audible warning will alert theoperator to indicate that the rotor is under excess load and at risk of ‘stalling’ – when thisaudible warning sounds the operator should reduce the forward tractor speed to protectthe machine and regain efficient cutting power – the audible warning will cease when thepower demand returns to an acceptable level.In certain cases, cutting materials of extreme density may cause an increase in the powerusage to the ‘warning level’ – in these types of conditions raising the cutting head into aless dense area of the material will regain an acceptable power demand. It is advisablethat work in problematic high density materials be performed in several passes, loweringthe cutting head slightly on each pass until the required cut height is achieved.ADDITIONAL CONTROL & SCREEN SETTINGSAdditional settings available to the operator can be found within the settings menu of thecontrol unit and accessible via the screen and menu buttons on the control panel.Access is gained by simultaneously pressing the scroll [◄] [►] buttons on the controlpanel until the unit emits a ‘beep’ and the setup screen appears on the LCD - the featurescan then be ‘scrolled’ to (forwards or backwards) by subsequent operation of either of thescroll [◄] [►]buttons. When the required screen is reached the tick [] button should bepressed to enter the settings menu for that feature.THUMB (Thumbwheel Switching) – this allows the operator to ‘swap over’ the left andright thumbwheel functions so that they control the opposing features. In most cases thissetting will be dictated by the operators’ personal preference and once chosen theoperator will keep it in the selected mode.Options are ‘Normal’ or ‘Swap’ – selection is by ‘highlighting’ the required option usingeither of the scroll [◄] [►] buttons – the feature is then activated using the tick [] button.Pressing the [X] button exits the screen settings and returns to the normal work screen.LED (Screen Contrast) - this setting allows the operator to adjust the contrast level of theLED display – the feature affords the option to increase or decrease the contrast level tosuit differing lighting conditions; this is particularly useful on dull or sunny days wherereduced or increased natural light can affect screen clarity.Options are ‘Increase Contrast’ or ‘Decrease Contrast’ – selection is by ‘highlighting’ therequired option using either of the scroll [◄] [►] buttons – once selected that particularoption can then be adjusted in incremental steps by pressing the tick [] button therequired number of times to achieve the desired contrast. Pressing the [X] button exits thescreen settings and returns to the normal work screen.CAUTION: Avoid adjusting the contrast level to a state where the screen cannot be viewed as exitingthe settings menu in this condition may render the LCD unusable as the ‘on screen’ prompts may nolonger be visible to the user.NOTE: Some screen menus are inaccessible to the operator – these are for factory or dealer use onlyand are password protected to avoid inadvertent changes to specific control settings.54
TEST & FAULT FINDING SCREENSThe following screens are available for testing and fault finding purposes, these are:JOYSTICK TEST SCREENThis screen reports the status of the CAN (ControllerArea Network) signal from the joystick during its variousfunctions.X and Y DisplayThese report the joystick signal as it travels through its range of movements in its 2 axis –the ‘X’ axis being the ‘Lift’ up and down function and the ‘Y’ axis the ‘Reach’ in and outfunction.With the joystick in the central (neutral) position both ‘X’ and ‘Y’ on the screen should read0 (zero). When the joystick is moved through a specific axis the relevant readout willincrease or decrease depending on the direction and distance of movement up to amaximum of +1000 in the fully forward or fully right position and -1000 in the fully back orfully left position. If the display reports a reading above the + or – 1000 figure at any pointof full travel the joystick has developed a fault and should be repaired or replaced.R1 and R2 DisplayThese report the signals from the 2 thumbwheels on the top of the joystick and arecalibrated to read +1000 in the fully back position and -1000 in the fully forward position. Ifeither of the ‘R’ readings are above the + or – 1000 figure at the point of full travel thethumbwheel has developed a fault and should be repaired or replaced.B1 and B2 DisplayThese report the status of the 2 joystick buttons and will display ‘ON’ when the button isactivated or ‘OFF’ when deactivated. The readings below B1 and B2 on the screen recordusage of the buttons.EDS STATUS SCREENAlthough this screen is present on all v4 controls, with theexception of the voltage reading, the information it reportsis only actually relevant to machines fitted with EDS.In addition to the aforementioned voltage reading thescreen will report Lift Ram Pressure and Reach Positionstatus – in each case these will display ‘OK’ when thesystem is working correctly. If ‘FAULT’ is displayed next toone or other feature it means a problem has beendetected with that component and it should beinvestigated further to locate and correct the problem.NOTE: As the pressure and position features are not present on Non EDS machines by default thescreen will display ‘FAULT’ next to the features on these models – this is normal and should beignored. The voltage reading will be relevant on all models.REACH FUNCTION SCREENThis screen displays the status of the joystick reach function and indicates to the operatorif the controls are set for correct operation of the machine to the left hand side of thetractor or to the right hand side of the tractor. The hand symbol with a displayed on itindicates the operating side that is currently active.L/H Machine Operation55R/H Machine Operation
ROTOR CONTROL - SI machines onlyROTOR ON / OFF is controlled by operation of the tractor PTO lever.To start rotor:-Bring tractor engine revs up to 1000 RPMEngage PTOTo stop rotor:-Disengage PTO Do not leave tractors seat until the rotor is stationary.REVERSING ROTATION - SI models onlyFully extend the armhead and lower flail to the ground to minimise oil loss. Release the hoses from the rotor relief valve and interchange. (Do not interchange theflail supply and return hoses at any other point as the hose routing and cros s overs inthe installation are necessary to allow the hoses to flex correctly during ar mmovements).To ascertain the direction of cut without running the machine the following applies.Connection P- (lower motor rigid pipe)Connection MR - (Upper motor right pipe)upward cuttingConnection P- (Upper motor rigid pipe)Connection MR - (Lower motor rigid pipe)downward cutting56
SLEW & LIFT LOCKSSlew LockAll machines with slewing capability are fitted with a slew lock –depending on the particular machine this will either be in theform of a lock tap fitted to the slew ram or a slew locking pin thatlocates through the pillar into the top of the mainframe. The slewfunction must be ‘locked’ at all times during transportation andstorage of the machine and only unlocked for work. Theillustrations opposite and below show the different types of slewlocks:TAP TYPE SLEW LOCK ►Open – only for workingClosed – always for transport & storagePIN TYPE SLEW LOCK (NOTE: PA600 model shown for illustration purposes only)Slew Locked – always for transport & storageSlew Unlocked – only for workingLift Ram LockCertain machines, predominantly largermodels, will be fitted with either one or twolift ram lock taps – on machines where theseare fitted the tap(s) should always be closedduring transportation and storage of themachine to prevent movement of the armsduring transport or when the machine isparked up. The tap lock(s) will be similar tothe one illustrated opposite.CAUTION!▲LIFT RAM LOCK TAPOpen – only for workingClosed – always for transport & storageWhere fitted Slew and Lift Locks must be in the closed / locked position at alltimes during machine transportation and storage – open / unlock only for work.57
BREAKAWAYThe machine is fitted with a hydraulic breakaway device which protects the structure of themachine should an unforeseen obstacle be encountered.NOTE:The breakaway function does not relieve the operator of his responsibility to drivecarefully, be alert and AVOID OBVIOUS HAZARDS BEFORE CONTACT OCCURS.Breakaway may occur momentarily during normal work should an extra thick or densepatch of vegetation be encountered. In these instances tractor forward motion may bemaintained with care.Where breakaway has occurred as a result of contacting a post or tree etc. the tractormust be halted and the controls of the machine utilised to manoeuvre the head away fromthe obstacle. NEVER CONTINUE FORWARD MOTION TO DRAG THE HEAD AROUNDTHE OBSTACLE IN BREAKBACK POSITION.NOTE:The force required to activate the breakaway system will vary dependent upon thegradient of work. It will require less force when working uphill and vice versa.On mid-cut machines the geometry of the breakaway will cause the head to initially moveoutwards in addition to rearwards. Therefore be aware that the breakaway action will beimpeded if the outer end of the head is working against a steep bank. In this circumstanceextra care must be taken during operation to avoid this occurrence.Breakaway occurs at the slew column pivot. When an obstacle is encountered continuedforward motion causes the pressure in the slew ram base to rise until the relief valvesetting is exceeded.With 'AUTO RESET' selected:When the slew relief valve setting is exceededoil is displaced from the slew ram into the baseof the lift ram which causes the head to rise asthe arm pivots backwards to clear theobstruction.Resetting of the head into the work positionoccurs automatically.With 'SLEW' selected:When the slew relief valve setting is exceededoil is displaced from the slew ram allowing thearm to pivot backwards horizontally and theobstacle to be cleared.Re-setting the head into the work position iscarried out manually by selecting 'SLEW OUT'on the control assembly58
AUTO-RESET – Pressure Setting for Front Mounted MachinesThe procedure for automatically setting pressures for Auto-reset on Front Mounted modelsis as follows:Maneuver flailhead to a horizontal positionwhere it is close to the tractor and restingon the ground.Open Valve Tap to allow oil in.see diagram opposite for Tap location.Valve Tap location Operate machine to raise the flailheaduntil it is clear of the ground and thenreturn it back to the ground. Close Valve Tap.The pressures will now be automatically set.NOTE: A test point is located on the Breakaway Ram to allow pressure to be checked or to‘bleed’ air from the system should it be required.POWERED SLEWThe slew feature allows a 95° arc of powered arm movement on the working side, fromright angles to the tractor, to 5° beyond the direct line astern.This feature is required to place the machine in the transport position but can also be usedto sweep the arm ‘to and fro’ whilst cutting awkward areas and corners thus avoiding theneed to constantly re-position the tractor. To operate in this way 'slew' must be selected onthe control assembly.If breakaway occurs the slew motion must be reversed to allow the slew breakawayrelief valve to re seat and the ram to become operable again.CAUTION:Extra care must be taken when working in 'SLEW’ mode with the reach fully inIT IS POSSIBLE FOR THE FLAIL HEAD TO HIT THE TRACTOR OR MACHINE FRAME.59
WIRE TRAPThe flail head is equipped with a wirecutting edge welded into the underside.This is to ensure that the ends of any wirethat may be entwined in the rotor are cutand fall within the confines of theflail head.This plate should not be interferedwith in any way.Any wire caught in the rotor must beimmediately removed (see below).REMOVING WIRESelect rotor 'OFF' and wait until it has stopped rotating.STOP the tractor and only then remove wire.Do not reverse the rotor in an attempt to unwind any wire.60
MOVING INTO TRANSPORT POSITIONSelect ‘Rotor Off’ and wait for the rotor to stopturning completely.Ensure that both ‘lift’ and ‘angle float’ functionsare switched off.Select ‘slew’ mode on the controls.Operate ‘slew in’ function to bring the arms intoposition directly behind the tractor.Operate ‘lift’ and ‘reach’ to position the asshown in the diagram opposite.Place transport prop into the transport positionWork PositionTransport PositionOperate ‘reach in’ until the dipper arm contacts thetransport prop.Select ‘lift up’ and raise the arms until the tension link is300mm (12”) from the tractor cab.Operate ‘angle’ to move the flailhead into a position whereit is as compact as possible.Close lift ram tap(s) (where applicable).Close slew ram tap or fit slew lock pin (as applicable).Disengage the PTO shaftEnsure power to the control unit is switched off.See following page for additional information regarding transport positions.61
TRANSPORT POSITION FOR REAR MOUNTED MACHINESThe machine is transported inline to the rear of the tractor with a minimum of 300mm (12”)clearance between the tension link and the rear cross member of the tractor cab.Transport Position with Flailhead AttachedTransport Position with Flailhead RemovedFor transportation without a flailhead attached, the machines arms must be fully folded andthe lift ram fully retracted so the mass of the arms is behind the centre line – If the lift ramwas extended the weight of the arms would be in front of the centre line which would resultin the balance of the machine going ‘over centre ’ causing the tension link to crash into therear cross member of the tractor’s cab.WARNING: During transport the 'SLEW’ mode must ALWAYS be selected on the controls.62
TRANSPORTING THE MACHINETransport HeightThere is no fixed dimension for the transportheight as this will vary for differing applicationsi.e. tractor size, carrying height, and degree ofarm fold the particular tractor cab will permit.For the majority of installations the transportheight for the <strong>PA53</strong> model will fall within theregion of approximately 3.45m to 3.75m.It is advisable that once your machine has beeninstalled on the tractor that it is folded into thetransport position and your own measurementtaken to ensure you have an accurate figure forthe transport height.CAUTION: Always be aware of the transport height ofyour machine and proceed with care whenmanoeuvring near building, bridges and all otheroverhead obstructions.3.45mto3.75mApproximate transport height for <strong>PA53</strong>Transport SpeedThe acceptable speed of transport will vary greatly depending upon the ground conditions.In any conditions avoid driving at a speed which causes exaggerated bouncing as this willput unnecessary strain on the tractors top hitch position and increase the likelihood of thetension link coming into contact with the cab rear cross member.WARNING: During transportation of the machine the PTO must be disengaged and power to thecontrols switched off.MOVING FROM TRANSPORT TO WORKReverting to the work position is basically a reversal of the previous work to transportprocedure.NOTE: Always remember to release the slew and lift locking devices before attempting to move themachine from the transport position.Engaging DriveEnsure the rotor control lever/switch is in the ‘stop’ position before engaging the PTOshaft. Allow the oil to circulate for a minute or so before operating the armhead levers.Position the flailhead in a safe position, increase the engine speed to a high idle and movethe rotor control lever/switch to ‘start’ – after initial ‘surging’ the rotor will run at an evenspeed.63
ROTOR OPERATING SPEEDTRACTOR FORWARD SPEEDThe material being cut determines tractorforward speed. Forward speed can be asfast as that which allows the flail headsufficient time to cut the vegetation properly.Too fast a speed will be indicated by overfrequent operation of the breakaway system,a fall off in tractor engine revs and a poorfinish to the work leaving ragged uncut tuftsand poorly mulched cuttings.64
HAZARDS & DANGERSAdverse SlopesWhen working with the flailhead high and reachfully in it is possible for the main arm balance togo over centre and take the weight off the liftram. A restrictor in the gland circuit of the lift ramwill prevent sudden unpredictable movements ifthis should occur - for reasons of safety thisrestrictor should not be removed.Never work the machine onadverse slopes with thearms positioned such thatthe tractor is unbalancedDANGER!NEVER REMOVE THE RESTRICTORFROM THE LIFT RAM GLAND CIRCUIT.The machine is fitted with a cam valve which stops unpredictablemovements when working with the machine in a high position.DANGER!NEVER CUT TO THE BLIND SIDE OF A HEDGE- it is impossible to see any potential hazards ordangers and the position of the flail head would allowdebris to be propelled through the hedge towards thetractor and operator.DANGER!NEVER OPERATE THE MACHINE WITHTHE FLAIL HEAD ROLLER REMOVEDDANGER!WHEN GRASS MOWING THE ROTOR MUST ALWAYSCUT IN THE UPHILL DIRECTION WITH FRONT HOODFITTED AND THE ROLLER POSITIONED BELOW THECUTTING HEIGHT OF THE FLAILS65
OVERHEAD POWER LINES (OHPLs)It cannot be stressed enough the dangers involved when working in the vicinity ofOverhead Power Lines (OHPLs). Some of our machines are capable of reach in excess of8 metres (26’); they have the potential to well exceed, by possibly 3 metres (9’ 9”), thelowest legal minimum height of 5.2 metres from the ground for 11,000 and 33,000 voltpower lines.Remember electrocution can occur without actually coming into contact with a power lineas electricity can ‘flashover’ when machinery gets close to it.WARNING: All operators must read the following information and be awareof the risks and dangers involved when working in the vicinity ofOverhead Power Lines (OHPLs).Wherever possible the safest option is always to avoid working in areas close to OHPLs.Where unavoidable, all operators must perform a risk assessment and implement a safeprocedure and system of work – see following page for details.All operators should perform a risk assessment before operating the machine within 10mhorizontal distance of any OHPLs.Minimum Heights for Overhead Power LinesAbsolute Minimum Exclusion Zones for Specific Overhead Power Lines66
Definitions of Exclusion ZonesRisk AssessmentBefore starting to work near OHPLs you should always assess the risks. The followingpoints should be observed;●●●●●●●●Know the risks of contacting OHPLs and the risk of flashover.Find out the maximum height and maximum vertical reach of your machine.Find out the location and route of all Power Lines within the work area.Find out the operating voltage of all Power Lines within the work area.Contact the local Distribution Network <strong>Operator</strong> (DNO) who will be able to advise youon the operating voltage, safe minimum clearance distance for working, and additionalprecautions required.Never attempt to operate the machine in exclusion zones.Always work with extreme caution and plan your work ahead to avoid high risk areas.If doubt exists do not work in the area – never risk the safety of yourself or others.Emergency Action for Accidents Involving Electricity Never touch an overhead line - even if it has been brought down by machinery, or hasfallen. Never assume lines are dead. When a machine is in contact with an overhead line, electrocution is possible if anyonetouches both the machine and the ground. Stay in the machine and lower any raisedparts in contact or drive the machine out of the lines if you can. If you need to get out to summon help or because of fire, jump out as far as you canwithout touching any wires or the machine - keep upright and away. Get the electricity company to disconnect the supply. Even if the line appears dead, donot touch it - automatic switching may reconnect the power.Further information and leaflets on this and other agricultural safety subjects are available on the‘Health & Safety Executive’ website at the following address: www.hse.gov.uk/pubns/agindex.htm67
HEDGECUTTING PROCEDURECut the side and bottom of the field side first.This leaves the maximum thickness of hedgeon the road side to prevent the possibility ofany debris being thrown through the hedge intothe path of oncoming vehicles.Cut the side and bottom of the road side.Top cut the hedge to the height required.68
LIFT FLOAT (Optional Extra for Ground Work)Work without lift float requires far more concentration and input from the operator toquickly react and re-adjust to the ground contours often resulting in patches of higher cutmaterial where the head is cutting too high and ‘scalping’ of the ground where it is cuttingtoo low – in the case of the latter this can lead to increased flail wear, damage or even lossof flails.The Lift float feature is an optional extra for use during mowing work. When the function isactivated the pressurised accumulator(s) work in conjunction with the valve and lift ram totake a proportion of the flailheads weight off the flail roller allowing the head toautomatically follow the natural contours of the ground; this produces a cleaner moreuniform cut without the need for constant operator re-adjustment. On EDS models thefunction has 3 user settings for differing working conditions – these are soft, medium andhard. Refer to the relevant control section for details of selecting the required setting.Operation of the lift float function is as follows: with lift float switched off, position theflailhead approximately 1m clear of the ground before switching the float function on tocharge the accumulator(s) – the arms may drop at this poi nt depending on the currentlevel of retained pressure. Lower the flailhead into the work position, release the lift controland proceed to work. NOTE: with the exception of EDS mode ls, occasional operation ofthe lift function will be required when wor king on downhill or u phill slopes and whenreaching in or out in order to replenish the oil lev el within the accum ulator(s) to reta inoptimum float capability.Without Lift FloatWith Lift Float- Will require constant operator input. - Automatically follows ground contours.Lift float operation when supplied as a factory fitted option is controlled from the controlsunit that accompanied the machine (refer to controls section for details), but the feature isalso available for a range of models as an after market kit, in which case operation willeither be via an auxiliary switch on cable controlled machines, or by utilisation of theauxiliary three-position type switch on the control unit of electric controlled machines - thiswill allow for selection of ‘lift float alone’ or ‘lift and angle float in unison’ if both features arefitted. Operation of the lift float control for these models will then be as specified in themain controls section.Power Connection on Cable MachinesOn cable controlled machines the switch supplied will need to be mounted in a convenientlocation in the cab. The supply cable from the poppet valve solenoid must be connectedinto the tractors ignition system - the brown lead is positive and the blue lead is negative.Power Connection on Electric MachinesOn electric controlled machines power to the unit is via the following connections:Machines with 14 core looms use connection 10 and common connection 11.Machines with 19 core looms use connection 15 and common connection 16.V3 and V4 Non-EDS proportional machines use connections LF and C.Depending on the particular machine after market lift float kits will either be frame mountedor ram mounted – they should be fitted and positioned in a location where they do not foulor interfere with other components during normal movements of the machine.69
ANGLE FLOAT KIT (Standard Feature)Machines are fitted with Angle Float as standard – when activated the feature connects thebase and gland circuits of the angle ram to allow free movement of oil in both directionsthus allowing the head to automatically angle itself to match the contours of the ground.Refer to specific controls section for details of operation.NOTE: On machines with V4 proportional controls any operation of the angle floatthumbwheel will override and de-activate the automatic angle float function, on release ofthe thumbwheel it will revert back to automatic angle float.Angle Float Off – Requires operator input to adjust flail head angle.Angle Float On – Flail head automatically angles itself to match the ground contours.70
CAM VALVE ADJUSTMENT1.0mm setting distancewith cam fully depressedAdjustment is made by slackeningholding bolts and moving in the slots71
GENERAL MAINTENANCEGeneral LubricationThe example illustration below indicates the general locations of lubrication points - allpoints should be greased on a daily basis and prior storage of the machine. New machinesmust be greased prior to first use.IMPORTANT: Grease newmachines before first use.Grease Points – General LocationsGearbox LubricationCheck gearbox oil level on new machines prior to first use, top up if required before usingthe machine. Refill the gearbox after an initial 50 hours of use and thereafter at annual or500 hour intervals, whichever occurs earliest.Gearbox Capacity:0.7 Litre SAE75W90 Fully Synthetic which meets the following minimum requirements;Viscosity at 40°C, cSt, 100.0 min.Viscosity at 100°C, cSt, 17.2 min.Drainage of the gearbox forchanges of oil is via the drainplug located on the base ofthe gearbox.For refilling or for ‘topping up’the oil remove both plugsindicated opposite and fillgearbox via the filler plug to apoint where the oil starts torun from the level plug orifice– replace plugs and tightensecurely.72
SERVICE SCHEDULEEvery DayGrease machine fully prior to work (and prior to storage).NOTE: New machines must be greased before initial use. Check for broken or damaged flails. Check tightness of flail nuts and bolts. Visually check for oil leaks and damaged hoses. Check all guards and safety shields are correctly fitted and undamaged. Ensure all lights are working and clean. Check oil level. Clean the cooler matrix, in dusty conditions more frequent cleaning is required.After initial 12 Hours Change return line filter element. Failure to do so will invalidate the warranty.Note; factory fitted filter elements are identified differently to replacement elements.After initial 50 Hours Change gearbox oil.Every 25 Hours Grease PTO Shaft universal joints and tubes.Every Week Check tightness of all nuts and bolts. Check gearbox oil level. Check for wear on telescopic arm pads – where applicable.Every 100 Hours Grease PTO shaft shield lubrication points.Every 500 Hours Change return line filter element. Change gearbox oil. Check condition of hydraulic oil and change if required; when changing oil newreturn line filter and suction strainer elem ents should be fitted and return line filterchanged again after 12 hours of work.Annually Change tank breather.PTO Shaft Lubrication73
HYDRAULIC SYSTEMOil SupplyCheck the oil level in the reservoir daily.Oil Condition & ReplacementNo fixed time period can be quoted for oil changes as operating conditions can vary widelybut a visually inspection of the oil will often indicate its current overall state. Signs of areduction in its condition will be apparent by changes in colour and appearance whencompared to new oil. Oil in poor condition can be dark, smell rancid or burnt, or in somecases be yellow, unclear or milky in appearance indicating the presence of air oremulsified water. Moisture resulting from condensation can become entrapped in the oilcausing emulsification that can block the return line filter, consequentially the filter systemwill be by-passed and the oil and any possible contaminants present will continue tocirculate without filtration risking damage to hydraulic components. All are indications orconditions that will require replacement of the oil.Hydraulic oil is a vital component of the machine; contaminated oil is the root cause of70% of all hydraulic system failures. Contamination can be reduced by the following:Cleaning around the reservoir cap before removal, and keeping the tank area clean.Use of clean containers when replenishing the system.Regular servicing of the filtration system.Filtration SystemMachines are protected by both replaceable 125 micron suction strainers and low pressure25 micron full flow return line filters – the diagram below is a ‘scaled up’ view illustratingthe filtering capability built into the hydraulic system of the machine:Filtering CapabilitySuction strainersThe replaceable 125 micron suction strainers (Part No. 8401097) are fitted within thehydraulic tank and are ‘screw’ fitted with easy access for removal and replacement.Return Line FilterThe 25 micron absolute filter elements (Part No. 8401089) should be changed after thefirst 12 hours and thereafter at 500-hour intervals. It is important to note hours worked asif the filter becomes blocked an internal by-pass within the canister will operate and nosymptoms of filter malfunction will occur to jog your memory.Tank BreatherTo reduce the risk of pump cavitation it is advisable to replace the 25 micron absolute tankbreather (Part No. 8401050) on an annual basis under normal working conditions – formachines operating in dry dusty environments it is recommended that replacement beincreased to 6 monthly.74
HYDRAULIC HOSESThe condition of all hoses should be carefully checked during routine service of themachine. Hoses that have been chaffed or damaged on their outer casing should besecurely wrapped with waterproof adhesive tape to stop the metal braid from rusting.Hoses that have suffered damage to the metal braid should be changed at the earliestopportunity.Hose ReplacementBefore changing any hoses take the time to study the existing installation as the routinghas been carefully calculated to prevent hose damage during operation - always replacehoses in exactly the same location and manner. This is especially important for the flailhoses where they must be crossed, upper to lower, at the dipper and head pivots.Always replace one hose at a time to avoid the risk of wrong connections.When the hose is screwed to an additional fitting or union, use a second spanner onthe union to avoid breaking both seals.Do not use jointing compound on the threads.Avoid twisting the hose. Adjust the hose line to ensure freedom from rubbing ortrapping before tightening hose end connections.All Hydraulic Hoses (BSP) now fitted to <strong>McConnel</strong> Power Arm Hedge/Grass Cutters have‘soft seal’ connections on both flail and ram circuit hoses.Recommended torque settings for nut security are as follows:SIZE TORQUE SETTING O Ring Ref.1/4” BSP = 24 Nm or 18 lb.ft. 10 000 013/8” BSP = 33 Nm or 24 lb.ft. 10 000 021/2” BSP = 44 Nm or 35 lb.ft. 10 000 035/8“ BSP = 58 Nm or 43 lb.ft. 10 000 043/4“ BSP = 84 Nm or 62 lb.ft. 10 000 051” BSP = 115 Nm or 85 lb.ft. 10 000 06For hose unions (BSP) fitted in conjunction with bonded seals the recommended torquesettings are as follows:SIZETORQUE SETTING1/4” BSP = 34 Nm or 25 lb.ft.3/8” BSP = 75 Nm or 55 lb.ft.1/2” BSP = 102 Nm or 75 lb.ft.5/8“ BSP = 122 Nm or 90 lb.ft.3/4“ BSP = 183 Nm or 135 lb.ft.1” BSP = 203 Nm or 150 lb.ft.Safety Note:Soft seal hose connections are capable of holding pressure when the nut is only ‘fingertight’. It is therefore recommended during dismantling that the hose be manually flexed torelieve any residual pressure with the retaining nut slackened prior to completedisassembly.75
CONTROL CABLESThe control cables operate on a push/pull system with the spool centring springs alwaysreturning the spool to the neutral position when the handle is released.Care should be taken during installation and operation to ensure that the cables are nottrapped or kinked. Any abrasion or damage to the outer casing should be sealed withplastic insulation tape to avoid moisture penetrating.No routine adjustments of the cables are necessary, as they do not stretch. The threadedcollar is correctly adjusted when the lever is in a vertical position in its housing allowing anequal amount of travel in either direction.CAUTIONOn no account should any attempt be made to lubricate the cables – these are assembled with aspecial ‘lifelong’ lubricant during manufacture and will not require any additional lubrication.Note: Take care to ascertain the correct cable connections on both the control unit and thevalve in the event of cable replacement.76
PTO SHAFT MAINTENANCEPTO Shaft LubricationThe PTO shaft should be lubricated on a regular basis using lithium based grease – eachend of the shaft has 2 greasing points; one for lubrication of the universal joint and one forlubricating the rotating fixing ring of the shaft shield – access to the lubrication points isgained by releasing the shaft shield from its fixing ring and sliding it back along the body ofthe driveshaft – the procedure and lubrication frequency is illustrated below.Shaft shield fixing claspsInsert screwdrivers into the claspsPrise clasps open to release the shieldSlide shield back to reveal universal jointPTO Shaft ShieldLubrication PointUniversal JointLubrication PointLocation of lubrication pointsRecommended lubricating frequencySlide the shaft shield back into place after lubrication ensuring the clasps relocate correctlyin the fixing ring – always fit torque chains to the shields to stop them from rotating with theshaft during operation.77
FRONT LIGHTING KIT INSTALLATIONThe Switchbox for the Front Lighting Kit should be located in a convenient position withinthe tractor cab.POWER SUPPLYConnect via 15 amp fused supply+-SWITCHBOXSwitch 1 – Lights ON/OFFSwitch 2 – Main Beam/Dip BeamL/H HEADLAMPCONNECTIONR/H HEADLAMPCONNECTION7 PIN PLUG CONNECTOR78
TORQUE SETTINGS FOR FASTENERSThe chart below lists the correct tightening torque for fasteners. This chart should bereferred to when tightening or replacing bolts in order to determine the grade of bolt andthe correct torque unless specific torque values are assigned in the text of the manual.Recommended torque is quoted in Foot-Pounds and Newton-Me tres within this m anual.The equation for conversion is 1 Nm. = 0.7376 ft.lbs.TORQUE VALUES FOR IMPERIAL BOLTSHead Marking Head Marking Head MarkingNo Marks Three Lines Six LinesGrade Two Grade Five Grade EightBoltValue (Dry) Value (Dry) Value (Dry)Dia. ft.lb. Nm. ft.lb. Nm. ft.lb. Nm.1/4" 5.5 7.5 9 12.2 12.5 17.05/16" 11 15.0 18 25.0 26 35.23/8" 20 27.0 33 45.0 46 63.07/16" 32 43.0 52 70.0 75 100.01/2" 50 68.0 80 110.0 115 155.09/16" 70 95.0 115 155.0 160 220.05/8" 100 135.0 160 220.0 225 305.03/4" 175 240.0 280 380.0 400 540.07/8" 175 240.0 450 610.0 650 880.01" 270 360.0 675 915.0 975 1325.01-1/8" 375 510.0 850 115.0 1350 1830.01-1/4" 530 720.0 1200 1626.0 1950 2650.01-3/8" 700 950.0 1550 2100.0 2550 3460.01-1/2" 930 1250.0 2100 2850.0 3350 4550.0NOTE:The values inthe chart applyto fasteners asreceived fromthe supplier,dry or whenlubricated withnormal engineoil. They DONOT apply ifspecialgraphited,molydisulphidegreases, orother extremepressurelubricants areused. Thisapplies to bothUNF and UNCcoarse threads .TORQUE VALUES FOR METRIC BOLTS.4.8 8.8 10.912.9Head Marking4.8Head Marking Head Marking8.8 10.9Head Marking12.9BoltValue (Dry)Value (Dry)Value (Dry)Value (Dry)Dia. ft.lb. Nm. ft.lb. Nm. ft.lb. Nm. ft.lb. Nm.6mm 4.5 6.1 8.5 11.5 12 16.3 14.5 20.08mm 11 14.9 20 27.1 30 40.1 35 47.510mm 21 28.5 40 54.2 60 81.4 70 95.012mm 37 50.2 70 95.0 105 140.0 120 160.014mm 60 81.4 110 150.0 165 225.0 190 260.016mm 92 125.0 175 240.0 255 350.0 300 400.018mm 125 170.0 250 340.0 350 475.0 410 550.020mm 180 245.0 350 475.0 500 675.0 580 790.022mm 250 340.0 475 645.0 675 915.0 800 1090.024mm 310 420.0 600 810.0 850 1150.0 1000 1350.027mm 450 610.0 875 1180.0 1250 1700.0 1500 2000.030mm 625 850.0 1200 1626.0 1700 2300.0 2000 2700.079
<strong>McConnel</strong> Limited, Temeside Works, Ludlow, Shropshire SY8 1JL. England.Telephone: 01584 873131. Facsimile: 01584 876463. www.mcconnel.com