VITOTRONIC 100, HC1 VITOCONTROL-S, WB2B Installation and ...
VITOTRONIC 100, HC1 VITOCONTROL-S, WB2B Installation and ...
VITOTRONIC 100, HC1 VITOCONTROL-S, WB2B Installation and ...

Create successful ePaper yourself
Turn your PDF publications into a flip-book with our unique Google optimized e-Paper software.
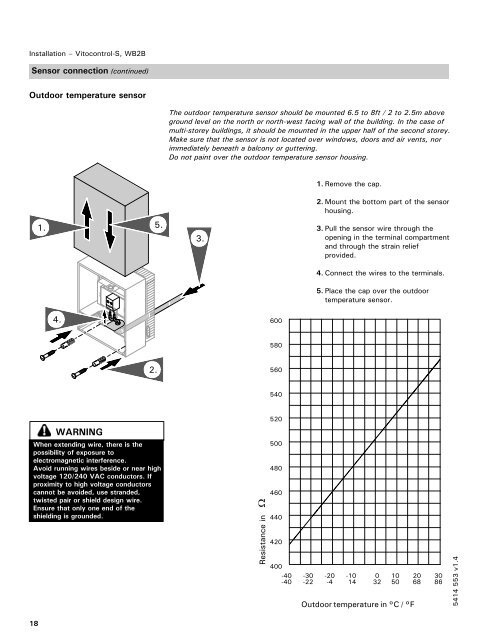
<strong>Installation</strong> – Vitocontrol-S, <strong>WB2B</strong>Sensor connection (continued)Outdoor temperature sensorThe outdoor temperature sensor should be mounted 6.5 to 8ft / 2 to 2.5m aboveground level on the north or north-west facing wall of the building. In the case ofmulti-storey buildings, it should be mounted in the upper half of the second storey.Make sure that the sensor is not located over windows, doors <strong>and</strong> air vents, norimmediately beneath a balcony or guttering.Do not paint over the outdoor temperature sensor housing.1. Remove the cap.2. Mount the bottom part of the sensorhousing.1.5.3.3. Pull the sensor wire through theopening in the terminal compartment<strong>and</strong> through the strain reliefprovided.4. Connect the wires to the terminals.5. Place the cap over the outdoortemperature sensor.4.6005802.560540WARNINGWhen extending wire, there is thepossibility of exposure toelectromagnetic interference.Avoid running wires beside or near highvoltage 120/240 VAC conductors. Ifproximity to high voltage conductorscannot be avoided, use str<strong>and</strong>ed,twisted pair or shield design wire.Ensure that only one end of theshielding is grounded.Resistance in520500480460440420400-40 -30 -20 -10 0 10 20 30-40 -22 -4 14 32 50 68 86Outdoor temperature in °C / °F5414 553 v1.418