

Instruction Manual - GME
Instruction Manual - GME
Instruction Manual - GME

Create successful ePaper yourself
Turn your PDF publications into a flip-book with our unique Google optimized e-Paper software.
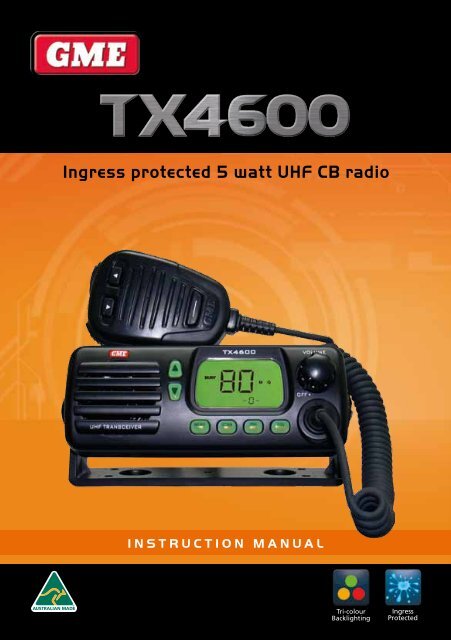
• Ingress protected to IP67FEATURES• Simple operation with Rotary On/Off Volume Control• Large LCD display with Lamp Dimming Function• Preset Squelch Control with User-Selectable Sensitivity• Channel Scanning with Memory• Frequency Seek Function with Band Edge Selection• All Surface Mount Technology• 19 User-Selectable Listening Channels• Selective Calling with Quiet Mode• CTCSS• Alpha Numeric Tagging• Individual Selectable Duplex Function• Microprocessor Controlled Frequency Synthesiser:Allows user programmable control of scanning, Selcall,CTCSS, channel memories and selected feature options.• Permanent Memory: Retains all user settings in nonvolatilememory even when the power has been removed.• 80 Channels: Now expanded to 80 channels using thenew narrow band specification.• Programmable Scan Function: Scans up to 80programmable channels with both Group and Open scanfunctions available.• User Programmable Receive-Only Channels: Usethe TX4600’s front panel controls to program up to 19of your own receive-only channels in the 403-520 MHzfrequency range.• Priority Channel: A user programmable priority channelfeature allows your working or local repeater channel tobe instantly recalled at the press of a button.• Large High Contrast Liquid Crystal Display: Fullydetailed LCD with large characters provides a visualindication of the selected channel and all selectedfunctions at a glance. LED backlit for viewing at nightwith DIM function.• Quiet Mode: Selectable on individual channels,the Quiet mode prevents incoming signals from beingheard on selected channels unless preceded by yourSelcall code.• Unique Page (Transpond) mode: Allows you totransfer an incoming Selcall to another radio if yourradio is unattended.• Feature Disabling Function: Allows Scanning, Squelch,Duplex, Priority, Channel selection and CTCSS featuresto be enabled or disabled to make the radio simpler tooperate.• Overvoltage Protection: Special overvoltage detectioncircuitry protects the radio and warns of excessive voltageconditions by flashing the display.• Australian Made: The TX4600 has been totally designedand manufactured in Gladesville NSW to meet thedemanding needs of the Australian community.Front PanelSpeakerLCD DisplayChannel NumberTransmit IndicatorBusy IndicatorScan IndicatorDuplex indicatorSelcall Call ModeMicrophoneControls(Dim) (Bright)Channel Channel LCD Volume On/OffDown Up DisplayMenuFunctionCALL TOCALL FROMMENUFScanDimTX4600SCANDIMPRIQUIETPriorityQUIETSQLALPHACall / SkipOFF.SquelchALPHAChannel in MemoryIndicatorQUIET ModeQUIET TagCTCSS IndicatorMicrophoneSocketAlpha Numeric Display• In-Built CTCSS: User selectable Continuous Tone CodedSquelch System provides quiet channel operation (can beenabled or disabled on individual channels).• In-Built Selcall: Selective Calling of individuals or groupswith four or five digit ANI and fully user-adjustable 5tone transmitted Selcall Ident. Also allows alphanumericnaming of up to 10 Idents for easier caller identification.• Front Facing Speaker: Projects the sound forward forgreater clarity.Channel DownPush To TalkPPTPriorityChannel Up• Individually Programmable DUPLEX function: Userselectable for only those individual channels in your areathat have repeaters, leaving the others free for use asextra simplex channels.PAGE 4 INSTRUCTION MANUAL TX4600 TX4600 INSTRUCTION MANUAL PAGE 5
General operationFunction KeyThe four keys beneath the TX4600’s display have bothprimary and secondary functions. Their primary functions areprinted in Black while their secondary functions are printedin Red.To access the primary functionsSimply press the required key.eg. To control the Squelch, briefly press the SQL key.To access the secondary functionsPress the F key followed immediately by the required key.eg. To Dim the display, briefly press the F key (‘F’ isdisplayed), then press the DIM key. The display will dim.Note: If the secondary key is not pressed within 10seconds the F key selection will be cancelled.Volume On/OffRotate the volume control clockwise past the ‘click’ to turnthe TX4600 on. Continue to advance the control clockwiseto increase the volume. Rotate the control counter clockwiseto turn the radio off.Note: At minimum volume setting there is still sufficientvolume to be heard in a quiet cabin environment.Selecting ChannelsBriefly press the Channel key to step upwards onechannel or the Channel key to step downwards onechannel. A high beep will be heard at each press.Press and hold the or key for 1.5 seconds to scrollquickly upwards or downwards through the channels at arate of 10 channels per second. When the key is releasedchannel scrolling stops.TransmittingPrior to transmitting, always check the channel is not beingused. This can be done by either listening or by checking the‘Busy’ indicator is not lit.To transmit, press the PTT (Push-to-Talk) button on themicrophone. Hold the microphone about 5-8 cm from yourface and speak at a normal voice level. The microphone isquite sensitive so it is not necessary to raise your voice orshout. Release the PTT when you have finished talking.Squelch Control.The Squelch control is used to eliminate the backgroundnoise when there are no signals present. The TX4600features a preset Squelch system. The Squelch sensitivity hasbeen factory set to provide optimum performance in mostenvironments, however the sensitivity can be altered by theuser if required, to suit varying environmental situations.The Squelch can be opened or closed with the SQL key.When the Squelch is open, the receiver’s background noisecan be heard and ‘BUSY’ is displayed. When the Squelch isclosed, the receiver remains quiet when there are no signalspresent but an incoming signal will override the squelch andbe heard in the speaker.To open the squelchBriefly press the SQL key. A low beep will be heard. Ifthere are no signals present you will hear the receiver’sbackground noise.To close the Squelch,Briefly press the SQL key again. A high beep will be heardand the receiver will become quiet.Note: If an incoming signal is very weak and is close to theminimum squelch level, it may become broken or ‘chopped’by the squelch action. To prevent this, simply open theSquelch to allow the signal to be heard clearly. Alternativelyyou can reduce the Squelch sensitivity as described below.Squelch SensitivityThe sensitivity of the Squelch to incoming signals can be setto suit your operating environment. For example, excessivelynoisy environments may cause the squelch to open on localnoise. The TX4600 has ten preset Squelch sensitivity settingsthat can be selected using the MENU function.To adjust the preset Squelch sensitivityPlease refer to the MENU settings on page 18.Priority ChannelThe Priority Channel feature allows you to store one ofthe channels as a Priority Channel that can be instantlyrecalled at the press of a key. This can be used to provideinstant access to your working channel or your localrepeater channel.To store a Priority Channel:1. Select the required channel.2. Press and hold the PRI key until a high beep is heard.The selected channel will be stored.To recall a Priority Channel:Briefly press the PRI key. The radio will switch straight tothe selected Priority Channel. Any active functions (suchas scanning or Quiet) will be cancelled.Duplex OperationDuplex operation allows the radio to transmit on a differentfrequency to that which is receives. This allows operationthrough local repeater stations. These repeater stationsautomatically re-transmit your signal over a wider area,providing greatly increased range.Duplex operation is only available on channels 1-8 and 41-48.When duplex is selected on these channels, the radio receiveson that channel but actually transmits 30 channels higher.CTCSSOverviewCTCSS (Continuous Tone Coded Squelch System) is asquelch quieting system that allows several groups of usersto share the same channel without disturbing each other.It uses a preset sub-audible (very low frequency) tone toopen and close the squelch on your radio. There are up to50 tones available in two optional tone sets. The systemapplies a continuous low-level tone to your transmissionand uses a matching tone decoder to control your receiver’ssquelch. With CTCSS enabled, the channel remains quietto all incoming signals unless they carry the correct tone.When a transmission with the correct tone is received, thesquelch opens and remains open for as long as the signal ispresent. When the transmission ends, the channel becomesquiet again. Transmissions that do not use the correct tonewill not be heard.The TX4600 allows CTCSS to be enabled or disabled onindividual channels.NOTE: The CTCSS tone you select will be used for all CTCSSenabled channels in your radio.Monitoring the ChannelIt is useful to be able to temporarily open your radio’ssquelch to allow you to listen for signals from other CTCSSusers outside your group. Because their CTCSS tone isdifferent to yours, your squelch would normally remainclosed, preventing you from hearing them. You can usethe SQL key to open the squelch and listen to the channelto check that it is clear before transmitting. This will helpprevent you from accidentally transmitting over the topof someone.To monitor the channelPress the SQL key. If there are no signals present, you willhear the usual hiss of an empty channel. Press the SQL keyagain to restore the Squelch to its previous setting.Selecting the Tone SetThere are two standard tones sets available, one comprising50 tones and the other comprising 38 tones. Both tone setsare included in the TX4600 to provide compatibility withother <strong>GME</strong> radio systems.Selecting the Required CTCSS ToneTo preselect the CTCSS tone on your radio, please refer to theMENU settings on page 19.Enabling CTCSS on a ChannelIf a CTCSS tone has been selected, it can be enabled onindividual channels.1. Press the or keys to select the required channel.2. Press and hold the SQL key. A high beep will be heardand ‘SILENT’ will appear on the display.You may activate CTCSS on as many channels as you wishexcept channel 5 which is designated for emergency use.Disabling CTCSS on a ChannelRepeat steps 1 and 2 above. A low beep will be heard and‘SILENT’ will disappear.Note: You will not be able to activate CTCSS if the CTCSStone is set to ‘oF’.SCANNINGOverviewThe TX4600 has a SCAN function that allows groups of userprogrammable channels to be scanned for signals. Channelscan be scanned at 20 channels per second. When a signalis found, scanning will pause on that channel to allow thesignal to be heard, then resume scanning when the channelis clear again.Scan GroupsThe TX4600 features two scan groups - Open Scan andGroup Scan.PAGE 6 INSTRUCTION MANUAL TX4600 TX4600 INSTRUCTION MANUAL PAGE 7
Open ScanAllows any of the installed channels to be scanned foractivity. If a busy channel is found, scanning will pause toallow the signal to be heard. Once the channel has beenclear for 5 seconds, scanning will resume automatically.1 2 3 4 5 6 7 8eg: Scanning channels 1 - 8 in Open ScanGroup ScanAlso allows any of the installed channels to be scannedfor activity, but in addition, it also inserts your Prioritychannel into the scan sequence. This means that yourPriority channel will be monitored regularly while scanningto ensure that no calls are missed. Any signals received onyour Priority channel will take precedence over any signalsreceived on the other channels.1 2 3 4 20 5 6 7 8 20eg: Scanning channels 1 - 8 with Priority channel 20 inGroup Scan.Selecting a Scan GroupTo preselect a scan groupThe radio is initially set to Open Scan Mode. Please refer tothe MENU settings on page 18 to change the Scan Group.Programming Scan ChannelsYour TX4600 is supplied with all 80 UHF CB channelsprogrammed into the Open Scan memory. Any channelsnot needed, can be removed if required. The Group Scanmemory is empty by default and you will need to addchannels to it before use.To add or remove channels from eitherscan memory:1. Ensure that the radio is not already scanning. If it is,briefly press the SCAN key to cancel the scan function.2. Ensure you have the required scan group preselected(See MENU settings on page 18).3. Select the required channel using the or keys.• If ‘M’ is visible to the right of the channel number,the selected channel is already in the scan memory.It can be removed by holding the SCAN key in for afew seconds until a low beep is heard. ‘M’ will thendisappear indicating the channel is no longerin memory• If ‘M’ is not visible, then the selected channel is notin the memory. To add it, hold the SCAN key in fora few seconds until a high beep is heard. ‘M’ willnow appear.4. Repeat step 3 to add or remove other channels in thescan memory.To Start ScanningTo begin scanning, briefly press the SCAN key. A high beepwill be heard, ‘SCAN’ will appear in the display and theradio will begin scanning. In addition the selected scangroup will be displayed below the channel number.NOTE: If there is only one channel programmed into theOpen Scan memory or none in the Group Scan memory, along low beep will be heard when you press the SCAN keyand the command will be ignored.To Stop ScanningTo cancel the Scan, briefly press the SCAN key. A low beepwill be heard and ‘SCAN’ will disappear from the display.OPEN SCAN MODEUsing Scan in the Open Scan Mode• If a busy channel is found, scanning will pause on thatchannel to allow the signal to be heard and will remainthere for as long as the channel remains busy. Oncethe channel has been clear for 5 seconds, scanning willresume automatically.• If your radio pauses on a busy channel and you don’twish to listen to that conversation, briefly press the SKIPbutton on the microphone (or one of the channel selectorkeys). The radio will skip over that channel and resumescanning from the next channel in the sequence.• If your radio is paused on a busy channel and you wish toremain there, briefly press the SCAN key. The radio willexit the Scan mode and remain on the busy channel.• To transmit while paused on a busy channel, simply pressthe PTT button. The radio will exit the Scan mode andremain on the busy channel. You can now converse onthat channel in the usual way. When you have finishedyour conversation, briefly press the SCAN key toresume scanning.• If your radio is scanning and you need to use yourPriority channel (for an urgent call or an emergency),briefly press the PRI key. The Scan mode will becancelled and the radio will jump straight to thePriority channel.Note: In the Open Scan mode your TX4600 will not allowyou to transmit while it is scanning. If the PTT button ispressed while scanning, the radio will give a low beep andwill ignore the command. Your radio will only transmit whileit is paused on a busy channel.GROUP SCAN MODEGroup Scan allows you to transmit and receive normally onyour priority (working) channel, while continuing to scanseveral other channels. The receiver will scan the otherchannels ONLY WHILE THERE ARE NO SIGNALS ONTHE PRIORITY CHANNEL.If a signal appears on the Priority channel it will overrideany signals being received on any of the other channels. Inaddition, if you press the PTT button at any time, the radiowill transmit on the priority channel in the usual way.Setting up the Group ScanReferring to the appropriate sections of this manual:1. Preselect the Group Scan mode (see MENU settingson page 18).2 . Store your preferred working channel into the Prioritychannel memory (see ‘Priority Channel’).3. Program the required ‘other’ channels into your GroupScan memory (see ‘Programming Scan Channels’).Scanning in the Group Scan ModeTo scan in the Group Scan mode, briefly press the SCANkey. A high beep will be heard, ‘SCAN’ will appear in thedisplay and the radio will begin scanning.Note: If there are no channels programmed in the GroupScan memory when you press the SCAN key (or thereis only one channel programmed and it is the same asthe Priority channel), a low beep will be heard and thecommand will be ignored.When scanning, the TX4600 scans all the channelsprogrammed into the Group Scan memory, with the Prioritychannel being scanned after every fourth channel (Dealerprogrammable option, if you require different timing foryour priority channel, please contact your Dealer).• If a signal appears on the priority channel - at anytime - the receiver will switch straight to the Prioritychannel and will stay there for as long as the channelis busy. During this time you can transmit on the prioritychannel in the usual way. Once there has been noactivity for 5 seconds, the radio will resume scanningthe other channels.• If a signal appears on one of the other channels, scanningwill pause on that channel and will remain there whilethe channel is busy, as long as there are no signals onthe priority channel. During this time the receiver willcontinue to check the priority channel for signals every2 seconds, resulting in a series of small ‘breaks’ in thereception of the paused channel. Once there has beenno activity on any channel for 5 seconds, the radio willresume scanning.• If your radio pauses on a busy channel and you don’twish to listen to that conversation, briefly press the SKIPbutton on the microphone (or one of the channel selectorkeys). The radio will skip over that channel and resumescanning from the next channel in the sequence.• If your radio is paused on a busy channel and youwish to remain there, briefly press the SCAN key. Theradio will exit the Scan mode and remain on the busychannel. Note that the radio will no longer be monitoringthe Priority channel (unless it is the same as the busychannel). To resume scanning, press the SCAN key again.• To transmit on a scanned channel, press the PTT buttonwhile the radio is paused on that channel, then talk in theusual way. The radio will resume scanning when you havefinished your conversation and there has been no furtheractivity on the channel for 5 seconds.• To transmit on the priority (working) channel AT ANYTIME, simply press the PTT button while the radio isscanning. The radio will switch straight to the prioritychannel. When you have finished your conversation andthere has been no further activity on the priority channelfor 5 seconds, the radio will resume scanning the otherchannels.• To go directly to the Priority channel, briefly press thePRI key. The radio will exit the Scan mode.PAGE 8 INSTRUCTION MANUAL TX4600 TX4600 INSTRUCTION MANUAL PAGE 9
Using two Group Scan or twoOpen Scan modesIf you prefer, the TX4600 can be re-programmed to havetwo Group Scan modes or two Open Scan modes instead ofone of each.For example there may be applications where you have noneed to scan the Priority channel and would prefer to havetwo separate Open Scan modes. Alternatively you may haveapplications where you prefer to have two Group Scanmodes with different Scan groups in each.Your TX4600 can be Dealer programmed to convert theGroup Scan mode into a second Open Scan mode and viceversa. If you would prefer to have two Group Scan or twoOpen Scan modes, you should contact your <strong>GME</strong> Dealerto arrange for this feature to be enabled (when using twoGroup Scan modes the Priority channel will be the samechannel for both scan groups).When the second Open or Group Scan mode is enabled,the resulting two Scan modes become Scan 1 and Scan2. To select the required scan mode, refer to the MENUsettings on page 18.When enabled, the two Scan modes will be identical inoperation. To program and operate each, refer to the OpenScan/Group Scan sections above.NOTE: Enabling or disabling the second Open or GroupScan mode is not a user selectable option. Once enabled byyour Dealer, the changed Scan mode becomes a permanentpart of the TX4600’s features and replaces the standardScan selection. If you find later that you need the originalGroup or Open Scan function re-enabled, you will need toreturn your TX4600 to your Dealer for re-programming.SELECTIVE CALLINGOverviewYour TX4600 has a Selective Calling system knownas Selcall that operates like a telephone. Your radio ispre-programmed with its own unique Selcall Identificationnumber. If this number is called by another radio, yourTX4600 will beep to alert you. If you do not want to hearany other activity while waiting on a channel, you can selectthe QUIET mode. This will force the radio to remain quiet toall incoming signals until your Selcall number is called.Your TX4600 will allow you to store up to ten of yourmost frequently called Selcall numbers in memory andeach number can be labelled with a 5-letter name foreasy identification.Selcall Identification NumberYour TX4600 is factory programmed with its own uniqueSelcall Identification Number (Ident). This number identifiesyour radio from others in your area. Your radio’s own SelcallIdent will be displayed for a few seconds, directly beneaththe channel display, when you first turn the radio on.You will need to make your Ident known to anyone whomay need to call you using Selcall. Whenever your TX4600hears a Selcall signal, it compares the incoming Ident withits own. If the two Idents match, the radio knows it is beingcalled and sounds an alarm to alert you, otherwise the callis ignored.Note: Although your radio’s Selcall Ident ispre-programmed at the factory, you can arrange to haveyour Dealer change it if required.Selcall Ident NamesWhen storing Selcall Idents in memory, the TX4600 allowsyou to add a 5 character name to each one, making it easierto identify whose Ident you are recalling from the memory.In addition, if an incoming Selcall matches one of the Identsstored in the memory, the name can be displayed to make iteasier for you to identify the caller.To add or display namesYour TX4600 must be in the ALPHA mode. To switchbetween ALPHA mode and NUMERIC mode, briefly pressthe F (function) key followed by the ALPHA key. ‘ALPHA’ or‘NUMER’ will be displayed for 2 seconds below the channeldisplay to indicate the selected mode.The QUIET Mode (Q)Your TX4600 can be set to monitor signals on a busychannel but remain QUIET unless it receives its own SelcallIdent. In this way, you won’t be disturbed unless someonecalls you. When a signal containing your Selcall Ident isreceived, the QUIET mode is deactivated and an alarmsounds to alert you to the call. You can then conversenormally on the channel. To use the QUIET mode, refer tothe QUIET Mode section further below.Note: The QUIET mode overrides the normal Squelchsystem to ensure that the radio remains quiet even whenthe channel is busy. When QUIET is set, you may see the‘BUSY’ icon appear on the display indicating the channel isbeing used. However, unless someone transmits your SelcallIdent, nothing will be heard in the speaker.You can activate the QUIET mode on individual channels ie.some channels can be set to remain Quiet while others canremain open to all incoming signals.TIP: Setting the QUIET mode is not mandatory. You can stilluse Selcall on any channel whether the QUIET mode is setor not.Selcall MemoriesYour TX4600 is fitted with one ‘Call’ memory and 10Selcall Ident memories. The 10 Selcall Ident memories areused to store frequently used Selcall Idents. The additional‘Call’ memory holds the Ident you last sent or received.The memories can be viewed by briefly pressing the CALLbutton. The initial memory displayed is the ‘Call’ memory.Pressing the channel selection keys will step through theother 10 Selcall storage memories in sequence. Selcallmemories are labelled ‘c0’ to ‘c9’.USING SELCALLEntering a Selcall Ident1. Press the CALL button. ‘CALL TO’ is displayed, alongwith the last sent or received Selcall Ident.Note: If an ALPHA label is displayed you will need toswitch to Numeric Mode. To toggle between Alpha modeand Numeric mode, briefly press the F key followed by theALPHA key. A high beep indicates Alpha mode is selectedwhile a low beep means the Numeric mode is selected.2. Enter the required Selcall Ident as follows:(a) Press and hold the F key until the radio beeps. Theright-hand digit of the Selcall Ident will flash.(b) Press the or keys to select the required numberin the flashing digit position.(c) Briefly press the F key again to select the nextdigit position.(d) Repeat steps (b) and (c) to enter all 5 digits asrequired. The Selcall number is now ready to send.CALL TOSending a SelcallWith the Selcall number displayed, press and hold the CALLbutton for 2 seconds. A long beep will be heard and theradio will transmit the Selcall Ident.Note: If the call is not sent within 10 seconds of enteringthe last Ident digit the call mode will time out and theradio will return to normal mode. To exit the CALL TO modewithout sending the Selcall briefly press the CALL buttonCall AcknowledgeIf your Selcall transmission is successful, the radio you calledshould respond with an ‘acknowledge’ signal - usually twoquick beeps. This will confirm to you that the radio youcalled is now alerting its user to your signal.Storing Selcall IdentsYour TX4600 is fitted with 10 user programmable SelcallIdent memories, allowing you to store up to 10 frequentlyused Selcall Idents. The memories are accessed by pressingthe CALL button, then pressing the channel selector keysto scroll through the memories. Ident memories are labelled‘c0’ to ‘c9’.To Store a Selcall Ident in memory1. Press the CALL button to select the CALL TO mode.‘CALL TO’ is displayed along with the last sent orreceived Selcall Ident.2. Press channel selector keys to select the required Identmemory (locations ‘c0’ to ‘c9’).TIP: If the radio displays letters instead of numbers inthe Selcall Ident position, your radio is in ALPHA mode.To switch back to NUMERIC mode, briefly press the F(Function) key followed immediately by the ALPHA key. Alow beep will be heard and ’NUMER’ will be displayed for afew seconds in the Ident position.3. With the required memory location displayed, enter theSelcall Ident as follows:(a) Press and hold the F key until the radio beeps.The right-hand digit of the Selcall Ident will flash.(b) Press the or keys to select the requirednumber in the flashing digit position.(c) Briefly press the F key again to select the nextdigit position.(d) Repeat steps (b) and (c) to enter all 5 digitsas required.PAGE 10 INSTRUCTION MANUAL TX4600 TX4600 INSTRUCTION MANUAL PAGE 11
(e) Now press and hold the F key. The entire Ident willflash for a few seconds then the radio will beep asthe new Ident is stored.Recalling Selcall Idents from Memory1 Press the CALL button to select the CALL TO mode. ‘CALLTO’ is displayed along with the last sent or receivedSelcall Ident.2. Press the or keys to select the required Identmemory in locations ‘c0’ to ‘c9’.3. When the required Selcall Memory is displayed, pressand hold the CALL button to send the Ident.Naming your Selcall IdentsThe TX4600 allows you to name each Selcall Ident using a5 character ALPHA name. The name is stored in memoryalong with the Ident making it easier to identify whoseIdent you are recalling from the memory. If an incomingSelcall matches one of those in your radio’s memory, thename can be displayed instead of the Selcall Ident.Displaying ALPHA NamesTo display the Selcall’s ALPHA Name, you must have theradio’s ALPHA display mode selected. To toggle the ALPHAdisplay mode, briefly press the F (Function) key followedby the ALPHA key. ‘ALPHA’ or ‘NUMER’ will be displayedfor 2 seconds below the channel display to indicate theselected mode.TIP: The normal channel display may give no indication ofwhich display mode is selected. The selected mode will onlybecome obvious when displaying Idents.Entering and Storing a Selcall NameNote: Before adding an ALPHA Name to a Selcall Ident,you should first store the required Ident in memory asdescribed above under ‘STORING SELCALL IDENTS’ onpage 11.1. Ensure the ALPHA mode is selected (briefly press the Fkey followed by the ALPHA key to toggle ALPHA mode).2. Briefly press the CALL button. The CALL TO mode will beselected and the last-sent Selcall memory location willbe displayed.3. Press the or keys to select the required Selcallmemory (locations c0 to c9). If no ALPHA name has beenprogrammed for that memory the radio will probablydisplay ‘- - - - -’ otherwise it will display the last ALPHAname programmed into that memory.4 With the required memory location displayed, enter therequired ALPHA name as follows:(a) Press and hold the F key until the radio beeps. Theleft-hand character of the ALPHA name will flash.Press the Channel selector keys to select the requiredletter in the flashing character position.The following characters are available:A B C D E F G H I J K L M N O P QR S T U V W X Y Z _ SPACE - ,0 1 2 3 4 5 6 7 8 9Tip: Holding the channel selector key for a few secondswill cause the radio to step quickly through the availablecharacters.(b) Briefly press the F key again to select the nextcharacter position.(c) Repeat steps (b) and (c) to enter all 5 charactersas required.(d) Now press and hold the F key. The entire ALPHAname will flash for a few seconds then the radio willbeep as the name is stored.CALL TORepeat the procedure to add ALPHA names to any otherSelcall Idents stored in memory.To exit the CALL TO modeBriefly press the CALL button. The radio will return tonormal operation.Note: The radio can be left in the ALPHA display modeso that an incoming Selcall matching one of those in theradio’s memory will display the name associated with thatSelcall Ident instead of the Ident itself. Any incoming Selcallsnot matching those in the memory will display -NEW-. Todisplay the Selcall Ident of that caller, briefly press the Fkey followed by the ALPHA key to return to the NUMERICdisplay mode.Receiving SelcallsWhen your TX4600 receives its Selcall Ident, an alarm willsound to alert you to the call. Initially the alarm will beepurgently at 2 beeps per second for around 10 seconds thenslow to around 1 beep every 3 seconds if the call is notanswered. It will then continue to beep indefinitely until youcancel it (the way your TX4600 handles the Selcall alert canbe altered by your Dealer).In addition to the alarm, the words ‘CALL FROM’ will appearon the display along with the callers Selcall Ident or ALPHAname to inform you of the identity of the person calling.To switch between the Selcall Ident and the ALPHA namebriefly press the F key followed by the ALPHA key.Cancelling the Selcall AlertThe following are the recommended methods:To Cancel the Alarm and talk on the channel:Press the PTT switch and talk in the usual way. The alarmwill be cancelled and the channel will be open for normalcommunication.To return the call:Press and hold the CALL button for a few seconds until theradio beeps. The callers Selcall will be sent to the caller.To Cancel the Alarm and listen on the channel:Briefly press the QUIET button (if QUIET has beenactivated). The alarm will stop beeping and the channelwill remain open to any incoming signals.QUIET ModeThe QUIET mode mutes the TX4600’s receiver to preventany incoming signals from being heard in the speaker untilyour Selcall Ident is received. In this way you can monitor abusy channel for personal calls without being disturbed byunwanted signals.If your Selcall Ident is received, the QUIET mode is thencancelled and all incoming signals are heard in the speaker.Setting up the QUIET ModeTo setup the QUIET mode you must first ‘tag’ the channelsthat you want to stay Quiet, then activate the QUIET mode.Once the QUIET mode is activated, the channels you havetagged will remain Quiet to all incoming signals unless yourSelcall Ident is received. Channels not tagged will remainopen to all signals and will operate normally.To Tag individual channels for QUIET operation:1. Select the required channel using the or keys.2. Briefly press the F key then press and hold the QUIETkey until the radio beeps. ‘Q’ will appear to the right ofthe channel display indicating the selected channel isnow tagged for Quiet operation.To Remove the QUIET Tag from Individual Channels:1. Select a channel that has been tagged for Quietoperation. ‘Q’ will be displayed.2. Briefly press the F key then press and hold the QUIETkey until the radio beeps. ‘Q’ will disappear indicatingthis channel is no longer tagged for Quiet operation.Activating the QUIET Mode1. First, select a channel that has been tagged for Quietoperation (you cannot activate the Quiet mode unless youhave selected a ‘tagged’ channel). ‘Q’ will be displayed.2. Now briefly press the F key followed by the QUIET key.‘QUIET’ will appear on the display.Now all channels that were tagged for Quiet operation willbe operating in the Quiet Mode.PAGE 12 INSTRUCTION MANUAL TX4600 TX4600 INSTRUCTION MANUAL PAGE 13CALL FROMCALL FROM
De-activating the QUIET Mode1. Select any channel that has been tagged for Quietoperation. ‘Q’ and ‘QUIET’ will be displayed.2. Briefly press the F key followed by the QUIET key.‘QUIET’ will disappear from the display and all channelsthat were tagged for Quiet operation will now operatenormally again.Receiving Signals in the QUIET Mode• If a normal signal is received on a QUIET channel, thechannel will appear busy (the ‘BUSY’ indicator will bevisible) but no sound will be heard from the speaker.This means you will not be disturbed by the signal.• If a normal signal is received on an Open channel (onethat is not tagged with ‘Q’) the signal will be heard inthe usual way.• If a signal containing your Selcall Ident is received onany channel - Open or QUIET - the QUIET mode will becancelled and the alarm will beep to alert you to thecall. In addition, the callers Ident or ALPHA name willbe displayed. All channels will now be open for normaltransmission and reception.If you wish to respond to the calling radio using Selcall,press and hold the call button for 1.5 seconds until theradio beeps. The callers Ident will be transmitted back tothem causing the alarm in their radio to be activated.To cancel the alarm on your radioBriefly press the PTT.To return your radio to the QUIET modeBriefly press the F (Function) key followed by the QUIETkey. ‘QUIET’ will re-appear on the display.Scanning in the QUIET modeThe TX4600 will allow you to scan while the QUIET mode isactive. Using this feature you can monitor a group of Quietchannels or a combination of Quiet and Open channels.To Scan in the QUIET Mode:1. Preselect the Group Scan mode (see MENU settings).2. Select the channels you wish to scan and store them inthe Scan memory.3. From those channels, select the ones you wish to remainQuiet and tag each one for QUIET operation.4. Select a tagged channel and activate the Quiet Mode(press the F key followed by the QUIET key).5. Press the SCAN key. The radio will begin scanning and‘SCAN’ and ‘QUIET’ will be displayed, indicating theradio is scanning in the QUIET mode.Receiving Signals while Scanningin the QUIET Mode• If a normal signal is received on an open channel,scanning will pause while the channel is busy and willresume scanning 5 seconds after the channel becomesclear. (If you were scanning in Group Scan mode, theradio may switch between the open channel and thePriority channel - this is normal).• If a normal signal is received on a Quiet channel but yourSelcall Ident is not detected, the signal will be ignoredand scanning will continue.• If a signal containing your Selcall Ident is received onany channel - Open or Quiet - both scanning and QUIETmodes will be cancelled and the receiver will stay onthat channel. In addition, the alarm will beep to alertyou to the call and the callers Ident or ALPHA Name willbe displayed. The channel will now be open for normaltransmission and reception.TIP: To ensure reliable Selcall detection when scanning inthe Quiet mode, it is recommended that you restrict thenumber of channels in the Scan group to 4 or less.GROUP CALLINGThe TX4600’s Selcall system includes a Group Call functionwhich allows you to call up to 1000 radios simultaneously.This can be useful in an emergency situation where you mayneed to transmit a message to a large number of radios inyour group.By default, your radio is factory-set to allow up to 10 radiosto be called at once. If your application requires more,you can arrange for your Dealer to re-program this optionto allow 100 or 1000 radios to be called. The followingdescription assumes the default Group Call setting of10 radios.The Group Call function works by allowing you to enter aspecial ‘group code’ into the last digit position of the SelcallIdent you are sending. The ‘group code’ appears as an‘A’ when displayed in the radio. When this ‘group code’ isreceived, it substitutes for all other numbers in the last digitposition. As long as the first 4 digits of the Selcall you aresending match those of the radios you are calling, their Selcallalarm will be activated as if their full 5 digit Selcall Idents hadbeen received.To achieve this, the 10 radios you are calling must beprogrammed with sequentially numbered Selcall Idents.eg. 12330, 12331, 12332, 12333 . . --> , 12339• Transmitting the Selcall Ident 12031 will only activate thealarm in the radio with the Selcall Ident of 12331.• Transmitting 1233A will activate the alarms in all radioswith Idents 12330 through 12339 (a total of 10 radios).If the radios in your fleet do not have sequentially numberedSelcall Idents and you want to make use of this function, youcan arrange for your Dealer to re-program the Selcall Identsin your radios.Programming and Sending Group CallsThe process for entering a Group call Ident is the same asentering a normal Selcall Ident.1. Press the CALL button. ‘CALL TO’ is displayed, alongwith the last sent or received Selcall Ident.2. Enter the required Selcall Ident as follows:(a) Press and hold the F (Function) key until the radiobeeps. The right-hand digit of the Selcall Identwill flash.(b) Press the or keys to select ‘A’ in the flashingdigit position. This is the special code that will createthe Group Call.(c) Briefly press the F (Function) key again to select thenext digit position.(d) Repeat steps (b) and (c) to enter the other 4 digits asrequired. The last digit will be set to ‘A’.Once the Ident has been entered you have 10 seconds tosend it otherwise the CALL TO mode will be cancelled andthe Ident you entered will be lost.Note: Where your TX4600 allows it, programming groupcalls for 100 radios is identical except that you will needto select ‘A’ for the last two digits (e.g. 123AA). For 1000radios you will need to select ‘A’ for last three digits (e.g.12AAA).eg.100 Radios Ident Sent: 123AA Idents called: 12300 -> 123991000 Radios Ident Sent: 12AAA Idents called: 12000 -> 12999To Send the Selcall Ident:With the required Selcall Ident displayed in the CALLTO mode, press and hold the CALL button for a fewseconds until the radio beeps. The Selcall Ident will be sentautomatically and the radio will return to normal operation.Call Acknowledge in Group Mode:There is no call acknowledge when sending group calls.This is to prevent all the radios in your group from trying torespond to your Selcall transmission at the same time.Storing Group Call Idents:Group Call Idents can be stored in memory in the same wayas a standard Selcall Ident.Receiving Group Calls:Receiving a Group call is identical to receiving a normalSelcall except that the alarm sound is a LOW tone beepinstead of the normal High tone beep. The Callers Ident orALPHA Name appears on the display in the usual way.LISTENING channelsThe TX4600 has provision for adding an additional 19 userprogrammable ‘Listening’ frequencies between 403 MHzand 520 MHz. These channels can be programmed by youusing the front panel keys, making the TX4600 a usefulUHF scanning receiver.Setting the Frequency StepThe extra frequencies can be programmed in 12.5 kHz or25 kHz steps. The step rate is preset and can be toggledas follows1. Switch the radio OFF.2. Hold the key while switching the radio ON.3. 12.5k or 25.0k will be displayed indicating the selectfrequency step is 12.5 kHz or 25.0 kHz.Activating Listening ChannelsBy default, the Receive–Only channels are disabled andonly the standard 80 UHF CB channels can be accessed.To make use of the extra channels you must activate theprogramming mode and program frequencies into thechannels you wish to use. Those channels will thenbecome available.To activate the programming mode:1. Switch the radio off.2. Hold the MENU key while switching the radio ON again.Using the or keys you will now be able to selectadditional channels between 81 and 99.PAGE 14 INSTRUCTION MANUAL TX4600 TX4600 INSTRUCTION MANUAL PAGE 15CALL TO
Once you have enabled and programmed your additionalListening channels, switch the radio off to end theprogramming mode. When you switch it on again, normaloperation will be restored and any Listening channels youhave enabled will now be available above channel 80.Programming the FrequenciesBefore programming channel frequencies, make sure theradio is in the NUMERIC mode. If it is in the ALPHA modepress F (Function) followed by ALPHA . ‘NUMER’ willbe displayed.To program a frequency into a channel1. Activate the Programming mode (hold MENU thenswitch ON).2. Press the or keys to select the required channelnumber (81 – 99).3. Press and hold the MENU key until the radio beeps.If the channel has never been activated, ‘OFF’ will bedisplayed, otherwise a frequency will be displayed.4. Press the or keys to adjust the flashing digit value.5. Press the CALL button to advance to the next digit.• Advancing above 9 or below 0 causes the adjacentdigit to change accordingly.• The display only indicates to 10 kHz resolution.The kHz digit is not displayed.eg. 468.425 MHz will display as4 6 8 4 212.5 / 25 kHz100 kHz1 MHz10 MHz100 MHz• While you are selecting the frequency, the receiver islive and will receive signals on the frequency beingdisplayed. You can use this feature to manuallyidentify active frequencies and store them.6. Once you have the correct frequency displayed, pressand hold the MENU key to store it.To remove a listening frequency from a channel, rotate thechannel selector until the display reads ‘–off–’.To program additional frequenciesRepeat steps 2 – 6 above.When you have finished programming your channels, switchthe radio off. When you switch it on again, normal operationwill be restored and the Listening channels you programmedwill now be available above channel 80.Setting ALPHA labels for yourListening Channels.Your extra listening channels can be set to display either thechannel Frequency or a meaningful label that you choose.Please refer to the Frequency/ALPHA Adjustment function inthe MENU settings on page 18.SEEK MODEThe Seek mode is a unique feature that allows you tocontinuously scan a band of frequencies between 403 MHzand 520 MHz for activity. Once the radio has reached theupper limit of 520 MHz it will resume scanning from 403MHz again. If you find an active frequency you can assign itto a Listening Channel. This feature makes it easier to locateactive channels when you aren’t sure of the exact frequencyyou want to listen to.Enabling the SEEK ModeNote: Before using the Seek mode you should1. Preselect your preferred frequency step (12.5 kHzor 25 kHz).2. Enable the Listening channel numbers that you wish tostore active frequencies into. You cannot use Seek modeunless at least 1 channel is enabled.3. Select the Numeric mode so that the frequency can bedisplayed (rather than the ALPHA label).To enable the Seek mode:1. Switch the radio OFF.2. Hold the SCAN key while switching the radio ON again.‘SEEK’ will be displayed for a few seconds. The radio isnow in Seek mode.Note: When you have finished using the Seek mode simplyswitch the radio off. When you switch it on again, normaloperation will be restored.Scanning for active frequenciesin the Seek ModeTo scan for active frequenciesand store them into a Listening channel:1. Select the required Listening channel (81 – 99). Thefrequency currently selected for that channel will bedisplayed.2. Briefly press the SCAN key. The radio will begin scanningthe frequency band starting from the selected frequency.The channel number will remain constant (because theradio is scanning frequencies not channels) but thefrequency will change as the scan advances throughthe band.3. To change the scanning direction press the or keys.Press key to scan upwards in frequency or key toscan downwards.4. When a signal is found, scanning will pause on thatfrequency. Once the signal has gone and the frequencyremains clear for 5 seconds, scanning will resume.5. To manually skip over an active frequency and continuescanning press the CALL button. To continue scanning ina specific direction or to change the direction, press theappropriate or key.6. When you find a frequency you wish to store, pressand hold the SCAN key until the radio beeps. Thefrequency will be stored under the selected Listeningchannel number.To store active frequencies into other Listening channelsrepeat steps 1 – 6 above.Setting SEEK Mode FrequencyLimitsWhen in Seek mode, the default frequency range is theentire Listening band of 403 - 520 MHz. However, in manycases you may only be interested in a searching for signalswithin a small section of the available frequency band.To make searching easier the TX4600 allows you to setupper and lower frequency limits. The Seek function willthen search only within those limits. This limits the scan tothe area you are most interested in, thereby increasing thechance of finding an active frequency within that band.To Scan within Frequency limits1. Select the required Listening channel (81 – 99).The frequency currently selected for that channel willbe displayed.2. Hold the MENU key until the radio beeps. The radio willenter the Frequency Edit mode.3. Select the LOWER frequency limit using the CALL buttonto select the flashing digit position and the or keysto change the frequency value.4. When the LOWER frequency limit has been selected,briefly press the SCAN key then press and hold thekey. The radio will give a long beep. The LOWER limit isnow stored.5. Now select the UPPER frequency limit using the CALLbutton to select the flashing digit position and theor keys to change the frequency value.6. When the UPPER frequency limit has been selected,briefly press the SCAN key then press and hold thekey. The radio will give a long beep. The UPPER limit isnow stored.7. Press and hold MENU to exit the frequency edit mode.Now follow the same steps as described under ‘Scanningfor active frequencies in the Seek Mode’ on page 16. Theonly difference will be smaller frequency band which willnow scan only within the frequency limits set above.Note: The Seek frequency limits will remain stored in theradio even after you have switched the radio OFF. The nexttime you use the Seek mode the same frequency limits willapply. To change the frequency limits simply reset them asdescribed above.TIP: The Lower frequency limit should normally be lowerthan the upper frequency limit. However, if you shouldenter a lower frequency limit that is higher than the upperfrequency limit the radio will then scan frequencies OUTSIDEthese limits. In other words you can exclude the frequenciesbetween the limits.If Upper Limit is greater than Lower Limit, radio will scanINSIDE the limit range.MHzIf Upper Limit is less than Lower Limit, radio will scanOUTSIDE the limit range.MHz403403LowerLimitUpperLimitUpperLimitLowerLimit520520PAGE 16 INSTRUCTION MANUAL TX4600 TX4600 INSTRUCTION MANUAL PAGE 17
OVERVIEWMENU SETTINGSThe MENU feature provides a convenient method ofcustomizing or storing some of the radio’s functions. Thefollowing Menu Options are available. Note that some itemsare only available on certain channels.Menu Settings Ch 1-8Ch 41-48Frequency /ALPHA AdjustmentCh 9-40Ch 49-80To access the Menu functions:1. Press and hold the MENU key. The first MENU functionis displayed.2. Briefly press the MENU key again to cycle through eachavailable function in the order listed above. After thelast function has been selected, the cycle returns tothe beginning.3. Press the or keys to alter the parameters of theselected function.4. Press and hold the MENU key to exit and storeany changes.FREQUENCY/ALPHA ADJUSTMENTThe Frequency/ALPHA adjustment is only available when auser programmable Listening channel is selected. It allowsyou to manually adjust the channel frequency or, if ALPHAmode is selected, lets you edit the ALPHA label for thatListening channel.1. Select a user Channel between 81 and 99.RX OnlyChSquelch Settings • • •Open / Group Scan • • •Duplex / Simplexmode•CTCSS Tones • • •Lamp Colour • • •Battery / S-MeterSelectionBattery / S-MeterALPHA Selection• •LCD Contrast • • •Beep Tone level • • •2. Press and hold the MENU key until the radio beeps.••If the radio is in Numeric mode, the channel frequency willbe displayed. If the radio is in ALPHA mode, your selectedALPHA label will be displayed (if you have not set a labelfor this channel, ‘ALPHA’ will be displayed).3. Briefly press the or key to change the character ornumber in the flashing digit position.4. Briefly press the CALL button to move to the nextflashing digit position.5. Once you are happy with your selection, press and holdthe MENU key to store the new setting.SETTING THE SQUELCH SENSITIVITYThe sensitivity of the Squelch to incoming signals can be setto suit your operating environment. In quiet rural locationsa low setting will allow the weakest signals to be receivedwhile still keeping the radio quiet between transmissions.In city locations, a higher setting might be needed to ensurethe squelch remains closed when subjected to the higherinterference levels often encountered in high density areas.The TX4600 has ten (10) preset Squelch sensitivity settings(labelled SQL-0 to SQL-9) that can be selected using theMenu function. The minimum Squelch setting (SQL-0) willopen the Squelch allowing all signals to be heard. SQL-9 isthe maximum setting, requiring very strong signals to openthe squelch. The factory default is SQL-3 which generallyprovides reliable squelch operation for most applications.To preselect the Squelch sensitivity:1. Select a Channel between 1 and 80.2. Press and hold the MENU key until the radio beeps.SQL-x will be displayed where x is a number from 0 to 9.3. Press the or key to increase or decrease the presetsquelch to the desired setting.4. Press and hold the MENU key to store the new setting.SELECTING THE SCAN MODEThe TX4600 features two scan groups – Open Scan andGroup Scan.NOTE: If preferred, your dealer can re configure your unit tohave two Open Scan or two Group Scan groups.To select the Scan Group:1. Select a Channel between 1 and 80.2. Press and hold the MENU key until the radio beeps.3. Briefly press the MENU key again. ‘OSCAN’ (Open Scan)or ‘GSCAN’ (Group Scan) will be displayed.Note: If two Open Scan or two Group Scan groups havebeen installed, SCAN1 or SCAN2 will be displayed.4. Press the or key to select the required Scan Group.5. Press and hold the MENU key until the radio beeps, tostore the setting.NOTE: If two Open Scan or two Group Scan groups areavailable, the radio will display ‘Scan1’ for the originalOpen Scan and ‘Scan2’ for the original Group Scan.SELECTING DUPLEXDuplex operation allows the radio to transmit on a differentfrequency to that which is receives. This allows operationthrough repeater stations. Repeaters automaticallyre-transmit your signal over a wider area, providinggreatly increased range.Simplex/Duplex Range ComparisonSimplexRepeateroperationChannel 31Channel 1RepeaterStationChannel 1Channel 31VechicleVechicleDuplex operation operates only on channels 1 – 8 or41 – 48. When duplex is selected on these channels, theradio receives on that channel but actually transmits 30channels higher. eg.The TX4600 allows you to select Duplex operationindividually on each channel.To enable or disable Duplex on a channel:1. Select the required channel 1 – 8 or 41 – 48 (the Duplexsetting feature is only available on these channels).2. Press and hold the MENU key until the radio beeps.3. Briefly press the MENU key twice. ‘dUPON’ (Duplex On)or ‘dUPOF’ (Duplex Off) will be displayed.4. Press the or key to select the requiredDuplex setting.5. Press and hold the MENU key until the radio beeps, tostore the setting.CTCSS TONESCTCSS (Continuous Tone Coded Squelch System) is asquelch quieting system that allows several groups of usersto share the same channel without disturbing each other. Ituses one of a set of sub-audible (very low frequency) tonesto open and close the squelch on your radio.There are two standard tones sets, one comprising 50 tonesand the other comprising 38 tones. Both tone sets areincluded in the TX4600 to provide compatibility with otherradio system.To toggle the required tone set:1. Switch the radio OFF.2. Press and hold the SQL key while switching the radioon again.3. ‘CTC50’ or ‘CTC38’ will be displayed indicating whichtone set is selected.Note: When switching up from CTC38 to CTC50, theradio will retain the selected CTCSS tone frequency andautomatically update the tone set number to reflect its newposition in the CTC50 tone set table.eg. If CTCSS tone frequency 233.6 Hz (CTC38 tone set #36)was selected, the radio will then display equivalent CTC50tone set #47.When switching down from CTC50 to CTC38, if there is noequivalent CTC38 frequency, the CTCSS tone will be set to‘oF’ (0 Hz). You will need to reselect a new tone.* Emergency Channel onlyChannel Selected 1 2 3 4 5* 6 7 8 41 42 43 44 45 46 47 48Receive Channel 1 2 3 4 5* 6 7 8 41 42 43 44 45 46 47 48Transmit Channel 31 32 33 34 35* 36 37 38 71 72 73 74 75 76 77 78PAGE 18 INSTRUCTION MANUAL TX4600 TX4600 INSTRUCTION MANUAL PAGE 19
TX4600Installing the UnitAfter choosing a location, hold the unit with the mountingbracket attached, to the desired position and mark thelocation with a pencil. Remove the mounting bracket fromthe radio and drill the mounting holes. Bolt or screw thebracket in place using hardware suitable for the mountingsurface. The unit is supplied with stainless steel screws,however, if the mounting surface is unsuitable for screwsyou may need to replace these with stainless steel bolts.Remember, in some applications the fixings for overheadmounted units may have to survive rough conditions.DC ConnectionsExtension Speaker(optional)UHFAntennaAntenna InstallationIt is essential to select a good quality, high efficiency,477 MHz antenna. A poor quality antenna or one notdesigned for the specific frequency band you are usingwill give very poor performance.<strong>GME</strong> have a huge range of suitable 477 MHz UHF CBantennas to suit most installations and applications. Werecommend you contact your local Dealer for advice.Connect to the antenna cable to the rear antenna socketusing a PL259 coaxial connector.Noise SuppressionConnect the RED power lead to the positive (+) side of thebattery or to an accessory point in the vehicle’s fuse box.Connect the BLACK power lead to the negative (-) side ofthe battery or to a ground point in your vehicle.Note: The RED power lead is fitted with a 3 Amp fuse. Ifthe fuse blows, use only a standard 3 Amp (3AG) fuse asa replacement. Use of a higher rated fuse or a slow-blowtype could result in damage to your radio which would voidthe warranty.If required, an extension speaker may be installed toimprove sound levels in noisy environments or in locationsfurther away from the steering or driving position. Forlocations exposed to water we recommend the SPK45 orSPK07. For dry installations the SPK04, SPK08 or SPK09 aresuitable extension speakers.Note: The internal speaker continues to operate when theextension speaker is plugged in.TX4600Radio remains ON when Ignition Switch is OFFRED FuseTo TX4600BLACKChassisCar Battery+veAccIgnIgnition SwitchRadio turns ON and OFF with Ignition SwitchREDTo TX4600BLACKFuseChassisCar Battery+veAccIgnIgnition SwitchThe inherent design of FM transceivers results in a high levelof resistance to ignition and electrical interference. Howeverin some installations it may be necessary to take additionalsteps to help reduce or eliminate noise interference.During installation, try to route the DC battery leads, theantenna lead or any accessory wires away from the enginecompartment, ignition or alternator wiring. If the noisecontinues, it may be necessary to fit a suppression kit inwhich case we recommend you consult an auto electricianfor advice specific to your installation.Higher frequency electrical interference cause by electricmotors can be suppressed directly at the motor terminals.Disconnecting the MicrophoneIt is recommended that the microphone be left permanentlyconnected to the TX4600, but if it must be disconnected,proceed as follows:1. Insert a small screwdriver between the rubber boot andthe lip of the raised area on the front panel.2. Ease the rubber boot out of the cable entry hole andslide it along the cable away from the front panel.3. Identify the plug locking lever, work the screwdriverblade behind it and move the lever towards the plugbody. At the same time gently pull the plug from thesocket. (see diagram)CableScrewdriverLocking Levermove to left torelease PlugCable entry holeIf required, replacement microphones are available withplug and rubber boot already fitted.PAGE 22 INSTRUCTION MANUAL TX4600 TX4600 INSTRUCTION MANUAL PAGE 23
UHF CB Operating FrequenciesChannel Frequency (MHz) Channel Frequency (MHz) Channel Frequency (MHz) Channel Frequency (MHz)1 476.425 ~ 21 476.925 41 476.4375 ~ 61 • 476.93752 476.450 ~ 22 # 476.950 42 476.4625 ~ 62 • 476.96253 476.475 ~ 23 # 476.975 43 476.4875 ~ 63 • 476.98754 476.500 ~ 24 477.000 44 476.5125 ~ 64 477.01255* 476.525 ~ 25 477.025 45 476.5375 ~ 65 477.03756 476.550 ~ 26 477.050 46 476.5625 ~ 66 477.06257 476.575 ~ 27 477.075 47 476.5875 ~ 67 477.08758 476.600 ~ 28 477.100 48 476.6125 ~ 68 477.11259 476.625 29 477.125 49 476.6375 69 477.137510 476.650 30 477.150 50 476.6625 70 477.162511 + 476.675 31 477.175 ~ 51 476.6875 71 477.1875 ~12 476.700 32 477.200 ~ 52 476.7125 72 477.2125 ~13 476.725 33 477.225 ~ 53 476.7375 73 477. 2375 ~14 476.750 34 477.250 ~ 54 476.7625 74 477.2625 ~15 476.775 35* 477.275 ~ 55 476.7875 75 477.2875 ~16 476.800 36 477.300 ~ 56 476.8125 76 477.3125 ~17 476.825 37 477.325 ~ 57 476.8375 77 477.3375 ~18 476.850 38 477.350 ~ 58 476.8625 78 477.3625 ~19 476.875 39 477.375 59 476.8875 79 477.387520 476.900 40^ 477.400 60 476.9125 80 477.4125* Emergency use only+Officially Designated Call Channel# Telemetry/Selcall use only. Voice Transmission is inhibited as required by AS/NZS 4365.2010^Road Channel~ Repeater Channels•Guard Band Channel. Transmission is inhibited as required by AS/NZ 4365.201050 ToneSet38 ToneSetFrequency50 ToneSetCTCSS38 ToneSetFrequency50 ToneSet.38 ToneSetFrequency1 1 67.0 18 17 118.8 35 - 183.52 - 69.4 19 18 123.0 36 30 186.23 2 71.9 20 19 127.3 37 - 189.94 3 74.4 21 20 131.8 38 31 192.85 4 77.0 22 21 136.5 39 - 196.66 5 79.7 23 22 141.3 40 - 199.57 6 82.5 24 23 146.2 41 32 203.58 7 85.4 25 24 151.4 42 - 206.59 8 88.5 26 25 156.7 43 33 210.710 9 91.5 27 - 159.8 44 34 218.111 10 94.8 28 26 162.2 45 35 225.712 11 97.4 29 - 165.5 46 - 229.113 12 100.0 30 27 167.9 47 36 233.614 13 103.5 31 - 171.3 48 37 241.815 14 107.2 32 28 173.8 49 38 250.316 15 110.9 33 - 177.3 50 - 254.117 16 114.8 34 29 179.9 oF oF 0(CTCSS Frequency shown in Hz)PAGE 24 INSTRUCTION MANUAL TX4600 TX4600 INSTRUCTION MANUAL PAGE 25
ELECTRICALGeneralCompliant Specification: Meets AS/NZS 4365 for radiocommunications equipmentin the UHF citizen and personalradio service.Frequency Range TX: 476.425 - 477.4125 MHzFrequency Range RX: 403 - 520 MHzNumber of Channels: 80 UHF CB + 19 Receive onlyChannel Spacing: 12.5 kHz onlyOperation Mode: Simplex Ch1 ‐ 80Semi Duplex Ch 1 ‐ 8, 41 ‐ 48Scanning Speed: 20 channels per secondAntenna Impedance: 50 Ohms nominalOperating Voltage Range: 10 - 15 volts DCNominal Battery Voltage: 13.8 volts DCOver Voltage Protection: 30 V DC max. At 18 V DC theRF power is reduced, and thewords ‘Hi DC’ flash.Over Current Protection: In-line 3A FuseReversePolarity Protection: Shunt DiodeFrequency Stability: ± 2.5 PPMSelcall Tone Length: 40 msTransmitterRF Output: 5.0 watts max.Spurious Emission: < - 67 dBFrequency Transientsduring switching: < 3 kHzModulation: FMMaximum Deviation: < ± 2.5 kHz at + 20 dBSpurious Emissions: < - 26 dBmTransmit FrequencyResponse: + 6 dB per octave300 Hz to 3 kHz + 1 ‐ 3 dB.Audio Signal to Noise: > 45 dBSpecificationsOut of Band Emission: - 70 dBcCurrent Consumption: 1.7 Amps with 50 OhmterminationReceiverCircuit Type: Double conversionSuperheterodyneIntermediate Frequencies: 1st - 21.4 MHz2nd - 450 kHzCurrent Consumption: < 260 mA muted600 mA @ max. A.F OutputSensitivity: - 123 dBm for 12 dB SINADunweightedSelectivity: - 6 dB at ± 3.5 kHz‐ 60 dB at ± 12.5 kHzIntermodulationImmunity: 73 dBBlocking Immunity: 100 dBSpurious ResponseImmunity: 70 dBImage Rejection: 70 dBAudio Power: 3 watts average into 4 OhmsAudio Signal to Noise: > 45 dBReceive FrequencyResponse: ‐ 6 dB/Octave de‐emphasis300 Hz to 3 kHz + 1 ‐ 3 dBConducted SpuriousEmission: < - 57 dBmMECHANICALENVIRONMENTALDimensions: 65 (H) x 165 (L) x 56 (D) mmWeight: 472 gramsTemperature Range: -10°C to +60°CWeatherproof: Meets IP67Shock and Vibration: MIL STD 810 methodSpecifications are subject to change without noticeor obligation.Standard communications contract warranty against defectsThis warranty against defects is given by StandardCommunications Pty Ltd ACN 000 346 814 (We, us, our or<strong>GME</strong>). Our contact details are set out in clause 2.7.1. Consumer guarantees1.1 Our goods come with guarantees that cannot beexcluded under the Australian Consumer Law. Youare entitled to a replacement or refund for a majorfailure and for compensation for any other reasonablyforeseeable loss or damage. You are also entitled tohave the goods repaired or replaced if the goods failto be of acceptable quality and the failure does notamount to a major failure.1.2 To the extent we are able, we exclude all otherconditions, warranties and obligations which wouldotherwise be implied.2. Warranty against defects2.1 This Warranty is in addition to and does not limit,exclude or restrict your rights under the Competitionand Consumer Act 2010 (Australia) or any othermandatory protection laws that may apply.2.2 We warrant our goods to be free from defects inmaterials and workmanship for the warranty period(see warranty table) from the date of original sale (oranother period we agree to in writing). Subject to ourobligations under clause 1.2, we will at our option,either repair or replace goods which we are satisfiedare defective. We warrant any replacement parts for theremainder of the period of warranty for the goods intowhich they are incorporated.2.3 To the extent permitted by law, our sole liability forbreach of a condition, warranty or other obligationimplied by law is limited(a) in the case of goods we supply, to any one of thefollowing as we decide -(i) the replacement of the goods or the supply ofequivalent goods;(ii) the repair of the goods;(iii) the cost of repairing the goods or of acquiringequivalent goods;(b) in the case of services we supply, to any one of thefollowing as we decide –(i) the supplying of the services again;(ii) the cost of having the services supplied again.2.4 For repairs outside the warranty period, we warrant ourrepairs to be free from defects in materials andworkmanship for three months from the date of theoriginal repair. We agree to re-repair or replace (at ouroption) any materials or workmanship which we aresatisfied are defective.2.5 We warrant that we will perform services withreasonable care and skill and agree to investigate anycomplaint regarding our services made in good faith.If we are satisfied that the complaint is justified, andas our sole liability to you under this warranty (to theextent permitted at law), we agree to supply thoseservices again at no extra charge to you.2.6 To make a warranty claim you must before the end ofthe applicable warranty period (see warranty table),at your own cost, return the goods you allege aredefective, provide written details of the defect, and giveus an original or copy of the sales invoice or some otherevidence showing details of the transaction.2.7 Send your claim to:Standard Communications Pty Ltd. Unit B, 22-24College Street, Gladesville, NSW 2111, Australia.Telephone: (02) 9879 8888 Fax: (02) 9816 4722.Email: servadmin@gme.net.au2.8 If we determine that your goods are defective, we willpay for the cost of returning the repaired or replacedgoods to you, and reimburse you for your reasonableexpenses of sending your warranty claim to us.3. What this warranty does not cover3.1 This warranty will not apply in relation to:(a) goods modified or altered in any way;(b) defects and damage caused by use with nonStandard Communications products;(c) repairs performed other than by our authorisedrepresentative;(d) defects or damage resulting from misuse, accident,impact or neglect;(e) goods improperly installed or used in a mannercontrary to the relevant instruction manual; or(f) goods where the serial number has been removedor made illegal.4. Warranty period4.1 We provide the following warranty on <strong>GME</strong> and Kingrayproducts. No repair or replacement during the warrantyperiod will renew or extend the warranty period pastthe period from original date of purchase.Product typewarrantyperiod477 MHz UHF CB mobile transceivers 3 yearsPAGE 26 INSTRUCTION MANUAL TX4600 TX4600 INSTRUCTION MANUAL PAGE 27
A division of: Standard Communications Pty. Ltd.Head office: Locked Bag 2086, North Ryde, NSW 1670, Australia. T: +61 (0)2 9844 6666 F: +61 (0)2 9844 6600Adelaide: Unit 1, 14 Phillips St, Thebarton, SA 5031T: (08) 8234 2633 F: (08) 8234 5138Brisbane: Unit 1, 89-101 Factory Rd, Oxley, QLD 4075T: (07) 3278 6444 F: (07) 3278 6555Melbourne: 7 Micro Circuit, Dandenong South, VIC 3165T: (03) 9798 0988 F: (03) 9798 0177Perth: Unit 1, 10-12 Harvard Way, Canning Vale, WA 6155T: (08) 9455 5744 F: (08) 9455 3110Sydney: Unit B, 22-24 College St, Gladesville, NSW 2111T: (02) 9879 8888 F: (02) 9816 4722Auckland: 2/24 Bishop Dunn Pl, East Tamaki,Manakau 2163 NZ T: (09) 274 0955 F: (09) 274 0959For customers outside Australia and New Zealand please contact your local <strong>GME</strong> retailer or email: export@gme.net.auPart Number: 310228 Drawing Number: 42333-7www.gme.net.au


