

Instruction Manual - GME
Instruction Manual - GME
Instruction Manual - GME

You also want an ePaper? Increase the reach of your titles
YUMPU automatically turns print PDFs into web optimized ePapers that Google loves.
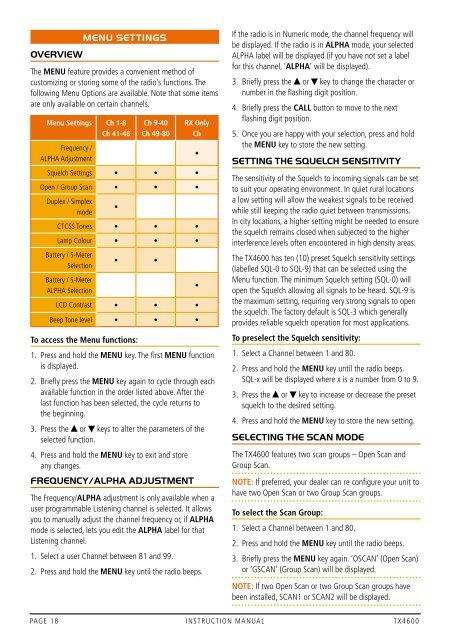
OVERVIEWMENU SETTINGSThe MENU feature provides a convenient method ofcustomizing or storing some of the radio’s functions. Thefollowing Menu Options are available. Note that some itemsare only available on certain channels.Menu Settings Ch 1-8Ch 41-48Frequency /ALPHA AdjustmentCh 9-40Ch 49-80To access the Menu functions:1. Press and hold the MENU key. The first MENU functionis displayed.2. Briefly press the MENU key again to cycle through eachavailable function in the order listed above. After thelast function has been selected, the cycle returns tothe beginning.3. Press the or keys to alter the parameters of theselected function.4. Press and hold the MENU key to exit and storeany changes.FREQUENCY/ALPHA ADJUSTMENTThe Frequency/ALPHA adjustment is only available when auser programmable Listening channel is selected. It allowsyou to manually adjust the channel frequency or, if ALPHAmode is selected, lets you edit the ALPHA label for thatListening channel.1. Select a user Channel between 81 and 99.RX OnlyChSquelch Settings • • •Open / Group Scan • • •Duplex / Simplexmode•CTCSS Tones • • •Lamp Colour • • •Battery / S-MeterSelectionBattery / S-MeterALPHA Selection• •LCD Contrast • • •Beep Tone level • • •2. Press and hold the MENU key until the radio beeps.••If the radio is in Numeric mode, the channel frequency willbe displayed. If the radio is in ALPHA mode, your selectedALPHA label will be displayed (if you have not set a labelfor this channel, ‘ALPHA’ will be displayed).3. Briefly press the or key to change the character ornumber in the flashing digit position.4. Briefly press the CALL button to move to the nextflashing digit position.5. Once you are happy with your selection, press and holdthe MENU key to store the new setting.SETTING THE SQUELCH SENSITIVITYThe sensitivity of the Squelch to incoming signals can be setto suit your operating environment. In quiet rural locationsa low setting will allow the weakest signals to be receivedwhile still keeping the radio quiet between transmissions.In city locations, a higher setting might be needed to ensurethe squelch remains closed when subjected to the higherinterference levels often encountered in high density areas.The TX4600 has ten (10) preset Squelch sensitivity settings(labelled SQL-0 to SQL-9) that can be selected using theMenu function. The minimum Squelch setting (SQL-0) willopen the Squelch allowing all signals to be heard. SQL-9 isthe maximum setting, requiring very strong signals to openthe squelch. The factory default is SQL-3 which generallyprovides reliable squelch operation for most applications.To preselect the Squelch sensitivity:1. Select a Channel between 1 and 80.2. Press and hold the MENU key until the radio beeps.SQL-x will be displayed where x is a number from 0 to 9.3. Press the or key to increase or decrease the presetsquelch to the desired setting.4. Press and hold the MENU key to store the new setting.SELECTING THE SCAN MODEThe TX4600 features two scan groups – Open Scan andGroup Scan.NOTE: If preferred, your dealer can re configure your unit tohave two Open Scan or two Group Scan groups.To select the Scan Group:1. Select a Channel between 1 and 80.2. Press and hold the MENU key until the radio beeps.3. Briefly press the MENU key again. ‘OSCAN’ (Open Scan)or ‘GSCAN’ (Group Scan) will be displayed.Note: If two Open Scan or two Group Scan groups havebeen installed, SCAN1 or SCAN2 will be displayed.4. Press the or key to select the required Scan Group.5. Press and hold the MENU key until the radio beeps, tostore the setting.NOTE: If two Open Scan or two Group Scan groups areavailable, the radio will display ‘Scan1’ for the originalOpen Scan and ‘Scan2’ for the original Group Scan.SELECTING DUPLEXDuplex operation allows the radio to transmit on a differentfrequency to that which is receives. This allows operationthrough repeater stations. Repeaters automaticallyre-transmit your signal over a wider area, providinggreatly increased range.Simplex/Duplex Range ComparisonSimplexRepeateroperationChannel 31Channel 1RepeaterStationChannel 1Channel 31VechicleVechicleDuplex operation operates only on channels 1 – 8 or41 – 48. When duplex is selected on these channels, theradio receives on that channel but actually transmits 30channels higher. eg.The TX4600 allows you to select Duplex operationindividually on each channel.To enable or disable Duplex on a channel:1. Select the required channel 1 – 8 or 41 – 48 (the Duplexsetting feature is only available on these channels).2. Press and hold the MENU key until the radio beeps.3. Briefly press the MENU key twice. ‘dUPON’ (Duplex On)or ‘dUPOF’ (Duplex Off) will be displayed.4. Press the or key to select the requiredDuplex setting.5. Press and hold the MENU key until the radio beeps, tostore the setting.CTCSS TONESCTCSS (Continuous Tone Coded Squelch System) is asquelch quieting system that allows several groups of usersto share the same channel without disturbing each other. Ituses one of a set of sub-audible (very low frequency) tonesto open and close the squelch on your radio.There are two standard tones sets, one comprising 50 tonesand the other comprising 38 tones. Both tone sets areincluded in the TX4600 to provide compatibility with otherradio system.To toggle the required tone set:1. Switch the radio OFF.2. Press and hold the SQL key while switching the radioon again.3. ‘CTC50’ or ‘CTC38’ will be displayed indicating whichtone set is selected.Note: When switching up from CTC38 to CTC50, theradio will retain the selected CTCSS tone frequency andautomatically update the tone set number to reflect its newposition in the CTC50 tone set table.eg. If CTCSS tone frequency 233.6 Hz (CTC38 tone set #36)was selected, the radio will then display equivalent CTC50tone set #47.When switching down from CTC50 to CTC38, if there is noequivalent CTC38 frequency, the CTCSS tone will be set to‘oF’ (0 Hz). You will need to reselect a new tone.* Emergency Channel onlyChannel Selected 1 2 3 4 5* 6 7 8 41 42 43 44 45 46 47 48Receive Channel 1 2 3 4 5* 6 7 8 41 42 43 44 45 46 47 48Transmit Channel 31 32 33 34 35* 36 37 38 71 72 73 74 75 76 77 78PAGE 18 INSTRUCTION MANUAL TX4600 TX4600 INSTRUCTION MANUAL PAGE 19


